background image

61

D335 User Manual


Using the Phone

Blind transfer  

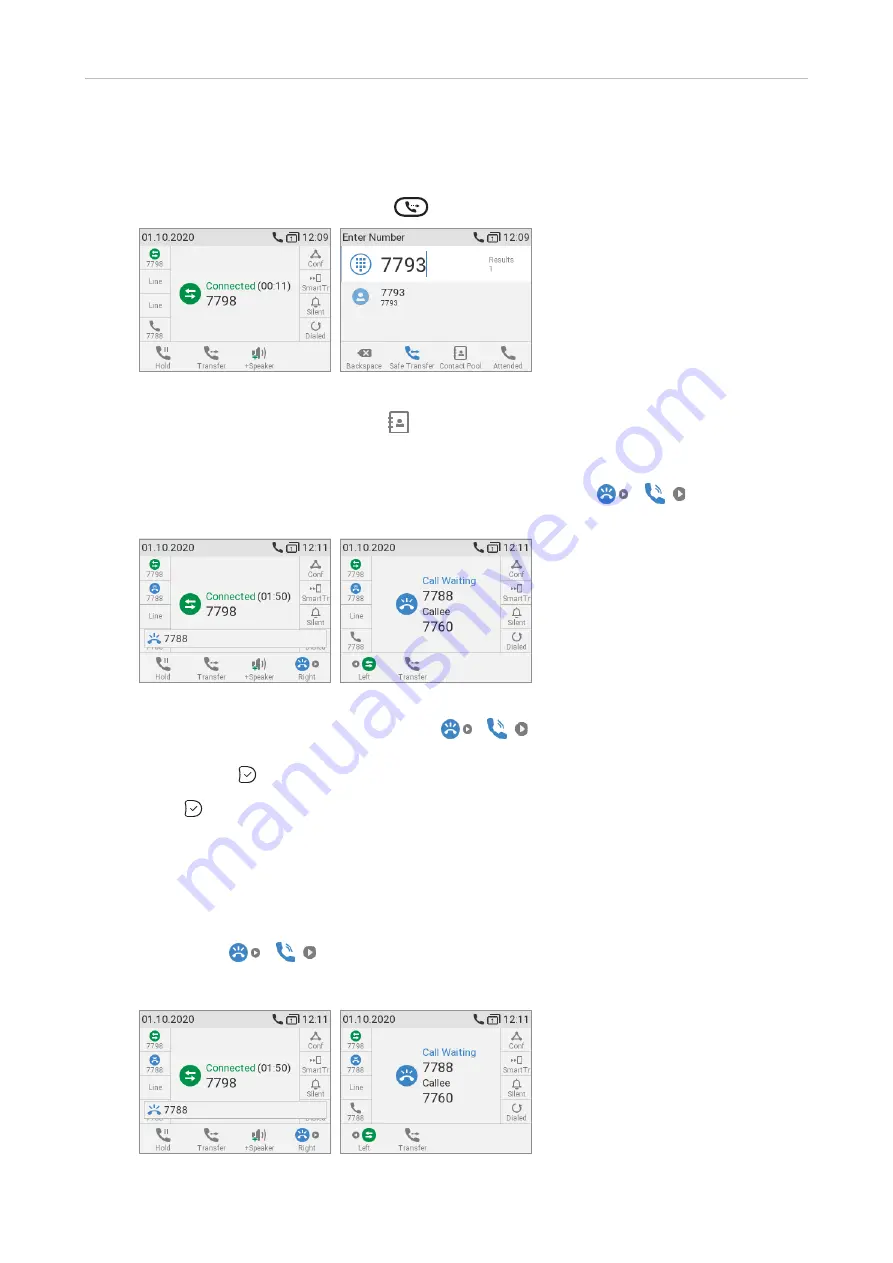
•  Blind transfer of active call  

1.   With a call on the line (Fig. 9), press 

.  The dial screen will appear.


Fig. 9 


            Fig. 10

2.   Dial the number (Fig. 10), or press 

 to select a number from the internal or one of the 

available external phone directories (see "Calling number from phone directory" on page 51 
and "Calling number from external directory" on page 51).


Note

:  If a call is waiting (Fig. 11), as indicated by the symbol  

 / 

 in the lower 

right corner, you must reject it before you can transfer your active call blindly. 


Fig. 11   


            Fig. 12

a.  Press the function key underneath 

 / 

.  The "Call Waiting" screen (Fig. 12) 

appears.
b.  Press   to reject the call waiting.  The caller hears the busy signal.

3.   Press 

.  You may briefly see two "Disconnected" messages followed by the callee and 

caller's name/number, indicating that the transfer was completed (Fig. 6 and 7 on the 
preceding page).

• 

Blind transfer of call waiting


1.   If you are in a call and want to transfer a call waiting (Fig. 13), press the function key 

underneath  

 / 

.  The "Call Waiting" screen (Fig. 14) appears.

Note:   Your active call will remain active while you are transferring the ringing call.


Fig. 13   


            Fig. 14

Summary of Contents for 00004390

Page 1: ...IP Phone D335 User Manual ...

Page 2: ...the phone 12 Connecting a headset 13 Initializing and registering the phone 14 Prerequisites 14 Initialization 14 What to do if initialization and registration are unsuccessful 16 Correcting the clock 17 Getting to know your phone 18 At a glance 18 LED indicators 20 Call indicator 20 SmartKey LEDs 20 Page key LED 20 MWI key LED 20 Hard keys 21 Context sensitive programmable function keys 21 Naviga...

Page 3: ...manual phone settings 36 User mode administrator mode 37 Directories 39 Directory 39 Definitions explanations 39 Directory entries 39 Contact Types 40 Outgoing identity 40 Group 40 Ringtones 40 Adding Editing Entries on the Phone 41 Adding new entry manually 41 Adding new entry from call list 41 Adding current caller 42 Sorting entries 42 Editing existing entry 42 Deleting an entry 43 Adding editi...

Page 4: ...rectory 51 Calling number from external directory 51 Speed dialing 52 Calling emergency numbers 52 Call completion 52 QuickLookUp number guessing auto completion 53 Accepting calls 54 Using different audio devices 54 Automatically accepting calls 54 Call pick up from another extension 54 Call waiting 55 Active calls 57 Hold 57 One call on hold 57 Holding multiple calls 57 Conference 58 Initiating ...

Page 5: ...ple 1 Extension monitoring and call pick up 77 Example 2 Extension monitoring and call pick up on D3 expansion module 79 Example 3 Speed dialing 80 Example 4 Changing setting of context sensitive key 82 Display options for SmartLabel keys 83 Settings on the phone 83 Display mode settings 83 Timer setting for returning display mode to default 85 Timer setting for returning label page to page 1 85 S...

Page 6: ...ooting 104 Reboot 104 Hard reboot 104 Reset to factory values 104 TFTP Update 104 Manual initialization 105 Contacting Snom Support 105 Traces 106 Appendix 1 Display Symbols and Icons 107 Symbols found in the function key line 107 Symbols found in the info bar status line 109 SmartLabel function symbols 110 Display indications 112 Appendix 2 Status Messages 114 Appendix 3 Wall Mounting 115 Appendi...

Page 7: ...chnology GmbH gives its permission to download and print copies of its content for the intended purpose of using it as a manual No parts of this document may be altered modified or used for commercial purposes without the express written consent of Snom Technology GmbH Although due care has been taken in the compilation and presentation of the information in this document the data upon which it is...

Page 8: ...ooms laundry rooms or damp basements Do not immerse the device in water and do not spill or pour liquids of any kind onto or into the device Do not install the device in surroundings at risk for explosions paint shops for example Do not use the device if you smell gas or other potentially explosive fumes Do not use the device during thunderstorms Lightning striking the power grid may cause electri...

Page 9: ... Gigabit switch Power Power over Ethernet PoE IEEE 802 3af Class 3 If PoE is not available one of the following power adapters not included in delivery can be ordered separately EU Snom A6 Phihong model PSM10R 050 Snom PN 00004325 Ten Pao model S018BAM0500200 SnomPN 00004393 AU Snom A6 Phihong model PSM10R 050 Snom PN 00004325 Ten Pao model S018BAM0500200 Snom PN 00004393 Disposal of the device Th...

Page 10: ...ide GNU General Public Licence Attaching and detaching the footstand The footstand can be attached in two different positions depending on whether the phone will be placed on a desk or mounted on a wall To avoid scratching or otherwise damaging the phone we recommend turning it upside down and placing it on a soft piece of cloth Attaching for desktop placement 1 1 2 2 2 1 Fig 1 Fig 2 1 Insert the ...

Page 11: ...ig 1 Fig 2 Rotating the tab of the cradle The phone is delivered with the tab level with the inner edge of the cradle Fig 1 If you are going to mount the phone on a wall we recommend that you rotate the tab 180 After rotation the tip of the tab Fig 4 will protrude slightly above the edge of the cradle The small rectangular hole in the receiver casing fits perfectly over the now protruding tip hold...

Page 12: ... phone can be operated with Power over Ethernet PoE provided via the network cable or if PoE is not avaible in your network with the separately available 5V DC power adapter see Product specifications on page 9 Optional If PoE not available power adapter not included in delivery ...

Page 13: ...our headset via the Snom EHS Adapter Connect the Snom EHS to the connector labeled Fig 1 on page 12 For more information on how to connect the Snom EHS Advanced and the headset please refer to the Quick Installation Guide of the Snom EHS Advanced that came with the device and to the manual of your wireless headset Connecting the headset to the phone via a Bluetooth compatible adapter Insert the ad...

Page 14: ...ired These are settings that can only be configured on the web interface of the phone after it has been successfully registered If your provider or your network provides a mailbox account that setting is also configured on the web interface For more information see Identities accounts on page 88 Initialization Snom phones are plug and play Once the phone is connected to your network it will begin ...

Page 15: ... are any Press to save the selected time zone indicated by the white bar Fig 3 3 Next you will be prompted to select the tone scheme of a country This affects the dial tone you hear when you pick up the receiver Different countries use different dial tones Press or to move up or down the list one item at a time Press to jump to the bottom country on the screen when the last country is selected pre...

Page 16: ...or and the phone is not working the server may be down either for servicing or due to a malfunction The registration and initialization should be completed as soon as the server is up and running again You may want to check with your administrator or your provider if nothing happens within a reasonable amount of time What to do if initialization and registration are unsuccessful Your network or yo...

Page 17: ...s and specific settings that may be required Do not change the standard configuration unless you know what you are doing Expert help may be required Correcting the clock The phone receives the time and date from your NTP time server If the time and or date on the display are incorrect you may need to set the correct time zone This setting is available in admin mode only Changing the settings on th...

Page 18: ...sitive programmable function symbols and function keys F1 F4 Press the function key underneath the display symbol to activate the function open the list etc depicted by the symbol above the key Standard functions available on idle screen Default settings and icons depend on firmware installed on phone Internal phone directory Call lists missed received dialled calls Forwarding all calls turning CF...

Page 19: ... supplied on PBX Press key to listen to message s Turn DND do not disturb on and off Callers hear the busy signal Directory Settings menu Transfer Dedicated customizable function keys Adjusting the volume of the ringer when the phone is idle or ringing of the handset casing loudspeaker when in a call Toggling between handsfree and handset mode Press to dial number and accept calls on speakerphone ...

Page 20: ...n LEDs on the key will be activated when the key event occurs The factory setting is red LED and line The LEDs of a line key will blink rapidly when a call is ringing on the line glow steadily when there is an ongoing call on the line blink slowly when a call is on hold on the line be off when the line is free When other functions are mapped onto the keys the LEDs may glow or blink For example Whe...

Page 21: ...ime On idle screen press to open the list of received calls Press to accept calls on speakerphone and in headset mode Press to confirm actions settings and return to preceding screen On idle screen Redial Press to terminate calls on speakerphone and in headset and handset modes Press to cancel actions and return to preceding screen Preprogrammed variably programmable function keys The factory sett...

Page 22: ...atus line will be replaced by the handset symbol indicating that you can now use only the handset for the call The phone will return to headset mode when the handset is placed in the cradle and the headset symbol will reappear in the status line Muting and unmuting the microphone when in a call When the microphone is muted the mute symbol is displayed in the info bar Freely programmable function k...

Page 23: ...ad or pick up the handset to open the Enter Number screen When dialing a number Fig 1 the input mode is always numerals When editing directory entries Fig 2 and identities the current input mode is indicated in the line underneath the cursor Press the left function key underneath the display to switch to the next input mode Text underneath cursor current input mode Press function key to switch to ...

Page 24: ...he alphanumeric key with the basic form of the respective letter as many times as necessary Pause briefly after each letter Available letters with accents and umlauts depend on the phone s language setting Example If the phone language is German press key 2 four times to type ä Entering special characters and symbols In input modes lower and upper case letters press keys 0 and 1 one or more times ...

Page 25: ...there are status messages Any of numerous messages concerning the current status of the phone might be displayed in this bar for example the availability of a firmware update a reboot being required etc If there is more than one current status message at any one time the one with the highest priority will be shown Some of the status messages you may see in idle mode are The text Missed and the tot...

Page 26: ... outgoing identity for making calls by pressing on the navigation key A blue circle with a revolving white ring indicates that the identity is trying to register A gray circle with a white x indicates that the identity is not properly registered Check your connections and whether the server is down Note Identities can be deactivated without removing the registration settings by changing their stat...

Page 27: ...tatus line will also disappear The function mapped onto the key is now available on this key again If you have mapped the Status messages function onto the key the key will remain blank until a new status message becomes available or until a reboot when all current status messages will be displayed anew When the phone is active The display will inform you of any activity the phone is engaged in se...

Page 28: ...nsor Page key Fig 1 Fig 2 Fig 3 The LED of the key associated with the label of the on screen page will react in accordance with the visible label s mapping pressing the key may affect its visible setting The function keys can be mapped on the phone and faster and more comfortably on the phone s web interface For information on programming the function keys see Configuring the function keys on pag...

Page 29: ...iting 2 VLAN Pri ority 0 7 1 Display 1 2 Auto answer 4 WLAN 1 Ambient light sensor 3 Reject anonymous 1 On off 2 Backlight on activity 4 Silent mode 5 Advanced 3 Backlight when idle 5 DND 1 802 1X 4 SmartLabel options 4 Speed dial 2 Hardware Idle screen 3 NTP Call screens 5 Fkeys 4 DNS Other screens 1 Context sensitive keys Return to default mode timer 2 Dedicated keys Return to page 1 timer 3 Sma...

Page 30: ...activity 3 Reject anonymous 2 Backlight when idle 4 Silent mode 3 SmartLabel options 5 DND Idle screen Call screens 5 Fkeys Other screens 1 Context sensitive keys Timer default display mode 2 Dedicated keys Timer back to page 1 3 SmartLabel keys 2 Expansion modules 1 Page 1 4 1 Backlight on activity 4 Expansion mod keys 1 2 Backlight when idle 6 General 3 Contrast 1 Quick dial contacts 4 Appearanc...

Page 31: ...light on the phone s display Intensity of backlight The setting adjusts the intensitiy of the backlight for both displays 1 Press 2 Select Preferences and press 3 Select Display and press 4 If applicable i e if there is a connected expansion module select Primary Display and press 5 Select Backlight on activity or Backlight when idle and press 6 Press the right or left arrow on the navigation key ...

Page 32: ...s adjusted separately for each module and only connected modules appear in the menu If there is more than one the first D3 in the daisy chain is listed as Expansion Module 1 the second one as Expansion Module 2 and the third one as Expansion Module 3 1 Press 2 Select Preferences and press 3 Select Display and press 4 Select Expansion Modules and press 5 Select Appearance and press 6 Select Expansi...

Page 33: ...nd press 4 Select Expansion Modules and press 5 Select Backlight on activity or Backlight when idle and press 6 Press the right or left arrow on the navigation key or the function key underneath or in the function key line to decrease or increase the backlight s intensity 7 Press to save and return to the Expansion Modules menu Contrast The setting is applied to all D3 expansion modules connected ...

Page 34: ...system Be sure to write down your admin password and your HTTP user name and password and store them in a secure place Without the administrator password you will not be able to return the phone and the web interface from user mode to administrator mode many settings will be inaccessible Without HTTP user name and password you cannot open the phone s web interface You can set and change the data o...

Page 35: ...character strings of letters and numerals e g john or jh24 Password Text string Opening the web interface 1 Look up the phone s IP address Press the function key underneath if the symbol is available or press Information System Info or Help 2 Open a web browser on your PC Enter the IP address preceded by http or https in the address bar for example http 192 168 10 115 and press ENTER The home scre...

Page 36: ...ave clicked on Apply in some cases the Save button will appear at the top of the page Click Save to save the changes permanently Changes that have not been saved will be lost if and when the phone loses power or is disconnected from its power source To the right of each setting there is a link symbolized by the question mark Click this link to open a page with information on the setting descriptio...

Page 37: ...phone is administered centrally user mode may be the rule Please check with your administrator User mode on the phone The Network menu and various other settings are inaccessible in user mode See Settings on page 28 Returning the phone to admin mode from user mode 1 Press 2 Select i e if necessary scroll to Maintenance and press 3 Select Security and press 4 Select Administrator Mode Fig 1 if nece...

Page 38: ...rn the phone and its web interface to administrator mode open the Advanced Settings page enter the administrator password in Administrator Login and click Apply Fig 2 The default password is 0000 4 x zero In administrator mode the two pages look like this Fig 3 Fig 4 ...

Page 39: ...ave or on Apply and Save depending on your firmware version Changes will be lost if you open another page of the web interface without first clicking on Apply Save Definitions explanations Directory entries Each entry must have at least one phone number multiple associated phone numbers are possible If you do not enter a first and or last name and or nickname the phone number will appear under bot...

Page 40: ...ry from the directory by clicking on the delete symbol or if you want to keep the number in the directory change the contact type to none or VIP by editing the entry See Editing existing entry on page 42 editing on the phone and Editing an entry on page 45 editing on the web interface for more information Outgoing identity The default setting is Active which means that the phone will use the curre...

Page 41: ...dding Editing Entries on the Phone Adding new entry manually 1 Press to open the phone s directory 2 Press the function key underneath Note See Input modes and navigation and Entering numerals letters special characters and symbols on page 23 for information on how to enter data 3 Enter the phone number and press 4 Enter a first name and or press 5 Enter a last name and or press Note Entering a fi...

Page 42: ...irectory 2 Press 3 Use to select the criterion for sorting nickname first name last name organization etc and press to sort Editing existing entry 1 Press to open the phone s directory 2 Selecting an entry Scroll to the entry or enter the first letter of the name 3 Press The Details screen for the entry will be displayed 4 Editing a detail a Press and to select a detail Depending on the detail b I...

Page 43: ...ry press Fig 1 and continue with step 4 below Fig 1 Fig 2 a If there is more than one phone number associated with the entry and you want to delete only one of them press Fig 2 or b Select the number you want to delete with Fig 3 and press You will see the details of the subentry Fig 4 c Press Fig 3 Fig 4 4 You will be asked Are you sure Fig 5 5 If you are press to delete the entry or phone number...

Page 44: ...contact type VIP Preferences page Directory Ringtones section Calls from entries on the Deny list will not ring on the phone The caller will always hear the busy signal Outgoing Identity The drop down list shows all identities configured on the phone If you select one of the identities for one of the numbers listed in the phone book all calls to that number initiated from the phone book will show ...

Page 45: ...ntry and two additional buttons Add Sub and Change are available see Fig 2 and 3 below Editing Fig 1 If single entry click in the entry s line If there is more than one number associated with a name Click in the name s line if you want to edit add the first or last name of the date of birth and the data in the blue area applicable to the master record Click in a phone number s line if you want to ...

Page 46: ...has a SIP number and a private number In this example his cell phone number will be added as a third number Click in the line containing John Miller s name The data is shown in Add or Edit area Fig 4 Fig 5 Enter the phone number in the text field of Number Select the number type Optional Select a contact type and an outgoing identity from the respective drop down list Click Add Sub The directory n...

Page 47: ...me and all associated phone numbers Deleting one of the phone numbers Click in the line of a phone number subentry to delete that subentry but keeping the master record and all other subentries Dialing from phone directory To dial click the phone symbol on the right side of the line with the phone number Deleting whole directory Deletes the entire directory irretrievably Importing a directory 1 Cl...

Page 48: ... Save LDAP search on the phone Enter the first letter of the name you are searching for Type more letters if the name shown isn t the right one or scroll through the list Press to dial Contacts If you want to use an external contacts list the Contact list and Contact list URI settings are mandatory Publish presence is optional when enabled the phone sends out PUBLISH SIP messages with the phone s ...

Page 49: ... User Manual Directories To dial a contact on the phone enter the first letter of the name you are searching for Type more letters if the name shown isn t the right one or scroll through the list Press to dial ...

Page 50: ...s Selecting identity for current outgoing call See Identities accounts on page 88 on how to configure identities If more than one identity is shown on the display the one on the white bar with the white and green rings around the green circle is the outgoing identity for the call and the number name that will show on the callee s phone Use the up or down arrow on the navigation key to select anoth...

Page 51: ...ct a different number and then press Calling number from call history missed received dialed calls 1 Press dialed calls received calls or missed calls to open the respective call list 2 Use to select a call 3 Press to dial the number Calling number from phone directory 1 Press to open the phone s directory 2 Use to select a name or enter the first letter s of the name on the alphanumeric keypad 3 ...

Page 52: ...d is locked See Emergency numbers on page 94 on how to set emergency numbers Several numbers 911 112 110 999 have been preconfigured On an unlocked keyboard Enter the number and press to dial On a locked keyboard Enter the number The phone dials the number as soon as you have entered all the digits of one of the programmed emergency numbers Call completion This function depends on whether it is av...

Page 53: ...s saved on its call lists and in the directory as soon as you have typed the minimum number of digits If there is more than match select with on the navigation key and press to dial The default setting as of firmware version 10 1 33 33 is enabled and the minimum number of characters that must be entered before QuickLookup starts looking for matches is three Changing the minimum number of character...

Page 54: ...can pick up calls ringing on another extension for example when the other extension is busy or when the user is absent when the following prerequisites for this function are met It must be supported by the PBX The extensions whose calls you want to pick up on your own extension must permit this function It is possible but not required to restrict the permission for monitoring to certain users or g...

Page 55: ...7788 7793 Fig 1 indicates that a call from 7788 is ringing on monitored extension 7793 In Fig 2 7793 7788 Fig 1 indicates that monitored extension 7793 is calling extension 7788 in Fig 3 7793 x 7788 Fig 3 indicates that 7793 is connected to 7788 and that 7793 is the caller 7788 the callee Press to close the Calls screen and return to the idle screen Call waiting When you are in a call another call...

Page 56: ...rrent connection Note Pressing and will affect the call shown on the display i e your current connection in Fig 1 and 3 the call waiting in Fig 2 5 and 6 or the call on hold in Fig 4 If there is more than one call waiting Fig 5 6 and 7 press the keys or respectively to bring them on screen and to return to the connected call If you do not wish to accept the waiting call you can ignore the announce...

Page 57: ...ngs up while on hold the call is terminated on your phone as well and the LED indicators are turned off Holding multiple calls When you are in a call with one party and have one or more calls on hold and when there is more than one call on hold the symbol is available in the function key line You can switch back and forth between the active call and any call on hold Up to 12 simultaneous calls are...

Page 58: ...ed conferences and how to set them up and participate please check with your network administrator or your VoIP provider Initiating a conference 1 Call the first intended participant and put him or her on hold 2 Call the second intended participant Fig 1 3 When you are connected to the participant press to start the conference Conference screen navigation Your input on the phone s keys will affect...

Page 59: ...ts on screen Fig 3 or 4 press to put this party on hold and to converse with the other party in private To restart the conference press To terminate the conference and the connections to both parties return to the conference screen Fig 2 and press Transferring calls You can transfer connected calls as well as calls ringing on your phone When you have a call on the line there are two ways to transf...

Page 60: ...isconnected 7788 indicating that the transfer was completed With more than one call All calls must be on hold In the below example you have two calls from phone numbers 7788 and 7798 on hold You want to transfer the call from 7798 to 7793 1 Dial 7793 and announce the call 2 If the third party wants to accept the call press If the holding 7788 screen i e the call you do not want to transfer appears...

Page 61: ... you must reject it before you can transfer your active call blindly Fig 11 Fig 12 a Press the function key underneath The Call Waiting screen Fig 12 appears b Press to reject the call waiting The caller hears the busy signal 3 Press You may briefly see two Disconnected messages followed by the callee and caller s name number indicating that the transfer was completed Fig 6 and 7 on the preceding ...

Page 62: ...ng speakerphone or a headset Press Missed Calls Missed calls are indicated by the call LED steady light the missed call symbol in the status line and by the Missed message with the number of missed calls on the display Fig 1 and on the Status info screen Fig 2 Note If there are status messages with a higher priority the status line will show the message with the highest priority Fig 1 Fig 2 Fig 3 ...

Page 63: ...lotted to the storing of call lists is full the oldest ones will be overwritten 1 Press to open the call history Fig 1 Fig 1 Fig 2 Fig 3 Fig 4 The red dot indicates the arrival of new missed messages since the last time the missed calls were viewed Fig 4 It is removed from the list of all calls and turns blue in the list of missed calls once the list has been viewed 2 To view the list of missed re...

Page 64: ...etails of a call Press to add the caller callee to the phone s directory See Editing existing entry on page 42 for information on adding a name and other data to the new directory entry Press to delete the call Locking and unlocking the keyboard When the keyboard is locked only the emergency numbers configured on the Preferences page of the phone s web user interface can be dialed Setting a PIN to...

Page 65: ...g it up rejecting it manually or transferring it manually to a third party Rejecting a ringing call manually Press The caller will hear the busy signal Press for two seconds to reject the call and additionally place the caller on the Deny list of the phone s directory so that calls from that number do not ring on your phone the caller hears the busy signal For more information on the Deny list and...

Page 66: ...ion Call forwarding See Call forwarding on page 66 and on page 95 Rejecting anonymous calls See the following section Rejecting anonymous calls With this setting you can have your phone reject calls from phones that are blocking or not transmitting their numbers Please note Calls from analog phone connections without caller ID will most likely be received as anonymous calls They will be rejected w...

Page 67: ... time If the call is not accepted by the end of this time period it is forwarded to the number of the phone extension or mailbox specified as this function s target Fig 3 Forwarding all calls Fig 4 Forwarding when busy Fig 5 Forwarding when call has not been answered after time set in seconds Settings on the phone and turning on call forwarding Forward all Forward when busy Forward after timeout P...

Page 68: ...he time span will disappear Press for two seconds to return to the idle screen Turning forwarding of all calls on off with a function key Turning call forwarding on Note Call forwarding is set separately for each configured identity separately When the setting is done on the phone it applies to the identity selected as outgoing identity 1 Press The display will show the Target when Forwarding scre...

Page 69: ...ty different functions will be available See Appendix 1 Display Symbols and Icons on page 107 for the lists of symbols and their description Navigation confirmation and cancel keys For the default settings see At a glance on page 18 You can select a different key event to be available on each respective key when the phone is in idle mode You cannot change the functions that are available when the ...

Page 70: ...arks between the digits For example a number with an area code that might conventionally be notated as 916 555 1234 should be entered as 9165551234 Short Full Label Mode phone Select a mode from the drop down list The default settings for both are icon and text Icon The label will display the icon of the functionality mapped onto the key e g if extension if speed dial etc Text The label will displ...

Page 71: ...e page has two subpages The key settings are configured on the subpage Key Assignment the manner in which the SmartLabel keys are shown on the display is configured on the subpage SmartLabel Fig 1 Page 1 with keys P1 P8 on phone s web interface Fig 2 Page 2 keys with and without Short and Full Label settings ...

Page 72: ...they will also be shown on the function key page of the phone s web interface below the phone s function keys and above the Apply button Their settings are stored on the phone not on the expansion module For more information see Example 2 Extension monitoring and call pick up on D3 expansion module on page 79 and the D3 user manual available at https service snom com Accessories button Expansion M...

Page 73: ...ore comfortable Function key settings on the phone On the phone a limited number of functionalities is available 1 Press Preferences Fkeys Fig 2 Fig 1 Fig 2 Fig 3 2 Select SmartLabel Keys 3 Select Page 1 2 3 or 4 respectively by scrolling to the respective page and pressing Fig 3 In the following example we will be configuring key 17 on page 3 Fig 4 Fig 5 4 Select a key and press to open the Key 1...

Page 74: ...ity Fig 9 Fig 10 Fig 11 7 In our example the functionality is Extension Fig 8 Press to select and return to the Key 17 function menu where Number has been added to the menu below Type Fig 11 8 Select Number and press I 9 Enter the extension number and press Fig 12 Fig 12 Fig 13 Fig 14 10 Short Label Fig 13 and Full Label on the phone and Label on the D3 are optional This is the data displayed on t...

Page 75: ... is icon and text you can also select text or icon only see Short Full Label Mode phone on page 70 15 Press briefly to return to the Key Function menu press for 3 seconds to return to the idle screen When page 3 is on screen the top left key can now be used to dial the extension by briefly pressing the key and to pick up calls ringing on the extension the LED will indicate the call status of the e...

Page 76: ... web interface and before closing the web interface 4 After you have clicked Apply the button Save will appear at the top of the page We strongly recommend clicking this button as well any modifications not saved will be lost if and when the phone is unplugged from its power source or when there is a power outage Selected examples for function key programming This chapter will show you a few examp...

Page 77: ...e of the configured identities from the drop down list 5 Under Type select Extension from the drop down list 6 In the Number text field enter the phone number whose calls you want to pick up In our example it is 7793 7 Select a display option from the drop down menu of Short Label Mode The default is Icon and text i e an icon depicting the function on the key and the number or the short label text...

Page 78: ...P7 P8 P9 P10 P11 P12 P13 P14 P15 P16 P17 P19 P19 P20 P21 P22 P23 P24 P25 P27 P27 P28 P29 P30 P31 P32 Fig 4 Press key to put page 2 3 and 4 on screen successively When page 4 is on screen press key to return to page 1 Page key Proximity sensor Move hand or object over sensor to switch from default to alternative SmartLabel display mode See Display options for SmartLabel keys on page 83 for more inf...

Page 79: ... if necessary 3 Scroll down to Expansion Keys and the expansion module you want to configure 4 Under Context of the key on the expandion module select Active or one of the configured identities from the drop down list 5 Under Type select Extension from the drop down list 6 In the Number text field enter the phone number whose calls you want to pick up In our example it is extension 157 on key 1 an...

Page 80: ...de 917 Type each phone number with any necessary area code and or country code etc without spaces hyphens etc Example In conventional notation you might write the number as 917 555 0123 Type 9175550123 into the text field 7 Select a display option from the drop down menu of Short Label Mode The default is Icon and text i e an icon depicting the function on the key and the number or the short label...

Page 81: ...P6 P7 P8 P9 P10 P11 P12 P13 P14 P15 P16 P17 P19 P19 P20 P21 P22 P23 P24 P25 P27 P27 P28 P29 P30 P31 P32 Fig 4 Press to put page 2 3 and 4 on screen successively When page 4 is on screen press to return to page 1 P15 P15 Page key Proximity sensor Move hand or object over sensor to switch from default to alternative SmartLabel display mode See Display options for SmartLabel keys on page 83 for more ...

Page 82: ...ing example the setting of the left key will be changed from Directory to LDAP Directory 1 On the phone s web interface click on Function Keys in the menu on the left 2 Click the Key Assignment tab if necessary 3 Click the drop down list of context sensitive key F1 and select LDAP Directory 4 Click on Apply and Save By pressing key F1 you now have direct access to your LDAP directory if available ...

Page 83: ... an object across the sensor see At a glance on page 18 triggers the switch Return Reset to default mode timer after sec This setting defines after how many seconds the appearance of the SmartLabels will automatically return to the default Valid values are 0 to 360 seconds the default is 3 seconds Selecting 0 turns automatic reversion off Manually returning the display mode to the default Press Th...

Page 84: ...n of the settings for all screens and other screens is done the same way Default and alternative display mode a Select the display mode you want to change for example the default mode Fig 3 and press In the following example the default mode is set to Full Fig 3 and 4 and we want to change it to Short Fig 3 Fig 4 Fig 5 Fig 6 b Use the navigation key to select Short Fig 5 and press to save and retu...

Page 85: ...martLabel options 2 Select the Return to default mode timer Fig 11 and press The preset default is 3 seconds Fig 11 Fig 12 Fig 13 3 Enter a different number of seconds between 0 and 360 Fig 11 on the alphanumeric keypad and press to save and return to the SmartLabel options menu Fig 13 The timer now shows the new setting Note If you enter 0 seconds the display will not return to the default mode a...

Page 86: ...o the Return to page 1 menu The timer now shows the new seconds setting Fig 18 Fig 17 Fig 18 Fig 19 Note If you do not want the on screen page to return to page 1 automatically select Automatic return Fig 15 if not already selected and press to turn off the function After the automatic return has been turned off the Timer line is no longer visible in the Return to first page menu Fig 19 Settings o...

Page 87: ...Off Off Short press page key Short press page key Short press page key Long press page key Long press page key Long press page key Proximity sensor Proximity sensor 4 Click the drop down list of the setting you want to change and select a setting 5 If you want to change the default timer settings for returning the display mode to the default and the SmartLabel page to page 1 type the number of sec...

Page 88: ... Apply and Save Changes will be lost if you open another page or tab of the web interface or if you close the web interface without first clicking on Apply and Save Identities accounts The phone supports up to four accounts or phone numbers with one or more providers or within an office or organization network On Snom phones these accounts or phone numbers are called identities Note If your phone ...

Page 89: ...echnical settings and textfields for entering URIs URLs to various servers for music on hold for example as well as some behavior settings These are Automatic acceptance of incoming calls Auto Answer The default setting is off Acoustic alert one short beep when the phone accepts a call automatically Preferences Auto Answer Auto Answer Indication The default setting is off Contact List A contact li...

Page 90: ...40 Selecting identity ringtones On the phone Press Preferences Audio tab Ringer If there is more than one configured identity on the phone they are shown on the display 1 Select an identity with if necessary and press to hear the current ringtone for that identity The current ringtone is indicated by the checked radio button 2 Selecting a different ringtone Press to navigate up and down the list o...

Page 91: ... and 6 Fig 1 Fig 2 Fig 3 Fig 4 Fig 5 Fig 6 Date Phone settings 1 Press Preferences Date Time see Fig 1 above US Date Format Date Setting On Setting Off March 5 2020 03 05 2020 05 03 2020 March 12 2020 03 12 2020 12 03 2020 December 5 2020 12 05 2020 05 12 2020 December 10 2020 12 10 2020 10 12 2020 2 To change U S date format from on Fig 1 above to off Fig 3 above scroll down to Date format and pr...

Page 92: ...tings 1 Open the Preferences page Appearance tab The default for the 24 Hour Clock setting in the General Information section on Select on to have the time on the phone s display shown in 24 hour format 00 01 to 24 00 Select off to have the time on the phone s display shown in AM PM format 0 01AM to 12 00PM 2 Click Apply and Save Time zone Note The time zone setting is accessible in admin mode onl...

Page 93: ...nu or for two seconds to return to the idle screen On the web interface 1 Open the Advanced Settings page Network tab Time section 2 Select your timezone country city from the drop down list of the Timezone setting 3 Click Apply and Save Language settings of phone and web interface The language used on the phone can be changed on the phone as well as on the web interface The language used on the w...

Page 94: ...een Setting on the Web Interface 1 Open Open the Preferences page Audio tab 2 Select the country from the drop down list of the Tone Scheme setting 3 Click Apply and Save Emergency numbers These are numbers that can be dialed when the keyboard is locked They must be set beforehand on the web interface The numbers 911 112 110 and 999 are preset 1 Open the Preferences page General tab 2 In the Gener...

Page 95: ...ll has not been accepted by the end of this time period it is forwarded to the number of the phone extension or mailbox specified as this function s target Configuring the settings on the phone See Settings on the phone and turning on call forwarding on page 67 Configuring the settings on the web interface If your internet telephony provider or your PBX uses codes to turn functions on and off refe...

Page 96: ...nd Save Turning call forwarding off 1 Open the Configuration Identity page Features tab 2 In the Call Forwarding section click the radio button Off for the forwarding event Always Busy Timeout you want to disable 3 Click Apply and Save Call completion On Snom phones call completion means that when a called number is busy or not available your phone will call you back as soon as the dialed number i...

Page 97: ...to the outgoing identity at the time it is saved If you want to change the setting for other identities select each one as the outgoing identity in turn and repeat the steps 1 Press Call Features Incoming Calls Call Waiting Fig 1 Fig 2 Fig 3 Fig 4 Fig 5 Fig 6 To turn call waiting on and off select Call waiting and press When call waiting is disabled Indicator is not available in the menu Fig 1 pre...

Page 98: ...l not be transmitted to any phones you call The function must be set for each identity separately Please note that your call may not be accepted if the other phone is set to reject anonymous calls see next item Setting on the phone On the phone the function is applied to the identity selected as the current identity for outgoing calls Select each identity as outgoing identity in turn and select an...

Page 99: ...onymous calls setting 3 Click Apply and Save QuickLookUp number guessing auto completion When the function is enabled the phone will propose numbers containing the typed string from the numbers saved on its call lists and in the directory as soon as you have typed the minimum number of digits on the enter number display If there is more than match select with on the navigation key and press to dia...

Page 100: ...click the radio button to turn the QuickLookUp function on or off 3 Type the minimum number of digits that must be entered into the text field of QuickLookup Start Length 4 Click Apply and Save Speed dial You can use the numbers 0 to 30 and the special characters and to speed dial frequently dialed and or long numbers without having to enter the complete phone number The numbers must be set on the...

Page 101: ...ressing 1 and on the phone Note You can also configure the freely programmable function keys with LEDs P1 P32 to dial one specific number each See Programming the function keys Example 3 Speed dialing auf Seite 80 for the instructions Setting a PIN to unlock the keyboard On the phone 1 Press and select Maintenance 2 Select Security 3 Select Set keyboard lock PIN 4 Enter the PIN and confirm by pres...

Page 102: ...he release notes 6 Scroll down to the Downloads table 7 Scroll down to your phone model in the left column of the table 8 Right click on the download link for SIP r bin file of the phone to be updated 9 Click Copy link location or Copy link address the exact wording depends on your browser 10 Open the phone s web interface and click Advanced in the menu on the left side of the display 11 Click the...

Page 103: ... left side of the display 2 Click the Update tab 3 Please click the radio button of each line and read the information on each setting before you configure the setting 4 Click Apply and Save If you have the changed the setting URL and or the PnP configuration a reboot is required before they will take effect Snom Secure Redirection and Provisioning Service SRAPS If you want to use Snom s Secure Re...

Page 104: ...s 4 Enter the administrator password and press 5 Wait for the idle screen to reappear 6 See Initializing and registering the phone on page 14 to continue Warning All customized settings will be lost TFTP Update When there is no other way to get the phone to work administrator password lost etc it can be reset to factory values via TFTP update Note All information and all customized settings stored...

Page 105: ...includes MAC addresses SIP headers etc that may allow others to hack into your system or use your identity for nefarious purposes Submitting a ticket If you are a Snom partner log in to the Snom helpdesk and open a ticket https helpdesk snom com support login You ll find the instructions here https helpdesk snom com support solutions Submitting system and settings information System information 1 ...

Page 106: ...ey requested you to use If it is the public forum make sure to delete private and or security relevant data like the MAC address public IP address etc Performing a PCAP Trace 1 Open the phone s web interface and click PCAP Trace in the Status menu on the left side of the display 2 Click Start to start recording network traffic 3 Click Stop to end recording 4 Click the here link to open the file do...

Page 107: ...one is idle depending on the firmware version on the phone the icons may look slightly different They can be selected on the phone s web interface Function Keys page See At a glance on page 18 for the default settings Line idle Server directory Call history call list menu all missed received and dialed calls Status messages viewed new DND inactive active Contacts list Forwarding all calls inactive...

Page 108: ...s to from date time total number and of received and dialed calls to from date time duration Deleting entire call list Moving to beginning of next time zone Moving to beginning of previous time zone Expanding the list of time zones to show all Collapsing the list of time zones to show only time zones relevant to the language setting i e countries where the language is spoken Put call or conference...

Page 109: ...n the current status of the phone e g which page of the SmartLabels is on screen which audio device is being used for the current call whether call forwarding is activated etc Call completion active SmartLabel page 1 4 on screen Anonymous mode Bluetooth mode Expansion module connected Handset headset speakerphone is the active audio device Call forwarding active Missed call Microphone muted Ringer...

Page 110: ...se note that not all available functionalities are represented by a symbol If the selected type is Key event please see the table Key event symbols below Action url Auto answer off on Busy lamp field Conference DTMF Extension Forwarding all calls turning on turning off Intercom off on IVR Interactive Voice Response Multicast paging is off on Presence Push 2 Talk Smart transfer Speed dial Star code...

Page 111: ...Hold Login e g hotel Return to previous move forward to next label page LDAP directory Settings menu Monitor calls Multicast zones Mute microphone unmute microphone red symbol microphone is mute Select outgoing identity next previous OCIP Reboot Voice recorder is off on red symbol call is being recorded check local regulations whether call recording is allowed Phone does not have built in voice re...

Page 112: ...entity Other configured and active identities are indicated by a green circle Active identities can be called Active identities can be selected as the outgoing identity for making calls by pressing or on the navigation key Identity not properly registered By changing the status of an identity to inactive on the phone s web interface it can be deregistered without removing its registration settings...

Page 113: ...113 D335 User Manual Appendix 1 ...

Page 114: ... Forward when Busy name number Call forwarding is on When your phone is busy incoming calls will be forwarded to the phone number indicated Forward after Timeout name number Call forwarding is on When an incoming call is not picked up within the set number of seconds the call will be forwarded to the phone number indicated Forward all name number Forwarding of all incoming calls is on All incoming...

Page 115: ... mm 5 236 133 00 mm 5 236 1 Before attaching the footstand in the position for wall mounting plug the long end of the handset cord into the connector labelled on the bottom of the phone and place the cord in the cable guide Fig 1 Fig 1 2 Insert the snap fits on the longer ends of the footstand into the holes marked Fig 2 3 Tilt the footstand away from you and insert the snap fits on the shorter en...

Page 116: ...ely in the upright position we recommend that you rotate the tab of the cradle 180 so that its tip protrudes slightly above the edge of the cradle see Rotating the tab of the cradle on page 11 The small rectangular hole in the receiver casing fits perfectly over the now protruding tip ...

Page 117: ... 2 etc BLF Busy Lamp Field This function key allows showing the status idle ringing held call busy of another extension on the key s LED By pressing the key it may also be possible to pick up calls ringing on the extension to dial the extension when the phone is idle and to transfer an incoming call ringing on your own extension These functionalities depend on your PBX for more information please ...

Page 118: ... the extension when the phone is idle and to transfer an incoming call ringing on your own extension These functionalities depend on your PBX for more information please check snom s interoperability page and the PBX manual With Asterisk generally use BLF rather than this function Forward to All incoming calls will be forwarded to the number extension or external phone number specified under Numbe...

Page 119: ...ult setting for all freely programmable function keys Incoming calls will go to the first free line key and outgoing calls will use the first free line key Line keys can be used to make outgoing calls with the identity selected from a particular key s Context menu and to have incoming calls for that identity going to that particular function key If the key is busy the incoming call will go to the ...

Page 120: ...r long numbers without having to enter the complete phone number Enter one phone number with any required prefixes area code country code operator auto attendant etc in the Number text field for any given freely programmable function key with LEDs Example 0019175557813 Or enter a partial phone number country area code etc and complete the number on the dialog screen In this case enter the partial ...

Page 121: ...XML sub tag of the action s you want the key to perform into the text field The currently available settings can be found here http wiki snom com Features Mass_ Deployment Setting_Files XML XmlSubTags Key Events ABS Address book search OCS accounts Accepted Calls Accepted List List of calls accepted on the phone Call Lists Call history list missed received dialed calls Change active ID List of reg...

Page 122: ...Providing access to a list where the Presence state of each registered SIP Identity can be defined online offline busy invisible Prev Outgoing ID Selecting the previous identity as the outgoing identity Reboot Rebooting the phone Record The phone does not record the voice streams at all they must be recorded on the PBX or other external device Pressed during a call the key informs the PBX to start...

Page 123: ... reflect on the original authors reputations Finally any free program is threatened constantly by software patents We wish to avoid the danger that redistributors of a free program will individually obtain patent licenses in effect making the program proprietary To prevent this we have made it clear that any patent must be licensed for everyone s free use or not licensed at all The precise terms a...

Page 124: ...by the Free Software Foundation write to the Free Software Foundation we sometimes make exceptions for this Our decision will be guided by the two goals of preserving the free status of all derivatives of our free software and of promoting the sharing and reuse of software generally the Program itself is interactive but does not normally print such an announcement your work based on the Program is...

Page 125: ...EN IF SUCH HOLDER OR OTHER PARTY HAS BEEN ADVISED OF THE POSSIBILITY OF SUCH DAMAGES END OF TERMS AND CONDITIONS How to Apply These Terms to Your New Programs If you develop a new program and you want it to be of the greatest possible use to the public the best way to achieve this is to make it free software which everyone can redistribute and change under these terms To do so attach the following...

Page 126: ...l 44 161 348 7500 Fax 44 169 348 7509 office uk snom com Snom Technology GmbH 6 Parc des fontenelles 78870 Bailly France Tel 33 1 80 87 62 87 Fax 33 1 80 87 62 88 office fr snom com Snom Technology GmbH Via Milano 1 20020 Lainate Italia Tel 39 02 00611212 Fax 39 02 93661864 office it snom com Snom Technology Ltd Rm 828 5F No 285 Sec 4 Zhongxiao E Rd Da an Dist Taipei City 10692 Taiwan Tel 886 2 87...

Reviews: