

Package Contents
• 1 × Vertical Wall-Mount Patch Panel
Rack
• 1 × Mounting Template
• 5 × 8×63mm Lag Bolts
• 5 × 8.4×16×2mm Lag Bolt Washers
• 5 × Concrete Anchor
• 26 × #10-32 Rack Screws w/ Washers
• 4 × Hook and Loop Strips
Key Features
• Stores and organizes EIA-standard 19"
rack equipment
• Maximum Weight Capacity 200lbs
• Rear cutout for cable access
Tools Required for Installation
• Power Drill
• 3/32" drill bit
• 1/2" (13mm) wrench
• level
• stud finder
• Phillips screwdriver
1
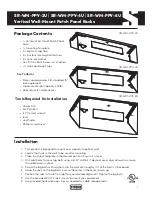
SR-WM-PPV-2U | SR-WM-PPV-4U | SR-WM-PPV-6U
Vertical Wall-Mount Patch Panel Racks
SR-WM-PPV-2U
SR-WM-PPV-4U
SR-WM-PPV-6U
Installation
1. This product is designed to mount on a wood or sheetrock wall.
2. Locate the studs in the wall to be used for mounting.
3. Place the cutout template in the desired position. Ensure it is level.
4. Drill pilot holes for your lag bolts using a 3/32" drill bit. If desired, use a drywall saw to remove
the cable access cutout.
5. Screw the lag bolts with washers into the wall until roughly 1/4" of the bolt is still exposed.
6. Hang the rack on the lag bolts. Ensure the arrow in the center points up.
7. Position the rack to the left or right for your desired alignment. Tighten the lag bolts.
8. Use the provided #10-32 rack screws to mount your equipment.
9. Use provided hook and loop strips as needed for cable management.
£
££
££


