background image

Działanie systemu | 6

CMS-30100_IM

99

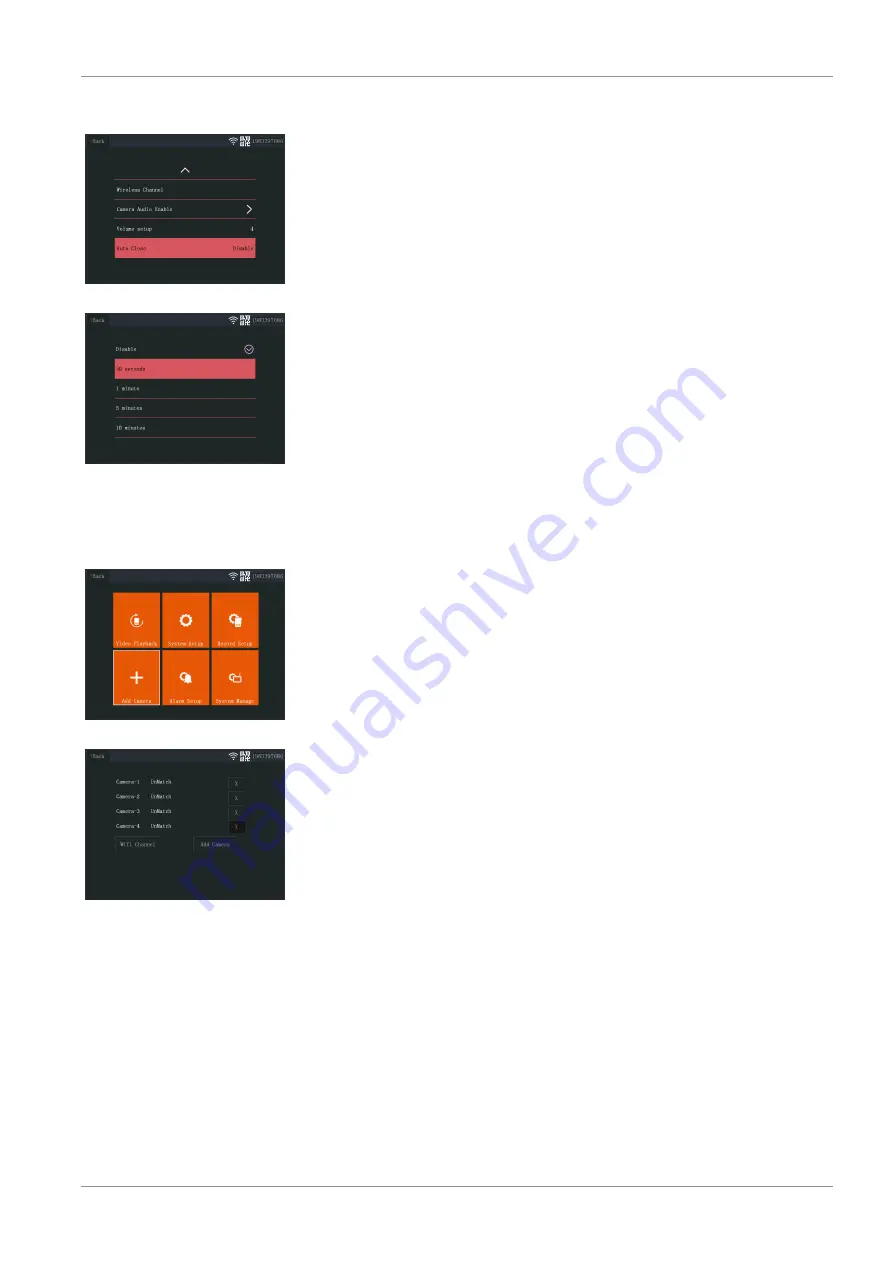
6.2.7 Automatyczne zamknięcie

 23: Automatyczne zamknięcie

 24: Czas (limit czasu) do automa-
tycznego zamknięcia

Funkcja automatycznego zamknięcia włącza/wyłącza limit czasu włączenia ekranu. Gdy
funkcja automatycznego zamknięcia jest włączona, ekran monitora wyłącza się po
upływie ustawionego czasu, gdy system jest normalnie uruchomiony i działa.

a) W menu głównym: Wybierz „System Setup” (Ustawienia systemu).

b) Wybierz „Auto Close” (Automatyczne zamknięcie)

c) Wybierz czas trwania przed upływem limitu (czas trwania rozpoczyna się od chwili

ostatniej interakcji z monitorem).

Uwaga: 

Gdy monitor działa na zasilaniu akumulatorowym, zaleca się ustawić krótki

czas trwania, aby oszczędzać energię.

6.3 Dodaj kamerę

 25: Menu główne — Dodaj kamerę

 26: Dodaj kamerę

Z monitorem można sparować maks. 4 kamery. Aby dodać kamerę, wykonaj następują-
ce kroki:

a) Włącz kamerę, podłączając ją do zasilania sieciowego.

b) Odczekaj 30 sekund.

c) Usłyszysz komunikat: „Start configuration mode” (Początek trybu konfiguracji).

ð

UWAGA: Jeśli nie słyszysz komunikatu, naciśnij i przytrzymaj przycisk reset na
kamerze przez 6 sekund, aż usłyszysz „Restore factory setting” (Przywracanie
ustawień fabrycznych).

d) Na monitorze w menu głównym: Wybierz „Add Camera” (Dodaj kamerę).

e) Wybierz „Add Camera” (Dodaj kamerę). (Należy to wykonać w ciągu x minut po

zresetowaniu kamery.)

f) Na kamerze: Jeśli powyższe kroki zostaną przeprowadzone poprawnie, usłyszysz

komunikat:
- „Wireless settings, please wait” (Ustawienia bezprzewodowe, poczekaj chwilę)
- „Wireless connection successful” (Nawiązano połączenie bezprzewodowe)

g) Na monitorze: Poczekaj na zakończenie parowania.

6.4 Ustawienia nagrywania

System można ustawić tak, aby nagrywał wideo w różnych trybach. Obsługiwane są
maks. 4 oddzielne harmonogramy, każdy z nich można ustawić w różnych trybach, z
wykorzystywaniem 1 lub większej liczby zainstalowanych kamer. Patrz sekcja „Harmo-
nogram nagrywania”.

Aby skonfigurować ustawienia nagrywania, wykonaj poniższe kroki.

a) W menu głównym: Wybierz „Record Setup” (Ustawienia nagrywania).

b) Wybierz urządzenie pamięci masowej. (Ma to znaczenie tylko, gdy jest włożona

karta MicroSD.)

Summary of Contents for CMS-30100

Page 1: ...CMS 30100...

Page 2: ...Table of Contents English iii Nederlands xx Deutsch xxxvii Fran ais liv Italiano lxxi Polski lxxxviii...

Page 3: ...ur device 9 5 1 Add a camera 9 5 2 Select WIFI channel if required 9 6 System operation 10 6 1 Video Playback 10 6 2 System Setup 11 6 2 1 Language 11 6 2 2 Time Setup 11 6 2 3 Wireless Internet 12 6...

Page 4: ...he presence of flammable liquids gases or dust Electrically powered products create sparks which may ignite the dust or fumes 2 The warnings precautions and instructions discussed in this instruction...

Page 5: ...3 Lens 4 Day night sensor 5 Microphone 6 Speaker Monitor 1 Antenna 2 Touch screen 3 Microphone 4 LED battery indicator 5 LED recording indicator 6 USB slot 7 MicroSD slot 8 On Off switch for battery u...

Page 6: ...until full and then operates directly from the AC adapter Batteries must be purchased separately Battery type 18650 3 1 3 Insert the MicroSD card not included To record video a MicroSD card is require...

Page 7: ...e outside of the wall a weatherproof con nection box is required 3 2 2 Wiring The camera is wireless and only requires an electrical connection Things to consider when wiring the camera The cable conn...

Page 8: ...h the currently watched camera Make sure camera microphone is enabled See section Camera Audio Enable Mute Select to mute unmute the monitor speakers Main menu Select to enter the main menu Zoom Selec...

Page 9: ...main menu Select Add Camera e Select Add Camera This must be done within x minutes from resetting the cam era f On the camera If the above steps are done correctly you will hear Wireless settings plea...

Page 10: ...y The monitor will start recording video depending on the settings in Record Setup To view the recordings do the procedure below a From the main menu Select Video Playback b Select the camera folder 1...

Page 11: ...e list 6 2 2 Time Setup Illustration 13 Select Time Setup The date and time can be set manually or by syncing to the internet a From the main menu Select System Setup b Select Time Setup c Choose whet...

Page 12: ...f Find and select your wireless router g Type your password NOTE Only 2 4GHz networks are supported h Download the SW360 app i Open the app register as a new user and follow the instructions given in...

Page 13: ...sabled 2 way communication with the camera is no longer possible a From the main menu Select System Setup b Select Camera Audio Enable c Select the relevant camera and pull the slider to the on or off...

Page 14: ...ed to have a short time out duration to save power 6 3 Add a camera Illustration 25 Main menu Add Camera Illustration 26 Add Camera The monitor can pair up to 4 cameras To add a camera do the followin...

Page 15: ...write to enable disable the monitor to overwrite older recordings when the memory runs out 6 4 1 Record Schedule Illustration 27 Record Schedule Illustration 28 Schedule 1 4 Illustration 29 Schedule s...

Page 16: ...e APP Alarm by moving the slider it will turn green when enabled if you wish to receive alarms on your mobile device See section Setting up the mo bile app g Enable the Monitor Sound Alarm if you wish...

Page 17: ...and Wifi settings To restore your system do the procedure below a From the main menu Select System Manage b Select Factory Setting c Select Simple Restore or Restore All 6 6 3 Upgrade The Upgrade menu...

Page 18: ...a wifi network See section Wireless Internet b Connect your mobile device to the same network c Download the SW360 app d Open the app register as a new user and follow the instructions given in the ap...

Page 19: ...ion of Conformity Hereby Smartwares Europe declares that the radio equipment type CMS 30100 is in compliance with Directive 2014 53 EU The full text of the EU declaration of conformity is available at...

Page 20: ...en camera toevoegen 26 5 2 Wifikanaal selecteren indien vereist 26 6 Systeembediening 27 6 1 Videoweergave 27 6 2 Systeeminstellingen 28 6 2 1 Taal 28 6 2 2 Tijdconfiguratie 28 6 2 3 Draadloos interne...

Page 21: ...sen of stof Elektrisch aange dreven producten produceren vonken die stof of dampen tot ontbranding kunnen brengen 2 De waarschuwingen voorzorgsmaatregelen en instructies in deze gebruiksaanwij zing ku...

Page 22: ...n Camera 1 Antenne 2 Ledlamp 3 Lens 4 Dag nachtsensor 5 Microfoon 6 Luidspreker Monitor 1 Antenne 2 Touchscreen 3 Microfoon 4 Led batterij indicator 5 Led opname indicator 6 USB sleuf 7 MicroSD sleuf...

Page 23: ...ot deze vol is en werkt de monitor op de AC adapter Batterijen moeten afzonderlijk worden aangeschaft Type batterij 18650 3 1 3 De MicroSD kaart plaatsen niet meegeleverd Voor het opnemen van video is...

Page 24: ...itenzijde van de muur wilt leiden is een weerbestendige verbindingsdoos vereist 3 2 2 Bedrading De camera werkt draadloos Hij hoeft alleen aangesloten te zijn op de voeding Aandachtspunten bij de bedr...

Page 25: ...eramicrofoon is ingeschakeld Raadpleeg de sectie Camera audio inschakelen Dempen Selecteren om de monitorluidsprekers te dempen in te schake len Hoofdmenu Selecteren om het hoofdmenu te openen Zoom Se...

Page 26: ...electeer Add Camera Camera toevoegen Dit moet u binnen x minuten na het opnieuw instellen van de camera doen f Op de camera Als de bovenstaande stappen correct zijn uitgevoerd hoort u het volgende Wir...

Page 27: ...ngen in Record Setup Opnameconfiguratie Als u de opnamen wilt bekijken gaat u als volgt te werk a Vanuit het hoofdmenu Selecteer Video Playback Videoweergave b Selecteer de cameramap 1 4 waaruit u opn...

Page 28: ...e De datum en tijd kunnen handmatig of door synchronisatie met internet worden inge steld a Vanuit het hoofdmenu Selecteer System Setup Systeem instellingen b Selecteer Time Setup Tijdconfiguratie c K...

Page 29: ...Typ uw wachtwoord OPMERKING Het apparaat biedt alleen ondersteuning voor 2 4 Ghz wifinet werken h Download de app SW360 i Open de app registreer u als een nieuwe gebruiker en volg de instructies uit...

Page 30: ...em Setup Systeem instellingen b Selecteer Camera Audio Enable Camera audio inschakelen c Selecteer de relevante camera en zet de schuifregelaar op de aan of uit positie 6 2 6 Volumeconfiguratie 21 Vol...

Page 31: ...uiten b Wacht 30 seconden c U hoort nu het volgende Start configuration mode Configuratiemodus starten OPMERKING Als u de stem niet hoort houdt u de resetknop op de camera 6 seconden ingedrukt tot u R...

Page 32: ...en camera s f Selecteer de kanalen camera s waarvandaan u wilt opnemen g Selecteer Weekday Weekdag h Selecteer in de lijst de dagen waarop u wilt opnemen i Selecteer Time Tijd om het tijdsbestek in te...

Page 33: ...vindt u informatie over de monitor De informatie wordt voorname lijk gebruikt wanneer ondersteuning noodzakelijk is Ga als volgt te werk om de sys teeminfo te bekijken a Vanuit het hoofdmenu Selecteer...

Page 34: ...00_IM 6 6 4 IPC upgrade In het menu IPC Upgrade IPC upgrade kunt u de camerafirmware bijwerken met een MicroSD kaart Dit wordt niet aanbevolen en wordt voornamelijk gebruikt wanneer dit door het onder...

Page 35: ...loos inter net b Verbind uw mobiele apparaat met hetzelfde netwerk c Download de app SW360 d Open de app registreer u als een nieuwe gebruiker en volg de instructies uit de app e Meld u aan in de app...

Page 36: ...itsverklaring Hierbij verklaart Smartwares Europe dat het type radioapparatuur CMS 30100 con form is met Richtlijn 2014 53 EU De volledige tekst van de EU conformiteitsverklaring kan worden geraadplee...

Page 37: ...nzuf gen 43 5 2 W hlen Sie den WLAN Kanal falls erforderlich 43 6 Systembetrieb 44 6 1 Videowiedergabe 44 6 2 Systemkonfiguration 45 6 2 1 Sprache 45 6 2 2 Zeiteinstellung 45 6 2 3 Kabelloses Internet...

Page 38: ...chen z B mit entflammbaren Fl ssigkeiten Gase oder brennbarem Staub Elek trisch betriebene Produkte erzeugen Funken die Staub oder D mpfe entz nden k nnen 2 Die in diesem Handbuch erw hnten Warnungen...

Page 39: ...ne 2 LED Leuchtmittel 3 Objektiv 4 Tag Nacht Sensor 5 Mikrofon 6 Lautsprecher Monitor 1 Antenne 2 Touchscreen 3 Mikrofon 4 LED Batterieanzeige 5 LED Aufnahmeanzeige 6 USB Steckplatz 7 MicroSD Steckpla...

Page 40: ...is er voll ist und das Modul dann direkt ber das Netzteil versorgt Die Batterie muss separat bezogen werden Batterietyp 18650 3 1 3 Einsetzen einer MicroSD Karte nicht im Lieferumfang F r Videoaufzeic...

Page 41: ...it Hilfe der Schrauben Falls die Kabel auf der Wand verlegt werden sollen ist eine wetterfeste Anschlussdose erforderlich 3 2 2 Verdrahtung Die Kamera funktioniert kabellos und braucht nur einen Elekt...

Page 42: ...ramikrofon einge schaltet ist siehe Abschnitt Kamera Audio aktivieren Stumm Dient zum Deaktivieren Aktivieren der Monitorlautsprecher Hauptmen Dient zum Aufrufen des Hauptmen s Zoom Dient zum Einzoome...

Page 43: ...s W hlen Sie Kamera hinzuf gen e W hlen Sie Kamera hinzuf gen Dies muss innerhalb von x Minuten nach dem Zur cksetzen der Kamera geschehen f An der Kamera Bei korrekter Ausf hrung der Schritte oben h...

Page 44: ...den Einstellungen in Auf nahmeeinstellungen Um sich die Aufzeichnungen anzusehen verfahren Sie wie folgt a Im Hauptmen W hlen Sie Videowiedergabe b W hlen Sie den Kameraordner 1 4 mit den gew nschten...

Page 45: ...und Uhrzeit k nnen manuell oder per Synchronisierung mit dem Internet ein gestellt werden a Im Hauptmen W hlen Sie Systemkonfiguration b W hlen Sie Zeiteinstellung c W hlen Sie ob die Uhrzeit automat...

Page 46: ...aus g Geben Sie Ihr Passwort ein HINWEIS Es werden nur 2 4 GHz Netzwerke unterst tzt h Laden Sie sich die App SW360 herunter i ffnen Sie die App melden Sie sich als neuer Benutzer an und befolgen Sie...

Page 47: ...Sie Systemkonfiguration b W hlen Sie Kamera Audio aktivieren c W hlen Sie die entsprechende Kamera und schieben Sie den Regler in die Stellung Ein oder Aus 6 2 6 Lautst rkeeinstellung Abb 21 Lautst rk...

Page 48: ...er Spannungsversorgung anschlie en b Warten Sie 30 Sekunden c Sie h ren Folgendes Start configuration mode Konfigurationsmodus starten HINWEIS Falls Sie keine Ansage h ren dr cken Sie die Reset Taste...

Page 49: ...ag h W hlen Sie in der Liste die Tage an denen eine Aufzeichnung erfolgen soll i W hlen Sie Uhrzeit und geben Sie die Zeitspanne f r die Aufzeichnung ein Hinweis Die Option Typ bietet nur eine M glich...

Page 50: ...forderlich ist Um die System informationen aufzurufen verfahren Sie wie folgt a Im Hauptmen W hlen Sie System verwalten b W hlen Sie Systeminformationen 6 6 2 Werkseinstellung Abb 34 Werkseinstellung...

Page 51: ...100_IM 51 6 6 4 IPC Upgrade Im Men IPC Aktualisierung k nnen Sie die Kamerafirmware mit Hilfe einer MicroSD Karte aktualisieren Dies wird nicht empfohlen und wird allgemein nur gebraucht wenn Unterst...

Page 52: ...mobiles Ger t mit demselben WLAN Netzwerk c Laden Sie sich die App SW360 herunter d ffnen Sie die App melden Sie sich als neuer Benutzer an und befolgen Sie die An weisungen in der App e Melden Sie si...

Page 53: ...ormit tserkl rung Hiermit erkl rt Smartwares Europe dass der Funkanlagentyp CMS 30100 der Richtlinie 2014 53 EU entspricht Der vollst ndige Text der EU Konformit tserkl rung ist unter der folgenden In...

Page 54: ...cessaire 60 6 Fonctionnement du syst me 61 6 1 Lecture vid o 61 6 2 Configuration du syst me 62 6 2 1 Langue 62 6 2 2 Configuration de l heure 62 6 2 3 Internet sans fil 63 6 2 4 Canal sans fil 63 6...

Page 55: ...quides inflammables de gaz ou de poussi res Les pro duits lectriques cr ent des tincelles qui peuvent enflammer la poussi re ou les vapeurs 2 Les avertissements pr cautions et instructions figurant da...

Page 56: ...ED 3 Lentille 4 Capteur de jour nuit 5 Microphone 6 Haut parleur cran 1 Antenne 2 cran tactile 3 Microphone 4 Indicateur LED de batterie 5 Indicateur LED d enregistrement 6 Port USB 7 Fente micro SD 8...

Page 57: ...elle soit pleine et fonctionne directement depuis l adaptateur secteur Les batteries s ach tent s par ment Type de batterie 18650 3 1 3 Ins rer la carte MicroSD non fournie Il faut une carte MicroSD...

Page 58: ...mur vous avez besoin d un bo tier de raccordement r sistant aux intemp ries 3 2 2 C blage La cam ra est sans fil et ne n cessite qu une connexion lectrique l ments prendre en compte lors du c blage d...

Page 59: ...a est activ voir section Activer le son de la cam ra Mute S lectionner pour activer d sactiver le mode silencieux des haut parleurs de l cran Menu principal S lectionner pour acc der au menu principal...

Page 60: ...rtir du menu principal S lectionner Ajouter Cam ra e S lectionner Ajouter Cam ra Ceci doit tre fait dans les x minutes partir de la r initialisation de la cam ra f Sur la cam ra Une fois les tapes ci...

Page 61: ...nfiguration du Calen drier d enregistrement Pour visualiser les enregistrements proc der comme suit a partir du menu principal S lectionner Lecture vid o b S lectionner le r pertoire de cam ra 1 4 par...

Page 62: ...ure Fig 13 S lectionner R glage de l heure La date et l heure peuvent tre r gl es manuellement par synchronisation en ligne a partir du menu principal S lectionner Configuration du syst me b S lection...

Page 63: ...lectionner votre routeur sans fil g Saisir votre mot de passe REMARQUE Seuls les r seaux 2 4 GHz sont compatibles h T l charger l appli SW360 i Ouvrir l application s enregistrer en tant que nouvel ut...

Page 64: ...ossible a partir du menu principal S lectionner Configuration du syst me b S lectionner Actionner le son de la cam ra c S lectionner la cam ra appropri e et tirer le curseur sur la position marche ou...

Page 65: ...ur conomiser l nergie 6 3 Ajouter une cam ra Fig 25 Menu principal Ajouter une cam ra Fig 26 Ajouter une cam ra L cran peut tre coupl 4 cam ras au plus Suivre la proc dure suivante pour ajou ter une c...

Page 66: ...nner craser pour activer d sactiver l cran afin d craser les anciens enregistrements lorsque la m moire est puis e 6 4 1 Calendrier d enregistrement Fig 27 Calendrier d enregistrement Fig 28 Calendrie...

Page 67: ...s activ f Activer Alarme APP en faisant glisser le curseur il passe au vert une fois activ si vous voulez recevoir des alarmes sur votre appareil mobile Voir Section Para m trer l application mobile g...

Page 68: ...fi Pour restaurer votre syst me proc der comme suit a partir du menu principal S lectionner Gestion du syst me b S lectionner Configuration d usine c S lectionner Restauration simple ou Tout restaurer...

Page 69: ...b Connecter votre p riph rique mobile au m me r seau c T l charger l appli SW360 d Ouvrir l application s enregistrer en tant que nouvel utilisateur et suivre les ins tructions de l application e Se...

Page 70: ...n de conformit Le soussign Smartwares Europe d clare que l quipement radio lectrique du type CMS 30100 est conforme la directive 2014 53 UE Le texte complet de la d claration UE de conformit est dispo...

Page 71: ...canale Wi Fi se richiesto 77 6 Funzionamento del sistema 78 6 1 Riproduzione video 78 6 2 Configurazione del sistema 79 6 2 1 Lingua 79 6 2 2 Impostazione dell ora 79 6 2 3 Internet senza fili 80 6 2...

Page 72: ...liquidi infiammabili gas o polvere I prodotti alimentati elettricamente possono produrre scintille con il rischio di incendiare polvere o fu mi 2 Le avvertenze le precauzioni e le istruzioni descritte...

Page 73: ...1 Antenna 2 Indicatore LED 3 Ottica 4 Sensore giorno notte 5 Microfono 6 Altoparlante Monitor 1 Antenna 2 Touch screen 3 Microfono 4 LED batteria 5 LED registrazione 6 Slot USB 7 Slot microSD 8 Inter...

Page 74: ...te la batteria poi alimenta l unit Le batterie devono essere acquistate separatamente Tipo di batteria 18650 3 1 3 Inserire la scheda microSD non fornita Per registrare il video richiesta una scheda m...

Page 75: ...scatola di derivazione stagna 3 2 2 Cablaggio La videocamera wireless e richiede solo il collegamento elettrico Considerazioni sul cablaggio della videocamera Il collegamento dei cavi deve essere rea...

Page 76: ...fono della videocamera sia abilitato Vedere la sezione Abilitare l au dio della videocamera Muto Disattiva riattiva l audio degli altoparlanti del monitor Menu principale Accede al menu principale Zoo...

Page 77: ...ipale del monitor Selezionare Match code Aggiungi videocame ra e Selezionare Match code Aggiungi videocamera Da eseguire entro x minuti dal la reimpostazione della videocamera f Sulla videocamera Se i...

Page 78: ...n Record Setup Impo stazione registrazione Per visualizzare le registrazioni procedere come segue a Nel menu principale Selezionare Video Playback Riproduzione video b Selezionare la cartella della vi...

Page 79: ...azione dell ora La data e l ora possono essere impostate manualmente o sincronizzandosi via Internet a Nel menu principale Selezionare Sistema b Selezionare Time Setup Impostazione ora c Scegliere se...

Page 80: ...ireless g Digitare la password NOTA Sono supportate solo reti a 2 4 GHz h Scaricare l app SW360 i Aprire l app registrarsi come nuovo utente e seguirne le istruzioni 6 2 4 Canale wireless 16 Seleziona...

Page 81: ...pi possibile a Nel menu principale Selezionare Sistema b Selezionare Camera Audio Enable Abilitare l audio della videocamera c Selezionare la videocamera desiderata e spostare il cursore in posizione...

Page 82: ...saggio Start configuration mode Avvio modalit di configurazione NOTA Se non si sente il messaggio premere il pulsante di reimpostazione re set sulla videocamera per 6 secondi fino a quando viene emess...

Page 83: ...re Weekday Giorno della settimana h Selezionare dall elenco i giorni in cui si desidera registrare i Selezionare Time Orario e inserire l intervallo di tempo di cui si desidera regi strare Nota Type T...

Page 84: ...sul monitor Queste informazioni vengono utilizzate principalmente a supporto degli interventi di assistenza Per visua lizzare le Informazioni sul sistema procedere come segue a Nel menu principale Se...

Page 85: ...roSD Questa operazione sconsigliata e viene principal mente eseguita su esplicita richiesta del supporto tecnico 6 6 4 Aggiornamento IPC Il menu IPC Upgrade Aggiornamento IPC consente di aggiornare il...

Page 86: ...ne Internet senza fili b Collegare il dispositivo mobile alla stessa rete c Scaricare l app SW360 d Aprire l app registrarsi come nuovo utente e seguirne le istruzioni e Accedere all app f Selezionare...

Page 87: ...e di conformit Il fabbricante Smartwares Europe dichiara che il tipo di apparecchiatura radio CMS 30100 conforme alla direttiva 2014 53 UE Il testo completo della dichiarazione di conformit UE disponi...

Page 88: ...z kana Wi Fi je li jest wymagany 94 6 Dzia anie systemu 95 6 1 Odtwarzanie wideo 95 6 2 Ustawienia systemu 96 6 2 1 J zyk 96 6 2 2 Ustawienia czasu 96 6 2 3 Internet bezprzewodowy 97 6 2 4 Kana bezprz...

Page 89: ...ktronarz dzi w otoczeniu wybuchowym np takim w kt rym wyst puj atwopalne p yny gazy lub py y Elektronarz dzia wytwarzaj iskry kt re mo g spowodowa zap on py u lub opar w 2 Ostrze enia rodki zabezpiecz...

Page 90: ...wietlenie LED 3 Obiektyw 4 Czujnik dnia nocy 5 Mikrofon 6 G o nik Monitor 1 Antena 2 Ekran dotykowy 3 Mikrofon 4 Wska nik LED baterii 5 Wska nik LED nagrywania 6 Gniazdo USB 7 Gniazdo MicroSD 8 Prze c...

Page 91: ...zia a bezpo rednio na zasilaczu Akumulatory nale y naby osobno Rodzaj akumulatora 18650 3 1 3 W kart MicroSD nie jest do czona do zestawu Karta MicroSD jest wymagana do nagrywania wideo a Gniazdo kart...

Page 92: ...wodoszczelna puszka przy czeniowa 3 2 2 Okablowanie Kamera jest bezprzewodowa wymaga jedynie pod czenia zasilania elektrycznego Istotne kwestie zwi zane z okablowaniem kamery Pod czenia kabli musz by...

Page 93: ...si e mikrofon kamery jest w czony patrz sekcja W czanie d wi ku kamery Wyciszenie Wybierz aby wyciszy pog o ni g o niki monitora Menu g wne Wybierz aby wej do menu g wnego Przybli enie Wybierz aby pr...

Page 94: ...amera Dodaj kamer e Wybierz Add Camera Dodaj kamer Nale y to wykona w ci gu x minut po zresetowaniu kamery f Na kamerze Je li powy sze kroki zostan przeprowadzone poprawnie us yszysz komunikat Wireles...

Page 95: ...nie wideo w zale no ci od ustawie w pozycji Record Se tup Ustawienia nagrywania Aby przegl da nagrania wykonaj poni sze kroki a W menu g wnym Wybierz Video Playback Odtwarzanie wideo b Wybierz folder...

Page 96: ...zasu Dat i czas mo na ustawi r cznie lub synchronizuj c je z Internetem a W menu g wnym Wybierz System Setup Ustawienia systemu b Wybierz Time Setup Ustawienia czasu c Wybierz czy synchronizowa czas a...

Page 97: ...bierz sw j router bezprzewodowy g Wpisz swoje has o UWAGA Obs ugiwane s tylko sieci Wi Fi 2 4 GHz h Pobierz aplikacj SW360 i Otw rz aplikacj zarejestruj si jako nowy u ytkownik i post puj zgodnie z in...

Page 98: ...System Setup Ustawienia systemu b Wybierz Camera Audio Enable W cz d wi k kamery c Wybierz dan kamer i przesu suwak do po o enia on w lub off wy 6 2 6 Ustawienie g o no ci 21 Ustawienie g o no ci 22 R...

Page 99: ...t Start configuration mode Pocz tek trybu konfiguracji UWAGA Je li nie s yszysz komunikatu naci nij i przytrzymaj przycisk reset na kamerze przez 6 sekund a us yszysz Restore factory setting Przywraca...

Page 100: ...rywa i Wybierz Time Czas i wstaw ram czasow w kt rej chcesz nagrywa Uwaga Type Typ ma tylko jedn opcj Enable motion alarm W cz alarm ruchu kt ra jest domy lnie w czona 6 5 Ustawienie alarmu 30 Kana y...

Page 101: ...gdy konieczna jest pomoc techniczna Aby wy wietli informacje o systemie wykonaj poni sze kroki a W menu g wnym Wybierz System Manage Zarz dzanie systemem b Wybierz System Info Informacje o systemie 6...

Page 102: ...rzy u yciu karty MicroSD Nie jest to zalecane g wnie u y wa si tej funkcji gdy zaleci to dzia pomocy technicznej 6 6 4 Aktualizacja IPC Menu IPC Upgrade Aktualizacja IPC umo liwia u ytkownikowi aktual...

Page 103: ...Patrz sekcja Internet bezprzewodowy b Pod cz urz dzenie przeno ne do tej samej sieci c Pobierz aplikacj SW360 d Otw rz aplikacj zarejestruj si jako nowy u ytkownik i post puj zgodnie z instruk cjami w...

Page 104: ...Deklaracja zgodno ci Smartwares Europe niniejszym o wiadcza e typ urz dzenia radiowego CMS 30100 jest zgodny z dyrektyw 2014 53 UE Pe ny tekst deklaracji zgodno ci UE jest dost pny pod nast puj cym ad...

Page 105: ...CMS 30100_IM 105...

Page 106: ...106 CMS 30100_IM...

Page 107: ...CMS 30100_IM 107...

Page 108: ......

Reviews: