background image

SMART Board User’s Guide

31

5

Press the Commit button to transfer the text in the Editing Area to the open
application at the cursor insertion point.

or

If you prefer to have the converted text


automatically


transferred into the active

application at the cursor insertion point, press the Edit button. Or press on the
Typewriter icon on the left edge of the title bar and select 

Direct Mode

.

The Editing Area will roll up, and SMART Board software will insert the text into the
active application as you complete your handwriting. To make the Editing Area re-
appear, press the Edit button again.

Editing Converted Handwriting

Sometimes, when SMART Board software attempts to convert your handwriting, you may
see the occasional question mark appearing where you expect to see a letter, number or
punctuation mark. This occurs if the program is unsure of precisely what your handwriting
indicates. Other anomalies may also result from the conversion process. For example, extra
or insufficient spaces or an erroneous conversion may appear in the Editing Area. In any of
these instances, you’ll want to edit the converted text before committing it into the active
application. Or, you may simply want to change the text after you’ve written it, adding or
removing extra words.

These tasks are easily accomplished in the Editing Area. You can position the cursor where
you want to make a change, replace any highlighted item with a handwritten substitute,
change the text case, and add extra or delete excess text or spaces.

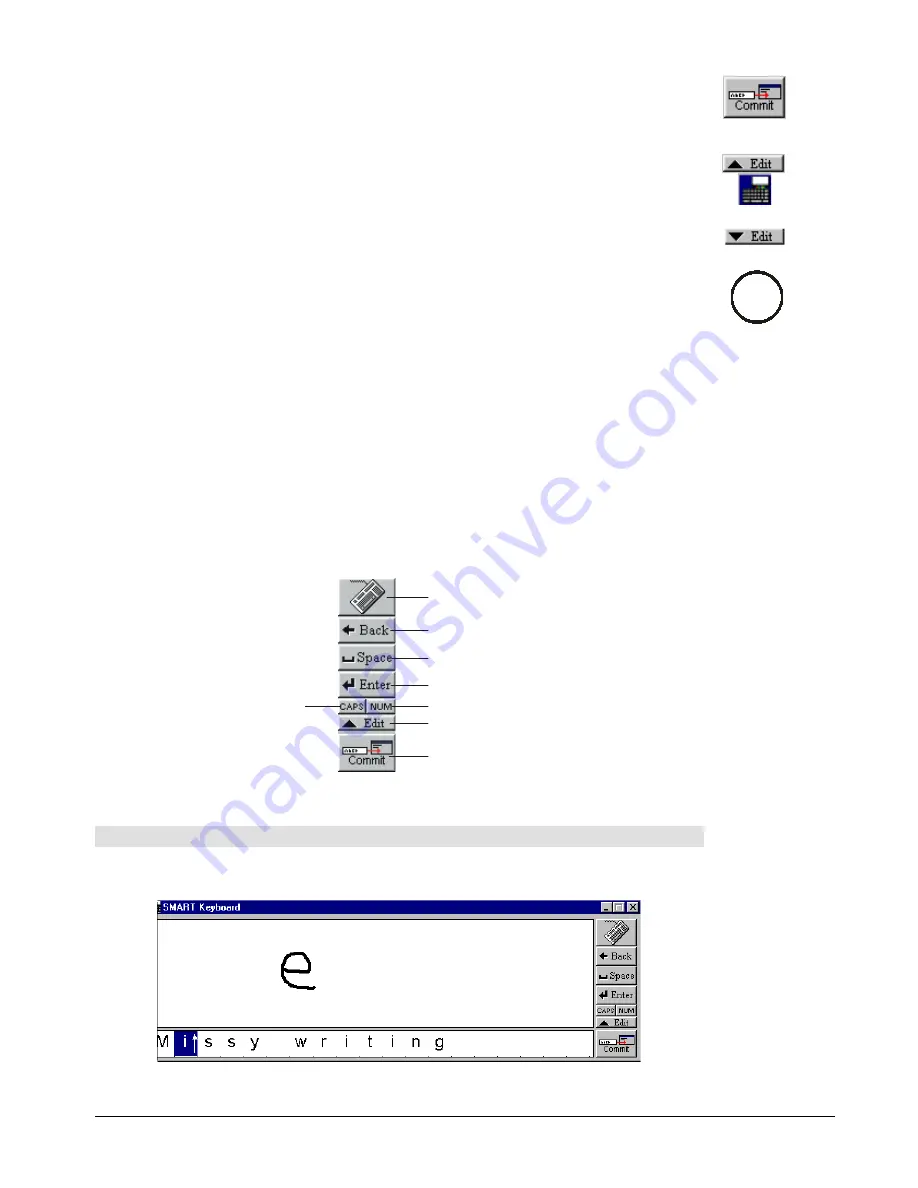
The Edit toolbar, located on the right side of the Handwriting Recognition window, helps you
perform these and many other tasks.

Edit Toolbar

To change text:

1

Press on the item(s) you want to change in the Editing Area.

The item(s) will appear highlighted.

Win

Return to Keyboard

Backspace

Insert a Space

Carriage Return
Number Recognition
Roll-up/Roll-down Edit Box

Commit to Application

All Caps

Summary of Contents for Smart Board

Page 1: ...User s Guide for Microsoft Windows 95 98 2000 ME XP Windows NT 4 0 and Mac OS 8 5 through Mac OS X ...

Page 2: ...echnologies Inc Microsoft NetMeeting and PowerPoint are either registered trademarks or trademarks of Microsoft Corporation in the U S and or other countries Macintosh Mac OS and QuickTime are trademarks of Apple Computer Inc registered in the U S and other countries CalliGrapher is either a registered trademark or a trademark of Microsoft Corporation in the U S and other countries CalliGrapher 6 ...

Page 3: ...kage it using the original packaging If the original packaging is no longer available pack all components with as much padding as reasonably possible to ensure that they are not exposed to excessive vibration or shock 3 Avoid setting up and using the interactive whiteboard in an area with excessive levels of dust humidity and cigarette smoke 4 Avoid leaving cables on the floor where they can be tr...

Page 4: ... contains solvents that work to remove permanent ink Do not use low odor or non scented dry erase markers as these markers do not contain appropriate solvents If any trace of the original permanent ink remains spray the area with standard glass or whiteboard cleaner and wipe clean Preventing Damage to the Writing Surface While the SMART Board interactive whiteboard is very durable sharp writing in...

Page 5: ...board To quickly find the connection procedure that meets your needs refer to the table below NOTE The information provided in this section applies to the SMART Board 500 front projection interactive whiteboard series If you have a Rear Projection SMART Board unit or a SMART Board for Plasma Displays model refer to the installation manual that came with your product for complete set up instruction...

Page 6: ... plug socket on the back of the long DB9 connector PC Serial Connections NOTE If you re connecting to a laptop computer you ll need to connect an external power supply rather than a keyboard adapter to the long DB9 connector This external power supply must have the characteristics described on page ix end of step 3 9 pin Serial Port Underneath Board Short DB9 Connector Serial Port Keyboard Port Po...

Page 7: ...oftware SMART Board Tools With SMART Board tools started you can now write over top of any application with a Pen Tray stylus 8 Press the SMART Board icon in the system tray and select Orient to perform a brief procedure that orients the computer image on the interactive whiteboard ensuring that SMART Board software accurately tracks your touch see page 9 for more information Manually Configuring ...

Page 8: ...ropriate USB driver installed on your system the Ready Light on the Pen Tray will turn red and you can proceed to install SMART Board software step 4 on the next page If you don t have the appropriate driver installed a Found New Hardware wizard will appear to assist you in locating the driver for the newly connected USB Human Interface Device the interactive whiteboard Direct the Windows operatin...

Page 9: ... to more accurately map the location of each interactive whiteboard contact see page 9 for more information Macintosh Computer USB Adapter Cable Setup 1 Connect the DB9 end of the optional USB adapter cable to the 9 pin serial port underneath the interactive whiteboard see the figure at the top of page iv 2 Connect the USB connector at the other end of this cable to the USB port on your computer s...

Page 10: ... Attach the supplied Macintosh serial adapter to the long DB9 end of the supplied serial cable and insert the barrel shaped end of the adapter into the modem or printer port on your Macintosh computer Mac Macintosh Serial Adapter Long DB9 Connecter Power Plug Socket Supplied Serial Cable Modem or Printer Port 9 pin Serial Port Underneath Board Short DB9 Connector ...

Page 11: ...enter post 5 5 mm outer diameter negative outer barrel 6V DC to 12V DC output minimum 200 mA output 4 Turn on your Macintosh computer NOTE The Ready Light on the Pen Tray will turn red when you turn on your Macintosh computer This indicates it s receiving power from your keyboard port or external power supply 5 Insert the SMART Board software CD into your CD ROM drive The CD will automatically lau...

Page 12: ...t and press the OK button or If you re unsure of the correct port press the Auto Detect button to initiate hardware detection Your ports will be searched for the presence of an attached interactive whiteboard until the correct port is located The Ready Light in the Pen Tray will change from red to green indicating the SMART Board interactive whiteboard is now touch sensitive 9 Press the Orient but...

Page 13: ...e an on screen keyboard to enter text right at the interactive whiteboard surface without using a conventional physical keyboard Use the handwriting recognition feature to convert your handwritten text into typewritten text Windows operating system only Import information from almost any electronic source into SMART Notebook software Use touch shortcuts to breeze through your PowerPoint software p...

Page 14: ...u ve mounted the SMART Board unit to a wall or to a floor stand and installed SMART Board software as described in the SMART Board interactive whiteboard setup instructions This manual is for users of both Windows and Mac OS operating systems Almost all of the procedures and descriptions apply to all systems However any information that relates solely to the Mac OS 8 5 through 9 x operating system...

Page 15: ...ly 15 Getting to Know Your SMART Pen Tray 16 Writing Capturing and Erasing 17 Writing with Pen Tray Styluses over Applications 17 Reconfiguring the Pen Tray Tools 18 Using the Floating Tools 20 Reconfiguring the Floating Tools 21 Saving Pen Tray and Floating Tools Settings as User Profiles 23 Capturing What You Write 23 Erasing What You ve Written 24 Using the Smooth Ink Setting 26 Using the SMART...

Page 16: ...port Methods for Windows Users 64 Capturing Pen Tray Annotations 64 Capturing All or Part of a Screen 65 Capturing Entire Files with Print Capture 66 Importing Scanned Pictures 67 Importing Graphic Files and ClipArt 67 Cutting Copying and Pasting 67 Dragging and Dropping via the Task Bar 68 Import Methods for Macintosh Computer Users 68 Capturing All or Part of a Screen 68 Importing Graphic Files ...

Page 17: ...lide Show Display 84 Customer Support 84 Contacting SMART Technical Support 85 Other SMART Contacts 85 Product Warranty 85 Appendix A Using an Interactive Whiteboard without a Projector 86 Setting Up the SMART Pen Tray for Non Projected Use 86 Configuring SMART Board software for Non Projected Use 86 Capturing Your Notes 87 Appendix B Floating Tools Options For Windows Users 88 Appendix C Using Mu...

Page 18: ...Contents ...

Page 19: ...T Board Tools The remaining program components of SMART Board software the SMART Board tools provide all the functionality of the SMART Board interactive whiteboard beyond basic touch control and Pen Tray button use Specifically the SMART Board tools provide you with annotation and tool configuration capabilities You can access the SMART Board tools by pressing on the SMART Board icon that resides...

Page 20: ...ftware Use SMART Notebook software to create organize save and print notes from your workstation or a SMART Board interactive whiteboard Notebook software includes many object creation tools for creating a variety of annotations within your Notebook files and you can also import graphics text and clip art from any other application into Notebook software Tip Windows Only To save time when you prep...

Page 21: ...ook file You can save the captured annotations as a Notebook file a PDF file a series of image files or an HTML file Windows only SMART Recorder Windows Operating System Only With SMART Recorder you can record everything you do on a SMART Board interactive whiteboard no matter which applications you re using You can then play the recording using Windows Media Player a free video player on any comp...

Page 22: ...If you re a Windows operating system user who prefers not to type you can press the Write button on the keyboard and then write in the Handwriting Recognition window with your finger or a stylus You don t need to alter your handwriting so the software can recognize it or perform any handwriting training procedures The SMART Keyboard will recognize and convert your handwriting into typewritten text...

Page 23: ...ected or non projected mode run a status log for diagnostic purposes and if you re a Windows operating system user access the SMART Board software Diagnostics program to test any connected SMART Board interactive whiteboards access advanced settings configure and perform an orientation for multiple SMART Board interactive whiteboard operation Windows operating system only In the Pen Tray tab you c...

Page 24: ...keep no record whatsoever NOTE Check the release notes for the version numbers supported for each application Macintosh users have access to one third party board aware program Microsoft PowerPoint software for Macintosh computers The unique touch shortcuts annotation capture and printing capabilities available when running PowerPoint software on a Macintosh connected SMART Board interactive white...

Page 25: ...annotations into Notebook software by using the capture buttons available on the Floating Tools palette or the Save Print toolbar which appears whenever you pick up a Pen Tray stylus NOTE In non aware applications you can t insert your annotations directly into the application as freehand notes or graphics Accessing and Exiting the SMART Board Tools Windows Operating System During the SMART Board ...

Page 26: ...and the full SMART Board tools will reappear Accessing and Exiting the SMART Board Tools Macintosh Computer To access the SMART Board tools with the Mac OS 8 5 through 9 x operating system Press on the SMART Board icon in the menu bar The SMART Board tools menu will appear To access SMART Board tools with the Mac OS X operating system Press on the SMART Board icon in the Dock The SMART Board tools...

Page 27: ...sponse to your touch the SMART Board driver needs to know exactly where the projected image from your computer is located on the interactive whiteboard You provide the SMART Board driver with this information when you perform an orientation procedure a very simple process of touching firmly and precisely on a grid of red crosses Although a default orientation is automatically assigned to your inte...

Page 28: ...ientation involves pressing on 80 individual crosses While the Fine setting is the most time consuming to complete it is recommended for higher resolution systems that may require a more precise orientation To orient the board with extreme precision 1 Press the SMART Board icon and select Control Panel 2 In the Boards tab press the Advanced button For Mac OS X computers the Edit Advanced Settings ...

Page 29: ...h It s very important that computer and projector resolutions correspond exactly If they don t match the on screen image will not properly fill the interactive whiteboard screen or may suffer from distortion or shimmering First ensure that the projector is set to its optimal image resolution Refer to your projector s manual for the true resolution of your projector and reset it if necessary While ...

Page 30: ...driver Non Projected Whiteboard Mode may have been accidentally selected in the Control Panel To ensure the SMART Board driver is correctly configured open the SMART Board tools select Control Panel and make sure Projected Mouse Mode is selected for the active COM port Adjusting the Projected Laptop Image If the Laptop Image Fails to Appear or is Distorted If you re unable to see an image from a p...

Page 31: ...en Display Controller With an On Screen Display Controller installed you ll never need to hunt for an elusive remote control again The On Screen Display Controller offers you the convenience of controlling your projector or PDP right at the SMART Board or overlay surface And unlike your remote control the on screen controller is no further away than a finger press on the On Screen Display Controll...

Page 32: ...P to an available COM port on your computer 2 Press the SMART Board icon in the system tray and select Control Panel The SMART Board Control Panel will appear 3 Press the Advanced button and select On Screen Controller Settings The Display Controllers tab of the SMART Board Control Panel will appear 4 Click the Add button The Display Controller Wizard will appear 5 Click the Next button 6 Select t...

Page 33: ...ctor s computer control connection to an available COM port on your computer You may have already made this serial connection between the projector and computer to activate an On Screen Display Controls see page 14 2 Press the Start button select Settings Control Panel 3 Double press on Display The Display Properties dialog box will appear 4 Press the Screen Saver tab 5 Select SMART Bulb Saver fro...

Page 34: ... changing any or all of these styluses to highlighters assigning any one of an array of colors to them or altering their width The size of the area erased with the Pen Tray eraser can also be easily changed Turn to page 18 for information on configuring the styluses and eraser Using the Pen Tray Buttons Press the top Pen Tray button to make the SMART on screen keyboard appear Press the bottom butt...

Page 35: ...you re writing in virtual electronic ink rather than physical ink To write in a different color place the stylus you first used back in its slot and select another Since the color recognition comes from the slots in the Pen Tray rather than the styluses themselves ensure that each stylus is returned to its proper slot the slot with the corresponding color when you finish using it WARNING If you to...

Page 36: ...ess the SMART Board icon and select Control Panel 2 Press on the Pen Tray tab 3 Press any of the large tool buttons The configuration area to the right of the buttons will alter to let you change the settings for the selected tool 4 To change the eraser settings Select Specify Size and scroll to set the number of pixels between 10 and 100 for the new eraser diameter NOTE 10 pixels is approximately...

Page 37: ...button next to the button you want to alter and select one of the available options NOTE If you re using an interactive whiteboard without a projector turn to Appendix A Using an Interactive Whiteboard without a Projector on page 86 for information on changing your Pen Tray button settings Button Setting Result Keyboard Opens the SMART On Screen Keyboard Right Mouse Windows and Mac OS X operating ...

Page 38: ...r presentations or a right mouse click Windows operating system only as well as for clearing annotations and restoring cleared annotations In Windows operating systems you can edit the Floating Tools to add a wide variety of options You can also create your own customized palette in the form of a user profile you can activate each time you use the interactive whiteboard To open and close the Float...

Page 39: ...s added to the Floating Tools whenever you write on a non board aware application Use it when you want to capture your annotations plus an image of the underlying application When you press this button SMART Notebook software automatically launches and the current annotations plus the application background are saved as separate objects in the current Notebook file NOTE The screen capture feature ...

Page 40: ... new location 4 To remove tools press and drag any of the tool buttons in the Editable Floating Toolbar to the trash can at the bottom of the tab 5 If you want to retain this configuration follow the procedure Saving Pen Tray and Floating Tools Settings as User Profiles on page 23 Otherwise your settings will be retained only until you log off or shut down your computer To reconfigure the Macintos...

Page 41: ...ew Profile dialog box will appear Your system logon name will appear as the default profile name 3 Accept the default profile name or type any name you prefer in its place 4 Press the OK button The new profile will appear as the currently selected user profile in the User Profiles text entry box 5 Press the OK button in the SMART Board Control Panel to begin using your new user profile To delete a...

Page 42: ...e newly captured image will then appear at the top of the current page in the Notebook file 3 Open SMART Notebook software to view your captured annotations In the Mac OS X operating system 1 Press the SMART Board Tools icon in the Dock 2 To capture a region select Screen Capture Capture Selected Area and press and drag across the screen area you want to capture into Notebook software To capture t...

Page 43: ...ea of the interactive whiteboard Circle and tap erasing method If you re running a Windows or Mac 8 5 9 x operating system encircle any area of the interactive whiteboard you want erased with an edge of the round Pen Tray eraser Then tap once inside that circle to erase all the annotations within it Once you ve removed the eraser from its Pen Tray slot any subsequent contact with the board has the...

Page 44: ... it determines an appropriate shading color somewhere between the color of the electronic ink and the color of the background it fills in the pixels at the edge of the electronic ink stream with this color resulting in a slight blurring around the edge of the electronic ink The extra processing required for this setting can slow down system performance slightly This will be more noticeable if your...

Page 45: ...SMART Board User s Guide 27 4 Press OK Press here for Smooth Ink ...

Page 46: ... SMART Keyboard Windows Operating Systems SMART Floating Keyboard Mac OS X Operating System If you re a Windows user who prefers not to type you can simply write in the SMART Keyboard s Handwriting Recognition window with a Pen Tray stylus or Floating Tools pen The on screen keyboard will recognize and convert your normal handwriting into typewritten text that can either be further edited before i...

Page 47: ...board for Windows operating system or SMART Keyboard for Mac operating systems The SMART Keyboard will appear SMART Keyboard Windows Operating System 2 Position the cursor insertion point where you want to enter text in the active application or dialog box 3 Press on the keyboard keys as you would normally type and the text will appear at the cursor insertion point TIP You can press and drag the k...

Page 48: ...ical keyboard for more accurate number recognition You must press the NUM key again when you return to writing letters To use handwriting recognition 1 Press the SMART Keyboard button in the Pen Tray or Press the SMART Board icon in the system tray and select Keyboard The SMART Keyboard will appear 2 Press the Write button in the upper row of buttons on the keyboard The Handwriting Recognition win...

Page 49: ...precisely what your handwriting indicates Other anomalies may also result from the conversion process For example extra or insufficient spaces or an erroneous conversion may appear in the Editing Area In any of these instances you ll want to edit the converted text before committing it into the active application Or you may simply want to change the text after you ve written it adding or removing ...

Page 50: ...ems 2 In the Writing Recognition Area enter the writing you want to add to the text in the Editing Area The recognized text will appear in the Editing Area To delete text in the Editing Area 1 Press on the text you want to delete TIP You can press and slide to highlight consecutive items 2 Press the Back button in the Edit toolbar The highlighted items will disappear To change lower to upper case ...

Page 51: ...r side of the Editing Area line Press on the left scroll button to scroll towards the beginning of the converted text press on the right scroll button to scroll towards the end of the converted text Entering Freehand Numbers If you re entering a long series of numbers it s a good idea to press the NUM button in the Edit toolbar to enhance number recognition While the on screen keyboard will normal...

Page 52: ...tions in a non aware program Just press and hold on the annotation for about three seconds The following shortcut menu appears Select the Insert your annotation here command and a converted text version of your annotation will appear at the cursor insertion point in the underlying application NOTE Remember that to insert text you need to use a prolonged press on the annotation rather than a tap If...

Page 53: ...harge from www windowsmedia com download As long as your computer meets the requirements for SMART Board software you can use SMART Recorder However for best performance we recommend you use a computer that meets the following requirements 400 MHz processor 64 MB RAM a sound card and a microphone recommended that are compatible with Windows operating systems To improve the quality of your recordin...

Page 54: ... For these options you must use the larger toolbar To exit SMART Recorder Press the Close button in the title bar of the large SMART Recorder toolbar The SMART Recorder toolbar will close and the SMART Recorder icon will no longer be display in the system tray Defining SMART Recorder Options The Options dialog box enables you to select default settings for sound and video quality video formats tar...

Page 55: ...y and select the directory and file folder you want We recommend that you use a local hard drive because network drives are slower and may hurt performance To change the file path under which temporary video processing files will be stored press the Browse button next to the Temporary Files Directory and select the directory and folder you want We recommend that you store temporary files in the sa...

Page 56: ... disk space and then press the Record button to resume recording 3 To end the recording press the Stop button The Save As dialog box will appear 4 Use the default directory or select a new one from the Save in drop down list 5 Use the File name already assigned or type a new one By default the file will be assigned a name based on the date and time of the recording 6 Press the Save button A messag...

Page 57: ... Performance and Video Quality Follow these tips to improve system performance during recording Reduce your screen resolution and the colors setting on your display as explained below Smaller screens and fewer colors result in smaller files Select a local hard drive for the target files in the SMART Recorder options see page 37 Network drives are slower and hurt performance Disable hardware accele...

Page 58: ... likely to get when using SMART Recorder 5 Drag the slider in the Screen Area or Screen Resolution to a lower setting than the one currently selected 6 Press the Apply button and then press the OK button To disable hardware acceleration 1 Press the Start button and select Settings Control Panel The Windows Control Panel will appear 2 Double press on Display The Display Properties dialog box will a...

Page 59: ...g system you can t use SMART Video Player to view the output from video hardware System Requirements Windows Operating Systems Intel Pentium III brand 800 MHz or higher processor recommended 128 MB RAM recommended 200 MB of free hard disk space recommended DirectX 8 0a or higher application programming interface support Windows Media Player Windows 95 98 2000 ME or XP operating system SMART Video ...

Page 60: ...ect the Fade Out Annotations check box Then select the amount of time that should pass before the ink begins to fade and the amount of time it will take for the annotations to disappear entirely 4 To automatically remove the toolbar that appears in Full Screen mode after a set period of time select the Remove Toolbar in Full Screen Mode check box Then select the amount of time that should pass bef...

Page 61: ...system A frame rate of 15 frames per second is adequate under most circumstances 4 Select the output size from the Output Size drop down list 5 Press OK To use on screen TV tuner controls From the Options menu select TV Settings The TV Settings Properties dialog box will appear enabling you to select a TV channel video standard and other settings related to your TV or VCR To play and freeze the ou...

Page 62: ...ed video file will begin playing in the SMART Video Player window To play and pause a video file To play a video file open the file and it will start playing automatically To pause a video press the Pause button To resume playing the video press the Play button Follow these tips when using video files 1 If you re using a slower computer system we recommend that you pause the video before annotatin...

Page 63: ...ware If you write over a video and then decide to remove your annotations press the Clear button This button alternates between the Clear and Restore functions After you ve cleared an annotation the button changes to Restore Press it again to restore the last annotation or a group of annotations press the Restore button Capturing Annotations Made over QuickTime 6 0 Video in the Mac OS X Operating ...

Page 64: ...ebook software will automatically launch when you use any of the screen capture tools available in either the Windows or Macintosh version of SMART Board tools However you may also want to open Notebook software to prepare a presentation before a meeting or to write notes during the course of a meeting If you are using Notebook software on a computer that s not connected to SMART equipment such as...

Page 65: ...and then individually select and modify move delete or resize each object 5 You can convert what you ve written by hand into typed text by selecting the object and pressing on the letter A that appears in the upper right corner of the selection box To highlight an object 1 Select Highlighter from the Draw menu or Press the Highlighter button in the toolbar When moved over the workspace the cursor ...

Page 66: ...ry so it remains within the width you established You can resize a text box after you ve created it but the text inside will remain the same size NOTE If you enter a URL the text will automatically be changed to blue and will function as a hyperlink To create a text object 1 If you re a Windows user simply begin typing Your text will appear enclosed by a text box or Press the Text button in the to...

Page 67: ... the Format menu Then select one of the 48 colors from the color palette Checking Your Typing for Spelling Errors If you re using a Windows operating system the Check Spelling feature in Notebook software will examine each word in all the pages of the current Notebook file alert you to any words that are repeated or misspelled and offer suggestions for change To activate and use the Check Spelling...

Page 68: ...ttributes changed deleted or erased undone and or redone with the Undo and Redo commands Selecting Objects In order to move or edit an object you must first select that object When an object is selected a dotted line selection rectangle and eight resize handles four handles if the object is small appear in a rectangular formation around the object The various methods for selecting one or more obje...

Page 69: ...hem on top of one another For information on rearranging the objects you ve stacked see Rearranging Stacked Objects on page 53 To move a single object or several objects 1 Select the object s to be moved as described in the previous procedure 2 Press hold and drag to any other position on the page or onto a thumbnail page in the Side Sorter If you select several objects moving any one of them will...

Page 70: ...group Select Ungroup from the Draw menu NOTE The object grouping disappears and the collection is broken into its original object components now appearing as individually selected objects Automatic Object Grouping SMART Grouping automatically places objects created within the same area in the same object group If the created group isn t to your liking you can subsequently rearrange automatically g...

Page 71: ...nal height to width ratio of a geometric object press the Shift key and drag one of the four diagonal resize handles located in each corner of the selection rectangle as shown in the figure below NOTE You can change the size of a text box but the contents will remain unaltered Contracting or enlarging a text box will only change the dimensions of the box and the way in which the text wraps within ...

Page 72: ...rase these objects You can configure one of the Pen Tray buttons to function as a Clear Page button deleting all annotations from the page at once You can also delete the last object created or undo the last action performed on the current page with either the Undo command in the Edit menu or the Undo toolbar button See Undoing Your Mistakes on page 55 To erase freehand annotations with the Pen Tr...

Page 73: ...ly change your mind you can easily reverse undo the effect of the last command invoked or action committed In fact you can reverse many previous actions by repeatedly selecting Undo Once you ve undone a previously issued command or object you can also change your mind again and reinstate redo the original object The Undo command in the Edit menu changes to show the most recent command or action af...

Page 74: ...files onto a Web server Save a Notebook file as a PDF file to allow others to view the file using Adobe Acrobat Reader Save your file as a template so you can insert specific pages from the template file into other Notebook files Save a Notebook file in a format that people using Mac OS X or UNIX operating systems can access This section shows you how to save your Notebook files in all the formats...

Page 75: ...ons of SMART Notebook software by selecting SMART Notebook 1 0 or SMART Notebook 1 1 selection in the Save as type drop down list Users of Windows operating systems can also save the file as a NetMeeting Whiteboard file by selecting NetMeeting 2 0 Whiteboard 256 colors in the Save as type drop down list Or you can save the Notebook file in xbk extension which saves the file in a format readable by...

Page 76: ...le folder avoid using spaces or special characters such as 6 Press the Next button 7 Specify the page image resolution for the HTML files then press the Finish button NOTE If you ve selected Publish Files to Web Server the Microsoft Web Publishing Wizard will appear to assist you with the process of publishing the HTML files to a Web server 8 To view the HTML file you ve just created go to the dir...

Page 77: ... authoring component upgrade called the Microsoft Web Publishing Wizard and of course Internet access The Web Publishing Wizard itself provides all the online assistance you ll need to publish your Notebook file on a server To download the Microsoft Web Publishing Wizard 1 Open Microsoft Internet Explorer 2 For Internet Explorer 4 0 select Product Updates from the Help menu For Internet Explorer 5...

Page 78: ...ges 1 Select Print from the File menu or Press the Print toolbar button The Print dialog box will appear 2 To specify a printer other than the default select a printer from the Name drop down list 3 To view or alter the properties for any selected printers press the Properties button 4 To print the entire Notebook file select All in the page range group or To print a range of pages select Pages in...

Page 79: ...end Mail from the File menu If you haven t yet named and saved the Notebook file a Save As dialog box will appear 2 Type a file name and select a directory 3 Click the Save button A New Message window will appear with the current Notebook file in the message body 4 Enter the name of the intended recipient in the To text box or Click the To button and select the recipient s name from the Address Bo...

Page 80: ...e a place to store boilerplate symbols and notes reducing the amount of work necessary to set up new documents You can easily add pages with commonly used symbols and notes into your new file If you re a Windows operating system user you can preserve your commonly used page layouts by saving any Notebook file as a template file see page 58 You can then open this template file select a template pag...

Page 81: ... insert the selected template page onto a new page of your current file 5 Press the Close button to close the Templates dialog box NOTE Now that you ve selected a template you can use the Current Template option from either the Insert menu or the menu that appears after you press the Template button Select Current Template and Notebook software automatically inserts a new page containing the templ...

Page 82: ...es directly into a Notebook file with the Print Capture function import a scanned picture directly into a Notebook file import graphics and clip art directly into a Notebook file cut or copy either text or graphics to the clipboard and then paste the contents into a Notebook file drag and drop text or graphics from other Windows applications via the Windows Task Bar into a Notebook file Capturing ...

Page 83: ...en appear at the top of the current Notebook page Press on the camera icon in the Screen Capture title bar for a full range of commands Move Minimize Close Small View to reduce the size of the Screen Capture toolbar Save Pictures to New Page and About Screen Capture To activate the Screen Capture toolbar 1 Select Launch Screen Capture from the View menu of Notebook software or Press the Launch Scr...

Page 84: ...ages of the imported file can be immediately viewed one printed page per page of the current Notebook file During Notebook software installation a print driver called the SMART Notebook Print Capture driver will be installed on your system This print driver functions like any other printer except that its output is captured in a Notebook file rather than on paper You can configure the SMART Notebo...

Page 85: ...ere on the current page or onto a thumbnail page in the Side Sorter Notebook supports graphics in the bmp jpg pcx tga tif png and lzw image formats as well as Windows Metafiles wmf and Enhanced Metafiles emf clip art To import graphic files or clip art 1 Select Picture from File or Clip Art from the Insert menu The Open dialog box will appear 2 Under Look In select the directory in which the image...

Page 86: ...rt Methods for Macintosh Computer Users Notebook software provides Macintosh computer users with a variety of import methods Your choice of import method will largely depend on the kind of information you want to bring into the Notebook file In this section you will learn to capture entire screens using the Screen Capture feature capture regions of screens using the Screen Capture feature import g...

Page 87: ... capture into the Notebook file Notebook software automatically opens By default the captured image appears on a new page To have the image appear on the current page de select the Snapshot to New Page command in the Tools menu To capture the entire current screen Mac OS X operating system 1 Press and hold on the SMART Board Tools icon in the Dock A SMART Board Tools shortcut menu will appear 2 To...

Page 88: ...o the current Notebook file 4 Press the Open button The image file will be directly imported into the current Notebook file in the top left corner of the workspace Cutting Copying and Pasting An easy and familiar way to import objects and content into Notebook software is to cut or copy selected material from other sources and then paste it into a Notebook file To cut copy and paste into a Noteboo...

Page 89: ...d select another page and so on Finally select Print from the File menu or press the Print button in the toolbar insert new pages For Windows operating systems select Blank Page from the Insert menu or press the Blank Page button For Macintosh computers select New Page from the Insert menu You can add as many new pages as you like Select and move them to any other position in the current Notebook ...

Page 90: ...r The Side Sorter is a vertical strip containing thumbnail versions of all pages in the current Notebook file These thumbnail pages are automatically updated as the content of the pages change Side Sorter Windows Operating System Double press on any page to open that page in Normal view Press and drag on any page to move it to another location Select a page and then press this button to delete it ...

Page 91: ...mbnail page Windows operating system only To move annotation objects from one page to another select an object on the current page then press and drag it to any of the scrollable series of thumbnail pages in the Side Sorter Windows and Mac OS X operating systems only Roll up the Side Sorter to a minimized title bar Change the visible area of the current page Side Sorter view of target page Press h...

Page 92: ... menu scroll tool and title bars or in Full Screen view Full Screen view maximizes available workspace on the interactive whiteboard or computer screen filling the entire viewing area and neither the menus toolbar title bar scroll bars Task Bar nor status bar are visible To activate Full Screen view in a Windows operating system 1 Select Full Screen from the View menu or Press the Full Screen butt...

Page 93: ...h of the workspace while maintaining the original aspect ratio Resolution differences can be especially problematic when a presentation created on a system in one resolution is shown on a system with a different display resolution For example if a presentation is created on a system with a 1024 x 768 pixel display and then shown on a system with a lower resolution such as a 640 x 480 pixel display...

Page 94: ...entation Several options are available for moving forward or backward through a presentation in SMART Notebook software You can press the Next Page button on the Pen Tray To facilitate quick review of material you can also configure the other Pen Tray button to function as a Previous Page button For detailed instructions see Reconfiguring the Pen Tray Tools on page 18 press the Next Page or Previo...

Page 95: ...tension of board aware status to a third party application is done automatically In other words you don t need to activate anything but the third party application itself In a data conference the presenter can control the conferencing application and open meeting files by pressing on the SMART Board surface In addition notes written at any connected interactive whiteboard will also appear at all c...

Page 96: ...ext form or as freeform drawing object With Word or Excel and SMART Board tools running lift up a Pen Tray stylus The following Capture Save toolbar will appear Press Save Annotations button to save the annotation in its current form It will appear as a drawing object inside a frame which you can easily move elsewhere within the document or delete Each pen stroke will be inserted as a separate obj...

Page 97: ...re you share the application For instructions on disabling SMART Aware see page 79 SMART Board Tools If you have SMART Board software running when you connect to a NetMeeting data conference the following active applications will be shared automatically SMART Floating Tools including the screen pointer the Slide Show toolbar provided by SMART if PowerPoint software is also shared Using the Whitebo...

Page 98: ... much greater ease than normal You have the extra large canvas of the SMART Board surface to work on and the kind of artistic control that can only be achieved with a pen in your hand You ll also find that Aware offers the same advantages when you re running CorelDRAW or AutoCAD software Microsoft Paint software is just one of several graphics programs supported by SMART Aware Other board aware gr...

Page 99: ...RT Board tools are active Therefore online Help specific to the third party applications is available as a major topic in the SMART Board tools online Help If you choose to make the Aware window visible select the Aware tab in the Control Panel and then press the Show Active Aware Applications button you can also access online Help from the Aware window itself PowerPoint software is no longer a bo...

Page 100: ...Point software in Slide Show view on an interactive whiteboard you ll notice the following three button Slide Show toolbar Previous Page Next Page Menu of Commands Slide Show Toolbar The two arrow buttons allow you to navigate backward and forward through a PowerPoint presentation the middle button provides access to a menu of commands Alternatively you can use the navigational touch shortcuts des...

Page 101: ...o PowerPoint The annotation will become part of the PowerPoint slide and be saved with the ppt file NOTE This selection is inactive if you are using the read only PowerPoint Viewer To automatically save annotations into PowerPoint software with slide advance 1 Press the menu button in the Slide Show toolbar 2 Select Settings Auto Save Annotations on Slide Advance All annotations written on the int...

Page 102: ...t Menu from the command menu to do such things as quit Slide Show mode access the Meeting Minder or Slide Meter and navigate This menu is only available while there are no annotations on the slide Once you ve written over a slide you won t be able to access this menu without clearing your annotations NOTE The PowerPoint Menu option will always be inactive if you clear the Pop up menu on right mous...

Page 103: ...and SMART Board for Plasma Displays models are covered by a one year limited equipment warranty If you need to return defective merchandise call SMART Technical Support to receive the appropriate Return of Merchandise Authorization as well as shipping instructions so that the interactive whiteboard can be sent to an authorized service center Warranty Shipping Charges Shipping charges incurred from...

Page 104: ...notes The bottom button is the Print button which sends your current page of notes to the default printer Configuring SMART Board Software for Non Projected Use If you re using an interactive whiteboard without a projector you should ensure that the Control Panel in the SMART Board tools has been set for non projected whiteboard use Otherwise when you write anywhere outside a board aware applicati...

Page 105: ...ook file before you erase them and write any more Press the top New Page button in the Pen Tray or the Insert Blank Page button in Notebook software Your notes are captured in the current page and a new page is simultaneously opened to be filled with fresh notes Don t forget to save the Notebook file when you finish When you press the New Page button in the Pen Tray you can erase the board confide...

Page 106: ... and drag to create squares and rectangles Draw Line Activates a drawing tool you can press and drag to create lines Draw Circle Activates a drawing tool you can press and drag to create circles and ellipses Clear Restore Annotations This tool toggles between two states When annotations are on the board the button is in the Clear Annotations state As soon as the annotations are deleted the button ...

Page 107: ...nter in the shape of a large arrow Alt Key Produces the equivalent of an Alt key press on an attached keyboard Control Key Produces the equivalent of a Ctrl key press on an attached keyboard Keyboard shift Produces the equivalent of a keyboard shift press on an attached keyboard Launch Keyboard Opens the SMART Keyboard for on screen typing Launch Notebook Software Opens SMART Notebook software ...

Page 108: ... board Now press a finger of your other hand on the adjacent board Release your finger from the first board and that object will disappear from the first board and reappear beneath your finger on the second board You have the option of displaying either a split window or different application windows from one computer desktop on multiple boards option 1 below displaying identical computer desktops...

Page 109: ...parate video card for each board or a single card that splits one video signal into multiple signals Option 2 Displaying Identical Computer Desktops on Multiple Interactive Whiteboards It s particularly useful to display the same desktop on multiple boards when you re delivering a presentation in a large lecture hall or meeting room By using multiple boards you can display the same information at ...

Page 110: ...aning the SMART Board ii Clear Annotations 27 Clearing and Restoring PowerPoint Annotations 84 Clip Art Importing into Notebook Windows 67 Configuring the SMART Board For Use with a Projector 13 For Use Without a Projector 86 Serial Port on Connected Computer v Connecting a SMART Board Macintosh Serial Cable viii x Macintosh USB Adapter Cable vii Windows Serial Cable iii vi Windows USB Adapter Cab...

Page 111: ...in Macintosh Cut Copy and Paste 69 Graphic Files 69 Screen Captures 68 Importing Information in Windows Cut Copy and Paste 67 Dragging and Dropping via the Task Bar 68 Files from Other Applications 66 Pictures from Files or Clip Art 67 Scanned Pictures 67 Screen Captures 64 66 Inserting Templates 62 Intel ProShare 77 Internet Publishing Notebook Files 59 J JPEG File Format 57 K Keystoning Problems...

Page 112: ...lb Saver 16 On Screen Keyboard 30 Deleting Text 33 Editing Converted Handwriting 32 Entering Freehand Numbers 34 Handwriting Recognition 30 Orientation Levels 11 Orienting a SMART Board 10 11 P Page Setup 60 Page Sorter View 71 Activating Page Sorter View 72 PC Paintbrush File Format 57 PDF Format 58 59 Pen Tray Buttons 17 Changing Button Settings 20 Changing Color and Size of Styluses 19 Changing...

Page 113: ... SMART Board Software Configuring for Use with Projector 13 Configuring for Use without a Projector 86 Macintosh 9 SMART Board Control Panel 5 SMART Board Service 1 Windows 7 9 SMART Bulb Saver 16 SMART Grouping 52 SMART Notebook 2 Capture PowerPoint Annotations 83 Capturing Annotations Macintosh 68 Capturing Annotations Windows 64 66 Capturing Notes on a Non Projected Board 87 Importing Clip Art ...

Page 114: ...ebook 71 73 Sound Quality 38 Support Customer 85 T Targa File Format 57 Template Files 59 Templates 62 TIFF File Format 57 Tool Settings Saving as a User Profile 24 Toolbar Tools Bold Tool 49 Drawing Tools 47 Highlighter Tool 47 Italic Tool 49 Pen Tool 47 Text Tool 48 Typing into SMART Notebook Software 48 U Undoing Your Mistakes 55 Ungrouping Objects 51 UNIX Format 59 Unresponsive Board 13 USB Ad...

Page 115: ...Avenue SW Calgary AB CANADA T2R 1K9 Support 1 866 518 6791 Canada U S or 1 403 228 5940 in all other countries Main Switchboard 1 888 42 SMART Canada U S or 1 403 245 0333 in all other countries Fax 24 hours 1 403 245 0366 support smarttech com www smarttech com ...

Reviews: