Slick MP550-4 User Manual Download Page 5

Charging the Battery

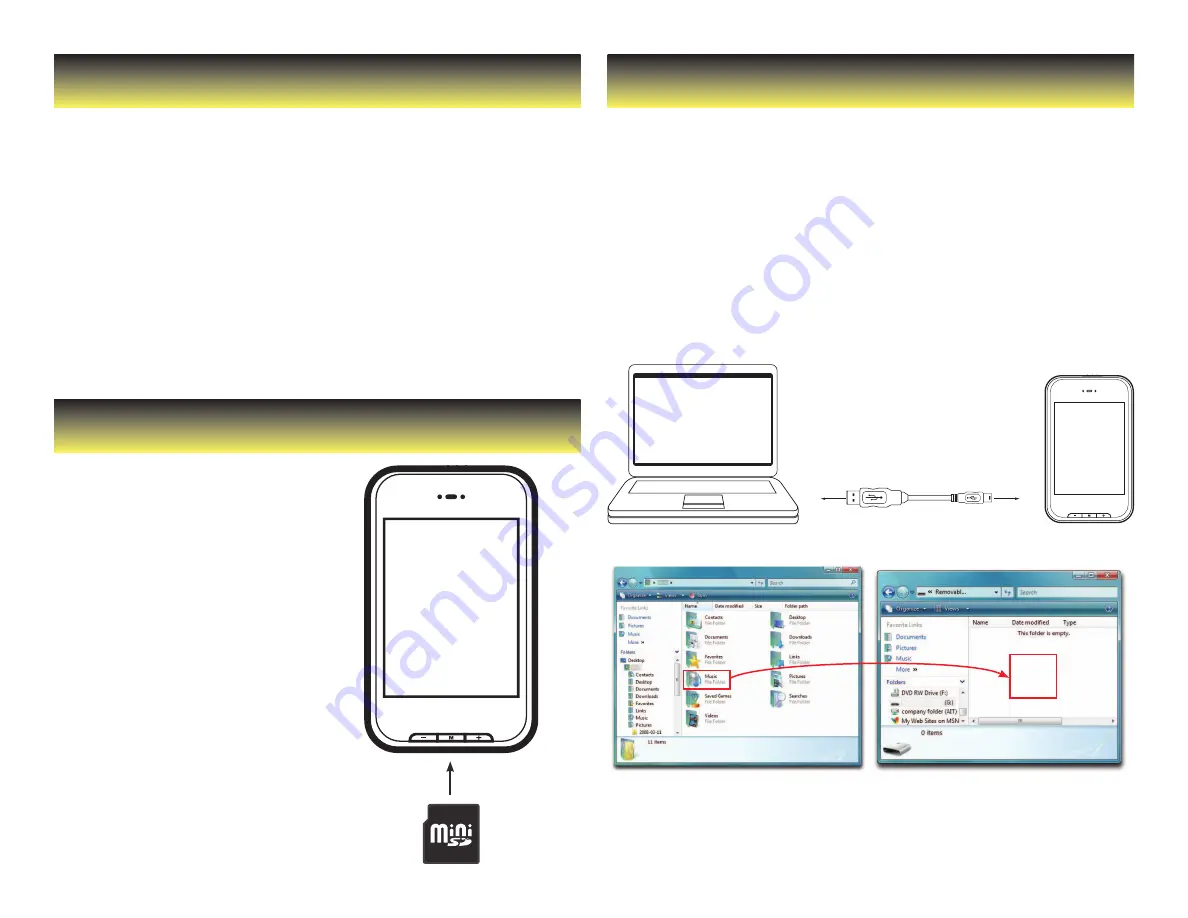
Transferring Media to the Player

Mini SD Card

Your MP3 Player has an integrated rechargeable Li-ion battery. It is 

recommended to fully charge the player before using it for the first time.

Recharge the battery by connecting the player to a 

computer using the included USB 2.0 cable.

Charging time is between 3-5 hours, depending if the player is powered off 

or working. To keep the battery in good condition, we recommend not

charging it for more than 8 hours.

Important:

• 

Fully charge the player before using it for the first time

• 

Charge the player immediately when the “Low Battery” message is displayed

• 

Do not overcharge or completely drain the battery. Overcharing 

or completely draining the battery will shorten battery life.

• 

The battery can be drained if the player is not used for a  long time. 

To avoid draining the battery, fully charge the player every three 

months, and always keep the battery charge above 50%.

The player supports Mini SD cards, 

which allow you to add up to 8 GB of 

additional memory to your MP3 Player.

To insert the (not included) Mini 

SD card:

1.  Insert the Mini SD card into the 

card slot at the bottom of your 

player, with the with the metal 

contacts facing towards the back 

of the player, and gently push 

it in until it clicks. Do not apply 

excessive force, as this may damage 

your MP3 Player and Mini SD card.

2.  To view files on your Mini SD card,                                     

select “browser”> Mini SD.

3.  To remove the Mini SD card, 

gently push it in until it pops out.

Important:

• 

Do not use force while inserting or 

removing the Mini SD card.

• 

Do not remove the card during file 

transfers.

Your MP3 Player is capable of storing and playing 

your favorite music, photos and video.

To transfer media from your computer:

1.  Connect your MP3 Player to your computer using the included USB cable.

2.  Open “Windows Explorer” or “My Computer,” and locate “MP3.”

3.  Drag and drop, or copy and paste your media files into “MP3.”

4.  When you are done, disconnect your MP3 Player from the computer 

using the “Safe Device Removal” utility in the taskbar (see page 8).

Important:

do not disconnect the USB cable when transferring files, as doing so may damage your 

MP3 Player and your files.

MP3

Drag or 

copy files 

here

Summary of Contents for MP550-4

Page 1: ...slicK MP550 4 Multimedia Player photosr ecord video music settings card drive...

Page 2: ...CDs onto your computer 8 Moving music from your computer to your MP3 Player 8 Using the Video Converter 9 To install the Video Converter 9 Converting videos 10 Photos 11 Viewing Photos 11 Record 12 R...

Page 3: ...display turns on To turn the player off slide and hold the POWER switch to the right until the display turns off Lock unlock function The Lock function prevents you from accidentally pressing the but...

Page 4: ...tarts to install the driver automatically Wait for the system to finish the installation When it has finished MP3 will be created in My Computer Important to avoid any data loss always perform a safe...

Page 5: ...up to 8 GB of additional memory to your MP3 Player To insert the not included Mini SD card 1 Insert the Mini SD card into the card slot at the bottom of your player with the with the metal contacts fa...

Page 6: ...e Record listen to clips you recorded with the built in microphone Dir List explore the file directories on your player Update refresh the music list Listening to music 1 Select music from the main me...

Page 7: ...ow the amount of free memory browse to settings System About To return to the main menu press and HOLD the button Video You can play AVI WMV MPG VOB ASF videos that you previously converted to the AVI...

Page 8: ...checkboxes to select which tracks to Rip 5 Click Start Rip Click the Rip tab Click Start Rip Moving music from your computer to your MP3 Player Windows Media Player gives you an easy way to add or Syn...

Page 9: ...ect format Use the Video Converter provided on the included CD to convert most video files to the correct format suitable for the Player To install the Video Converter 1 Insert the CD into the CD driv...

Page 10: ...USB port of your computer optional 2 Click on the icon on your Desktop 3 Click on Input File and select a video to convert click Input File click Output File OR Find and select a video from your compu...

Page 11: ...he conversion When complete the converted video will either be on your MP3 Player or the selected Output File location on your computer where you can easily transfer it to the player see Transferring...

Page 12: ...I button to pause the playback To resume playback press the button 6 To return to the previous screen press the button 7 Press and HOLD the M button or the Return button to get back to the main menu...

Page 13: ...Please ensure the volume is turned up and the headphones are properly connected Check if the format of music file is supported by the player Can not record Check if there is enough memory and battery...

Page 14: ...ce the risk of product damage and personal injury FCC Part 15 This equipment has been tested and found to comply with the requirements for a Class B digital device under Part 15 of the Federal Communi...

Page 15: ...y does not cover damage resulting from accident misuse abuse improper installation or operation lack of reasonable care and unauthorized modification This warranty is voided in the event any unauthori...

Reviews: