Sionyx Aurora Classic User Manual Download Page 13

13/29

2. 

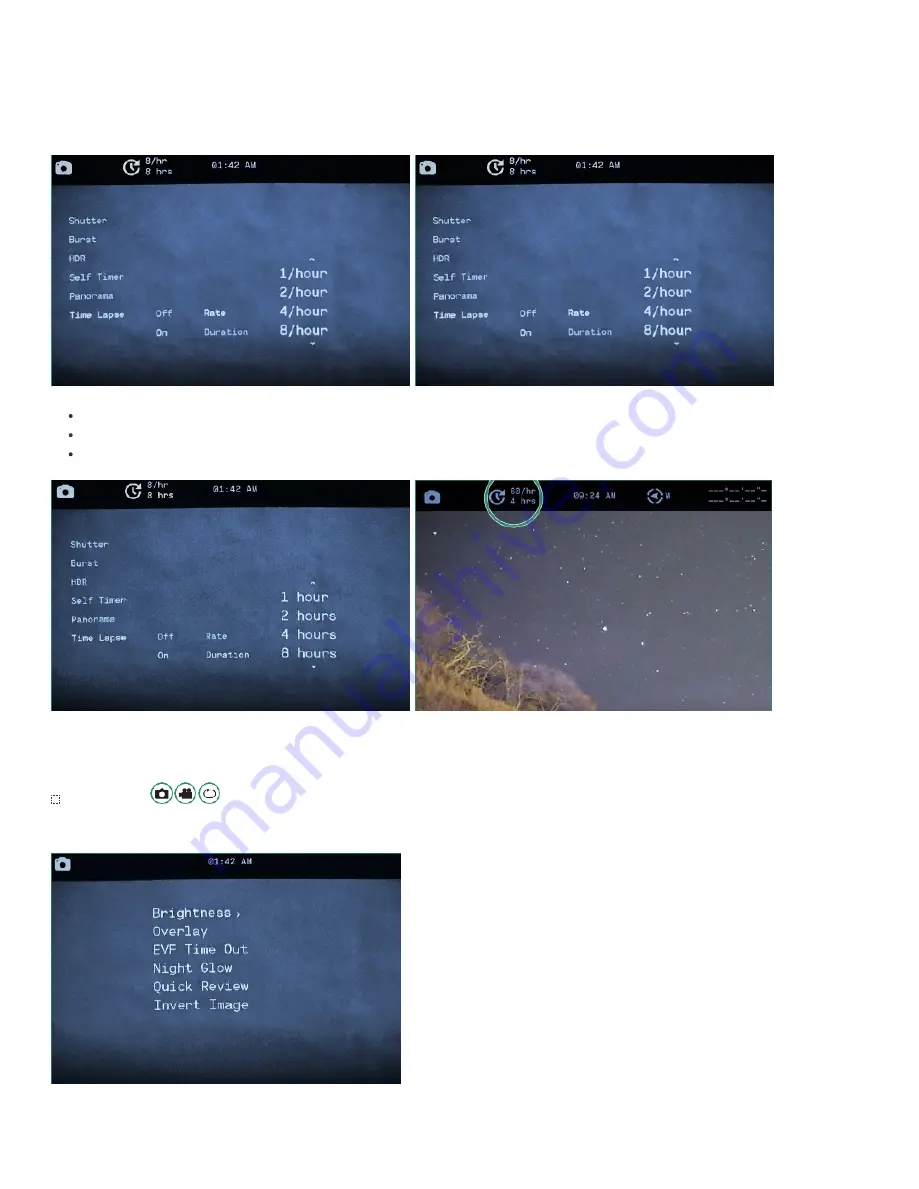
Press SET to access the menu and toggle down to Time Lapse.

3. 

Toggle right to On and right again to set the Rate.

4. 

Choose a Rate by pressing SET.

5. 

Toggle down to Duration and right to select the number of hours.

6. 

Toggle left twice and press SET to exit.

The Time Lapse settings will be visible at the top of the screen.
Place the camera in the location that best suits your scene and press the Shutter button.
The camera will start shooting the photos based on your settings.

NOTE: Once the time lapse is complete, the camera will create a Time Lapse video.

Advanced Settings 

The Advanced Settings are additional settings that will help you get your best shot.

1. 

Turn the camera on by rotating the Settings Dial to Photo Mode.

Summary of Contents for Aurora Classic

Page 1: ...o and Video Advanced Settings Brightness EVF Overlay EVF Time Out Night Glow Quick Review photo Invert Image Video Settings EIS Frame Rate Resolution Loop Mode Trigger Type and Mode WIFI Settings Mode About FW Version Serial MAC Address Factory Reset Auto Power OFF Calibrate Compass original Aurora only Date and Time Language SD Card Chimes Audio GPS original Aurora only WIFI and the Mobile App Re...

Page 2: ... the Viewfinder by pulling down on the Viewfinder Release button Pull the Viewfinder straight out Slide the battery into the battery slot Insert the Micro USB cable into the camera Connect the camera to a powered on computer or plug it into a wall charger using the supplied USB cable A green led on the side of the camera will blink slowly during the charging process When the battery is fully charged ...

Page 3: ...s well as to set the camera mode Power Off Photo Video Loop Playback WiFi Settings Electronic Viewfinder EVF The EVF Electronic Viewfinder contains a menu and control system for the camera has a Diopter Dial on the right side allows you to focus the menu without prescription glasses needs to be removed to access the battery and MicroSD card timeout is set to automatic by default will turn off when t...

Page 4: ...f 1 4 full night vision Twilight f 2 0 approximately one hour before sunrise and one hour after daylight Day f 5 6 sun or clouds Focusing Ring Use the Focusing Ring to adjust the focus visually or by the distance settings on the dial MicroSD Card 32GB card included with Aurora PRO ...

Page 5: ...T The date at the top of the menu is now in change mode 6 Toggle up and down to change the Date and press SET Repeat these steps to set the Time NOTE The Set Time warning will appear until the date and time are set To set the format of the date and time 1 Rotate the Settings Dial to the WiFi Settings position 2 Toggle down to Date and Time and then right and down to Format 3 To set the Date Format...

Page 6: ...n the strap Pull the straps to tighten the loops Photo and Video Modes Taking a Photo 1 To take a photo rotate the Settings Dial to Photo Mode 2 Press the Shutter button to take a photo Shooting a Video NOTE AURORA WILL RECORD 29 MINUTES OF VIDEO AND STOP 1 To shoot a video rotate the Settings Dial to Video Mode 2 Press the Shutter button to start and stop the video Adjusting the Focus To bring an...

Page 7: ...le Zoom To zoom in and out toggle left and right with the buttons either side of SET Three toggle clicks to the right gives you 1 1 imaging Exposure Value EV Gain Exposure Value adjusts the brightness and darkness of the scene Toggle up and down to increase or decrease NOTE The EV setting is located on the bottom left of the Viewfinder screen ...

Page 8: ... a permanent zoom 6 Long press the right toggle button to further zoom in or the left toggle button to zoom out 7 Quick presses of the various toggle buttons pan around the image NOTE To return to normal view long press the left toggle and double click SET Viewing Thumbnails of Photos and Videos You can view four or nine thumbnails of photos and videos in the Playback Mode 1 Rotate the Settings Di...

Page 9: ...hotos and Videos You can delete multiple photos and videos at the same time 1 Rotate the Settings Dial to Playback Mode 2 Toggle to the photos or videos that you want to delete 3 Select the image and press SET 4 You ll see a green checkmark in the bottom right hand corner 5 Do this for each image that you want to delete 6 Long press SET until a trash can appears 7 To continue with deletion long pr...

Page 10: ...enu The shutter speed is now visible at the bottom of the screen Burst The Burst Mode enables you to take consecutive photos at a rate of 10 frames per second fps 5 fps or 2 5 fps and is helpful when capturing action 1 Turn the camera on by rotating the Settings Dial to Photo Mode 2 Press SET to access the menu 3 Toggle down to Burst and then right to the options 4 Select the option the best suits...

Page 11: ... to Photo or Video Mode 2 Press SET to access the menu 3 Toggle down to HDR and right to On or Off and press SET 4 Press SET to exit the menu The HDR icon will be visible in the Viewfinder Self Timer The Self Timer allows you to delay the timing of the shutter release for steady shots or selfies You can set the Self Timer for 2 5 or 12 seconds 1 Turn the camera on by rotating the Settings Dial to Ph...

Page 12: ...iewfinder 6 To take a panorama photo press the Shutter button You ll see a gray bar on the left side of the screen for Landscape or on the bottom for Portrait Move the camera either up and down Portrait or left and right Landscape As you move the camera you ll see the gray bar progress across the bottom of the screen Panorama image must be between 90 and 180 degrees NOTE Less than 90 degrees or mov...

Page 13: ...he Time Lapse settings will be visible at the top of the screen Place the camera in the location that best suits your scene and press the Shutter button The camera will start shooting the photos based on your settings NOTE Once the time lapse is complete the camera will create a Time Lapse video Advanced Settings The Advanced Settings are additional settings that will help you get your best shot 1...

Page 14: ...hat places a red highlight on in focus edges 1 Turn the camera on by rotating the Settings Dial to Photo Video or Loop Mode 2 Long press the SET button to access the menu 3 Toggle down to Overlay and then toggle right and down to Focus Peak 4 Toggle right on Focus Peak Select Off or On and press SET 5 Toggle left and press SET to exit the menu NOTE Now when you look through the Viewfinder you ll se...

Page 15: ... 4 Toggle right to On and press SET 5 Toggle left and press SET to exit The Pitch Roll feature will now be visible in the Viewfinder To level the camera move until a pointer appears at the end of the vertical and horizontal bars Toggle All The Toggle All option turns all of the Overlay features on and off Focus Peak Grid Pitch Roll 1 To turn the Toggle All option on rotate the Settings Dial to Phot...

Page 16: ...s 4 Toggle down to the option you want and press SET twice to select the Time Out and then exit Note The EVF setting does not appear in the Viewfinder Night Glow Click here to view a related video There are three settings in the Night Glow menu that you can use with Night Scene Greyscale adjusts the Viewfinder to shades of grey and enables you to take photos or videos when there is no artificial ligh...

Page 17: ...by rotating the Settings Dial to Photo Mode 2 Long press the SET button to access the menu 3 Toggle down to Quick Review and right to the options 4 Toggle down to the option you want and press SET and SET again to exit Note This feature only works in Photo Mode Invert Image The Invert Image feature allows you to read the menus when the camera is upside down such as when attached to a helmet 1 Turn...

Page 18: ... Video or Loop Mode and press SET to access the menu 2 Toggle right on EIS to turn the option Off or On 3 Press SET to select and SET again to exit NOTE The EIS setting is visible in the Viewfinder Frame Rate The frame rate is the speed at which the camera records video 1 Turn the camera on by rotating the Settings Dial to Video or Loop Mode 2 Press SET to access the menu 3 Toggle down to Frame Rat...

Page 19: ...n to Resolution and right to choose 720p or 360p 4 Press SET to select and SET again to exit The Resolution will be visible at the bottom of the Viewfinder Loop Mode Click here to view a related video Loop Mode enables you to capture video that s activated by a trigger A trigger can either be the shutter button or a shock to the camera such as the recoil from a gun Trigger Type Not available with A...

Page 20: ...press SET to select Mode and SET again to exit The Trigger Mode and settings will be visible in the Viewfinder NOTE The Loop Mode has some of the same options as the Video Mode EIS Frame Rate Resolution HDR WIFI Settings Mode About The About option displays information about your camera 1 Turn the camera on by rotating the Settings Dial to WiFi Settings Mode to access the menu 2 The WiFi Settings m...

Page 21: ...ever 1 Turn the camera on by rotating the Settings Dial to WiFi Settings Mode to access the menu 2 Toggle down to Auto Power OFF and right to the Power Off options 3 Toggle down to the option that best suits your camera use and press SET 4 Turn the Settings Dial to another Mode to exit the menu Calibrate Compass Click here to view a related video Not available with Aurora Sport The camera has an e...

Page 22: ...ed States Standard Eastern Time Zone is UTC 5 Format You can change the format of the date and time 1 Turn the camera on by rotating the Settings Dial to WiFi Settings Mode to access the menu 2 Toggle down to Date and Time and toggle right to Format 3 Toggle right again to Date Format and press SET The selectable options are at the top of the screen The default Format is month date year To change ...

Page 23: ...OTE There is no way not to record audio on a video recording 1 Turn the camera on by rotating the Settings Dial to WiFi Settings Mode to access the menu 2 Toggle down to Audio and right to the volume options 3 Select the volume option you prefer and press SET GPS Click here to view a related video Not available with Aurora Sport The camera GPS displays your exact longitude and latitude GPS coordin...

Page 24: ...the GPS menu 6 Turn the camera to either the Photo Video or Loop Mode and go outside to receive a signal 7 The GPS coordinates will appear in the upper right side of the Viewfinder Note GPS consumes power and should be turned off when not in use to extend battery life GeoTag Image Not available with Aurora Sport The GeoTag Image writes GPS metadata to photos 1 Turn the camera on by rotating the Set...

Page 25: ...Onyx camera WiFi connection Note If you re using an iOS device turn off Bluetooth in Settings before connecting to Aurora 1 Enter the Wi Fi password SiOnyx_cam KEY in the Viewfinder 2 Once the WiFi connection is established the Viewfinder displays WIFI connection established 3 Open the Mobile app and tap the camera name 4 Now you re on the home screen of the app which is called the Media Center Note...

Page 26: ...ttery recycling To safely dispose of lithium ion batteries protect terminals from exposure to other metal Lithium ion batteries contain recyclable materials and are accepted for recycling by the rechargeable battery recycling coloration s RBRC recycling program Visit Call2Recycle org or call 1 800 BATTERY in North America to find a convenient recycling location WARNING Never dispose of a battery in...

Page 27: ...ies contained in the original packaging SiOnyx Product against defects in materials and workmanship when used normally in accordance with SiOnyx s published guidelines for a period of TWO 2 YEARS from the date of original retail purchase by the end user purchaser Warranty Period The Warranty Period for the Aurora Sport is ONE 1 YEAR SiOnyx s published guidelines include but are not limited to info...

Page 28: ...not be extended or renewed or otherwise affected due to subsequent exchange resale repair or replacement of the camera or accessory However part s repaired or replaced during the Warranty Period will be warranted for the remainder of the original Warranty Period or for ninety 90 days from the date of repair or replacement whichever is longer Warranty Limitations Subject to Consumer Law To the exte...

Page 29: ...e no question or other recourse regarding this process Please allow up to TEN 10 business days from the time we receive the return for your exchange or return to be processed Return address will be provided to you by SiOnyx Customer Care when you call for an RMA number Questions Please contact SiOnyx www sionyx com United States Customer Care 833 SiOnyx 1 833 746 6991 Japan Support Center 0570 006...

Reviews: