5
How to plug in
BeatBuddy Manual
Power
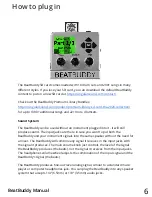
The BeatBuddy uses a 9V 500mA center-negative power supply.
If you use a power supply of more than 9V or plug it directly into AC power you
will destroy your BeatBuddy
, and your warranty will NOT be valid! This would be
painful for everyone - especially your BeatBuddy. Do not do this!
The power supply must have a minimum of 300mA (0.3 Amps) for the BeatBuddy to
turn on. More amps won’t harm your BeatBuddy. If you use a center-positive
adapter, it won’t harm your BeatBuddy either, but your BeatBuddy won’t turn on.
Using your pedal board’s power supply
If you would like to use your pedal board’s ‘octopus’ power supply (a single power
supply that powers all of your pedals), make sure it is 9V and center negative (most
are) BEFORE plugging it in! To calculate if your pedal board’s power supply has
enough Amps to power the BeatBuddy, add up all of the Amps that your other
pedals require (usually written on the bottom of the pedal. Remember: 1000 mA
[milliAmps] = 1.0 A [Amps]) and add 0.3 Amps for the BeatBuddy’s requirement. If
this total is more Amps than your power supply can produce (for example, the total
of all of your pedals plus the BeatBuddy is 2.5 Amps but your power supply can only
produce 2.0 Amps), then the BeatBuddy won’t turn on (neither will any of your other
pedals), because there isn’t enough power available. PLEASE NOTE: Plugging the
BeatBuddy (a digital pedal) into the same power supply as analog pedals (most
effect pedals) can cause noise
interference in the analog pedal sound. If you
experience this, please use a separate power supply for the BeatBuddy.
SD Card
Compatibility: All SD cards 4-32 GB in capacity (outside that range will not work).
Class 10 is recommended.
All of the BeatBuddy’s content (songs/beats and drum sets) are stored on the SD
card. The SD card must be properly inserted into the BeatBuddy for it to work.


