Chase / Saylor / Halstein
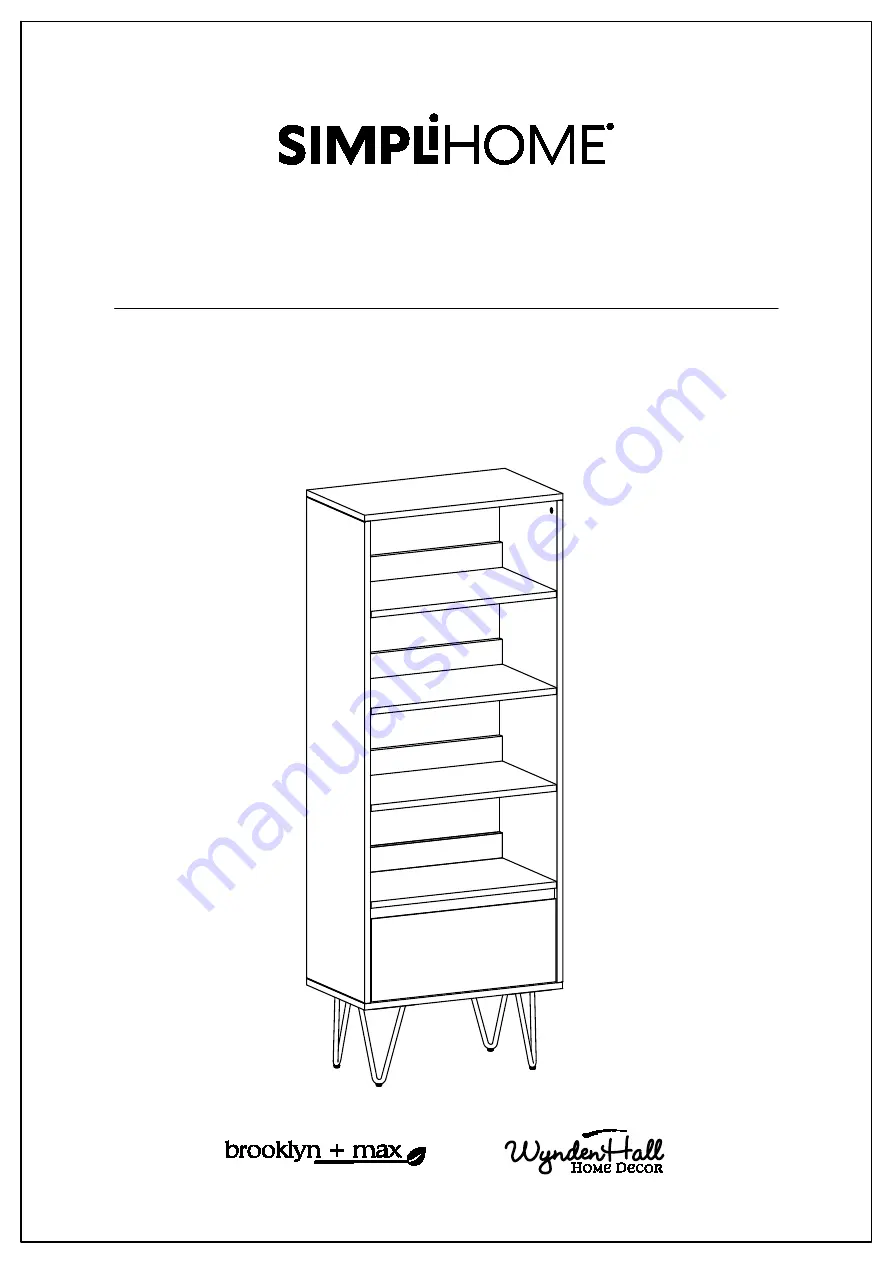
Tall Bookcase
Model # AXCCHS09-RNAB
TM
1
Page 1: ...Chase Saylor Halstein Tall Bookcase Model AXCCHS09 RNAB TM TM 1...
Page 2: ...ll be happy you did simpli home com product registration Great quality is a right Thank you for shopping with Simpli Home America s top brand for high value furniture Activate your 1 year warranty Au...
Page 3: ...d love your feedback Please share a review and get instant rewards simpli home com product review Share photos and get your cash back Send us images or share them on social and qualify for instant re...
Page 4: ...form with your order information and issue 6 Submit form 7 A customer service associate will contact you Other ways to contact us Visit Us Visit our site directly at www simpli home com Email Us custo...
Page 5: ...until you have checked that you have all of the parts and hardware required Hardware package may have spare parts WARNING This item contains small parts which can be swallowed by children and pets Kee...
Page 6: ...nd lacquered to protect against humidity To help protect your furniture follow these steps Use a humidifier preferably one with an automatic control system that can sense the humidity level and adjust...
Page 7: ...T SIDE QTY 1 RIGHT SIDE QTY 1 BOTTOM QTY 1 LOWER SHELF QTY 1 UPPER SHELF QTY 3 BACK PANEL QTY 1 BACK BAR QTY 4 DRAWER FRONT QTY 1 Front Avant Front Avant Front Avant Front Avant Front Avant Warning La...
Page 8: ...Part Description IL LEFT DRAWER SIDE QTY 1 DRAWER BOTTOM QTY 1 METAL LEG QTY 4 DRAWER BACK QTY 1 K L IR J RIGHT DRAWER SIDE QTY 1 8 Model AXCCHS09 RNAB Pre Assembly Information...
Page 9: ...OWEL 8 X 30mm QTY 12 1 2 3 4 5 6 FURNITURE TIP OVER RESTRAINT QTY 1 SET a M4 X 25mm QTY 2 1 is extra b M4 X 15mm QTY 1 c M4 X 25mm QTY 1 ALLEN KEY BOLT M6 x 20 mm QTY 12 WASHER 16 6 X 1mm QTY 12 WASHE...
Page 10: ...A E E E D B F F F F G CL CR L L J IR K IL H Front Avant Front Avant Front Avant Front Avant Front Avant Front Avant Front Avant 10 Model AXCCHS09 RNAB Components Key Diagram...
Page 11: ...secure Cam Lock Pins Do not over tighten Step2 H IL IL IR IR H 1 Align Cam Lock Pins with guide holes and attach Drawer Sides IL IR to Drawer Front H 2 Insert two Cam Locks 2 into guide holes on each...
Page 12: ...er Front H Step4 H IR K J J IL IR IL 1 1 1 Align Drawer Back J with Drawer Bottom K and press firmly into slot 2 Attach Drawer Back using two Allen Key Screws 1 through guide holes on each Drawer Side...
Page 13: ...CL CR 2 Use Phillips screwdriver to secure Cam Lock Pins Do not over tighten 3 Insert four Dowels 3 into guide holes on each Sides CL CR 4 Use rubber mallet to tap Dowels 3 into bottom of holes secur...
Page 14: ...tep6 1 Insert four Dowels 3 into guide holes on part D 2 Use rubber mallet to tap Dowels 3 into bottom of holes securely 1 2 length of Dowels should be exposed 3 3 D D 3 14 Model AXCCHS09 RNAB Assembl...
Page 15: ...using three Allen Key Screws 1 through guide holes 2 Use Allen Key 8 to tighten Screws Do not over tighten 3 Attach Upper Shelf E to Back Bar F using three Allen Key Screws 1 through guide holes 4 Use...
Page 16: ...k Pins with guide holes on parts CR E and attach part CR to part E CR Front Avant E Front Avant 2 2 2 Insert two Cam Locks 2 into guide holes on part E 3 Use Phillips screwdriver to secure Cam Locks D...
Page 17: ...E CR Front Avant Front Avant Front Avant Front Avant E E E Front Avant Front Avant Front Avant CR 2 2 2 1 Repeat Step 8 for the other two parts E 2 Repeat Step 8 for the other two parts E 17 Model AX...
Page 18: ...Front Avant Front Avant Front Avant Front Avant D 1 Repeat Step 8 for Lower Shelf D Front Avant CR E E E Front Avant Front Avant Front Avant Front Avant D 2 2 2 Repeat Step 8 for Lower Shelf D 2 18 M...
Page 19: ...h guide holes on parts CL E D and attach part CL to parts E D Front Avant E E E D CR Front Avant CL 2 2 2 Insert two Cam Locks 2 into guide holes on each part E D 3 Use Phillips screwdriver to secure...
Page 20: ...les on Bottom B and attach Bottom B to Sides CL CR Front Avant Front Avant Front Avant CR CL Front Avant B 1 1 1 8 2 Attach Bottom B to Sides CL CR using six Allen Key Screws 1 through guide holes 3 U...
Page 21: ...Step13 P X 2 2 A A 2 1 Attach four Cam Lock Pins 2 into pre drilled holes on Top A 2 Use Phillips screwdriver to secure Cam Lock Pins Do not over tighten 21 Model AXCCHS09 RNAB Assembly...
Page 22: ...L CR A and attach part A to parts CL CR 2 2 2 Insert two Cam Locks 2 into guide holes on each Side CL CR 3 Use Phillips screwdriver to secure Cam Locks Do not over tighten Front Avant CR CL Front Avan...
Page 23: ...to back frame using Phillips Screws Round Head 4 through guide holes 2 Use Phillips Screwdriver to tighten screws Do not over tighten B G L L 3 Attach Legs L to Bottom B 4 Use three Allen Key Bolts 5...
Page 24: ...bled drawer into glides on assembled Bookcase 2 Turn the wood lock on the Drawer Back to be perpendicular to the frame for safety stop intended to keep the drawers from pulling all the way out 24 Mode...
Page 25: ...Step17 Note Levelers on bottom of legs can be adjusted if floor is uneven 25 Model AXCCHS09 RNAB Assembly...
Page 26: ...in the hardware pack WARNING Serious or fatal crushing injuries can occur from furniture tip over If the furniture tip over restraint kit is not in the box please contact our customer service departme...
Page 27: ...r screw to securely attach the bracket to the wall 5 Place the furniture so the back edge is in line with the bracket on the wall 6 Lace an end of the nylon zip tie strap down through each bracket Bri...