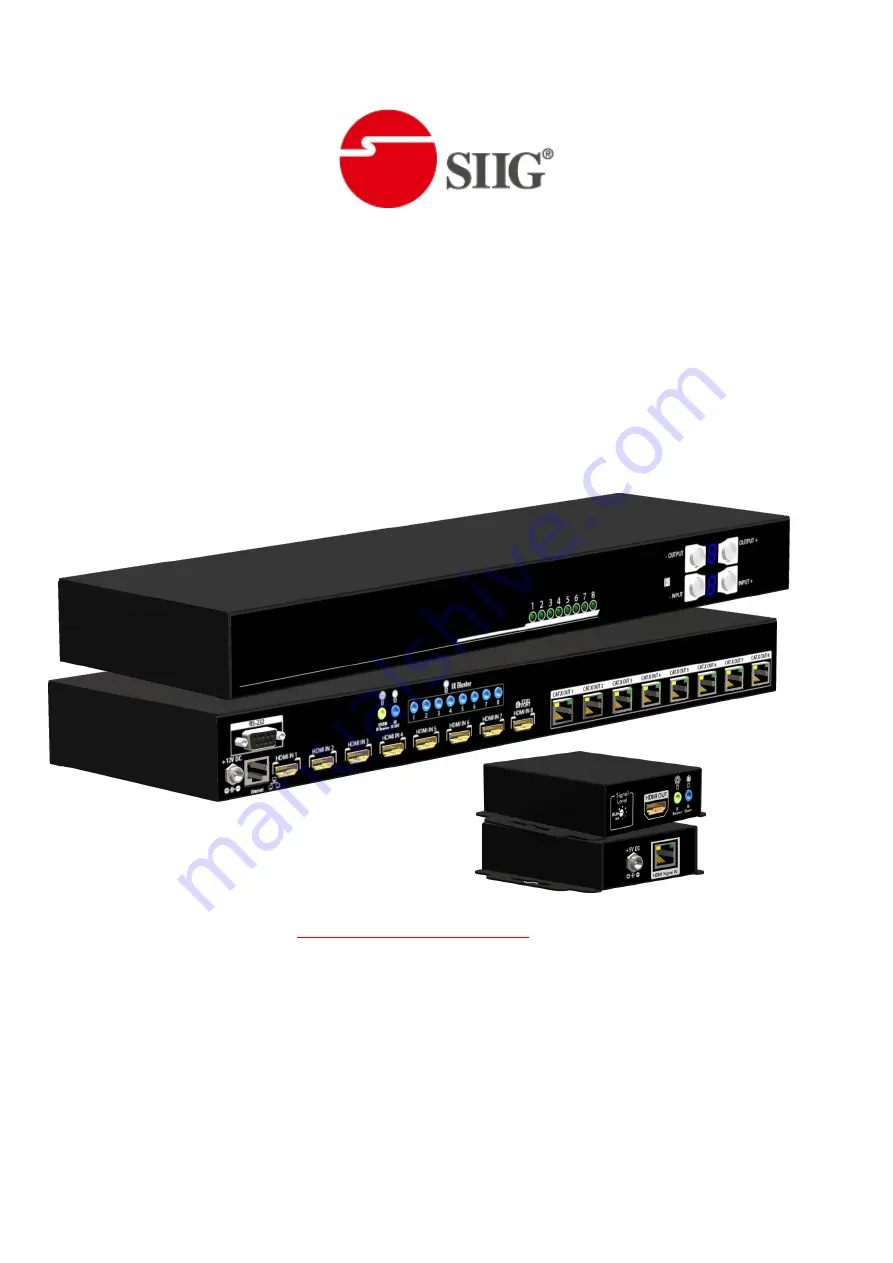
8x8 HDMI Deep Color & Full 3D
over single Cat.X Matrix
To avoid EMI issue, complete STP Cat6 cable is strongly recommended!
P/N: AV-GM07U3-S1
Page 1: ...8x8 HDMI Deep Color Full 3D over single Cat X Matrix To avoid EMI issue complete STP Cat6 cable is strongly recommended P N AV GM07U3 S1...
Page 2: ...service this unit yourself except where explained in this manual Provide proper ventilation and air circulation and do not use near water Keep objects that might damage the device and assure that the...
Page 3: ...he same time Allows any HDMI display to view any HDMI source at any time Supports 7 1 channel digital audio Supports default HDMI EDID and learns the EDID of displays The matrix master can switch ever...
Page 4: ...button IR remote control RS 232 control Ethernet control IR remote control HDMI source control Controllable via IR pass through from IR receiver at RX to IR blaster at TX IR remote control Electro op...
Page 5: ...r receiving the IR commands from IR remote 3 Output Push Button 7 segment LED Front panel push buttons used to select the number of display channel LED display for output ports 4 Input Push Button 7 s...
Page 6: ...ssible range to short distance Please adjust the signal level from strongest to weakest and stop turning the rotary switch whenever the audio video is playing normally Inappropriate signal level setti...
Page 7: ...f the HDMI source devices 5 Connect the 12V 5A DC power supply to the AV GM07U3 S1 and 5V 2A DC power supply to the receivers 6 Power on all HDMI sources and displays 8 Dial the 8 level rotary control...
Page 8: ...put channel from 1 to 8 System IR Receives IR commands from remote control AV GM07U3 S1 RX IR BLASTER IR control on individual display device IR RECEIVER IR receiver connected here can receive all IR...
Page 9: ...DIAGRAM You can buy any IR extension cables in the market that are compatible to the definition of the IR sockets for the matrix if necessary for replacement use However IR cables longer than 2m 6 ft...
Page 10: ...input push button to select the mapping configuration 1 8 which you want to save current input output mapping 3 After you select the desired mapping configuration number the LED will blink twice and t...
Page 11: ...u push the input learn button before the setting is effective 6 The LED will show 0 0 if the setting is success The LED will show F F if the setting is failure 5 EDID Learning Mode 1 Connect display t...
Page 12: ...Ex Input 2 To Output 3 1 Press output number key 3 to select Output 3 3 2 Press input number key 2 to select Input 2 3 2 2 Function Key Button Function OFF Standby mode ON Power on the matrix switcher...
Page 13: ...put Number 1 8 storage site Take Ex Preset saved mapping from 5 1 Press PRESET button P 2 Press output number key 5 to select the storage site 5 P 5 3 Press TAKE button Learn default EDID Default EDID...
Page 14: ...quirement 1 OS Information MS WinXP 7 2 Baud rates 9600 3 Software size 3 MB 4 Minimum RAM requirement 256 MB 1 Version Button for FW SW 8 EDID Button 2 RS 232 Button 9 Firmware Update Button 3 Ethern...
Page 15: ...e sure the connection status is on connected status 3 FW SW Version Button Click button to show version information 4 RS 232 Button 1 Click button to switch to RS 232 function 2 If RS 232 is connected...
Page 16: ...on Click this button to change connection status 9 Power On Off Button Click this button to power on off Power on status Blue Click this button to power off device Standby Mode Power off status Red Cl...
Page 17: ...DID File to Input a Select Input b Click Load button to select the EDID file 3 Learn EDID From Display a Select EDID Port b Select Input c Click Learn button to learn display EDID 4 Create EDID File a...
Page 18: ...analysis c Click Save As to save the read EDID as a file on computer 11 Firmware Update Button Step1 Make sure RS 232 is connecting and the connecting status is Step2 Click FIRMWARE UPDATE Button and...
Page 19: ...utton and then will be a pop up windows Step4 Click Read From Device to read the device IP address Step5 Select Ethernet button and then will be a pop up windows Step6 Key in the device IP address to...
Page 20: ...Mapping 1 8 b Click Recall button to recall previous mapping which are saved 3 Rename Mapping a Rename the mapping Mapping1 Mapping8 b Click Confirm button to confirm the change 14 Default Reset Butto...
Page 21: ...to select Input Output port User can click the input number button to let all outputs select the same input Ex All outputs select input 3 16 Mute Output Button Click the circle button to turn off out...
Page 22: ...lowest capable HDMI display among others to make sure all displays are capable to play the HDMI signals normally There are THREE methods to do EDID Learning as below 1 Front Panel Push in Button Pleas...
Page 23: ...21...
Page 24: ...damage in transit Under no circumstances will a unit be accepted without a return authorization number The warranty is in lieu of all other warranties expressed or implied including without limitation...