


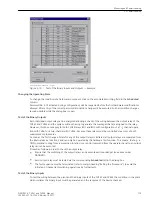


[schalttafeleinbau-gehaeuse-grafikdisplay-halb-st-040403, 1, en_GB]
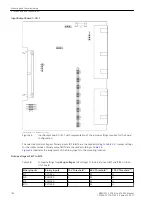
Figure 3-13
Panel flush mounting of a device (housing size
1
/
2
)
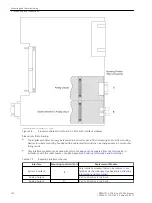
Rack and Cubicle Mounting
To install the device in a rack or cubicle, two mounting brackets are required. The order numbers can be found
in the Appendix.
•
Loosely screw the two mounting brackets in the rack or cubicle with four screws.
•
Remove the 4 covers on the corners of the front plate Thus, 4 respectively elongated holes in the
mounting bracket are revealed and can be accessed.
•
Fasten the device to the mounting brackets with 4 screws.
•
Mount the 4 covers.
•
Tighten the mounting brackets to the rack or cubicle using 8 screws.
•
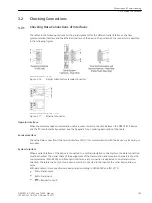
Connect the low-resistance operational and protective earth on the rear plate of the device. Using at least
one M4 screw for the device earthing. Make connections at the device rear using plug or screw terminals
in accordance with the circuit diagram. When using spade lugs or directly connecting wires to threaded
terminals, before cable insertion the screws must be tightened so that the heads are flush with the
outside of the terminal block. The cross-section of the earth wire must be at least 2.5 mm
2
.
•
Connections are realized via the plug terminals or screw terminals on the rear side of the device
according to the circuit diagram. When using forked lugs for direct connections or screw terminal, the
screws, before having inserted the lugs and wires, must be tightened in such manner that the screw
heads are even with the terminal block. A ring lug must be centered in the connection chamber in such a
way that the screw thread fits in the hole of the lug. The SIPROTEC 4 System Description provides infor-
mation regarding maximum wire size, torque, bending radius and cable relief and must be observed.
3.1.3.2
Mounting and Commissioning
3.1 Mounting and Connections
160
SIPROTEC 4, 7VE61 and 7VE63, Manual
C53000-G1176-C163-3, Edition 10.2017
Summary of Contents for SIPROTEC 4 7VE61
Page 8: ...8 SIPROTEC 4 7VE61 and 7VE63 Manual C53000 G1176 C163 3 Edition 10 2017 ...
Page 24: ...24 SIPROTEC 4 7VE61 and 7VE63 Manual C53000 G1176 C163 3 Edition 10 2017 ...
Page 142: ...142 SIPROTEC 4 7VE61 and 7VE63 Manual C53000 G1176 C163 3 Edition 10 2017 ...
Page 192: ...192 SIPROTEC 4 7VE61 and 7VE63 Manual C53000 G1176 C163 3 Edition 10 2017 ...
Page 222: ...222 SIPROTEC 4 7VE61 and 7VE63 Manual C53000 G1176 C163 3 Edition 10 2017 ...
Page 230: ...230 SIPROTEC 4 7VE61 and 7VE63 Manual C53000 G1176 C163 3 Edition 10 2017 ...
Page 256: ...256 SIPROTEC 4 7VE61 and 7VE63 Manual C53000 G1176 C163 3 Edition 10 2017 ...
Page 314: ...314 SIPROTEC 4 7VE61 and 7VE63 Manual C53000 G1176 C163 3 Edition 10 2017 ...
Page 316: ...316 SIPROTEC 4 7VE61 and 7VE63 Manual C53000 G1176 C163 3 Edition 10 2017 ...
Page 330: ...330 SIPROTEC 4 7VE61 and 7VE63 Manual C53000 G1176 C163 3 Edition 10 2017 ...


