background image

Connection 


6.3 Connecting the control circuit 


98


Manual, 08/2017, L1V30368969104A-02 

6.3.5.4


Connecting power supply kit 3KC9833-, 3KC9834- for single-phase network 

The power supply kit 3KC9833-, 3KC9834- for 2-pole applications consists of one phase and 

a neutral conductor. On the one hand, it includes voltage measurement by the relevant 

inputs (103 and 106 as well as 203 and 206), and on the other, it supplies the electronic 

module with power. 
After you have mounted the power supply kit between the connecting terminals in 

accordance with the section titled Installing accessories for the electronic module (Page 89)

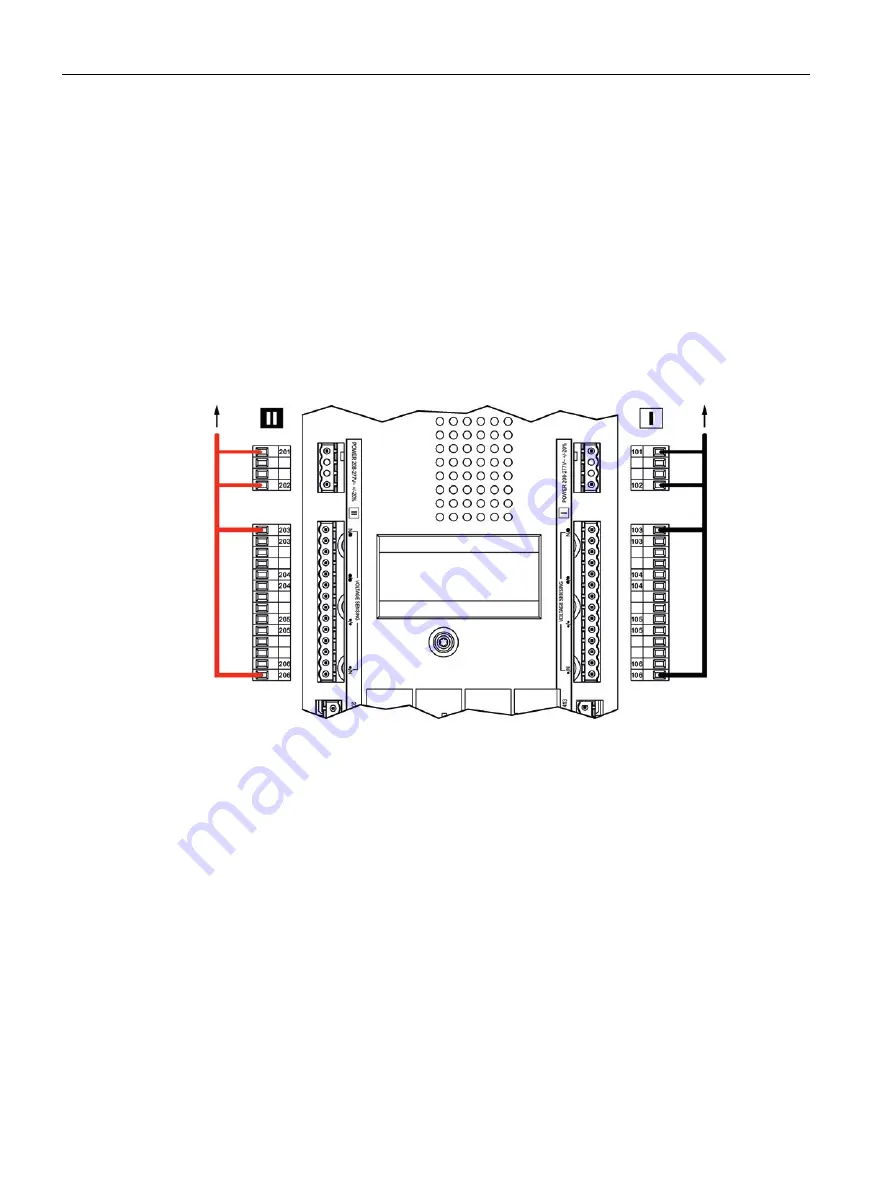
you can connect the electronic module with the accessories. The following inputs are 

connected with the cable: 


Inputs for power supply (101 and 102 as well as 201 and 202) 


Inputs for voltage measurement (103 and 106 as well as 203 and 206) 

1.


To connect the accessories with the electronic module, proceed as shown in the figure. 


Figure 6-85  Connecting the power supply kit for single-phase networks 

Summary of Contents for SENTRON

Page 1: ......

Page 2: ......

Page 3: ...__ ___________________ ___________________ ___________________ ___________________ ___________________ Manual 08 2017 L1V30368969104A 02 Introduction 1 General information 2 Product information 3 Functions 4 Mounting 5 Connection 6 Operation 7 Commissioning 8 Accessories 9 Service and maintenance 10 Technical specifications 11 Dimension drawings 12 Applications 13 Appendix A ESD guidelines B List ...

Page 4: ...be operated only by personnel qualified for the specific task in accordance with the relevant documentation in particular its warning notices and safety instructions Qualified personnel are those who based on their training and experience are capable of identifying risks and avoiding potential hazards when working with these products systems Proper use of Siemens products Note the following WARNIN...

Page 5: ...me for door cut out 30 6 Connection 31 6 1 Network types 31 6 1 1 Three phase 4 wire network with neutral 3PH N 32 6 1 1 1 Circuit diagram for the 3KC4 transfer switching equipment 4 pole transfer switching equipment 32 6 1 1 2 Circuit diagram for the 3KC8 transfer switching equipment 4 pole transfer switching equipment 33 6 1 2 Three phase 3 wire network without neutral 3PH 33 6 1 2 1 Circuit dia...

Page 6: ... 6 3 3 1 Installing auxiliary switches 250 A to 630 A 82 6 3 3 2 Installing auxiliary switches of current rating 800 A to 1600 A 84 6 3 4 Inputs and outputs of the electronic module 3KC8 only 88 6 3 5 Connecting the inputs and outputs of the electronic module 3KC8 only 89 6 3 5 1 Installing accessories for the electronic module 89 6 3 5 2 Connecting power supply kit 3KC9830 3KC9831 4 pole 92 6 3 5...

Page 7: ... 9 3 Terminal plates 150 9 3 1 Mounting terminal plates 151 9 4 Mounting spacers 153 9 4 1 Fitting mounting spacers 153 9 5 Bridging bars 154 9 6 Copper bar connection kit 155 9 7 Autotransformer 157 9 8 Dual power supply DPS 3KC4 only 158 9 9 Power supply kit 3KC9830 3KC9831 4 pole 3KC8 only 159 9 10 Auxiliary conductor terminal 3KC9822 3KC9832 3 pole 3KC8 only 160 9 11 Power supply kit 3KC9833 3...

Page 8: ...etween two sources with one outgoing load 206 13 2 Transfer between two sources with two outgoing loads 207 13 3 Transfer between three sources with one outgoing load 209 13 4 Transfer between three sources with two outgoing loads 210 13 5 Transfer between two loads with one incoming source with 3KC4 transfer switching equipment only 213 A Appendix 215 A 1 Environmental conditions 215 A 2 Operatin...

Page 9: ...rrective maintenance and fault rectification Application examples Target groups and required basic knowledge This manual is intended for Users Qualified electricians Switchgear manufacturers Maintenance personnel A general knowledge of low voltage power distribution is required to understand this manual Technical support You can find further support on the Internet at Technical support https www s...

Page 10: ...Introduction 10 Manual 08 2017 L1V30368969104A 02 ...

Page 11: ...r Part 5 1 Control circuit devices and switching elements electromechanical control circuit devices IEC 60947 6 1 Low voltage switchgear and controlgear Part 6 1 Multiple function equip ment Transfer switching equipment IEC 61010 1 Safety requirements for electrical equipment for measurement control and laboratory use Part 3 1 Conformity verification report for IEC 61010 1 2001 General requirement...

Page 12: ...General information 2 1 Certification 12 Manual 08 2017 L1V30368969104A 02 ...

Page 13: ...ual 08 2017 L1V30368969104A 02 13 Product information 3 3 1 Product description The following features of the 3KC4 and 3KC8 transfer switching equipment are described in this chapter Design Current ratings ...

Page 14: ...Product information 3 1 Product description 14 Manual 08 2017 L1V30368969104A 02 3 1 1 Design of the 3KC4 and 3KC8 transfer switching equipment 3KC4 remotely operated transfer switching equipment RTSE ...

Page 15: ...ction 3KC8 Electronic module below this is locat ed the power supply connection Assembly for mounting Motor operator Power LED Plug on handle for manual changeover Warning LED Switch for selecting the mode Manual Automatic Padlock assembly 4 outputs for Switch position I O II indicator Product availability indicator Connection for attachable handle 5 inputs for Positioning commands I O II Activati...

Page 16: ...power Electronic module The 3KC8 transfer switching equipment is programmed using the electronic module You can find more information on programming in the section titled Automatic mode programming of the electronic module 3KC8 only Page 132 Operator controls Potentiometer 1 Presetting of line voltage frequency AutoConf 1 to 13 Potentiometer 2 Presetting of voltage frequency limits 1 to 14 Potenti...

Page 17: ...ching equipment Shows a continuous green light if the transfer switch ing equipment is in Auto mode and is ready for source transfer Flashes green if defaults haven not been saved or a new change has been made MANUAL Manual mode Shows a continuous yellow light if the transfer switching equipment is in Manual mode AUTO Auto mode Indicates the activity of Auto mode Shows a continuous green light if ...

Page 18: ...inuous green light if the switch is in posi tion I O Position 0 indica tion Shows a continuous yellow light if the switch is in posi tion 0 OFF 3 1 2 Current ratings of the 3KC4 and 3KC8 transfer switching equipment The 3KC4 and 3KC8 transfer switching equipment are available in 10 current ratings The table shows the types of transfer switching equipment according to the current ratings Current ra...

Page 19: ...04A 02 19 Designs The following figures show the different designs of the transfer switching equipment depicted according to current rating using the example of the 3KC8 transfer switching equipment 3KC8 250 A 3KC8 400 A 3KC8 630 A 3KC8 800 A 1000 A 3KC8 1250 A 3KC8 1600 A ...

Page 20: ...Product information 3 1 Product description 20 Manual 08 2017 L1V30368969104A 02 3KC8 2000 A 2500 A 3200 A ...

Page 21: ...es 3KC4 and 3KC8 from 250 A to 3200 A encompass two types of transfer switching equipment Product family Type Designation Current rating Number of poles 3KC4 Remotely operated transfer switch ing equipment RTSE RTSE Remotely Operated Transfer Switching Equipment 250 3200 A 3 4 3KC8 Automatic transfer switching equipment ATSE ATSE Automatic Transfer Switching Equipment 250 3200 A 3 4 ...

Page 22: ...ed trans fer switching equipment RTSE 3KC4 Automatic transfer switch ing equipment ATSE 3KC8 3 2 3 Properties of the 3KC4 and 3KC8 transfer switching equipment The 3KC4 and 3KC8 transfer switching equipment enables a continuous power supply to be maintained The main features are as follows Reliable transfer between two sources with transfer through the OFF position Simple installation Transfer wit...

Page 23: ...fer switching equipment The 3KC4 and 3KC8 transfer switching equipment can be used in all areas where a continuous power supply must be ensured Service sector Public facilities Computing centers data server rooms Shopping malls Infrastructure Airports Subways Industry Production lines in continuous operation Engine rooms Pumps ...

Page 24: ...Product information 3 2 Product family 24 Manual 08 2017 L1V30368969104A 02 ...

Page 25: ...otentiometer and DIP switch LED indicator for source availability LED indicator for the switch positions Test on load network generator application via inputs Test off load network generator application via inputs Connection for an optional external display Setting of the OFF position with priority via inputs Indication of availability of the motor operator via output Switch position indication of...

Page 26: ...Functions 26 Manual 08 2017 L1V30368969104A 02 ...

Page 27: ...ng position Motor operator right Motor operator bottom Motor operator left Motor operator top 250 630 A 800 3200 A 5 2 Installing the 3KC4 and 3KC8 transfer switching equipment Note The 3KC4 transfer switching equipment is depicted in the following installation instructions The 3KC8 transfer switching equipment differs from the 3KC4 transfer switching equipment in its additional electronic module ...

Page 28: ...P 3P 4P A 35 35 35 35 34 34 B 160 210 160 210 210 270 C 50 50 50 50 65 65 D 25 25 35 35 45 45 Proceed as follows to install the current ratings 250 A to 630 A 1 Mount the transfer switching equipment with four bolts in the desired position as shown in the figure see also the section titled Mounting position Page 27 2 Fasten the holder for the handle on the transfer switching equipment and insert t...

Page 29: ...re 5 2 Installing the current ratings 800 A to 3200 A The dimensions vary according to the current rating and the number of poles They can be found in the table below mm 800 A 1000 A 1250 A 1600 A 2000 A 2500 3200 A 3P 4P 3P 4P 3P 4P 3P 4P 3P 4P 3P 4P 3P 4P A 255 335 255 335 255 335 347 467 347 467 347 467 347 467 B 80 80 80 80 80 80 120 120 120 120 120 120 120 120 The installation steps are ident...

Page 30: ...gures show the dimensions of the cover frame for door cut out for the 3KC4 and 3KC8 transfer switching equipment Note On the 3KC8 transfer switching equipment there is an additional electronic module that enables source monitoring Current ratings 250 A to 630 A Current ratings 800 A to 3200 A Figure 5 3 Dimensions of the cover frame for door cutout 800 A to 3200 A ...

Page 31: ...network types Three phase 4 wire network with 3 phases with neutral 3PH N Three phase 3 wire network with 3 phases without neutral 3PH Single phase network with 1 phase and neutral 1PH N NOTICE Possible damage to the device The product is designed for a rated impulse voltage resistance Uimp of 12 kV for the main circuit and 4 kV for the electronics and or motor unit The dual power supply DPS acces...

Page 32: ...r switching equipment 4 pole transfer switching equipment Figure 6 1 Three phase 4 wire network with neutral for the 3KC4 transfer switching equipment F1 1 x 3NW6004 1 1 x 3NW7013 4 A gG For the power supply of the transfer switching equipment the dual power supply accessory 3KC9625 1 is required You can find a detailed description in the section titled Mounting and connecting the dual power suppl...

Page 33: ...ion titled Connecting power supply kit 3KC9830 3KC9831 4 pole Page 92 The dual power supply DPS accessory is not required with the 3KC8 transfer switching equipment since it is supplied with power via two inputs of the electronic module 6 1 2 Three phase 3 wire network without neutral 3PH The 3KC4 and 3KC8 transfer switching equipment can be used in a network comprising 3 phases It can be used bot...

Page 34: ... there is no neutral conductor available For this reason the following optional accessories can must be used for establishing this network 2 x autotransformer 3KC9824 1 For information see the section titled Installing and connecting an autotransformer 400 V 230 V Page 79 1 x dual power supply 3KC9625 1 For information see the section titled Mounting and connecting the dual power supply DPS Page 7...

Page 35: ...es can be used for establishing this network 2 x autotransformer 3KC9824 1 For information see the section titled Installing and connecting an autotransformer 400 V 230 V Page 79 For the power supply Power supply kit 3KC9830 3KC9831 For information see the section titled Connecting power supply kit 3KC9830 3KC9831 4 pole Page 92 Note The F1 fuses must be installed as closely as possible to the tap...

Page 36: ...s can must be used for establishing this network 2 x autotransformer 3KC9824 1 For information see the section titled Installing and connecting an autotransformer 400 V 230 V Page 79 The auxiliary conductor terminal kit is required in the case of the 3 pole variant for connecting the electronic module and it must be mounted before connection to the source See the section titled Connecting the auxi...

Page 37: ...in 3 pole design is the best choice 6 1 3 1 Circuit diagram for the 3KC4 transfer switching equipment 3 pole transfer switching equipment Figure 6 6 Single phase network without neutral for 3KC4 transfer switching equipment F1 1 x 3NW6004 1 1 x 3NW7013 4 A gG For the power supply of the 3KC4 transfer switching equipment the dual power supply accessory 3KC9625 1 is required You can find a detailed ...

Page 38: ...004 1 1 x 3NW7013 4 A gG The dual power supply DPS accessory is not required with the 3KC8 transfer switching equipment since it is supplied with power via two inputs of the electronic module Before connecting the pins 101 102 and 201 202 must be connected to the main circuit This can be done most easily with the 3KC9833 3KC9834 power supply kit See the section titled Connecting power supply kit 3...

Page 39: ...nnecting terminals of the transfer switching equipment The connecting terminals of the 3KC4 and 3KC8 transfer switching equipment differ depending on the current rating The different connecting terminals are shown below Connecting terminals for current ratings 250 A to 630 A 250 A 400 A 630 A Connecting terminals for current ratings 800 A to 1600 A 800 A 1000 A 1250 A 1600 A Connecting terminals f...

Page 40: ...g cable lugs or busbars Transfer switching equipment of 2000 A and higher is connected using the optionally available copper bar connection kit Note The transfer switching equipment for 2000 A and higher comprises 2 switches switch 1 and switch 2 in each case These must be bridged using the copper bar connection kit NOTICE Incorrect connection in the case of network generator applications of the 3...

Page 41: ... Connecting the 3KC8 transfer switching equipment Note Before you connect the 3KC8 transfer switching equipment to the power supply systems you must attach the corresponding accessories to make the electronic module functional The required accessories depend on the current rating and the network type Observe the information in the section titled Connecting the inputs and outputs of the electronic ...

Page 42: ...eginning to mount the bridging bars Current ratings 250 A to 1600 A require bridging bars These serve as a bridge for the load side connection and they can be mounted either on the top or bottom of the transfer switching equipment The bridging bars are not included with the transfer switch and must be ordered as accessories Figure 6 10 Bridging bar current ratings 250 A to 630 A Figure 6 11 Bridgi...

Page 43: ...7 20 26 400 A M10 x 25 mm 630 A M12 x 30 mm 19 40 45 1 Position the bridging bar on the connecting terminal 2 Fix the first half of the bridging bar to the connecting terminal with the bolt and washer 3 Fix the second half of the bridging bar to the connecting terminal with the bolt and washer Note The two halves of the bridging bar must come into contact completely before work step 4 4 Connect th...

Page 44: ... tools and tightening torques The bolts for mounting the bridging bars are included in the scope of supply Bolts with washers and nuts are additionally required in the following quantities for fixing the bridging bars to the connecting terminal 4 x for current ratings 800 A to 1250 A 2 x for current rating 1600 A Requirements Power supply is switched off Transfer switching equipment is in the Manu...

Page 45: ...al For current ratings of 800 A to 1250 A with 4 bolts 8 washers and 4 nuts For current ratings of 1600 A with 2 bolts 4 washers and 2 nuts 3 Fix the second half of the bridging bar to the connecting terminal For current ratings of 800 A to 1250 A with 4 bolts 8 washers and 4 nuts For current ratings of 1600 A with 2 bolts 4 washers and 2 nuts Note The two halves of the bridging bar must come into...

Page 46: ...nsure there is no live voltage before connecting the transfer switching equipment to the main circuit NOTICE System damage Connect the power supply systems with phase equality Note Using bridging bars Mount the bridging bars before connecting the transfer switching equipment to the main circuit For information see the section titled Connecting bridging bars on the load side Page 42 Note If you are...

Page 47: ... the Manual position Procedure Figure 6 14 Connecting current ratings 250 A to 630 A Current rating 250 A 1 x 30 x 4 1 x 32 x 5 120 150 M10 20 26 400 A 1 x 30 x 8 1 x 32 x 8 240 M10 20 26 630 A 2 x 40 x 5 2 x 50 x 8 2 x 185 2 x 300 M12 40 45 1 Mount the cable lug or the busbar according to the figure 2 Secure the connection with 1 bolt 2 washers and 1 nut on the cable lug or the busbar ...

Page 48: ...tings 800 A to 1600 A Current rating 800 A 2 x 50 x 5 2 x 240 2 x 300 M8 8 3 13 1000 A 2 x 60 x 5 4 x 185 M8 8 3 13 1250 A 2 x 60 x 7 4 x 185 M10 20 26 1600 A 2 x 100 x 5 6 x 185 M12 40 45 1 Mount the cable lug or the busbar according to the figure 2 Secure the connection with a cable lug or the busbar For current ratings of 800 A to 1250 A with 4 bolts 8 washers and 4 nuts in each case For curren...

Page 49: ...ion kit and connection to the power supply systems 6 2 5 1 Copper bar connection kit For current ratings 2000 A to 3200 A the copper bar connection kit may be mounted on the line or load side depending on the connection type This is not fully included with the transfer switch and must be ordered separately The copper bar connection kit is made up of 5 separately available parts The different compo...

Page 50: ... 3KC9811 4 and the bridging bar 3KC9811 8 are already included with the transfer switch The different solutions offered by the copper bar connection kit for current ratings 2000 A to 3200 A are shown below Note With the 3KC4 and 3KC8 transfer switching equipment of current rating 3200 A the connection part A 3KC9811 0 is already included with the transfer switch and must be mounted on the 3200 A t...

Page 51: ... 51 Connection options The following connections are possible with the copper bar connection kit Version Position of the connection Current rating Fig 1 Line side 2000 A 2500 A 2 Line side 3200 A 3 Line side 2000 A 2500 A 4 Line side 2000 A 2500 A 5 Line side 3200 A 2900 A max ...

Page 52: ...6 2 Connecting the main circuit 52 Manual 08 2017 L1V30368969104A 02 Version Position of the connection Current rating Fig 6 Line side 3200 A 7 Load side 2000 A 2500 A 8 Load side 3200 A 9 Load side 2000 A 2500 A ...

Page 53: ...Connection 6 2 Connecting the main circuit Manual 08 2017 L1V30368969104A 02 53 Version Position of the connection Current rating Fig 10 Load side 2000 A 2500 A 11 Load side 3200 A 12 Load side 3200 A ...

Page 54: ...e of the copper bar connection kit changes the dimensions of the 3KC4 and 3KC8 transfer switching equipment Dimensions version 1 Figure 6 22 Dimensions with copper bar connection kit version 1 Dimensions version 2 Figure 6 23 Dimensions with copper bar connection kit version 2 Dimensions of version 3 to 8 Figure 6 24 Dimensions with copper bar connection kit versions 3 to 8 ...

Page 55: ...nection kit Page 49 WARNING Hazardous voltage Ensure there is no live voltage before connecting the transfer switching equipment to the main circuit NOTICE System damage Connect the power supply systems with phase equality Note If you are using the 3KC8 transfer switching equipment mount the corresponding accessories for the electronic module For information see the section titled Connecting the i...

Page 56: ...of the copper bar connection kit are required in the following quantities for these versions Figure 6 27 Bolt set part B 35 mm short length 3KC9811 2 Number of poles Current rating Bolt set part B 35 mm 3KC9811 2 1 3 pole 2000 A 2500 A 6 x 4 pole 2000 A 2500 A 8 x 1 Contains only the quantity for line side connection This variant is connected directly to the power supply systems via the busbars ...

Page 57: ...Main circuit is disconnected Transfer switching equipment is in the Manual position Procedure 1 Mount one busbar on each connecting terminal of the 3KC4 or 3KC8 transfer switching equipment with 6 bolts and 6 washers of the bolt set part B 35 mm 3KC9811 2 Figure 6 28 Connecting busbar version 1 ...

Page 58: ... for these versions Figure 6 30 Bolt set part B 35 mm short length 3KC9811 2 Figure 6 31 Bolt set part B 45 mm 3KC9811 1 Number of poles Current rating Bolt set part B 35 mm 3KC9811 2 1 Bolt set part B 45 mm 3KC9811 1 1 3 pole 3200 A 3 x 3 x 4 pole 3200 A 4 x 4 x 1 Contains only the quantity for line side connection This variant is connected directly to the power supply systems via the busbars Par...

Page 59: ...on part A 3KC9811 0 already included with the transfer switch between the two connecting terminals Figure 6 32 Inserting connection part A 2 Mount 2 busbars with 3 bolts and 3 washers of the bolt set part B 45 mm 3KC9811 1 on the front connecting terminal 3 Mount 1 busbar with 3 bolts and 3 washers of the bolt set part B 35 mm 3KC9811 2 on the rear connecting terminal Figure 6 33 Connecting busbar...

Page 60: ...2 Connecting the main circuit 60 Manual 08 2017 L1V30368969104A 02 Mounting and connecting version 3 to 6 2000 A to 3200 A Version 3 2000 A to 2500 A Version 4 2000 A to 2500 A Version 5 2900 A max Version 6 3200 A ...

Page 61: ...fer switch for 3200 A Figure 6 35 T piece part C 3KC9811 3 Figure 6 36 Bracket part D 3KC9811 4 Number of poles Current rating Connection part A 3KC9811 0 1 T piece part C 3KC9811 3 1 Bracket part D 3KC9811 4 1 3 pole 2000 A 2500 A 6 x 6 x 6 x 3 pole 3200 A Included with the transfer switch 6 x 6 x 4 pole 2000 A 2500 A 8 x 8 x 8 x 4 pole 3200 A Included with the transfer switch 8 x 8 x 1 Contains ...

Page 62: ...nnecting terminals Figure 6 37 Inserting connection part A 2 Mount the bracket part D 3KC9811 4 with the supplied bolts on the outside of the connecting terminals to secure the connection part A Figure 6 38 Mounting bracket part D 3 Position the T piece part C 3KC9811 3 with the supplied bolts as shown in the figure on top of the already mounted parts A and D Figure 6 39 Mounting the T piece ...

Page 63: ...quirements Main circuit is disconnected Transfer switching equipment is in the Manual position Copper bar connection kit is mounted Procedure The bolt set required for mounting is not included with the transfer switch You can find the bolt set requirements in the following table Version Bolt Washer Nut 3 vertical 2000 2500 A 3 x H M12 55 6 8 6 x 3 x 4 horizontal 2000 2500 A 5 x H M12 55 6 8 10 x 5...

Page 64: ...hers and 3 nuts Version 4 and 6 horizontal alignment each with 5 bolts 10 washers and 5 nuts Figure 6 40 Connecting versions 3 and 4 2000 A to 2500 A Figure 6 41 Connecting versions 5 and 6 2900 A or 3200 A 2 Connect the mounted transfer switching equipment to the power supply systems For the 3 pole type with 6 x the above listed bolt set For the 4 pole type with 8 x the above listed bolt set ...

Page 65: ...here is no live voltage before connecting the transfer switching equipment to the main circuit NOTICE System damage Connect the power supply systems with phase equality Note If you are using the 3KC8 transfer switching equipment mount the corresponding accessories for the electronic module For information see the section titled Connecting the inputs and outputs of the electronic module 3KC8 only P...

Page 66: ...000 A to 2500 A Version 8 3200 A The same components of the copper bar connection kit are required for versions 7 to 8 as for versions 3 to 6 Mounting is also identical to mounting of versions 3 to 6 You can find more detailed information in the section titled Connecting current ratings 250 A to 1600 A to the main circuit Page 46 ...

Page 67: ...fer switch You can find the bolt set requirements in the following table Version Bolt Washer Nut 7 horizontal 2000 2500 A 10 x H M12 55 6 8 20 x 10 x 8 horizontal 3200 A 10 x H M12 65 6 8 20 x 10 x 1 Mount the busbar with 10 bolts 20 washers and 10 nuts on the transfer switching equipment Figure 6 42 Connecting versions 7 and 8 2 Connect the mounted transfer switching equipment to the power supply...

Page 68: ...ection 6 2 Connecting the main circuit 68 Manual 08 2017 L1V30368969104A 02 Mounting and connecting version 9 to 12 Version 9 2000 A to 2500 A Version 10 2000 A to 2500 A Version 11 3200 A Version 12 3200 A ...

Page 69: ...t A 3KC9811 0 Figure 6 44 Bolt set part B 45 mm 3KC9811 1 Figure 6 45 Bridging bar part E 3KC9811 8 Number of poles Current rating Connection part A 3KC9811 0 Bolt set part B 45 mm 3KC9811 1 Bridging bar part E 3KC9811 8 3 pole 2000 A 2500 A 6 x 6 x 3 x 3 pole 3200 A Included with the transfer switch 6 x 3 x 4 pole 2000 A 2500 A 8 x 8 x 4 x 4 pole 3200 A Included with the transfer switch 8 x 4 x ...

Page 70: ...rt a connection part A 3KC9811 0 between every pair of opposite connecting terminals Figure 6 46 Inserting connection part A 2 Position the bridging bar part E 3KC9811 8 as shown in the figure on the already mounted parts A Figure 6 47 Mounting bridging bar part E 3 Mount the bridging bar with the supplied bolts and washers on the parts A ...

Page 71: ...ystems in two different ways Version 9 and 11 Vertically aligned Version 10 and 12 Horizontally aligned The same components are required for versions 9 to 12 as for versions 3 to 6 Mounting is also identical to mounting of versions 3 to 6 The following versions correspond here Version 9 corresponds to version 3 vertical 2000 A to 2500 A Version 10 corresponds to version 4 horizontal 2000 A to 2500...

Page 72: ...operator differs in part between the 3KC4 and 3KC8 transfer switching equipment Please pay particular attention to these important notices 6 3 1 Inputs and outputs of the motor operator 6 3 1 1 Overview of motor operator The motor operator has the following Inputs and outputs Figure 6 50 Overview of inputs and outputs for 3KC4 and 3KC8 transfer switching equipment Note You can find more informatio...

Page 73: ...tage Ensure there is no live voltage before connecting the motor operator to the control circuit NOTICE Damage to the device The product is designed for a rated impulse voltage resistance Uimp of 12 kV for the main circuit and 4 kV for the motor operator If you use the product in an application with possible overvoltages of 4 kV you must additionally employ suitable measures such as surge arrester...

Page 74: ...to the Manual position 2 Connect the supply lines with the connector for the control inputs For 3KC8 only Figure 6 52 Connecting supply cables 3 Connect the supply lines with the connector for the outputs of the motor operator You can see the designations of the inputs and outputs in the figure 4 Tighten the contacts with a screwdriver 5 Insert the connector in the terminal of the control inputs 6...

Page 75: ...g equipment the control circuit including the motor operator is supplied with power via the inputs of the electronic module Cover Figure 6 53 Input of power supply 3KC4 transfer switching equipment After connecting the inputs and outputs of the transfer switching equipment the power supply of the motor operator must be connected NOTICE Damage to the device The transfer switching equipment must onl...

Page 76: ... 6 54 Removing the cover cap 2 Slide the flap carefully backwards and remove it Inputs 301 and 302 are now accessible 3 Remove the connector Figure 6 55 Remove the connector 4 Prepare the supply lines in accordance with the figure N on 302 L on 301 5 Connect the supply lines with the connector 6 Tighten the terminals Figure 6 56 Connecting supply cables with connector ...

Page 77: ... is not drawn from an external power supply system separately available accessories are necessary This is described in the following sections 6 3 2 1 Mounting and connecting the dual power supply DPS The 3KC4 transfer switching equipment can be supplied from two 230 V AC power supply systems with the dual power supply 3KC9625 1 The dual power supply can be used for all 3KC4 devices Properties of t...

Page 78: ...mbly Figure 6 58 Mounting the dual power supply DPS on the standard mounting rail 2 Align the clip assembly with a screwdriver as shown in the figure 3 If you have aligned the plug in assembly on the underside press the device carefully to the rear until the plug in assembly audibly engages also on the underside Connecting the dual power supply See the table below for the requirements of the suppl...

Page 79: ...connecting an autotransformer 400 V 230 V The 3 pole transfer switching equipment requires a voltage of 230 V AC to supply the transfer switching equipment The autotransformer 3KC9824 1 converts the voltage of 400 V AC that is active between the phases to the required voltage of 230 V AC Installing an autotransformer 1 Mount the autotransformer at the desired position with 4 bolts in accordance wi...

Page 80: ...ction Cu 200 VA Ue 400 230 V Uimp 2 5 kV 0 5 2 5 mm2 0 5 1 5 mm2 On the autotransformer phase L1 is transformed in each case and phase L3 is used as the conductor Please proceed as follows to connect the autotransformer correctly 1 Connect the supply lines with the autotransformer in accordance with the figure Figure 6 61 Connecting an autotransformer 2 Tighten the contacts with a screwdriver ...

Page 81: ...uts of already installed auxiliary switches that indicate switch positions I and II Figure 6 62 Auxiliary switches current ratings 2000 A to 3200 A The auxiliary switch has the following outputs Figure 6 63 Outputs of the auxiliary switch The outputs have the same PIN designation twice If auxiliary switches in addition to the above listed outputs are required for current ratings 250 A to 1600 A yo...

Page 82: ...lts required for mounting You can install no more than 2 auxiliary switches one above the other Figure 6 64 3KC9803 1 auxiliary switch WARNING Hazardous voltage Ensure there is no active voltage before beginning to install the auxiliary switches Requirements Power supply is switched off Procedure 1 Disassemble the motor operator in accordance with the section titled Motor operator Page 170 2 Place...

Page 83: ...ng bolts M3 x 30 mm Figure 6 65 Installing auxiliary switches 4 After installing the auxiliary switch place the motor operator on the transfer switching equipment again Figure 6 66 Installing the motor operator on the transfer switching equipment Note Make sure the switch position shown in the auxiliary switch display is identical to that of the transfer switching equipment 5 Install the motor ope...

Page 84: ...he scope of supply of the 3KC9803 2 auxiliary switch includes the auxiliary switch with connected plug and the bolts required for mounting You can install no more than 2 auxiliary switches one above the other Figure 6 67 Auxiliary switch 3KC9803 2 WARNING Hazardous voltage Ensure there is no active voltage before beginning to install the auxiliary switches ...

Page 85: ...ary switch at the corresponding position and secure it to the transfer switching equipment When installing 1 auxiliary switch use 4 short bolts M3 x 18 mm When installing 2 auxiliary switches use 4 long bolts M3 x 30 mm Figure 6 68 Installing auxiliary switches 800 A to 1600 A 3 Lay the cable of the auxiliary switch around the transfer switching equipment in accordance with the figure Figure 6 69 ...

Page 86: ...erminal of the auxiliary switch in the H piece in accordance with the figure When installing 1 auxiliary switch mount the terminal in the lower hollow of the H piece When installing 2 auxiliary switches mount the terminals in the lower or upper hollow of the H piece Figure 6 71 Mounting the auxiliary switch terminal on the H piece 6 Secure the H piece again on the transfer switching equipment Figu...

Page 87: ...ansfer switching equipment again Figure 6 73 Installing the motor operator on the transfer switching equipment Note Make sure the switch position shown in the auxiliary switch display is identical to that of the transfer switching equipment 8 Install the motor operator on the transfer switching equipment with the bolts Figure 6 74 Installing motor operator ...

Page 88: ... following inputs and outputs are located on the top of the electronic module of the 3KC8 automatic transfer switching equipment Figure 6 75 Inputs and outputs of the electronic module The description of the inputs and outputs of the electronic module 3KC8 only can be found in chapter Inputs and outputs of the electronic module 3KC8 only Page 115 ...

Page 89: ...utral Three phase 3 wire network without neutral Single phase network with neutral Connecting the load Load on the top Load on the bottom The required accessories and their installation are described in the following sections See also the section titled Accessories Page 145 6 3 5 1 Installing accessories for the electronic module The accessories required for connecting the electronic module depend...

Page 90: ... terminals of source I and source II Connect the black cables with the terminals of source I and the red cables with the terminals of source II 2 Install the accessories between the connecting terminals in accordance with the figure From size 800 A FASTON plug in connectors are used Figure 6 76 Installing size 250 A to 630 A 4 pole Figure 6 77 Installing size 800 A to 1600 A 4 pole ...

Page 91: ... described in the sections Connecting current ratings 250 A to 1600 A to the main circuit Page 46 or Connecting current ratings 2000 A to 3200 A to the main circuit on the line side Page 55 Note On the 3KC8 transfer switching equipment of sizes 2000 A the accessories must be attached between the two terminals that are connected using the copper bar connection kit ...

Page 92: ... module is supplied with power via inputs 101 102 and 201 202 After you have installed the power supply kit between the connecting terminals in accordance with the section titled Installing accessories for the electronic module Page 89 you can connect it with the electronic module The following inputs are connected with the cable Inputs for the power supply 101 102 and 201 202 Inputs for voltage m...

Page 93: ...30368969104A 02 93 The following figure shows a 3KC9830 3KC9831 power supply kit for 4 pole applications with neutral Figure 6 80 3KC9830 3KC9831 power supply kit for 4 pole applications 3KC9831 for fastening on top of the transfer switching equipment is shown here ...

Page 94: ...he circuit diagram below The F1 fuses are not required when using the 3KC9830 3KC9831 power supply kits Figure 6 81 Circuit diagram for a typical connection of the sources 3PH N to the electronic module If the power supply kit is not used the following fuses are to be fitted F1 3 x 3NW6004 1 1 x 3NW7033 4 A gG Note The F1 fuses must be installed as closely as possible to the tap ...

Page 95: ...transfer switching equipment must be implemented using two 3KC9824 1 autotransformers 400 V 230 V After you have mounted the auxiliary conductor terminal connection kit between the connecting terminals in accordance with the section titled Installing accessories for the electronic module Page 89 you can connect the electronic module with the accessories In doing so the inputs for voltage measureme...

Page 96: ...re shows the 3KC9822 3KC9832 auxiliary conductor terminal connection kit for 3 pole applications without neutral Figure 6 83 3KC9822 3KC9832 auxiliary conductor terminal connection kit for 3 pole applications without neutral 3KC9832 for fastening on top of the transfer switching equipment is shown here ...

Page 97: ... kits Figure 6 84 Circuit diagram for a typical connection of the sources 3PH to the electronic module Note The complete circuit diagram with connection to the power supply can be found in section Circuit diagram for the 3KC8 transfer switching equipment 3 pole transfer switching equipment Page 36 If the auxiliary conductor terminal connection kit is not used the following fuses are to be fitted F...

Page 98: ...ies the electronic module with power After you have mounted the power supply kit between the connecting terminals in accordance with the section titled Installing accessories for the electronic module Page 89 you can connect the electronic module with the accessories The following inputs are connected with the cable Inputs for power supply 101 and 102 as well as 201 and 202 Inputs for voltage meas...

Page 99: ... L1V30368969104A 02 99 The following figure shows a 3KC9833 3KC9834 power supply kit for a single phase network Figure 6 86 3KC9833 3KC9834 power supply kit for a single phase network 3KC9834 for fastening on top of the transfer switching equipment is shown here ...

Page 100: ...the circuit diagram below The F1 fuses are not required when using the 3KC9833 3KC9834 power supply kits Figure 6 87 Circuit diagram for a typical connection of the sources 1PH N to the electronic module If the power supply kit is not used the following fuses are to be fitted F1 1 x 3NW6004 1 1 x 3NW7013 4 A gG Note The F1 fuses must be installed as closely as possible to the tap ...

Page 101: ...the functions of the inputs and outputs Programming the electronic module 3KC8 transfer switching equipment only 7 1 Operating modes of the transfer switching equipment The performance range of the Siemens 3KC4 and 3KC8 transfer switching equipment encompasses in principle 3 operating modes Figure 7 1 Automatic mode 3KC8 remote mode 3KC4 Figure 7 2 Manual operation Figure 7 3 Padlocking mode ...

Page 102: ...ment By closing contacts 312 and 317 on the motor operator automatic mode of the electronic module is prevented and the 3KC8 transfer switching equipment can be used as remotely operated transfer switching equipment RTSE Activating remote mode 1 Turn the switch on the motor operator from the Manual position to the Auto position to change from manual operation to remote mode Figure 7 4 Changing to ...

Page 103: ...c mode of the electronic module 3KC8 only allows attachment of the handle allows locking using a padlock if the handle is not attached padlocking mode Setting Manual operation mode 1 Turn the switch on the motor operator from the Auto position to the Manual position to change from remote automatic mode 3KC8 only to manual operation 2 Attach the handle Figure 7 5 Setting manual operation The Power ...

Page 104: ...inputs 312 317 as well as automatic mode of the electronic module 3KC8 transfer switching equipment only prevents attachment of the handle Note The transfer switching equipment can only be locked under the following conditions The transfer switching equipment is in manual operation mode The handle is removed Setting padlocking mode 1 Remove the handle if applicable 2 Turn the switch on the motor o...

Page 105: ...Automatic mode activates the controller and automatic mode of the electronic module prevents padlocking mode prevents attaching of the handle Setting automatic mode 1 Turn the switch on the motor operator from the Manual position to the Auto position to change from manual operation to automatic mode Figure 7 8 Activating automatic mode The Power LED on the motor operator shows a continuous green l...

Page 106: ... section titled Connecting the control circuit Page 72 are explained in more detail Note Some points in this chapter are only relevant for the 3KC4 or 3KC8 transfer switching equipment Please pay particular attention to these important notices 7 2 1 Inputs and outputs of the motor operator The inputs of the motor operator are located in the following positions Figure 7 9 Inputs of the motor operat...

Page 107: ...erties Recommended cable cross section Power supply 3KC4 only 301 Power supply 208 277 V AC 20 45 65 Hz 1 5 2 5 mm2 302 Power supply Control inputs of the motor opera tor 312 Enable Ctrl Remote mode enabled if closed with 317 Use only with floating contacts and supply via pin 317 Maximum cable length 100 m 1 5 2 5 mm2 313 OFF Priority command for the OFF position if closed with input 317 314 II Co...

Page 108: ... inputs on the motor operator of the 3KC4 and 3KC8 transfer switching equipment Pin 317 is used as the common control terminal for control inputs 312 316 NOTICE Damage to the device Do not connect the control inputs to an external power supply On the 3KC8 transfer switching equipment the transfer is implemented using the electronic module By closing contacts 312 and 317 the electronic module can b...

Page 109: ...312 and can thus also be activated when that input is not shorted However this requires the transfer switching equipment to be in the Auto position The transfer switching equipment remains in position O when pins 313 and 317 are shorted Transfer to other switch positions is prevented Only after opening the pin can the transfer switching equipment implement new commands As long as pins 313 and 317 ...

Page 110: ... Common control terminal for inputs 312 316 Input 317 is used as the common control terminal for inputs 312 316 Technical specifications for the control inputs of the motor operator Motor operator Number of inputs 5 Direct current Iin 0 35 0 5 mA Line resistance 1 kΩ Length of cable Maximum 100 m cable cross section min 1 5 mm2 16AWG Minimum pulse duration 60 ms Power per input 0 06 VA Overvoltage...

Page 111: ...on Outputs of motor opera tor 04 0 Auxiliary contact position O nor mally open Floating contacts 2 A AC1 250 V 1 5 2 5 mm2 13 C Common control terminal for pins 04 14 and 24 14 I Auxiliary contact position I nor mally open NO contact 24 II Auxiliary contact position II nor mally open NO contact 63A AVAIL Availability of the motor operator Opened if the motor operator of the transfer switching equi...

Page 112: ...or operator and its switching capacity The functional capability of the electronic module is ignored here The transfer switching equipment checks product availability in the case of the following events When switching on When changing the switch on the motor operator from the Manual position to the Auto position and every 5 minutes thereafter The internal availability test indicates whether the tr...

Page 113: ...voltage of the motor operator outside the limit A supply voltage of the motor operator of less than 166 V AC or more than 332 V AC sets the transfer switching equipment in a non available state Yes Yes Operating fault caused by too many operations per minute The transfer switching equipment has been operated more frequently than 10 times in one minute The trans fer switching equipment is not avail...

Page 114: ... II for each auxiliary switch Designation Pin Explanation Properties Recommended cable cross section Additional auxiliary switches 81 Common control terminal for the auxiliary switch position I Floating contacts 2 A AC1 250 V 1 5 2 5 mm2 82 Auxiliary switch position I leading normally closed NC contact 84 Auxiliary switch position I leading normally open NO contact 91 Common control terminal for t...

Page 115: ...ule in addition to the two inputs and outputs of the motor operator 7 2 3 1 Inputs for voltage measurement and power supply The inputs for voltage measurement and power supply on the electronic module are located in the following positions on the electronic module Power supply input I Voltage measurement supply source I Voltage measurement supply source II Power supply input II Figure 7 11 Inputs ...

Page 116: ...t for voltage measure ment of a phase of source I 106 N L1 Input for voltage measure ment of a phase or of the neutral conductor of source I Inputs source II The inputs for the power supply and voltage measurement of source II are listed in the table below Designation Pin Typical connec tion Explanation Properties Recommended cable cross section Power supply input 2 201 N Power supply through sour...

Page 117: ...ect on the display of source availability and on automatic mode of the transfer switching equipment The following parameters can be monitored Phase rotation To determine the phase rotation both sources I and II must be available Frequency within defined limits Compliance with the frequency limits refers either to the nominal frequency default Auto Conf on potentiometer 1 or the default via potenti...

Page 118: ...etection of the phase rotation Detection of the neutral conduc tor Single phase network with neutral 1PH N Three phase 3 wire network without neu tral 3PH Three phase 4 wire network with neutral 3PH N 7 2 3 2 Control inputs of the electronic module The following control inputs are located on the electronic module Control inputs of the electronic module Figure 7 12 Control inputs of the electronic ...

Page 119: ...air 2 4 kV Impulse voltage resistance Uimp between inputs and other current carrying parts 4 8 kV 1 2 μs 50 μs increased insulation Permissible cable cross section min 1 5 mm2 max 2 5 mm2 7 2 3 3 Functions of the control inputs for network generator application Designation Pin Explanation Properties Recommended cable cross section Control inputs of the electronic module 207 Common control terminal...

Page 120: ...are closed Pin 209 Input for test on load This command enables execution of a generator start and a complete transfer on load for generator test purposes The test on load can only be carried out in automatic mode The test is carried out when contacts 207 and 209 are closed Pin 210 Inactive Pin 413 Priority for test on load During a test on load pin 209 pin 413 causes the transfer switching equipme...

Page 121: ...fer switching equipment can be operated only in manual operation using the handle or in remote mode using inputs 313 317 on the motor operator Pin 417 Common control terminal of inputs 413 416 Pin 417 is used as the common control terminal for inputs 413 416 7 2 3 4 Functions of the control inputs for network network application Designation Pin Explanation Properties Recommended cable cross sectio...

Page 122: ...l return transfer This command prevents automatic return transfer to the prioritized source supply In other words even if the prioritized source is available again the 3KC8 transfer switching equipment remains in the current switch position and it must be switched back manually The command becomes active when contacts 415 and 417 are closed If the contact is opened the transfer switching equipment...

Page 123: ...le and of the motor operator Open if the electronic module and or motor operator of the transfer switching equipment are not available Closed if the switch on the motor operator is at the Auto position and the electronic module and the motor operator are ready for operation Floating contacts 2 A AC1 250 V 1 5 2 5 mm2 64B Switching the genera tor on off 71 Common control terminal for pins 72 and 74...

Page 124: ...Outputs of the motor operator Page 111 Fault internal clock Yes Yes Motor operator has not been recognized Wiring problem connection between electronic module and motor operator Yes Yes Fault Outputs signal for start ing stopping the generator At least one of the outputs signal for starting stopping the generator does not change its state pin 72 74 Yes Yes Fault during autoconfigura tion Detection...

Page 125: ... 64A of the motor operator are open the user can bypass the electronic module and actuate remote control for transfer switching via inputs 312 to 317 on the motor operator If outputs 63A 64A of the motor operator are closed manual transfer switching with the supplied handle is possible in the event of an emergency Outputs 71 72 74 only relevant for the network generator application These outputs e...

Page 126: ... 3KC8 transfer switching equipment automatic mode of the electronic module is prevented by closing the inputs Depending on the connection of the 3KC4 and 3KC8 transfer switching equipment there are two control logics of the inputs Impulse logic Continuous operation logic Note In remote mode the commands for changing to position I and II are prioritized over command O In this way the continuous ope...

Page 127: ... ms is required Each command can be executed by the combination of one 3SB3000 0AA11 pushbutton one contact block with 3SB3400 0BA contact element Commands I and II take priority over command O The OFF position has priority over all commands and also functions when contact 312 activate remote mode is not connected This causes the switch to change to position O The OFF command can be executed with ...

Page 128: ...Operation 7 3 Remote mode 128 Manual 08 2017 L1V30368969104A 02 Figure 7 14 Control logic of the 3KC4 3KC8 transfer switching equipment in the case of impulse logic ...

Page 129: ...O and they can be set using the 3SB3000 2DA11 toggle switch in conjunction with two contact blocks with a 3SB3400 0BA contact element for I and II The O command must always be active for continuous operation logic This command 316 can be maintained with the 3SB3000 2KA11 toggle switch in conjunction with a contact block with 3SB3400 0BA contact element Commands I and II have the same priority in o...

Page 130: ...69104A 02 3 x toggle switch with 2 switch positions 0 I 3SB3000 2KA11 5 x contact blocks with one contact element 3SB3400 0BA 1 x toggle switch with 3 switch positions 0 I II 3SB3000 2DA11 Note Contact blocks with gold plated internal contacts must be used ...

Page 131: ...Operation 7 3 Remote mode Manual 08 2017 L1V30368969104A 02 131 Figure 7 15 Control logic of the 3KC4 3KC8 transfer switching equipment in the case of continuous operation logic ...

Page 132: ...le in five steps Programming is described below Figure 7 16 Electronic module 7 4 1 Step 1 Preset network conditions You set the defaults of the network conditions on the DIP switches A screwdriver is required for this First make sure the transfer switching equipment is in manual operation 1 Check whether the transfer switching equipment is in the Manual position Set the transfer switching equipme...

Page 133: ...ase network B Single phase network with this setting the DIP switch C D is inactive C D C Three phase 4 wire network with neutral Enables recognition of failure of the neutral conductor in the case of unbalanced loads D Three phase 3 wire network without neutral E F E No additional delay in position O F Additional delay of 2 s in position O G H G Network generator applications H Network network ap...

Page 134: ...Figure 7 19 Setting the potentiometer Potentiometer Explanation Un Position 0 Autoconfiguration Position 1 13 Pre configuration of voltage and frequency see table below ΔU ΔF Setting the limits ΔU Adjustable from 5 to 20 ΔF Adjustable from 3 to 10 Transfer delay sec Timer for setting the delay for system loss 0 60 sec If system loss is detected the timer is started If the source is available again...

Page 135: ...time is fixed at 3 mins command to generator remains active The table contains a summary of the possible potentiometer settings Item no 0 1 2 3 4 5 6 7 8 9 10 11 12 13 14 Un Auto Conf 220 127 V 380 220 V 400 230 V 415 240 V 480 277 V 208 120 V 220 127 V 230 132 V 240 138 V 380 220 V 400 230 V 415 240 V 480 277 V Freq 50 Hz 60 Hz ΔU ΔF 5 3 6 3 7 4 8 4 9 5 10 5 11 6 12 6 13 7 14 7 15 8 16 8 18 9 20 ...

Page 136: ...d frequency the phase sequence and the position of the neutral conductor Requirements The connections have been checked The product is ready for commissioning Availability of the main source is required optimally both sources are available Procedure 1 Press the OK Prog button for at least 2 s to measure the rated values for voltage frequency the phase sequence and the position of the neutral condu...

Page 137: ...continuous green light when the parameters have been successfully saved 7 4 5 Step 5 Switching the 3KC8 transfer switching equipment to automatic mode After programming steps 1 to 4 have been successfully carried out the 3KC8 transfer switching equipment can be switched to automatic mode 1 Turn the switch from the Manual position to the Auto position Figure 7 22 Turning the switch to the Auto posi...

Page 138: ...Operation 7 4 Automatic mode programming of the electronic module 3KC8 only 138 Manual 08 2017 L1V30368969104A 02 ...

Page 139: ...3KC4 transfer switching equipment After the 3KC4 transfer switching equipment has been connected to the main circuits and the control circuits have been successfully connected according to type and source you can commission the transfer switching equipment Requirements The transfer switching equipment is in the Manual position Figure 8 1 Switch in Manual position The handle is in the O position Fi...

Page 140: ...8 3 Fastening the cable lugs busbars All connectors have been fastened properly Procedure 1 Switch on the power supply Figure 8 4 Switching on the power supply Power LED and warning LED light up 2 Turn the switch from the Manual position to the Auto position to switch the transfer switching equipment to remote mode Figure 8 5 Turning the switch to the Auto position ...

Page 141: ...o the main circuits and the control circuits have been successfully connected according to type and source you can commission the transfer switching equipment Requirements The transfer switching equipment is in the Manual position Figure 8 6 Switch in Manual position The handle is in the O position Figure 8 7 Handle in the O position All cable lugs busbars have been properly mounted Figure 8 8 Fas...

Page 142: ...C8 transfer switching equipment 142 Manual 08 2017 L1V30368969104A 02 All connectors have been fastened properly Figure 8 9 Securing the connectors The electronic module has been correctly connected Figure 8 10 Electronic module connections ...

Page 143: ... and on the electronic module light up The LEDs for indicating source availability light up depending on source availability 2 Program the electronic module as described in the section titled Automatic mode programming of the electronic module 3KC8 only Page 132 3 Turn the switch from the Manual position to the Auto position to switch the transfer switching equipment to automatic mode Figure 8 12 ...

Page 144: ...Commissioning 8 2 Commissioning the 3KC8 transfer switching equipment 144 Manual 08 2017 L1V30368969104A 02 ...

Page 145: ...tage Ensure there is no live voltage before mounting an accessory Note Some points in this chapter are relevant either for the 3KC4 transfer switching equipment or the 3KC8 transfer switching equipment Note the relevant information in the chapter headings If you are using the 3KC8 transfer switching equipment mount the corresponding accessories for the electronic module first For information see t...

Page 146: ...cope of supply includes 3 or 4 terminal covers depending on the number of poles Front side protection of the terminals top and bottom requires two terminal covers to be ordered Full protection including touch protection on the rear requires four sets to be ordered The optionally available terminal covers are listed in the table below Current rating Number of poles Position Product number 250 A 3 p...

Page 147: ...rst Requirements Main circuit is disconnected Transfer switching equipment is in the Manual position Bridging bars are mounted if used Accessories for the electronic module installed 3KC8 only Procedure Figure 9 2 Mounting terminal covers 1 Connect the terminal covers with each other depending on the number of poles 2 Place the connected terminal covers in the draw out assembly of the transfer swi...

Page 148: ...e 9 3 Phase barriers The scope of supply includes 2 phase barriers for 3 pole devices or 3 phase barriers for 4 pole devices depending on the number of poles For full protection on the top and bottom of both installed switches 4 packs must be ordered in each case The optionally available phase barriers are listed in the table below Current rating Number of poles Position Product number 250 A 3 pol...

Page 149: ...are used mount them first Requirements Main circuit is disconnected Transfer switching equipment is in the Manual position Bridging bars are mounted if used Accessories for the electronic module installed 3KC8 only Procedure Figure 9 4 Mounting phase barriers 1 Insert the barrier into the mounting channels on the transfer switching equipment With 3 pole types insert 4 phase barriers per side in ea...

Page 150: ...ings from 800 A the terminal plates consist of 2 parts and are included in the scope of supply The optionally available terminal plates are listed in the table below Current rating Number of poles Position Product number 250 A 3 poles Top bottom 3KC9827 1 4 poles 3KC9828 1 400 A 3 poles 3KC9827 1 4 poles 3KC9828 1 630 A 3 poles 3KC9827 2 4 poles 3KC9828 2 800 A 3 poles 3KC9827 3 4 poles 3KC9827 7 ...

Page 151: ...g the terminal plates on the 3KC4 and 3KC8 transfer switching equipment Requirements Main circuit is disconnected Transfer switching equipment is in the Manual position Accessories for the electronic module installed 3KC8 only Procedure Figure 9 6 Mounting terminal plates for current ratings 250 A to 630 A Figure 9 7 Mounting terminal plates for current ratings 800 A to 1600 A ...

Page 152: ...tes 800 A and higher to the transfer switching equipment in accordance with the figure 2 Fit the terminal plate s on the transfer switching equipment using the supplied bolts Note If you have fitted the phase barrier accessories you can find information on this in the section titled Phase barriers Page 148 they can no longer be removed after the terminal plate has been fitted ...

Page 153: ...itching equipment Figure 9 9 Mounting spacers The scope of supply includes one set comprising 2 mounting spacers Current rating Number of poles Position Product number 250 A 630 A 3 or 4 poles Top 3KC9820 3 9 4 1 Fitting mounting spacers The following steps are necessary for fitting additional mounting spacers Note The mounting spacers must be attached before mounting the 3KC4 or 3KC8 transfer swi...

Page 154: ...serve as a bridge for the load side connection and they can be attached either on the top or bottom of the transfer switching equipment The bridging bars for current ratings 250 A to 630 A and 800 A to 1600 A comprise one bridging bar as well as the bolts nuts and washers for mounting These must be ordered separately for connecting to the connecting terminals Please note here the section titled Co...

Page 155: ...18 4 4 poles 3KC9818 4 800 A 3 poles 3KC9818 5 4 poles 3KC9818 5 1000 A 3 poles 3KC9818 5 4 poles 3KC9818 5 1250 A 3 poles 3KC9818 6 4 poles 3KC9818 6 1600 A 3 poles 3KC9818 7 4 poles 3KC9818 7 9 6 Copper bar connection kit The copper bar connection kit is described in the section titled Copper bar connection kit Page 49 All the components in the connection kit are listed below Figure 9 13 Connect...

Page 156: ...set part B 35 mm short length 3KC9811 2 Figure 9 16 T piece part C 3KC9811 3 Figure 9 17 Bracket part D 3KC9811 4 Figure 9 18 Bridging bar part E 3KC9811 8 Different connection variants can be created from these components These are described in the section titled Copper bar connection kit Page 49 ...

Page 157: ...sformer can be seen in the section titled Installing and connecting an autotransformer 400 V 230 V Page 79 Figure 9 19 Autotransformer 400 V 230 V 3KC9824 1 Use of a dual power supply is recommended for the 3KC4 transfer switching equipment In this case 2 autotransformers are required both for the 3KC4 transfer switching equipment and for the 3KC8 transfer switching equipment respectively Current ...

Page 158: ...the 3KC4 remotely operated transfer switching equipment is implemented by means of 2 x 230 V AC sources The section Mounting and connecting the dual power supply DPS Page 77 describes the design and installation of the dual power supply Figure 9 20 Dual power supply DPS 3KC9625 1 Current rating Number of poles Position Product number 250 A 3200 A 3 or 4 poles 3KC9625 1 ...

Page 159: ...ecting power supply kit 3KC9830 3KC9831 4 pole Page 92 Figure 9 21 Power supply kit 3KC9830 3KC9831 The table below lists the possible variants depending on the arrangement of the load on the top or bottom and the current rating Current rating Number of poles Position Product number 250 A 4 poles Bottom 3KC9830 1 400 A 4 poles 3KC9830 2 630 A 4 poles 3KC9830 3 800 A 1000 A 4 poles 3KC9830 4 1250 A...

Page 160: ...C9822 3KC9832 for a three phase 3 wire network 3 pole Page 95 Figure 9 22 Auxiliary conductor terminal kit 3KC9822 3KC9832 The table below lists the possible variants depending on the arrangement of the load on the top or bottom and the current rating Current rating Number of poles Position Product number 250 A 3 poles Bottom 3KC9822 1 400 A 3 poles 3KC9822 2 630 A 3 poles 3KC9822 3 800 A 1000 A 3...

Page 161: ...r supply kit 3KC9833 3KC9834 for single phase network Page 98 Figure 9 23 Power supply kit 3KC9833 3KC9834 The table below lists the possible variants depending on the arrangement of the load on the top or bottom and the current rating Current rating Number of poles Position Product number 250 A 3 poles Bottom 3KC9833 1 400 A 3 poles 3KC9833 2 630 A 3 poles 3KC9833 3 800 A 1000 A 3 poles 3KC9833 4...

Page 162: ...oor cut out to enable access to the front of the 3KC8 transfer switching equipment electronic module and operation of the motor operator You can find the dimensions of the cover frame in the section titled Dimensions of the cover frame for door cut out Page 30 Figure 9 24 Cover frame Current rating Product number 250 A 630 A 3KC9820 4 800 A 3200 A 3KC9820 5 ...

Page 163: ...om 2000 A to 3200 A the auxiliary switches are already included and mounted on the transfer switching equipment One leading CO contact per auxiliary switch is included for position I and II The section titled Auxiliary switch of the transfer switching equipment Page 81 describes the auxiliary switches and their installation in more detail Figure 9 25 Auxiliary switches 3KC9803 1 left and 3KC9803 2...

Page 164: ...he connection is 3 m Figure 9 26 Display 3KC9823 0 The 3KC9823 0 display shows the following states Display of source availability Indication of the switch position Indication of the selected mode Auto Fault indicator Current rating Product number 250 A 3200 A 3KC9823 0 Mounting the display The door thickness must not exceed 20 mm to allow the display to be mounted on a cabinet door 1 Release and ...

Page 165: ...nt in the door where you would like to mount the display Note the dimensions in the figure Figure 9 28 Cabinet door drill holes 3 Insert the bolt thread and the connection socket of the display through the two drill holes Figure 9 29 Mounting the display 4 Place the nut on the bolt thread and tighten it with the specified torque ...

Page 166: ...so the section titled Connection cable 3KC8 only Page 167 1 Connect one end of the 3KC9823 2 connection cable with the connection socket on the rear of the display Figure 9 30 Connecting the 3KC9823 2 connection cable on the display 2 Connect one end of the connection cable 3KC9823 2 with the connection socket on the rear of the display Figure 9 31 Connecting the display on the transfer switching ...

Page 167: ... the connection cable a simple connection can be established between the 3KC8 transfer switching equipment and the external display Technical specifications Type RJ45 8 core Straight wires not shielded and not crossed Length 3 m Figure 9 32 3KC9823 2 connection cable Current rating Product number 250 A 3200 A 3KC9823 2 ...

Page 168: ...lable cover Current rating Product number 250 A 3200 A 3KC9821 0 Mounting the sealable cover Requirement The electronic module of the transfer switching equipment is already programmed Procedure 1 Press the threaded sockets into their intended positions 2 Remove the sealable cover s protective film and mount the two sealing ribbons as shown in the diagram 3 Mount the sealable cover onto the electr...

Page 169: ...16 Sealable cover 3KC8 only Manual 08 2017 L1V30368969104A 02 169 Note The sealing ribbons are also available separately as spare parts in a packet of 10 3KC9621 2 Current rating Product number 250 A 3200 A 3KC9621 2 ...

Page 170: ...he event of a defect It is possible to replace the motor operator without disassembling the transfer switching equipment Figure 9 34 Motor operator The required motor operator depends on the current rating The table below lists the motor operators according to current rating Current rating Product number 250 A 400 A 3KC9826 1 630 A 3KC9826 2 800 A 1250 A 3KC9826 3 1600 A 3KC9826 4 2000 A 3200 A 3K...

Page 171: ...e the replacement of the motor operator on the 3KC4 transfer switching equipment 1 Switch the transfer switching equipment from Auto mode to Manual mode Figure 9 35 Set the switch to the Manual position 2 Switch the transfer switching equipment to position 0 OFF 3 Press the button on the cover cap Figure 9 36 Disassembling the cover cap and the power supply kit 4 Slide the cover cap carefully back...

Page 172: ...rator in an environmentally friendly way 11 To mount a new motor operator follow steps 1 to 8 in the reverse order Replacing the motor operator of the 3KC8 transfer switching equipment The following steps describe the replacement of the motor operator on the 3KC8 transfer switching equipment 1 Switch the transfer switching equipment from Auto mode to Manual mode Figure 9 39 Set the switch to the M...

Page 173: ... 14 04 13 5 Remove the bolts in accordance with the figure Figure 9 42 Disassembling the motor operator of the 3KC8 transfer switching equipment 6 Remove the motor operator from the transfer switching equipment 7 Remove the bolts of the electronic module in accordance with the figure Figure 9 43 Disassembling the electronic module 8 Pull the electronic module to the rear to release the bolts ...

Page 174: ...supply 10 Disconnect the power supply of the transfer switching equipment pin 301 and 302 11 Release the clip assembly to remove the electronic module from the motor operator 12 Dispose of the motor operator in an environmentally friendly way Figure 9 45 Disposing of the motor operator 13 To mount a new motor operator follow steps 1 to 11 in the reverse order ...

Page 175: ...ronic module 3KC9826 0 Current rating Product number 250 A 3200 A 3KC9826 0 Replacing the electronic module 1 To disassemble the electronic module follow the corresponding steps 1 to 11 in the section titled Motor operator Page 170 2 Dispose of the electronic module in an environmentally friendly way Figure 9 47 Disposing of the electronic module 3 To mount a new electronic module follow steps 1 t...

Page 176: ...Accessories 9 18 Electronic module 3KC8 only 176 Manual 08 2017 L1V30368969104A 02 ...

Page 177: ...the Auto position Check whether contacts 313 and 317 are opened Check whether contacts 312 and 317 are closed Check whether the Power LED shows a green light and the warning LED has gone out Check product availability via the closed contacts 63A and 64A The transfer switching equipment cannot be operated with the handle Check whether the switch is in the Manual position Check whether the product i...

Page 178: ... transfer switching equipment can be reset on the hard ware by switching off the power supply to the transfer switching equipment for more than 3 minutes If the LED continues to light up you must locate and correct the fault The warning LED lights up if contacts 313 priority com mand for the OFF position and 317 are closed This is a normal state If the LED lights up for other reasons contact Techn...

Page 179: ...dule can be bypassed to localize the problem to the electronic module or motor opera tor Contacts 312 and 317 must be closed and contact 313 must remain open In this way the motor operator can execute transfer com mands through inputs 314 317 without involvement of the electronic module The transfer switching equipment is in remote mode The transfer switching equipment cannot be operated with the ...

Page 180: ...ator lights up when the transfer switching equipment is in manual operation If the LED lights up even though the transfer switching equipment is in automatic mode an internal fault is active To reset the state switch the transfer switching equipment from automat ic mode to manual operation and back again to automatic mode Alternatively the transfer switching equipment can be reset on the hardware ...

Page 181: ...sks involved when handling these products systems and to avoid any possible hazards Procedure WARNING Hazardous voltage Ensure there is no live voltage before carrying out service or maintenance work on the transfer switching equipment We recommend actuating the 3KC4 and 3KC8 transfer switching equipment at least once a year in the following sequence I 0 II 0 I This should be done both in manual o...

Page 182: ...Service and maintenance 10 2 Regular service and maintenance 182 Manual 08 2017 L1V30368969104A 02 ...

Page 183: ...voltage V 1000 AC 1000 DC Impulse withstand voltage Uimp of the main circuit kV 12 12 12 12 12 Impulse withstand voltage Uimp of the control circuit kV 4 4 4 4 4 Overvoltage category with pollution degree 3 RTSE IV ATSE III Operational current in compliance with IEC 60947 6 1 AC 31 B 415 V A 250 400 630 800 1000 AC 32 B 415 V A 200 400 500 800 1000 AC 33 B 415 V A 200 200 400 800 800 Operational c...

Page 184: ...cuit current making capacity Icm 415 V kA 22 at 690 V 30 at 690 V 17 at 690 V 73 5 73 5 Conditional short circuit current with fuse Continuous current of upstream fuse A 250 400 630 800 1000 Conditional short circuit current with fuse 690 V IEC 60947 3 kA 50 50 50 50 50 Conditional short circuit current with fuse 415 V IEC 60947 6 1 kA 50 50 50 50 50 Let through current of gG fuse at 415 V max per...

Page 185: ... Cu busbar mm2 1 x 32 x 5 1 x 32 x 8 2 x 40 x 5 2 x 50 x 5 2 x 60 x 5 Tightening torque for main contacts Nm 20 26 20 26 40 45 8 3 13 8 3 13 Other properties Power loss per pole W 5 9 15 1 32 4 41 7 46 9 Mechanical endurance 7000 4000 4000 2500 2500 Electrical endurance AC 23 B at 415 V 1000 1000 1000 500 500 IP protection class with cover IP00 IP20 Ambient temperature during opera tion C 20 70 Am...

Page 186: ...2 12 12 Impulse withstand voltage Uimp of the control circuit kV 4 4 4 4 4 Overvoltage category with pollution degree 3 RTSE IV ATSE III Operational current in compliance with IEC 60947 6 1 AC 31 B 415 V A 1250 1600 2000 2500 3200 AC 32 B 415 V A 1250 1600 2000 2000 2000 AC 33 B 415 V A 1000 1000 1250 1250 1250 Operational current in compliance with IEC 60947 3 AC 21 A B 415 V A 1250 1600 2000 250...

Page 187: ...5 105 105 Conditional short circuit current with fuse Continuous current of upstream fuse A 1250 2 x 800 Conditional short circuit current with fuse 690 V IEC 60947 3 kA 100 100 Conditional short circuit current with fuse 415 V IEC 60947 6 1 kA 100 100 Let through current of gG fuse at 415 V max permissible kA 100 100 I2t value of the gG fuse at 400 500 V max permissible kA2s Transfer switching pr...

Page 188: ...x 10 3 x 100 x 10 Tightening torque for main con tacts Nm 20 26 40 45 40 45 40 45 40 45 Other properties Power loss per pole W 93 3 122 178 255 330 Mechanical endurance 2500 2500 1500 1500 1500 Electrical endurance AC 23 B at 415 V 500 500 500 500 500 IP protection class with cover IP00 IP20 Ambient temperature during opera tion C 20 70 Ambient temperature during storage C 40 70 Width x height x d...

Page 189: ...aximum rated voltage Un Phase phase V AC 480 Phase neutral V AC 277 Metering range L N V 30 332 Metering range L L V 30 600 Measuring frequency Hz 30 70 Input impedance L L MΩ 12 Number of monitored phases 1 or 3 Measuring method True RMS Relative error of measurement method 0 5 Auxiliary supply Connection type Integrated dual power supply Rated voltage AC V 230 Supply voltage range AC V 166 332 F...

Page 190: ...delay ms 46 Number of relay outputs Motor unit 4 NO Electronic module 1 NO 1 CO 2A 250 V AC 2A 24 V DC Supplementary notes on relay outputs2 Motor operator availability of the motor operator switch position I O II Electronic module availability of the device generator start stop signal Connections Connecting terminals removable plug in Connectable conductor cross section stranded solid mm2 1 5 2 5...

Page 191: ...8969104A 02 191 Dimension drawings 12 The following content is described in this chapter Dimensions of the 3KC4 transfer switching equipment 250 A to 3200 A Dimensions of the 3KC8 transfer switching equipment 250 A to 3200 A ...

Page 192: ...68969104A 02 12 1 Dimension drawings of the 3KC4 transfer switching equipment The dimension drawings of the 3KC4 transfer switching equipment are shown below The dimension drawings are arranged according to current rating Current rating 250 A to 630 A Figure 12 1 Dimension drawing current rating 250 A to 630 A ...

Page 193: ... 321 321 C 288 288 288 288 402 402 D 328 378 328 378 377 437 E 152 152 152 152 221 221 F 195 245 195 245 244 304 G 35 35 35 35 34 34 H 160 210 160 210 210 270 I 50 50 50 50 65 65 J 25 25 35 35 45 45 K 30 30 35 35 50 50 L 11 11 11 11 13 13 M 33 33 33 33 42 5 37 5 N 3 5 3 5 3 5 3 5 5 5 O 39 5 39 5 39 5 39 5 53 53 P 133 5 133 5 133 5 133 5 190 190 Q 160 160 170 170 260 260 R 130 130 140 140 220 220 S...

Page 194: ...he 3KC4 transfer switching equipment 194 Manual 08 2017 L1V30368969104A 02 Current rating 800 A to 1600 A Figure 12 2 Dimension drawing current rating 800 A to 1600 A front view Figure 12 3 Dimension drawing current rating 800 A to 1600 A side view ...

Page 195: ...370 370 370 370 370 380 380 B 461 461 461 461 461 461 531 531 C 504 584 504 584 504 584 596 716 D 307 387 307 387 307 387 399 519 E 255 335 255 335 255 335 347 467 F 80 80 80 80 80 80 120 120 G 50 50 50 50 60 60 90 90 H 60 5 60 5 60 5 60 5 65 65 44 44 I 47 5 47 5 47 5 47 5 47 5 47 5 53 53 J 7 7 7 7 7 7 8 8 K 66 5 66 5 66 5 66 5 66 5 66 5 67 5 67 5 L 321 321 321 321 330 330 288 288 ...

Page 196: ...e 3KC4 transfer switching equipment 196 Manual 08 2017 L1V30368969104A 02 Current rating 2000 A to 3200 A Figure 12 4 Dimension drawing current rating 2000 A to 3200 A front view Figure 12 5 Dimension drawing current rating 2000 A to 3200 A side view ...

Page 197: ...3200 A 3P 4P 3P 4P 3P 4P A 380 380 380 380 380 380 B 461 461 461 461 461 461 C 596 716 596 716 596 716 D 399 519 399 519 399 519 E 347 467 347 467 347 467 F 120 120 120 120 120 120 G 90 90 90 90 90 90 H 44 44 44 44 44 44 I 53 53 53 53 53 53 J 8 8 8 8 8 8 K1 67 5 67 5 67 5 67 5 67 5 67 5 K2 134 134 134 134 134 134 L 288 288 288 288 288 288 ...

Page 198: ...68969104A 02 12 2 Dimension drawings of the 3KC8 transfer switching equipment The dimension drawings of the 3KC8 transfer switching equipment are shown below The dimension drawings are arranged according to current rating Current rating 250 A to 630 A Figure 12 6 Dimension drawing current rating 250 A to 630 A ...

Page 199: ... 321 321 C 288 288 288 288 402 402 D 328 378 328 378 377 437 E 152 152 152 152 221 221 F 195 245 195 245 244 304 G 35 35 35 35 34 34 H 160 210 160 210 210 270 I 50 50 50 50 65 65 J 25 25 35 35 45 45 K 30 30 35 35 50 50 L 11 11 11 11 13 13 M 33 33 33 33 42 5 37 5 N 3 5 3 5 3 5 3 5 5 5 O 39 5 39 5 39 5 39 5 53 53 P 133 5 133 5 133 5 133 5 190 190 Q 160 160 170 170 260 260 R 130 130 140 140 220 220 S...

Page 200: ...he 3KC8 transfer switching equipment 200 Manual 08 2017 L1V30368969104A 02 Current rating 800 A to 1600 A Figure 12 7 Dimension drawing current rating 800 A to 1600 A front view Figure 12 8 Dimension drawing current rating 800 A to 1600 A side view ...

Page 201: ...370 370 370 370 370 380 380 B 461 461 461 461 461 461 531 531 C 504 584 504 584 504 584 596 716 D 307 387 307 387 307 387 399 519 E 255 335 255 335 255 335 347 467 F 80 80 80 80 80 80 120 120 G 50 50 50 50 60 60 90 90 H 60 5 60 5 60 5 60 5 65 65 44 44 I 47 5 47 5 47 5 47 5 47 5 47 5 53 53 J 7 7 7 7 7 7 8 8 K 66 5 66 5 66 5 66 5 66 5 66 5 67 5 67 5 L 321 321 321 321 330 330 288 288 ...

Page 202: ... 3KC8 transfer switching equipment 202 Manual 08 2017 L1V30368969104A 02 Current rating 2000 A to 3200 A Figure 12 9 Dimension drawing current rating 2000 A to 3200 A front view Figure 12 10 Dimension drawing current rating 2000 A to 3200 A side view ...

Page 203: ...3200 A 3P 4P 3P 4P 3P 4P A 380 380 380 380 380 380 B 461 461 461 461 461 461 C 596 716 596 716 596 716 D 399 519 399 519 399 519 E 347 467 347 467 347 467 F 120 120 120 120 120 120 G 90 90 90 90 90 90 H 44 44 44 44 44 44 I 53 53 53 53 53 53 J 8 8 8 8 8 8 K1 67 5 67 5 67 5 67 5 67 5 67 5 K2 134 134 134 134 134 134 L 288 288 288 288 288 288 ...

Page 204: ...Dimension drawings 12 2 Dimension drawings of the 3KC8 transfer switching equipment 204 Manual 08 2017 L1V30368969104A 02 ...

Page 205: ...the following meaning Symbol Explanation Transformer 1 Generator Transfer switching equipment with the switches P1 and P2 Load CL critical load NCL non critical load The following tables show the behavior of the transfer switching equipment The availability of the sources transformers or generators is described by the following numbers 1 source available 0 source not available x source availabilit...

Page 206: ...equipment with an appropriate separate transfer switching controller 13 1 Transfer between two sources with one outgoing load Transfer with T1 kVA T2 kVA The transfer switching equipment can be used for transfer between 2 sources with equal power T1 kVA T2 kVA and with an outgoing load The 3KC8 series offers the ideal solution both for network network applications as well as for network generator ...

Page 207: ...than that of source II T1 kVA T2 G kVA One generator and one transformer are usually used for this However with this application the 3KC8 transfer switching equipment can also switch between two transformers The load is divided into a critical and non critical load here Figure 13 2 Transfer T1 kVA T2 G kVA T1 T2 G Switching state of the transfer switching equipment Non critical load Critical load ...

Page 208: ... with T1 kVA T2 kVA The transfer switching equipment also offers innovative approaches for connection to two non differentiated transformers with equal power T1 kVA T2 kVA Figure 13 3 Transfer T1 kVA T2 kVA T1 T2 Switching state of the transfer switching equipment Loads 0 0 x OFF 1 0 P1 P3 ON 0 1 P2 P4 ON 1 1 P1 P3 ON ...

Page 209: ...sformers T1 and T2 as well as one generator G with an outgoing load By using two transfer switches this complex application in which the power of the 3 sources is equal T1 kVA T2 kVA G can be realized thus enabling the power supply to be maintained Figure 13 4 Transfer T1 kVA T2 kVA G T1 T2 G Switching state of the transfer switching equipment Load 0 0 0 x OFF 1 0 x P1 P3 ON 0 1 x P2 P3 ON 0 0 1 P...

Page 210: ...ransformers is greater than that of the generator T1 kVA T2 kVA G By using two transfer switches this complex application can be realized thus enabling the power supply to be maintained The load is divided into a critical and non critical load here Figure 13 5 Transfer T1 kVA T2 kVA G T1 T2 G Switching state of the transfer switching equipment Non critical load Critical load 0 0 0 x OFF OFF 1 0 x ...

Page 211: ... switches are required for this application This configuration ensures high source reliability and thus minimum fault susceptibility Figure 13 6 Transfer T1 kVA T2 kVA G T1 T2 G Switching state of the transfer switching equipment Non critical load Critical load 0 0 0 x OFF OFF 1 0 x P1 P4 P5 ON ON 0 1 x P2 P3 P5 ON ON 0 0 1 P6 OFF ON 1 1 x P1 or P2 P3 or P4 P5 ON ON Dependent on the priority setti...

Page 212: ...can also be implemented with the transfer switching equipment By using two transfer switches this complex application can be realized thus enabling the power supply to be maintained Figure 13 7 Transfer T1 kVA T2 kVA and T2 kVA T3 kVA T1 T2 T3 Switching state of the transfer switching equipment Non critical load 1 Critical load 2 0 0 0 x OFF OFF 1 0 0 P1 ON OFF 0 1 0 P2 P3 ON ON 0 0 1 P4 OFF ON 1 ...

Page 213: ... between two loads with one incoming source with 3KC4 transfer switching equipment only The 3KC4 transfer switching equipment can be used for transfer between 2 loads with 1 incoming source Figure 13 8 Transfer between 2 loads with 1 incoming source T1 Switching state of the transfer switching equipment Load 1 Load 2 0 x OFF OFF 1 0 OFF OFF 1 P1 ON OFF 1 P2 OFF ON ...

Page 214: ...Applications 13 5 Transfer between two loads with one incoming source with 3KC4 transfer switching equipment only 214 Manual 08 2017 L1V30368969104A 02 ...

Page 215: ...ating conditions Storage conditions A 1 Environmental conditions IP degree of protection IP20 protection against direct contact of the motor operator IP20 protection against direct contact of the interfaces when the terminal covers are mounted correctly and according to regulations IP00 protection without mounted terminal covers ...

Page 216: ...to 70 C The simplified method of calculating the derating is used here lthu Ith x Kf In a few cases specific requirements demand precise derating calculations Contact Siemens for this A 2 2 Humidity At 80 air humidity and 55 C condensation does not take place At 95 air humidity and 40 C condensation does not take place A 2 3 Altitude conditions Up to 2000 m no derating For higher altitudes the fol...

Page 217: ... Maximum storage time up to 12 months Storage in a dry non corrosive salt free environment is recommended A 3 3 Storage position At current rating 630 A a maximum of 3 packages may be stored on top of each other Figure A 1 Storage position 630 A At current rating 800 A no more than 1 package may be stored Stacking several packages on top of each other is not permissible Figure A 2 Storage position...

Page 218: ...e 11 9 15 2 536 x 378 x 427 4 pole 14 0 17 3 536 x 378 x 427 800 A 3 pole 27 9 43 9 730 x 800 x 600 4 pole 32 2 48 2 730 x 800 x 600 1000 A 3 pole 28 4 44 4 730 x 800 x 600 4 pole 23 9 48 9 730 x 800 x 600 1250 A 3 pole 28 9 44 9 730 x 800 x 600 4 pole 33 6 49 6 730 x 800 x 600 1600 A 3 pole 33 1 49 1 730 x 800 x 600 4 pole 39 4 55 4 730 x 800 x 600 2000 A 3 pole 50 7 66 7 730 x 800 x 600 4 pole 6...

Page 219: ...e 13 0 16 3 536 x 378 x 427 4 pole 15 1 18 4 536 x 378 x 427 800 A 3 pole 29 0 45 0 730 x 800 x 600 4 pole 33 3 49 3 730 x 800 x 600 1000 A 3 pole 29 5 45 5 730 x 800 x 600 4 pole 34 0 50 0 730 x 800 x 600 1250 A 3 pole 30 0 46 0 730 x 800 x 600 4 pole 34 7 50 7 730 x 800 x 600 1600 A 3 pole 34 2 50 2 730 x 800 x 600 4 pole 40 5 56 5 730 x 800 x 600 2000 A 3 pole 51 8 67 8 730 x 800 x 600 4 pole 6...

Page 220: ...Appendix A 3 Storage conditions 220 Manual 08 2017 L1V30368969104A 02 ...

Page 221: ... These modules can be easily destroyed or damaged by improper handling You must discharge your body electrostatically immediately before touching an electronic component To do this touch a conductive grounded object e g a bare metal part of a switch cabinet or the water pipe Always hold the component by the plastic enclosure Electronic modules should not be brought into contact with electrically i...

Page 222: ...elow illustrate the required ESD protective measures for electrostatic sensitive devices 1 ESD seat 2 ESD standing position 3 ESD seat and ESD standing position Protective measures a Conductive floor b ESD table c ESD footwear d ESD smock e ESD bracelet f Cubicle ground connection Figure B 1 ESD work center ...

Page 223: ...ic transfer switching equipment Cu Copper DC Direct voltage DPS Dual power supply EN European Standard ESD Electrostatic discharge IEC International Electrotechnical Commission IP International Protection N Neutral conductor RJ Registered jack PH Phase RTSE Remotely operated transfer switching equipment Table C 2 Meaning of symbols and abbreviations Sym bol abbreviation Meaning ΔU Voltage toleranc...

Page 224: ...ation Always at your disposal our extensive support www siemens com online support Subject to change 3ZW1012 3KC83 0AC1 Siemens AG 2017 Germany Siemens AG Energy Management Low Voltage Products Postfach 10 09 53 93009 REGENSBURG ...

Reviews: