Siemens ET8 FCP1 Series Information For Use Download Page 10

en 

Automatic switch-off

10

Tip: 

The automatic timer is valid for all hotplates. You

can reduce or delete the cooking time for individual
hotplates. → 

Page 9

8.2 Kitchen timer

You can set a time of up to 99 minutes after which a
signal will then sound. The kitchen timer runs inde-
pendently of all other settings.

Setting the kitchen timer

1.

Switch on the kitchen timer.
There are 2 different ways of switching the kitchen
timer on.

If a hotplate has been
selected.

Touch  ​⁠ twice within
10 seconds.

If a hotplate has not
been selected.

Touch  ​⁠.

a

The  ​⁠ indicator lights up.

2.

Within the next 10 seconds set the required time on
the control panel.

a

The time counts down.

a

When the time has elapsed, a signal sounds.  ​⁠ ​⁠
lights up on the timer display. The  ​⁠ indicator for
the kitchen timer lights up brightly. It switches off
after 10 seconds.

Displaying the time

Select the kitchen timer with  ​⁠.

a

The time is displayed for 10 seconds.

Setting the correct time

1.

Select the kitchen timer with  ​⁠.

2.

Set the required time on the control panel.

Switching off the timer signal

You can switch the signal off manually.

Touch any touch field.

a

The display goes out and the audible signal ceases.

8.3 Setting the cooking time

Requirement:

 The hotplate is selected.

1.

Select the heat setting.

2.

Touch  ​⁠.

a

The 

​⁠ display for the hotplate lights up.  ​⁠ ​⁠ lights

up on the timer display.

3.

Touch the required presetting on the control panel.
The possible presetting from left to right is 1, 2, 3.....
to 9 minutes.

4.

Within the next 10 seconds slide your finger along
the control panel until the required cooking time is
reached.

a

The cooking time counts down. If you have set a
cooking time for more than one hotplate, the cook-
ing time of the hotplate selected is displayed.

a

When the cooking time has elapsed, the hotplate
switches off. A signal sounds and  ​⁠ ​⁠ flashes on the
display for 10 seconds. The 

​⁠ display lights up

brightly.

9  Automatic switch-off

If you do not change the settings of a hotplate for a
long time, automatic switch-off will be activated.
When the hotplate switches off depends on the heat
setting selected (1 to 10 hours).
The heat to the hotplate is switched off.  ​⁠ ​⁠ and the re-
sidual heat indicator  ​⁠/ ​⁠ flash alternately on the hot-
plate display.

9.1 Continuing cooking after automatic
switch-off

1.

Touch any touch field.

a

The display goes out.

2.

Reset.

10  Wipe protection

Wiping over the control panel while the hob is switched
on may alter settings. Your hob has a wipe protection
function to prevent this.
The main switch is excluded from the wipe protection
function. You can switch the hob off at any time.

10.1 Activating wipe protection

Touch 

​⁠  ​⁠.

a

A signal sounds.

a

The indicator lamp above 

​⁠  ​⁠ lights up.

a

The control panel is locked for 30 seconds.

Summary of Contents for ET8 FCP1 Series

Page 1: ...8 FNP1 ET8 FCP1 ET8 FCP1C en Information for Use Register your product on My Siemens and discover exclusive ser vices and offers siemens home bsh group com welcome The future moving in Siemens Home Appliances ...

Page 2: ...2 Ø cm ET8 FNP1 ET8 FCP1 ET8 FCP1 C ...

Page 3: ...rol This does not apply if operation with appliances included in EN 50615 is switched off 1 3 Restriction on user group This appliance may be used by children aged 8 or over and by people who have reduced physical sensory or mental abilities or inad equate experience and or knowledge provided that they are supervised or have been instructed on how to use the appliance safely and have understood th...

Page 4: ...e insulation on cables of electrical appli ances may melt if it touches hot parts of the appliance Never bring electrical appliance cables into contact with hot parts of the appliance WARNING Risk of injury Saucepans may suddenly jump due to liquid between the saucepan base and the hotplate Always keep hotplates and saucepan bases dry WARNING Risk of suffocation Children may put packaging material...

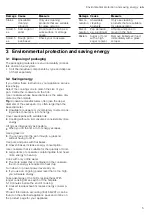
Page 5: ...he same dia meter as the hotplate Tip Cookware manufacturers often give the upper diameter of the saucepan It is often larger than the base diameter Unsuitable cookware or incompletely covered cook ing zones consume a lot of energy Cover saucepans with suitable lids Cooking without a lid consumes considerably more energy Lift lids as infrequently as possible When you lift the lid a lot of energy e...

Page 6: ...ol panel dry Moisture impairs the function Do not pull pans close to the displays and touch fields The electronics may overheat 4 4 Hotplates You can find an overview of the different activations of the hotplates here If you operate the activations the relevant displays light up If you switch on a hotplate it will switch to the setting last selected Hot plate Name Activating and deactivating Singl...

Page 7: ...ual heat indicator remains on until the hot plates have cooled down sufficiently 5 4 Setting the hotplates To set a hotplate it has to be selected Select the required heat setting on the control panel Heat setting 1 Lowest setting 9 Highest setting Every heat setting has an intermediate setting e g 4 5 5 Selecting heat settings Requirement The hob is switched on 1 Select the hotplate with a lights...

Page 8: ...n or breaded 6 7 6 10 Escalope frozen 6 7 8 12 Chops plain or breaded1 6 7 8 12 Steak 3 cm thick 7 8 8 12 Patties 3 cm thick1 4 5 30 40 Hamburgers 2 cm thick1 6 7 10 20 Poultry breast 2 cm thick1 5 6 10 20 Poultry breast frozen1 5 6 10 30 Fish or fish fillet plain 5 6 8 20 Fish or fish fillet breaded 6 7 8 20 Fish or fish fillet breaded and frozen e g fish fingers 6 7 8 12 Scampi prawns 7 8 4 10 V...

Page 9: ...r display 3 Touch the required presetting on the control panel The possible presetting from left to right is 1 2 3 to 9 minutes 4 Within the next 10 seconds slide your finger along the control panel until the required cooking time is reached a The cooking time counts down If you have set a cooking time for more than one hotplate the cook ing time of the hotplate selected is displayed a When the co...

Page 10: ...tting 2 Touch a The display for the hotplate lights up lights up on the timer display 3 Touch the required presetting on the control panel The possible presetting from left to right is 1 2 3 to 9 minutes 4 Within the next 10 seconds slide your finger along the control panel until the required cooking time is reached a The cooking time counts down If you have set a cooking time for more than one ho...

Page 11: ...nsumption display Ask your electricity supplier what the mains voltage is Consumption display is switched off 1 Consumption display at mains voltage of 230 V Consumption display at mains voltage of 400 V Consumption display at mains voltage of 220 V Consumption display at mains voltage of 240 V Automatic timer Switched off 1 Cooking time after which the hotplates switch off Duration of the timer e...

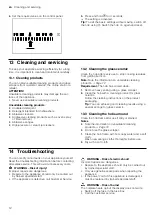
Page 12: ... 2 Clean the hob with a cleaning product for glass ceramic Follow the cleaning instructions on the product packaging Tip You can achieve good cleaning results using a special sponge for glass ceramic 13 3 Cleaning the hob surround Clean the hob frame after use if dirty or stained Notes Note the information on unsuitable cleaning products Page 12 Do not use the glass scraper 1 Clean the hob frame w...

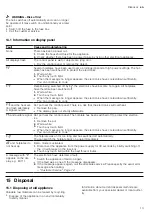
Page 13: ... sounds Hot pot near the control panel There is a risk that the electronics will overheat Remove the pan a The display goes out shortly afterwards and audible signal Hot pot near the control panel The hotplate has been switched off to protect the electron ics 1 Remove the pot 2 Wait a while 3 Touch any touch field a When the message no longer appears the electronics have cooled down sufficiently Y...

Page 14: ... of the manufacturer s warranty the use of Customer Service is free of charge Detailed information on the warranty period and terms of warranty in your country is available from our after sales service your retailer or on our website If you contact Customer Service you will require the product number E Nr and the production number FD of your appliance The contact details for Customer Service can b...

Page 15: ......

Page 16: ...nchen GERMANY siemens home bsh group com Valid within Great Britain Imported to Great Britain by BSH Home Appliances Ltd Grand Union House Old Wolverton Road Wolverton Milton Keynes MK12 5PT United Kingdom Manufactured by BSH Hausgeräte GmbH under the trademark licence of Siemens AG ...

Reviews: