background image

3 YEARS

LIMITED WARRANTY

Built to Exceed 

7

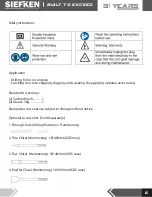
5. Goose Chisel (Hammering) :18*400mm (SDS max)


6. Surface Roughing (Hammering)             


 (1) Bushing Tool +    (2) Shank

7. Tamping (Hammering)


 (1) Rammer   +  (2) Shank (150 x 150 mm)

Optional accessories are subject to change without notice.

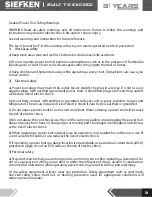
Prior To Operation

Read the ENTIRE IMPORTANT SAFETY INFORMATION section at the beginning of this manual 

including all text under subheadings therein before set up use of this products.

1. Power source check

Ensure that the power source to be utilized conforms to the power requirements specified on 

the product nameplate.

2. Switch status check

Ensure that the power switch is in the OFF position. If the plug is connected to a power recep-

tacle while the power switch is in the ON position, the power tool will start operating immedia-

tely, which could cause a serious accident.

3. Extension cord

When the work area is removed from the power source, use an extension cord of sufficient thic-

kness and rated capacity. The extension cord should be kept as short as practicable.

Assembly

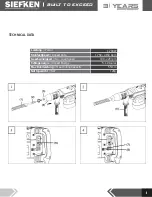
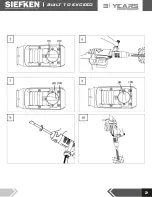
1. Install and Removing the SDS-max bit (Fig.1)

CAUTION:

To prevent accidents, make sure to turn the switch off and disconnect to the plug from the 

power receptacle.

Warning: Always wear gloves when changing accessories. The exposed may become extre-

mely hot during operation.

Summary of Contents for SCHOCK DAMON

Page 1: ...a por favor lea cuidadosamente las INSTRUCCIONES DE USO Asegúrese de saber cómo funciona la máquina y cómo debe ser operada Mantenga la herramienta de acuerdo a estas instrucciones y asegúrese de que la maquina funcione correctamente por favor guarde estas instrucciones y otros documentos que vengan junto con la herramienta ...

Page 2: ...icos 2 Advertencias generales de seguridad 3 Requisitos especiales para rotomartillo 4 Instrucciones de seguridad 5 Aplicaciones 6 Accesorios 7 Antes de la operación 8 Montaje 9 Operación 10 Mantenimiento e Inspección 11 Garantía 1 3 5 6 7 7 7 8 10 12 13 ...

Page 3: ...ÉCNICOS Leistung Potencia 1 700W Stoßfestigkeit Rango de impacto 1 750 2 150 bpm Geschwindigkeit Velocidad libre de carga 100 220 rpm Schlagenergie Energía de impacto 5 19 Joules Max Bohrleistung Max capacidad de perforación 55mm Nettogewicht Peso 12Kg ...

Page 4: ...3 YEARS LIMITED WARRANTY Built to Exceed 2 ...

Page 5: ... modi fique el enchufe de ninguna manera No utilice enchufes adaptadores con herramientas eléc tricas conectadas a tierra Los enchufes no modificados y los tomacorrientes correspondientes reducirán el riesgo de descarga eléctrica b Evite el contacto del cuerpo con superficies conectadas a tierra como tuberías radiadores cocinas y refrigeradores Existe un mayor riesgo de descarga eléctrica si su cu...

Page 6: ...ta eléctrica en situaciones inesperadas f Vístase adecuadamente No use ropa suelta o joyas Mantenga su cabello recojido ropa y guantes lejos de las partes móviles La ropa suelta las joyas o el cabello largo pueden quedar atrapados en las piezas móviles g Si se proporcionan dispositivos para la conexión de las instalaciones de extracción y recolec ción de polvo asegúrese de que estén conectados y s...

Page 7: ...uxiliares si se suministran con la herramienta La pérdida de control puede causar lesiones personales 3 Sujete la herramienta eléctrica por las superficies de agarre aisladas cuando realice una ope ración en la que el accesorio de corte pueda entrar en contacto con cables ocultos o con su propio cable El corte del accesorio que entra en contacto con un cable vivo puede hacer que las partes metálic...

Page 8: ... los pulmones si no se usa una máscara efectiva contra el polvo 2 Daño a la audición si no se usa protección auditiva efectiva 3 Daños a la salud resultantes de la emisión de vibraciones si la herramienta eléctrica se está utilizando durante un período de tiempo más largo o no se maneja adecuadamente y no se mantiene adecuadamente ADVERTENCIA Esta herramienta eléctrica produce un campo electromagn...

Page 9: ...la sección INFORMACIÓN DE SEGURIDAD IMPORTANTE al principio de este manual incluido todo el texto debajo de los subtítulos antes de configurar el uso de estos productos 1 Broca de perforación Rotación Martilleo 2 Cincel de diente martilleo 18 400 mm SDS máx 3 Cincel plano martilleo 18 400 mm SDS máx 4 Cincel plano grande martilleo 18 400 mm SDS máx 5 Cincel de ganso martilleo 18 400 mm SDS máx 6 D...

Page 10: ...ra empresa 1 Limpie el vástago de la broca y aplique grasa antes de insertar la broca 2 Inserte la broca en la herramienta Gire la broca con una ligera presión puede sentir un lugar donde hay un enganche En ese punto empújalo hasta que se enganche 3 Tire de la broca para asegurarse de que esté completamente bloqueada 4 Para extraer la broca tire completamente de la funda flexible en la dirección d...

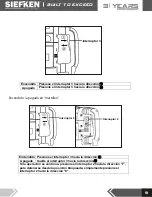
Page 11: ...3 hacia la dirección Apagado Release the switch 3 towards Interruptor 3 Interruptor 2 Endendido Presione el interruptor 3 hacia la dirección Apagado Suelte el interruptor 3 hacia la dirección Si la operación es continua presione el interruptor 2 hacia la dirección I para detenerse desde la posición bloqueada simplemente presione el interruptor 2 hacia la dirección 0 ...

Page 12: ...tén firmemente sujetos durante el funcionamiento 3 Al astillar y cincelar en martilleo PRECAUCIÓN Si la perilla de función se cambia durante la rotación del motor la herramienta puede comenzar a girar bruscamente lo que puede ocasionar accidentes inesperados Asegúre se de cambiar la perilla de función cuando el motor esté completamente parado Si se usa el cincel de dientes o el cincel plano en la ...

Page 13: ...iencia degradada remplácelo por uno nuevo cuando su accesorio sea rebajado 2 Inspeccionar los tornillos de montaje Inspeccioneregularmentetodoslostornillosdemontajeyasegúresedequeesténbienapretados Si alguno de los tornillos está suelto vuelva a apretarlos inmediatamente De lo contrario podría provocar un peligro grave 3 Mantenimiento del motor El motor es el corazón de la máquina por favor evite ...

Page 14: ...u implementación de conformidad con la legislación nacional las herramientas eléctricas que hayan llegado al final de su vida útil deben recogerse por separado y devolverse a una instala ción de reciclaje compatible con el medio ambiente PRECAUCIÓN La reparación modificación e inspección de las herramientas eléctricas SIEFKEN debe realizar las un centro de servicio autorizado de SIEFKEN En la oper...

Page 15: ...eben seguirse la guía de uso mantenimientos y cuidados incluidos en el manual si al momento del diagnóstico se evidencia que no llevaron a cabo estos cuidados la garantía puede ser negada 3 AÑOS DE GARANTÍA Cada herramienta SIEFKEN Industriell tiene garantía al comprador original de estar libre de defectos en materiales y mano de obra Sujeto a ciertas excepciones SIEFKEN reparará o remplazará cual...

Page 16: ... using this tool please read the INSTRUCTIONS FOR USE carefully Make sure you know how the machine works and how it should be operated Keep the tool according to these instructions and make sure the machine is working properly please keep these instructions and other documents that come with the tool ...

Page 17: ...Technical data 2 General safety warnings 3 Special requirements for rotary hammer 4 Safety instructions 5 Applications 6 Accessories 7 Prior the operation 8 Assembly 9 Operation 10 Maintenance and Inspection 11 Warranty 1 3 5 6 7 7 7 8 10 12 13 ...

Page 18: ...it Impact Rate 1 750 2 150 bpm Geschwindigkeit No Load Speed 100 220 rpm Schlagenergie Impact Energy 5 19 Joules Max Bohrleistung Max Drilling Capacity 55mm Nettogewicht NW 12Kg 3 YEARS LIMITED WARRANTY Built to Exceed 1 TECHNICAL DATA ...

Page 19: ...3 YEARS LIMITED WARRANTY Built to Exceed 2 ...

Page 20: ...ors ranges and refrigerators There is an increased risk of electric shock if your body is earthed or grounded c Do not expose power tools to rain or wet conditions Water entering a power tool will increase the risk of electric shock d Do not abuse the cord Never use the cord for carrying pulling or unplugging the power tool Keep cord away from heat oil sharp edges or moving parts Damaged or entang...

Page 21: ...t on and off Any power tool that cannot be controlled with the switch is dangerous and must be repaired c Disconnect the plug from the power source before making any adjustments changing accessories or storing power tools Such preventive safety measures reduce the risk of starting the power tool accidentally d Store idle power tools out of the reach of children and do not allow persons unfamiliar ...

Page 22: ... the bit during or immediately after operation The bit becomes very hot during operation and could cause serious burns 8 Do not use the power tool with a damaged cord Do not touch the damaged cord and pill the plug from the outlet when the cord is damaged while working Damaged cords increase the risk of an electric shock 9 If the supply cord is damaged it must be replaced by the manufacturer its s...

Page 23: ... by applying optional accessories Standard Accessories 1 Carbon Brush 1 2 Grease 30g 1 Standard accessories are subject to change without notice Optional Accessories Sold Separately 1 Through hole drilling Rotation Hammering 2 Tine Chisel Hammering 18 400mm SDS max 3 Flat Chisel Hammering 18 400mm SDS max 4 Big Flat Chisel Hammering 18 400mm SDS max ...

Page 24: ...the product nameplate 2 Switch status check Ensure that the power switch is in the OFF position If the plug is connected to a power recep tacle while the power switch is in the ON position the power tool will start operating immedia tely which could cause a serious accident 3 Extension cord When the work area is removed from the power source use an extension cord of sufficient thic kness and rated...

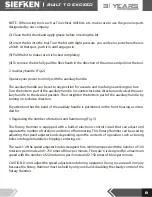
Page 25: ...ighten the bottom part of the auxiliary handle by turning in clockwise direction Pay attention that the band of the auxiliary handle is positioned on the front housing as inten ded for 3 Regulating the number of rotations and hammering Fig 3 This Rotary Hammer is equipped with a built in electronic control circuit that can adjust and regulate the number of rotations and times of hammering This Rot...

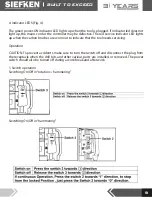
Page 26: ... worn out to indicate that the tool needs servicing Operation CAUTION To prevent accidents make sure to turn the switch off and disconnect the plug from the receptacle when the drill bits and other various parts are installed or removed The power switch should also be turned off during a work break and after work 1 Switch operation Switching On Off in rotation hammering Switching On Off in hammeri...

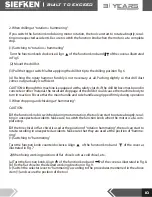
Page 27: ...and side handle are gripped firmly during operation 3 When chipping and chiseling at hammering CAUTION If the function knob is switched during motor rotation the tool can start to rotate abruptly resul ting in unexpected accidents Make sure to switch the function knob when the motor is at a com plete stop If the tine chisel or flat chisel is used at the position of rotation hammering the tool can ...

Page 28: ...ng the mounting screws Regularly inspect all mounting screws and ensure that they are properly tightened Should any of the screws be loose retighten them immediately Failure to do so could result in serious hazard 3 Maintenance of the motor The motor is the heart of the machine please avoid any damage to the winding or any water and oil to wet it 4 Inspecting the carbon brushes The Motor employs c...

Page 29: ...ional law electric tools that have reached the end of their life must be collected separately and returned to an environmentally compatible recy cling facility CAUTION Repair modification and inspection of Siefken Power tools must be must be carried out by a Siefken Authorized Service Center In the operation and maintenance of power tools the safety regulations and standards pres cribed in each co...

Page 30: ... tool s guarantee the use maintenance and tool care guide included in the manual must be followed If at the moment of carry the tool to the service center the tool shows evidence that was not correctly maintained the guarantee may be denied 3 YEARs WARRANTY Each SIEFKEN Industriell tool is guaranteed to the original purchaser to be free from defects in materials and workmanship Subject to certain ...

Page 31: ...3 YEARS LIMITED WARRANTY Built to Exceed ...

Page 32: ......

Reviews: