background image

COMMISSIONING AND OPERATION   

8024534 /  16UW / 2020-02-26 

Operating Instructions | InspectorP Rack Fine Positioning   

35 

Subject to change without notice 


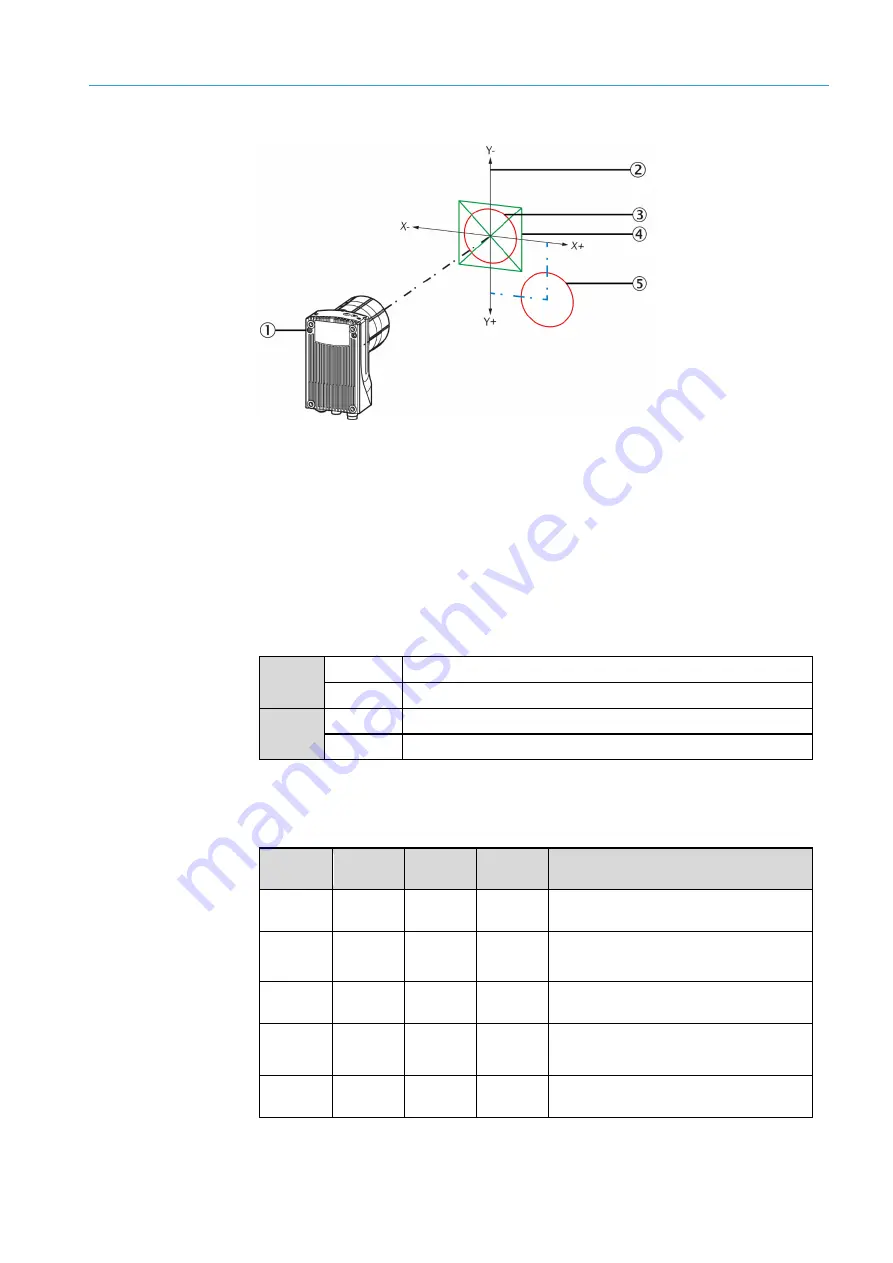
(1)


Device 

(2)


Coordinate system, for determining the location of the positioning mark  

(3)


Positioning mark in the middle of the target region (X = 0 µm, Y = 0 µm)  

(4)


Target region  

(5)


Positioning mark below the target region and to the right (X = 14,000 µm, Y = 15,000 µm) 

5.4.6


Control via digital inputs and digital outputs 

Digital input sensor 1 activates and deactivates continuous measurement. The 

“Sensor2” digital input can be used to switch between the Single and Double deep 

modes. 

Sensor 1 


Continuous measurement is switched on. 

Continuous measurement is switched off. 

Sensor 2 

Double deep mode is activated. 

Single deep mode is activated. 

The IN/OUT 3 – IN/OUT 6 digital outputs give information about the current position 

of the positioning mark. In evaluation mode 1 – 8, all outputs in the following table are 

possible. In evaluation mode 9 – 13, the device only outputs via the digital outputs 

whether the positioning mark is located within the target region.  

IN/OUT 3 

(up) 

IN/OUT 4 

(down) 

IN/OUT 5 

(right) 

IN/OUT 6 

(left) 

Position of the positioning mark relative to 

the target region 

The positioning mark is located within the 

target region. 

The positioning mark is located above the 

target region. 

The positioning mark is located below the 

target region. 

The positioning mark is located to the right 

of the target region. 

The positioning mark is located to the left of 

the target region. 

Figure 9: Interpretation of the position correction values 

Summary of Contents for InspectorP

Page 1: ...OPERATING INSTRUCTIONS InspectorP Rack Fine Positioning 2D machine vision ...

Page 2: ...s document may also be trademarks and are only used here for identification purposes Legal notes This work is protected by copyright The associated rights are reserved by SICK AG Reproduction of this document or parts of this document is only permissible within the limits of the legal provisions of copyright law Any modification abridgment or translation of this document is prohibited without the ...

Page 3: ...ry 10 3 2 Function and use 10 3 3 Principle of operation 11 3 4 Single deep applications 12 3 5 Single and double deep applications 12 3 6 Positioning mark 12 4 Installation 14 4 1 Software installation 14 4 1 1 SICK AppManager 14 4 1 2 SOPASair web server 15 4 1 3 Saving parameter set 15 4 1 4 Installing firmware updates 16 4 2 Mounting 16 4 2 1 Mounting requirements 16 4 2 2 Mounting procedure 1...

Page 4: ...timizing image brightness 28 5 3 9 Setting up Ethernet interface 28 5 3 10 Additional parameters 29 5 3 11 Completing configuration 29 5 4 Specification of the interface and interaction with the controller 29 5 4 1 Communication process 29 5 4 2 Interfaces 29 5 4 3 Commands from the controller to the device 31 5 4 4 Response from the device to the controller 33 5 4 5 Interpretation of the position...

Page 5: ...l times Should the device be passed on to a third party these operating instructions should be handed over with it These operating instructions do not provide information on operating the machine or system in which the device is integrated For information about this refer to the operating instructions of the specific machine Related publications The following related publications must be read Part...

Page 6: ...nformation for efficient and trouble free operation 1 3 Further information NOTE Other documentation for the device can be found on the online product page at www sick com InspectorP_Rack_Fine_Positioning There additional information has been provided depending on the product such as Model specific online data sheets for device variants containing technical data dimensional drawing and specificati...

Page 7: ...r use outside of the technical specifications and the requirements for intended use will be deemed to be incorrect use The device does not constitute a safety component in accordance with the respective applicable safety standards for machines The device must not be used in explosion hazardous or corrosive areas or under extreme ambient conditions Any use of accessories not specifically approved b...

Page 8: ...invalidate any warranty claims against SICK AG This applies in particular to opening the housing even as part of mounting and electrical installation 2 6 Requirements for skilled persons and operating personnel WARNING Risk of injury due to insufficient training Improper handling of the device may result in considerable personal injury and material damage All work must only ever be carried out by ...

Page 9: ...ning configuration Basic knowledge of the WindowsTM operating system in use Basic knowledge of the design and setup of the described connections and interfaces Basic knowledge of data transmission Knowledge of the programming of image processing systems and network components Operation of the device for the specific application Knowledge of the operation and control of the devices in their particu...

Page 10: ... Printed safety notes multilingual Brief information and general safety notes 3 2 Function and use Temperature load and steel construction dependent influencing variables generate varying geometric conditions at transfer points in the storage and conveyor technology These conditions make safe automated positioning of automated storage and retrieval systems more difficult when putting in and removi...

Page 11: ...ences in system design such as the selection of the lens focal length and the use of lighting filters The positioning mark hole or reflector is typically placed in the center of the camera image and defined as the target region during alignment and rack fine positioning of the device The target region typically corresponds to the area around the center point of the image If necessary the target re...

Page 12: ...Depends on the application 3 6 Positioning mark The accuracy and tolerance when detecting the positioning mark and in the sub sequent position correction depends on the working distance the sensor resolution and the ambient conditions Each specific application situation must be considered individually Only relevant for single deep applications The type of positioning mark hole or reflector can be ...

Page 13: ...eep applications The surface characteristics of the steel around the reflector will have only a minor effect on the application and can be ignored NOTE The following reflectors are recommended PL22 1 part number 1003546 PL22 2 part number 1003621 PL22 3 part number 1004488 PL22 4 part number 5327829 You can find the reflectors as accessories in the Internet at www sick com by entering the respecti...

Page 14: ...rently valid parameter set on the computer or a microSD memory card in the device cloning Installing firmware updates Installing SICK AppManager To install SICK AppManager open the installation file exe and follow the instructions on the screen SICK AppManager user interface 1 Device window window name changes depending on the connected device 2 Device Search window 3 Firmware window NOTE The curr...

Page 15: ... interface appears 4 1 3 Saving parameter set The currently valid parameter set can be backed up using SICK AppManager The complete environment of the device is then available if support is necessary Saving on the computer backup 1 In the SICK AppManager in the Device window click on the Backup button The Backup Apps and Data window opens 2 Fill out the Name Version and Filename fields 3 Select th...

Page 16: ... the lower right section of the window to install the update 4 2 Mounting 4 2 1 Mounting requirements General mounting requirements Distance from the device to the positioning mark hole or reflector 100 mm 1 995 mm The distance depends on the device type and type of positioning mark The user can locate the positioning mark anywhere in the field of view of the device to suit the application situati...

Page 17: ...ust be ensured If necessary clean the reflector During rack fine positioning with round reflectors lights structures are searched for on darker surfaces Use a polarizing filter to prevent total reflection of the illumination The polarizing filter hides the total reflecting light from the surface Do not use the polarizing filter for applications with holes NOTE You can find the the polarizing filte...

Page 18: ...pe of delivery of polarizing filter kit part number 2088229 Polarizing filter disk 2 Turn optics cover counterclockwise 3 Remove optics cover 4 Turn spacer ring counterclockwise 5 Remove spacer ring 6 Clip on the polarizing filter disk Make sure the alignment is correct Centering ring downwards recesses over retaining clips 7 Put on optics cover 8 Turn optics cover clockwise Figure 5 Polarizing fi...

Page 19: ...so that the device points vertically to the positioning mark on the rack NOTE It should be mounted so that it is exposed to as little shock and vibration as possible Ensure that the position of the device is not moved by vibrations during operation After switching on the supply voltage the Continuous measurement parameter in the device is activated by default The device immediately goes into measu...

Page 20: ... position correction of the automated storage and retrieval system The necessary communication protocol PROFINET TCP IP or UDP is set using the SOPASair operating software see 5 3 9 Setting up Ethernet interface page 28 Digital inputs and digital outputs The device is triggered via the digital input The device outputs the position results using 4 digital outputs The device only delivers informatio...

Page 21: ...Select the desired device The Device window shows the application currently loaded on the device 4 Click on the Edit IP Address button The Edit IP Address window opens 5 Select the Use manual IP settings option 6 Enter an IP address 7 Confirm changes with OK 5 2 Establishing a connection PROFINET In order to use the PROFINET communication protocol the local device setting must be in the Profinet E...

Page 22: ...l Several user levels are available in SOPASair To change the user level click on the button with the currently set user level at the top right in the user interface The following user levels are available User levels Password Application Run No password required Observe the system during operation Switch continuous measurement on and off Activate and deactivate double deep applications Switch ima...

Page 23: ...e very bottom in the parameter bar 5 3 3 Fine adjustment of the device After the device has been roughly aligned during mounting fine adjustment is done using the SOPASair operating software Prerequisites The device is mounted at the same height as the positioning mark The device is aligned vertically to the rack with a view to the positioning mark The Operator or Maintenance user level is set 1 O...

Page 24: ...are activated 1 Open the Setup window in SOPASair 2 Measure the distance between the viewing window of the device and the rack with the positioning mark 3 Make the following calculation Measured distance between the viewing window and rack 40 mm calculated working distance Example 300 mm 40 mm 340 mm 4 Enter the calculated working distance in the Working distance area into the Working distance sin...

Page 25: ...ioning mark of the single deep rack is visible in the image Test fine adjustment and calibration in single deep applications 5 3 6 Setting the evaluation mode The selected evaluation mode affects which circle is detected as the positioning mark and used for the output of measured values The user can select one of the available evaluation modes in SOPASair and via the Ethernet interface The evaluat...

Page 26: ...can be shifted in SOPASair using the Relative offset to origin X mm and Relative offset to origin Y mm parameters 7 Follow first circle found The circle that is closest to the top left corner of the image in the first image taken after starting the device is used for the output of measured values and defined as the circle to follow For every subsequent image taken the circle that is closest to the...

Page 27: ...e circle within the target region is used for the output of measured values If there are several circles within the target region no output of measured values occurs 1 The score measured value specifies how well the located circle corresponds to an ideal circle The score value is displayed at the top of the live image in SOPASair 5 3 7 Adjusting the target region The size of the target region can ...

Page 28: ...t circle must be clearly differentiated from the dark background The illumination time cannot be set separately for single and double deep applications 5 In the Rack Fine Positioning area activate the Double deep parameter The device is in Double deep mode 6 Increase the Gain factor parameter in Double deep mode to a value which offers sufficient image brightness for positioning marks in double de...

Page 29: ... controller cyclically In doing so the device sends offset values of the center point of the positioning mark relative to the origin of the coordinate system to the controller The offset values are transmitted in micrometers Determining the average value of the transmitted offset values in the controller and positioning the automated storage and retrieval system according to this average value is ...

Page 30: ...mands must be transmitted in binary format TCP IP PLC is the server For the TCP IP PLC is server communication protocol TCP IP PLC is server the device is the client The connected host acts as the server The measurement results and commands must be transmitted in binary format UDP For the UDP communication protocol the data is transmitted via UDP More information upon request Digital inputs and di...

Page 31: ...ent Command 2 Switch on continuous measurement Single deep 00 01 If a command is sent with the contents 00 01 then continuous measurement is switched on in Single deep mode Byte 1 Byte 2 Designation Command_H Command_L Function Command Example 2 00 01 Interpretation example 2 Switching on continuous measurement Activating Single deep mode Command 3 Switch on continuous measurement Double deep 00 0...

Page 32: ...e Non relevant circles are hidden Activation leads to parameter change but not to recalibration Byte 1 Byte 2 Byte 3 Byte 4 Byte 5 Byte 6 Byte 7 Byte 8 Byte 9 Byte 10 Byte 11 Designation Command_H Command_L CircSel OffX_H OffX_L OffY_H OffY_L TolX_H TolX_L TolY_H TolY_L Function Command Selection Relative offset to origin X in 1 10 mm Relative offset to deviation Y in 1 10 mm Tolerance X in 1 10 m...

Page 33: ...ce sends status bytes 00 80 These status bytes are reset to 00 00 after successful parameterization Other parameters cannot be set by the host 5 4 4 Response from the device to the controller As long as continuous measurement is switched on the device cyclically transmits measurement results to the controller For each image 16 bytes are reported back to the controller from the device Byte 1 Byte 2...

Page 34: ...tation 5 4 5 Interpretation of the position correction values The device determines the location of the positioning mark based on a coordinate system in the field of view To do so the device determines the offset of the positioning mark from the origin of the coordinate system on the X axis and Y axis When evaluation mode 1 8 is set the origin is located in the middle of the target region For eval...

Page 35: ...Sensor 2 1 Double deep mode is activated 0 Single deep mode is activated The IN OUT 3 IN OUT 6 digital outputs give information about the current position of the positioning mark In evaluation mode 1 8 all outputs in the following table are possible In evaluation mode 9 13 the device only outputs via the digital outputs whether the positioning mark is located within the target region IN OUT 3 up I...

Page 36: ...ark is located to the left below the target region 0 0 0 0 The positioning mark was not found in the image The device only delivers information on the direction up down left right via the digital outputs The automated storage and retrieval system can approach the target position step by step based on this direction information A quantitative statement about the deviation between the actual and the...

Page 37: ...ut area If the positioning mark is located in the target region the circle in the center is green and surrounding squares are black If the positioning mark is located outside the target region a surrounding circle is shown in red depending on the position of the positioning mark in relation to the target region up down left right Figure 11 Positioning mark within the target region Figure 10 Positi...

Page 38: ...the device will result in a reduced measurement accuracy and faulty measurements Clean the viewing window of the device before operation IMPORTANT Device damage due to improper cleaning Improper cleaning may result in device damage Only use suitable cleaning agents Never use sharp objects for cleaning NOTE For detailed information on cleaning see the operating instructions of the InspectorP63x Fle...

Page 39: ...g up the device This simplifies commissioning as image recording does not have to be triggered by the controller Selection Define hole or reflector which is to be used as the positioning mark If several circles are located in the field of view of the device Selection of the correct hole or the correct reflector as the positioning mark Hiding of the non relevant image section for several circles in...

Page 40: ... example for comparing the signals arriving at the controller with the counter Deformation factor for triple reflectors Compensate for deformed circles which typically occur when using triple reflectors If reflectors are not exactly circular this parameter ensures that the reflectors are still detected as positioning marks The detection of the positioning mark is optimized in relation to the devia...

Page 41: ...d or dark circle on light background Holes typically appear dark on light backgrounds Reflectors appear light on dark backgrounds Invert X Y axis Exchange output values for X axis and Y axis Use this parameter for example if the device is installed upside down in the system IP address FTP server Set IP address of the FTP server Define target address for image transmission IP address PLC Set IP add...

Page 42: ...terization to delivery condition Tolerance range X mm Tolerance zone Y mm Circle target region Define the size of the target region in which the positioning mark must be located before putting goods into or taking them out of storage The more accurately the size of the target region corresponds to the size of the positioning mark the more exact the positioning is This makes system throughput slowe...

Page 43: ...L Version2 GPL Version3 and GNU Lesser General Public License LGPL the MIT license zLib license and the licenses derived from the BSD license This program is provided for general use but WITHOUT ANY WARRANTY OF ANY KIND This warranty disclaimer also extends to the implicit assurance of marketability or suitability of the program for a particular purpose More details can be found in the GNU General...

Page 44: ...an Phone 81 3 5309 2112 E Mail support sick jp Malaysia Phone 603 8080 7425 E Mail enquiry my sick com Mexico Phone 52 472 748 9451 E Mail mexico sick com Netherlands Phone 31 0 30 229 25 44 E Mail info sick nl New Zealand Phone 64 9 415 0459 0800 222 278 tollfree E Mail sales sick co nz Norway Phone 47 67 81 50 00 E Mail sick sick no Poland Phone 48 22 539 41 00 E Mail info sick pl Romania Phone ...

Reviews: