background image

7.5.5.3.1

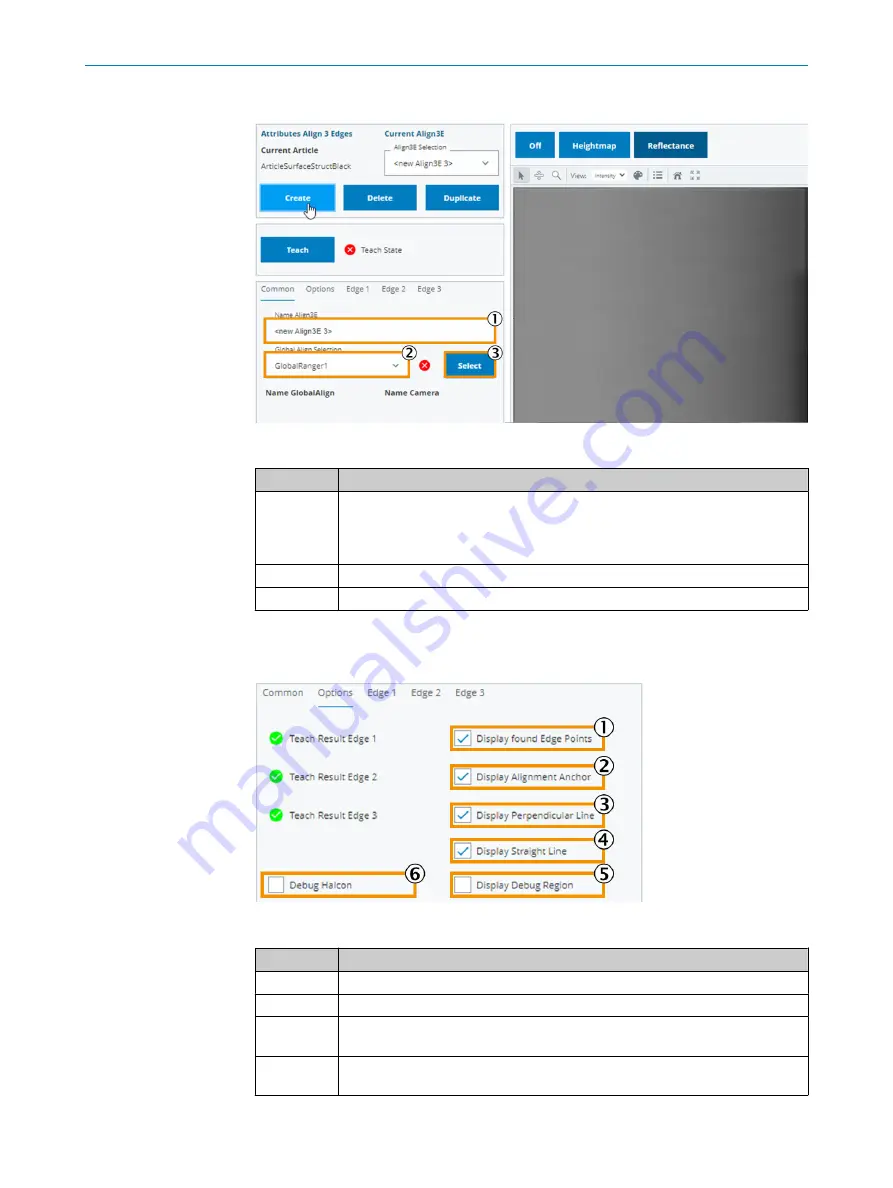
Common

 tab

Figure 47: Alignment, Common tab

Function

Description

1

Input field for name assignment.
The entered name is preceded by an abbreviation to indicate the camera ([

C1

],

[

C2

]). In addition, an abbreviation indicating the alignment type (

[3E

],

[CC

], [

PA

]) is

prefixed.

2

Assign the 

Global Align

.

3

Apply the changes.

7.5.5.3.2

Options

 tab

The 

Options

 tab is used to configure display or maintenance parameters.

Figure 48: Alignment 3E, Options tab

Function

Description

1

Show the found scanning point of the edge using a red cross.

2

Show the alignment coordinate system.

3

Show the straight line through the edge points 1 and 2 (horizontal straight line in
this example).

4

Show the straight line through edge point 3 (a perpendicular line in this exam‐
ple).

OPERATION 

7

8027445/V1-0/2022-06-15 | SICK

O P E R A T I N G   I N S T R U C T I O N S | FOS-HVS

51

Subject to change without notice

Summary of Contents for FOS-HVS Duo 1600

Page 1: ...O P E R A T I N G I N S T R U C T I O N S FOS HVS Quality control system ...

Page 2: ...this document is only permissible within the limits of the legal determination of Copyright Law Any modi fication abridgment or translation of this document is prohibited without the express written permission of SICK AG The trademarks stated in this document are the property of their respective owner SICK AG All rights reserved Original document This document is an original document of SICK AG 2 ...

Page 3: ...2 3 1 Scope of delivery 12 3 2 Product characteristics 12 3 3 Typical system structure 12 3 4 System components 13 3 4 1 Measuring head 13 3 4 2 Evaluation unit SIM4000 14 3 4 3 SID120 display device 15 4 Mounting 16 4 1 Important information 16 4 2 System requirements 16 5 Electrical installation 17 5 1 Important information 17 6 Commissioning 18 6 1 Important information 18 6 2 Configuring the s...

Page 4: ... the image 34 7 5 3 Application menu group 35 7 5 3 1 Run Cam1 Run Cam 2 page 35 7 5 4 Article menu group 38 7 5 4 1 Article page 38 7 5 4 2 Camera page 41 7 5 4 3 Block page 44 7 5 4 4 Test Article page 46 7 5 5 Alignment menu group 46 7 5 5 1 Higher level functions 46 7 5 5 2 Global Align page 47 7 5 5 3 Align 3E page 49 7 5 5 4 Align CC page 53 7 5 5 5 Align PA page 56 7 5 6 Basic ROI menu grou...

Page 5: ...87 9 Troubleshooting 89 9 1 Troubleshooting the Ranger3 camera 89 9 2 Helping support in the event of a fault 89 10 Decommissioning 90 11 Technical data 91 11 1 Data sheet 91 11 2 Dimensional drawings 92 11 2 1 FOS HVS measuring head 92 11 2 2 SID120 93 11 2 3 SIM4000 94 12 Spare parts 95 13 Annex 96 13 1 User levels with different rights 96 13 2 Test sequence 98 13 3 Control bits process diagram ...

Page 6: ... describes the function of the HVS application from the point of view of the system operator The documentation includes the information that the system operator receives about an inspection In addition this document describes the means by which a system operator can influence the behavior of the system b The document must be made available to all those who work with the product b Read through the ...

Page 7: ...ted WARNING Indicates a situation presenting possible danger which may lead to death or serious injuries if not prevented CAUTION Indicates a situation presenting possible danger which may lead to moderate or minor injuries if not prevented NOTICE Indicates a situation presenting possible danger which may lead to property damage if not prevented NOTE Highlights useful tips and recommendations as w...

Page 8: ...l voltage Risk of electrical shock Contact will result in death burns or shock b Electrical work may only be performed on the system by qualified specialist per sonnel b Before working on electrical components observe the five safety rules Disconnect Secure against being switched back on Ensure that there is no voltage Ground and short circuit Cover or enclose live parts in the vicinity WARNING Ri...

Page 9: ...ortant information WARNING If any operating or adjusting devices other than those specified here are used or other methods are employed this can lead to dangerous exposure to radiation Overview The product is equipped with one or more class 2 lasers according to EN IEC 60825 1 2014 DIN EN 60825 1 2015 and complies with 21 CFR1040 10 with the exception of the deviations listed in the Laser Notice N...

Page 10: ...tem 2 4 Intended use WARNING The product must only be used for the intended use Non intended use can pose a hazard to people and cause damage to the device The FOS HVS Forein Object Detection System for foreign body detection consists of a number of different hardware and software components for product and process optimization in the manufacturing industry Foreign objects are reliably detected on...

Page 11: ... been designed for specific applications in large industrial plants according to Article 2 4 e RoHS 2011 65 EU and must therefore only be used in such plants The product is neither suitable nor approved for use outside of these systems SICK therefore cannot provide any warranty or accept any liability whatsoever for such use 2 9 Cybersecurity Overview To protect against cybersecurity threats it is...

Page 12: ...bjects of different dimensions to be inspected and inspection tasks with varying requirements with regard to resolution and detection quality to be achieved Figure 1 FOS HVS Foreign Object Detection System Variant Number of system heads Mono 1600 2 single heads 2 Ranger3 Duo 1600 2 double heads 4 Ranger3 Duo 2400 3 double heads 6 Ranger3 currently not yet available 3 3 Typical system structure The...

Page 13: ...120 Sensor Visualization 8 Network switch 9 Signal transmission with higher level PLC 3 4 System components 3 4 1 Measuring head Overview Each measuring head consists of one or two Ranger3 cameras 1 and one line laser 2 Figure 3 FOS HVS measuring head 1 Ranger3 2 Line laser PRODUCT DESCRIPTION 3 8027445 V1 0 2022 06 15 SICK O P E R A T I N G I N S T R U C T I O N S FOS HVS 13 Subject to change wit...

Page 14: ... 1 Laser output aperture 2 Fanning of the laser beam 3 4 2 Evaluation unit SIM4000 Figure 5 Evaluation unit SIM4000 The SIM4000 evaluation unit is used for each measuring head The station specific scripts are executed on the respective SIM The evaluation units in the middle SIM_Middle and on the right side SIM_Right communicate with the SIM_Left_Master evaluation unit The SIM_Left_Master station h...

Page 15: ...ection areas where a foreign object was detected are highlighted in a schematic diagram In addition to the inspec tion results status information about the inspection system is also displayed PRODUCT DESCRIPTION 3 8027445 V1 0 2022 06 15 SICK O P E R A T I N G I N S T R U C T I O N S FOS HVS 15 Subject to change without notice ...

Page 16: ...at and firm surface Low vibration environment Protected from wind and free of drafts Clean and dry 20 to 80 air humidity non condensing Ambient temperature between 0 C and 45 C NOTE Avoid strong temperature fluctuations NOTE The cooling fins of the SIM4000 must not be covered or restricted in their functionality NOTE Ambient light shielding To achieve consistently reliable inspection results even ...

Page 17: ...is no voltage Ground and short circuit Cover or enclose live parts in the vicinity NOTICE All electrical work may only be performed by qualified persons Qualified persons have the specialist training skills experience and knowledge of the relevant regulations and standards needed to be able to perform work assigned to them and to identify and avoid any potential dangers independently Electricians ...

Page 18: ...ical systems and to detect and avoid any potential dangers independently 6 2 Configuring the system The initial commissioning is described in a separate document The essential steps are Installing and connecting the components System configurations IP addresses Internal I O ports SIM4000 SID120 Ranger3 PLC communication Calibration data Encoder FTP Setting up the inspection objects and criteria Fu...

Page 19: ... SIM IP address SIM_Left_Master http 192 168 0 1 Visualization The Sensor Integration Display SID shows the interface for visualizing the overall system for the operator The SID is set to display this visualization directly IP address SID http 192 168 0 10 Configuration The inspections are configured via the respective Standard Page of each individual Sensor Integration Machine SIM The Standard Pa...

Page 20: ...igure 8 Structure of the user interface 1 Title bar 2 Menu area 3 Main window 4 Status bar 7 2 1 1 Title bar Figure 9 Title bar Function Description 1 Show and hide the operating menu 2 Home button 3 Displays the currently activated menu 7 2 1 2 Menu area The menu area contains the individual selection options for the functions of the system 7 OPERATION 20 O P E R A T I N G I N S T R U C T I O N S...

Page 21: ...logged in user is displayed in the status bar at the bottom left Clicking on the user name opens the login dialog which can be used to log in as another user 2 To the right of the displayed user is the status bar The system displays messages to the user here e g if a camera is not available Each message in the status line is overwritten by the subsequent message The messages are displayed here on ...

Page 22: ...d to set general system parameters The structure and layout of the menu area changes depending on the logged in user The following figure shows the menu items for the Maintenance user b To open the Master Page of the test configuration call up the IP address 192 168 0 1 via a computer connected over Ethernet The following menu is displayed for the user level Maintenance Figure 12 Menu for the Main...

Page 23: ...ag Surface Green Red The surface check reports OK The surface check reports NOK In connection with the Result flag The Details area displays detailed information about the last inspection The Open Standard Page button can be used to open the setup environment 7 3 1 2 PLC Status page This page displays information about the communication with the PLC It indicates whether there is a valid article pr...

Page 24: ...t Inside block contains settings for testing the system for example running tests without a PLC connected 7 4 Display operation visualization The structure and layout of the menu area changes depending on the logged in user The following figure lists the menu items on the SID for the Maintenance user 7 OPERATION 24 O P E R A T I N G I N S T R U C T I O N S FOS HVS 8027445 V1 0 2022 06 15 SICK Subj...

Page 25: ...n Status page on the master SIM Config This page is required for commissioning The App State Logger System and Info pages are described in section General menu group If there is no line in the table in the status display then there is no connection between the SID and the master SIM The SID therefore does not have any information about the system OPERATION 7 8027445 V1 0 2022 06 15 SICK O P E R A ...

Page 26: ...us bar Status Description O The system has started correctly and is now ready for performing inspections O The system could not be started successfully Diagnosis Test Article Check whether the article was able to be loaded cor rectly App Status The storage space on the device can be checked here It also displays the status of all apps on the device Logger Information about the system status can al...

Page 27: ... enter the name directly Incorrect credentials If an incorrect username or password is selected or if the username or password is entered with a typo the following message appears b Click OK to confirm the message and repeat the entries for logging in Automatic login If the selected user should be logged in automatically at the next restart the Keep me logged in option can be set NOTICE Make sure ...

Page 28: ...The following figure shows the display on the SID when there is a connection but no article is selected yet Before each inspection a valid article must be selected by the PLC i e an ID must be transferred As long as no article has been selected the screen shown here appears if the SID is connected to the inspection system Figure 19 Application window no article selected Inspection OK The following...

Page 29: ...n this case an error has occurred during the screw inspection This may be due for example to one or both screws not being present or being too short or too long The region where an error occurred is shown here in red OPERATION 7 8027445 V1 0 2022 06 15 SICK O P E R A T I N G I N S T R U C T I O N S FOS HVS 29 Subject to change without notice ...

Page 30: ... on the display until a new inspection is started As soon as a new inspection is started the blocks and their colorings are reset The display on the SID then appears as shown in the following figure 7 OPERATION 30 O P E R A T I N G I N S T R U C T I O N S FOS HVS 8027445 V1 0 2022 06 15 SICK Subject to change without notice ...

Page 31: ... the connection is established b If this message appears during operation it is recommended to restart the entire system b Check the physical connection cable System OK The output indicates that the display SID is functional and the devices SIMs and SID have been able to establish a connection with each other Individual devices however are still in the initialization process or may not have been i...

Page 32: ...mouse to the yellow square in the center while holding down the left mouse button Move the mouse downwards The region is reduced symmetrically about the midpoint of the region Move the mouse upwards The region is enlarged symmetrically about the midpoint of the region Clicking on the arc section while holding down the left mouse button opens the option to rotate the region Moving the mouse to the ...

Page 33: ... the last point edited This support point is the active support point This is important for operations like Delete Insert Before or Insert After for the Polygon region type only 7 5 2 Image display functions Figure 23 Configuration of the image displays Function Description 1 Turn off the image display 2 Heightmap image type Display the heightmap of the inspection object In the high resolution hei...

Page 34: ...ion To zoom in position the mouse pointer magnifying glass icon in the center of the image Hold down the left mouse button and move the mouse pointer outward To zoom out position the mouse pointer magnifying glass icon at the edge of the image Hold down the left mouse button and move the mouse pointer to the center of the image 4 View Only the Intensity setting is available 5 Color Color settings ...

Page 35: ...he Reflectance image type the value Intensity represents a bright ness value i e how strongly the laser line was reflected The value range is 0 255 For the Heightmap image type the value Intensity is the uncalibrated z value height The value has no relevance here however for operating and setting up the system A calibration of the measuring head with its two cameras ensures the output of values sp...

Page 36: ...figure shows the display during an inspection run in which no foreign objects were found in the displayed camera and the screw inspection was also successful Indication in the Result column OK Region found processing step successful OK For FOD inspection OK ck OK Additional inspection for special regions OK 7 OPERATION 36 O P E R A T I N G I N S T R U C T I O N S FOS HVS 8027445 V1 0 2022 06 15 SI...

Page 37: ... as foreign bodies in the image The foreign body itself is highlighted in a darker red If the Result indicator is red deviations were detected during the inspection or foreign objects were found in the area Indication in the Result column NOK Region not found processing step not successful NOK For FOD inspection NOK ck NOK Additional inspection for special regions NOK OPERATION 7 8027445 V1 0 2022...

Page 38: ...sful The determination of a coordinate system is necessary to compensate for deviations of the position of inspection objects from the ideal position 7 5 4 Article menu group 7 5 4 1 Article page The Article page is used to manage articles maintain create or delete or an article The article to be edited for which the alignment ROIs etc are to be created or modified can be selected on this page 7 O...

Page 39: ...es Current Article Function Description 1 Article description freely selectable 2 Identifier for communication with an external system PLC The PLC can use this ID to control the selection of an article 3 System internal identification number is generated automatically 4 This option can be used to load a schematic diagram into the system 7 5 4 1 3 Backup Restore Current Article The settings of an a...

Page 40: ...e the name of the device from which the backup originates the article name a time stamp four digit year two digit month two digit day the milliseconds elapsed since the date change If the suggested file name for the backup is not customized the file will be saved with the suggested name e g ArticleBackup FOD3 HVS SIM_Left_Master Article SurfaceStruct YYYYMMDD _ ms since 0 00 zip The file names are...

Page 41: ...mage can be loaded from the camera Figure 34 Camera menu page Function Description 1 Selection of the desired camera NOTE Regardless of the measuring head Left_Master Middle or Right the two cameras of a measuring head are always designated Ranger3 1 and Ranger3 2 The camera mounted at the front of the measuring head during the scan and looking backwards at the high voltage battery is the Ranger3 ...

Page 42: ...this option uses up additional time it should always be deactivated in inspection mode 2 The Median filter is used for image preprocessing This parameter must not be changed The filter size can be changed using the and buttons The default setting is filter size 2 3 Image preprocessing is used to improve the evaluability of the camera image 4 Calibrate camera image 5 Perform image preprocessing and...

Page 43: ...mission level of Authorized Client or higher After the parameters have been appropriately configured for the article the parameters must be read from the camera and saved in the article During each inspection and also when the execution plan is loaded these parameters are read from the article configuration and loaded into the camera This overwrites the current parameters on the camera Figure 37 C...

Page 44: ... and camera b Transfer the configuration to the camera This is done automatically at the start of an inspection run This can also be done without an inspection by opening Set Plan to Camera The button can be found on the page in the Test Article menu b Clear the existing camera configuration on the camera using the Camera page Clear Camera Config action b Adjust the article specific camera setting...

Page 45: ... is changed the width is aligned symmetrically about the midpoint 4 Height of the rectangle If this value is changed the height is aligned symmetrically about the midpoint Circle selection The following configuration options are available for the Circle selection The settings can also be adjusted directly in the image using the mouse Figure 40 Block page Circle selection Function Description 1 X v...

Page 46: ...ioning deviations i e a change in the positioning of the inspec tion object under the camera and to compensate for manufacturing tolerances on the inspection object the position and orientation of the entire inspection object or of special regions on the inspection object are determined and corrected in the camera image This step is referred to below as Alignment or Align A coordinate system for t...

Page 47: ...be applied by clicking Select Common tab Other wise the previously valid state is applied 5 The Teach State changes from to once the settings have been applied 6 Display for Align 3E CC and PA whether Global Align is set up and working 7 5 5 2 Global Align page The Global Align returns the origin of the coordinate system in the upper left corner of the camera image A separate Global Align can be u...

Page 48: ...e 44 Global Align Options tab Function Description 1 Show the coordinate system icon at the origin of the Global Align 2 Parameters for development This can be used to display the debug region used for system maintenance 3 This option supports system maintenance and further development NOTE This option is not required in check mode Since this option uses up additional time it should always be deac...

Page 49: ...of the first straight line are located on the bar that is perpendicular in the image marked 1 in the image The edge of the orthogonal straight line marked 2 in the picture is located at the bottom edge of the inspection object The midpoints of the edges are represented in the image by a red cross The deter mined straight lines by orange lines Using this combination it is possible to determine an o...

Page 50: ...he Create button b The input field for assigning a name to the new Align3E in the Common tab becomes active b Enter a unique name in the Name Align3E field b Assign a Global Align via the selection list b Click Select to confirm b To apply the settings click Teach 7 OPERATION 50 O P E R A T I N G I N S T R U C T I O N S FOS HVS 8027445 V1 0 2022 06 15 SICK Subject to change without notice ...

Page 51: ...e Options tab is used to configure display or maintenance parameters Figure 48 Alignment 3E Options tab Function Description 1 Show the found scanning point of the edge using a red cross 2 Show the alignment coordinate system 3 Show the straight line through the edge points 1 and 2 horizontal straight line in this example 4 Show the straight line through edge point 3 a perpendicular line in this e...

Page 52: ... Edge1 to Edge3 7 5 5 3 3 Edge1 Edge2 and Edge3 tabs The Edge1 Edge2 and Edge3 tabs are used to set the edges for alignment To activate the search rectangle for the edge layout of the first edge click the Edge1 tab The search rectangle is displayed as a filled green rectangle NOTE If the search region is not displayed in the image the zoom factor may be too large and the region is outside the disp...

Page 53: ...ection is used 7 5 5 4 Align CC page Align CC stands for an alignment determined by searching two circular structures e g holes on the inspection object The midpoint of each of these circles is determined The first midpoint of the circle is used as coordinate origin A straight line is then drawn from this point through the midpoint of the second circle This connecting straight line through the mid...

Page 54: ...em maintenance 7 This option supports system maintenance and further development NOTE This option is not required in check mode Since this option uses up additional time it should always be deactivated in inspection mode 7 5 5 4 3 Center Circle tab The Center Circle tab is used to specify the parameters of a search rectangle for deter mining the midpoint of the first circle Figure 51 Align CC Cent...

Page 55: ...um outer diameter of the circle 7 5 5 4 4 Angle Circle tab The Angle Circle tab is used to specify the parameters of a search rectangle for determin ing the midpoint of the second circle Figure 52 Align CC Angle Circle tab Function Description 1 X value column value of the midpoint of the rectangle Larger values shift the midpoint to the right smaller values to the left 2 Y value line value of the...

Page 56: ...mmon tab are the same for the alignment types 3E CC and PA see Common tab page 51 7 5 5 5 2 Options tab The Options tab is used to set the display or maintenance parameters Figure 53 Alignment PA Options tab Function Description 1 Display the surface used to determine the origin and orientation of the coordi nate system in the image 2 Show the region that is not in use 3 Show the alignment coordin...

Page 57: ... stable 7 5 5 5 4 ROI tab The search region can be created as a rectangle or an ellipse The detailed descriptions for a rectangular search region or for an elliptical region can be found in the Basic ROI section see ROI tab page 60 7 5 5 5 5 Symmetric BLOB tab In the case of symmetrical objects the angle determined for the reference object and the inspection object may differ by 180 All regions li...

Page 58: ... of an inspection object is typically divided into different regions The system supports three different types of regions Rectangle rectangular region Ellipse circular region Polygon freeform region arbitrary number of points to describe irregular regions General functions Figure 56 Basic ROI General functions Function Description 1 Create a new object of type Region type Rectangle Ellipse or Poly...

Page 59: ... can be assigned to the same block in the schematic diagram both inspections use the same block for display This is the case if for example a check for foreign bodies is to be performed in one region and a check for screws is to be performed in a neighboring region or a region within the region The display changes from to once the settings have been applied 5 Display the currently valid selection ...

Page 60: ... rectangle ellipse and polygon Figure 59 Basic ROI ROI tab Rectangle selection The following configuration options are available for the Rectangle selection The settings can also be adjusted directly in the image using the mouse Figure 60 Basic ROI ROI tab Rectangle selection Function Description 1 X value column value of the midpoint of the rectangle Larger values shift the midpoint to the right ...

Page 61: ...smaller values to the left 2 Y value line value of the midpoint of the ellipse Larger values shift the midpoint downward smaller values shift it upward 3 The angle determines the orientation of the ellipse For an angle 0 radius 1 changes the width of the ellipse and radius 2 changes the height For an angle 90 radius 1 changes the height of the ellipse and radius 2 changes the width 4 Radius along ...

Page 62: ...count when inserting 5 Insert a point after the current point in the sequence midway between the two previously adjacent points The new point gets an index 1 higher than the current point The subsequent list of points is renumbered in ascending order 6 Regardless of the current point insert a point at the end of the sequence midway between the last point and point 1 7 Delete current point The subs...

Page 63: ...layed on the left hand side The aim of the Selector is to be able to quickly change regions This can also be done for other cameras using the Camera Selection drop down menu Function Description 1 Select camera 2 Reload article All unsaved changes are lost 3 Display or selection of the Basic ROI 4 Display or selection of the special region 5 Display or selection of the inspection 6 Apply changes t...

Page 64: ... for foreign objects This region is therefore omitted from the check To do so a special ROI Simple region is created and placed on the screw It is the operator s responsibility to ensure that this region is placed on the correct basic ROI Verification by the system is not possible 7 5 7 1 1 Common tab Common tab Figure 64 ROI Simple Common tab Function Description 1 Input field for name assignment...

Page 65: ...ion is not required in check mode Since this option uses up additional time it should always be deactivated in inspection mode 7 5 7 1 3 ROI tab The radio button can be used to choose between rectangle ellipse or polygon When the recess in this example ellipse circular has been created and placed over the screw hole this region can be applied by clicking the Teach button analogous to a Basic ROI s...

Page 66: ...with several identical flanges in one step In addition a check for foreign objects can be activated for the flanges that have been found 7 5 7 2 1 Common tab Figure 67 ROI Circle Registerkarte Common Function Description 1 Input field for name assignment 2 Select the basic ROI from which the respective region is to be subtracted In the drop down menu you can select from the regions already availab...

Page 67: ...ription 1 Show region enabled by default 2 Show result region 3 Show difference region 4 Show flange region 5 Display foreign objects found 6 Parameters for development This can be used to display the debug region used for system maintenance 7 This option supports system maintenance and further development NOTE This option is not required in check mode Since this option uses up additional time it ...

Page 68: ...selected Check Mode are activated 3 Minimum height at which the circles for the recesses must be located This value indicates how far in mm the circle region must be above the surrounding surface 4 Minimum diameter in real dimension mm of the circles to be searched Small est possible value 1 0 Only circles that meet the previous conditions and have the minimum diameter specified here are searched ...

Page 69: ...rcle Param Dynamic tab Function Description 1 Width of the circle search mask 2 Height of the circle search mask 3 Enable disable pre processing median filter For the median filter the size in the Median Filter Size field is used The filter is applied to the region 4 Size of the median filter 5 Enable disable padding of NoData pixels NoData pixels are padded with the height value from the surround...

Page 70: ...e flanges 2 Minimum extension of foreign bodies on the flanges 3 Minimum height in mm of foreign bodies on the flanges 4 This reduces the outer and inner contour of the flanges to avoid incorrect meas urements 7 5 7 2 7 ROI tab The detailed descriptions for a rectangular elliptical or polygon region can be found in the Basic ROI section see ROI tab page 60 7 5 7 3 ROI Screw page The ROI Screw func...

Page 71: ...s how far up screw protrudes further the area can be before the test is output as NOK 6 Calculated value in mm of the screw height Example A nominal height of 6 mm is required to have a tolerance of 1 mm at the bottom and 3 mm at the top Screw Height Lower Tolerance 4 should then be set to 1 mm and Screw Height Upper Tolerance 5 to 3 mm 7 5 7 3 4 ROI tab The region can be positioned graphically or...

Page 72: ... when positioned on the inspection object The position tolerances are included in the checks 7 5 7 4 1 Common tab The configuration options in the Common tab are the same as those described in the ROI Circle menu see Common tab page 66 7 5 7 4 2 Options tab The Options tab is used to configure display or maintenance parameters Figure 75 ROI Seal Options tab Function Description 1 Show region enabl...

Page 73: ... seal is installed 3 Extension of the rubber seal in the X direction minimum value in mm 4 Extension of the rubber seal in the X direction maximum value in mm 5 Extension of the rubber seal in the Y direction minimum value in mm 6 Extension of the rubber seal in the Y direction maximum value in mm 7 Threshold value for shadowing from laser or camera view or due to adjacent foreign objects This val...

Page 74: ...for the inner circle on the rubber seal in the current region on the inspection object 2 Calculated value in mm for the inner circle on the rubber seal 3 Maximum value in mm for the height of the rubber seal 4 Maximum size in mm of the extent of foreign bodies during this inspection This prevents long but interrupted parts of the rubber seal from being recognized as foreign bodies 7 5 7 4 6 Steadi...

Page 75: ...s from steadiness The maximum value is used so that interruptions in the rubber seal are not identified as a fault and part of the rubber seal then being evaluated as a foreign body when interruptions are present 5 The value of the length of the contour deviation in mm actually determined during setup on the reference image 7 5 7 4 7 ROI tab Rectangle selection The following configuration options ...

Page 76: ...ks menu group 7 5 8 1 Higher level functions The higher level attributes of inspection regions are explained below Figure 81 Foreign Object Detection FOD Function Description 1 Create a new surface inspection FOD 2 Delete the active surface inspection 3 Duplicate the active surface inspection This allows the copy to be used for another region with minor adjustments if necessary 4 Apply settings Th...

Page 77: ...ion is not displayed in the image the zoom factor may be too large and the region is outside the display area Decrease the zoom factor to view and move the region 7 5 8 2 2 Options tab The Options tab is used to configure display or maintenance parameters Figure 83 FOD Options tab Function Description 1 Show region enabled by default 2 Display foreign objects found 3 Display the region where forei...

Page 78: ...aram Absolute window Only the available parameters of the selected Check Mode are activated 3 Minimum height in mm for the foreign bodies to be detected in the inspection region This value indicates how far the region is above the Basic ROI 4 Threshold value for the minimum extension of the foreign body to be detected 5 Threshold value for the minimum extension of the areas with NoData 6 Enable di...

Page 79: ...Description 1 Camera settings Settings are valid Settings are invalid 2 Connection status Camera is connected to the associated SIM No connection between the camera and SIM 3 Camera status Camera is working correctly and is ready to take images Camera is not ready 4 Status of the calibration Status of the calibration is valid Status of the calibration is invalid 5 Start downloading the calibration...

Page 80: ...ibration This includes the height of the measuring head above a reference on the inspection object as well as the x and y alignment of the measuring head and the alignment of the two cameras and the laser in a measuring head to each other If one of these variables is changed by improper operation or by external influence the evaluation may be impaired Since the Foreign Object Detection System is i...

Page 81: ...ption 1 Save log output to the connected device where the browser is open opens Save As dialog 2 Save current log output to the SIM For this operation a message appears in the log output Logs copied to from which the location of the log output can be read 3 Delete all entries from the log output 4 Set the level for which log outputs are to be made Hierarchy of configurable levels Warning Info Fine...

Page 82: ...settings are valid from the moment of saving NOTE To ensure that the images are actually saved an established and also active FTP connection to an FTP server is required 7 5 10 4 FTP Client page FTP is used to transfer the large image files to an FTP server The settings for the data transfer to the FTP server can be configured for the Maintenance user level and above Figure 89 FTP client configura...

Page 83: ... address to the FTP server with a valid port number 7 Login name and password valid on the FTP server 8 Option set Connection is established by the client 9 Option set Keep connection to FTP server permanently This ensures no new connection setup is necessary during operation ß This option should only be set when setting up the connection In check mode the detailed logs are not required à Time int...

Page 84: ...cation Figure 91 Backup restore system Function Description 1 Create a backup file of the current system settings in the buffer memory of the SIM 2 Download the backup file from the buffer memory of the SIM to the computer 3 Load the backup file into the buffer memory of the SIM using the file browser 4 Replace the current system settings with the backup file 7 5 10 5 3 System resources Figure 92 ...

Page 85: ... card 7 5 10 6 Info page The Info page displays a range of information for example Information about the configuration of this application Configuration area Information about the device Device area Statistical information Statistics area OPERATION 7 8027445 V1 0 2022 06 15 SICK O P E R A T I N G I N S T R U C T I O N S FOS HVS 85 Subject to change without notice ...

Page 86: ...them CAUTION Gefahr der Dekalibrierung bei Reinigungsvorgängen Bei Reinigungsvorgängen für die Lasereinheit sowie für die Kameras besteht grundsät zlich die Gefahr der Dekalibrierung durch mechanische Positionsveränderungen oder Fokusverstellungen der Kameras oder Laser 8 2 System functions 8 2 1 Backing up the SIMs Procedure for performing a full backup after setting up each SIM b Backup Current ...

Page 87: ...ure to the laser beam for longer periods of time may cause damage to the retina The laser radiation is harmless to human skin b Never look directly into the laser beam b Never point the laser beam at people s eyes b During commissioning or maintenance work suitable eye protection must be worn b Avoid laser beam reflection caused by reflective surfaces especially during assembly and alignment work ...

Page 88: ... Disconnect the laser from voltage before performing maintenance work on the laser unit b To do this disconnect the power supply to the entire system This disconnects the SIM4000 evaluation unit s and thus also the laser unit from the power supply Approach Figure 94 Cleaning the optical surfaces of the laser b Clean the optical surfaces regularly using a clean damp lint free cloth Further topics N...

Page 89: ...Red The device is in rescue mode due to software problems or overheating Connection data Off No Ethernet connection O Green Connection established 1 gigabit s Ö Green Data frames are being sent or received Laser Off 9 2 Helping support in the event of a fault If an error cannot be rectified independently the responsible SICK subsidiary must be contacted For a quick response to your request SICK Su...

Page 90: ...oints b This icon on the product packaging or in this document indicates that a product is covered by these provisions NOTICE The applicable local and statutory environmental regulations and guidelines for the disposal of industrial and electrical waste must be observed The following assemblies may contain substances that need to be disposed of sepa rately Electronics capacitors accumulators batte...

Page 91: ...n scan direction 11 1 3 Optical properties Mono 1600 Duo 1600 Duo 2400 Laser colors Single color red or blue Single color red or blue Multicolor red green red or blue green blue Laser class 2 Typical camera distance 750 mm Typical field of view width 1 600 mm 1 600 mm 2 400 mm 11 1 4 Detection size Mono 1600 Duo 1600 Duo 2400 Minimum object size 4 mm x 4 mm x 2 mm 11 1 5 Evaluation time Mono 1600 ...

Page 92: ... 1600 Duo 2400 Communication with higher level PLC PROFINET Data export FTP client 11 2 Dimensional drawings 11 2 1 FOS HVS measuring head 120 4 72 221 8 70 203 5 8 01 M6 26 x 8 5 868 34 17 1 Figure 96 Dimensional drawings of the FOS HVS measuring head 11 TECHNICAL DATA 92 O P E R A T I N G I N S T R U C T I O N S FOS HVS 8027445 V1 0 2022 06 15 SICK Subject to change without notice ...

Page 93: ...20 35 140 18 140 18 108 60 226 58 8 06 8 06 54 97 195 98 90 85 83 90 108 60 1 35 80 70 60 80 111 35 1 35 10x M3 x 10 108 65 117 65 Figure 97 Dimensional drawings of the SID120 TECHNICAL DATA 11 8027445 V1 0 2022 06 15 SICK O P E R A T I N G I N S T R U C T I O N S FOS HVS 93 Subject to change without notice ...

Page 94: ...Link Act Link Act Link Act Link Act Link Act Link Act Link Act USB Micro SD DevRDY SysRDY Result Funct 1 Funct 2 Remote SSD1 SSD2 Wi Fi BLE BF NS SF MS Mode IO Link IO Link IO Link 30 1 19 85 3 33 83 3 25 272 10 71 39 5 1 56 13 5 0 53 12 5 0 49 38 5 1 52 79 4 3 13 40 1 56 29 1 16 60 2 37 241 9 49 0 27 3 1 07 68 3 2 69 100 3 3 95 136 3 5 36 168 3 6 62 203 2 8 00 246 3 9 69 0 Repairwarranty voidifbr...

Page 95: ...m lens 2124126 Measuring head blue 16 mm lens 2123166 SIM4000 for measuring head master 2123856 SIM4000 for measuring head 2123866 SID120 FOS web display 2125739 Encoder distributor SPARE PARTS 12 8027445 V1 0 2022 06 15 SICK O P E R A T I N G I N S T R U C T I O N S FOS HVS 95 Subject to change without notice ...

Page 96: ...plication Settings x x Access permissions on the display visualization User level Menu Run Maintenance Application Inspection x x Status x x Config x General App State x x Logger x x System x Info x x Application Settings x x Access permissions in the configuration area User level Menu Run Maintenance Application Run Cam 1 x x Run Cam 2 x x Article Article x Camera x Block x Test article x Alignme...

Page 97: ...cle x ROI Screw x ROI Seal x Checks FOD x Device Ranger3 1 Calibration x Ranger3 2 Calibration x General App State x x Logger x x Image Storage x FTP Client x System x Info x x Application Settings x x ANNEX 13 8027445 V1 0 2022 06 15 SICK O P E R A T I N G I N S T R U C T I O N S FOS HVS 97 Subject to change without notice ...

Page 98: ...n image processing Safety violation Invalid article or article not taught in yes no Article available Result invalid yes no Inspection result ResultNOK NOK ResultOK End of inspection OK 13 ANNEX 98 O P E R A T I N G I N S T R U C T I O N S FOS HVS 8027445 V1 0 2022 06 15 SICK Subject to change without notice ...

Page 99: ...K FTPError Start system Article submission Move portal shortly after start of inspection Eject HVS or repeat inspection Result submission Image acquisition processing Load article Initialization 13 4 Control bits IN Name Control bit BVReady 1 ReadyToInspect 2 ResultOK 3 ResultNOK 4 ResultInvalid 5 SurfaceOK 6 SurfaceNOK 7 ScrewOK 8 ScrewNOK 9 free 10 free 11 free 12 free 13 free 14 free 15 FTPErro...

Page 100: ...tionStart 2 SafetyViolation 3 13 6 Data OUT Name Byte Article ID 1 2 Serial number 3 4 5 6 7 8 9 10 13 ANNEX 100 O P E R A T I N G I N S T R U C T I O N S FOS HVS 8027445 V1 0 2022 06 15 SICK Subject to change without notice ...

Page 101: ...ANNEX 13 8027445 V1 0 2022 06 15 SICK O P E R A T I N G I N S T R U C T I O N S FOS HVS 101 Subject to change without notice ...

Page 102: ... Phone 52 472 748 9451 E Mail mexico sick com Netherlands Phone 31 0 30 229 25 44 E Mail info sick nl New Zealand Phone 64 9 415 0459 0800 222 278 tollfree E Mail sales sick co nz Norway Phone 47 67 81 50 00 E Mail sick sick no Poland Phone 48 22 539 41 00 E Mail info sick pl Romania Phone 40 356 17 11 20 E Mail office sick ro Russia Phone 7 495 283 09 90 E Mail info sick ru Singapore Phone 65 674...

Reviews: