background image

SYSTEM DESCRIPTION   


15 

8022161-1B29 / V2-0/2021-04|SICK 

Subject to change without notice 

T R A N S L A T I O N   O F   A N   O R I G I N A L   O P E R A T I N G   I N S T R U C T I O N S | Backup Assistance System 

3.2.2


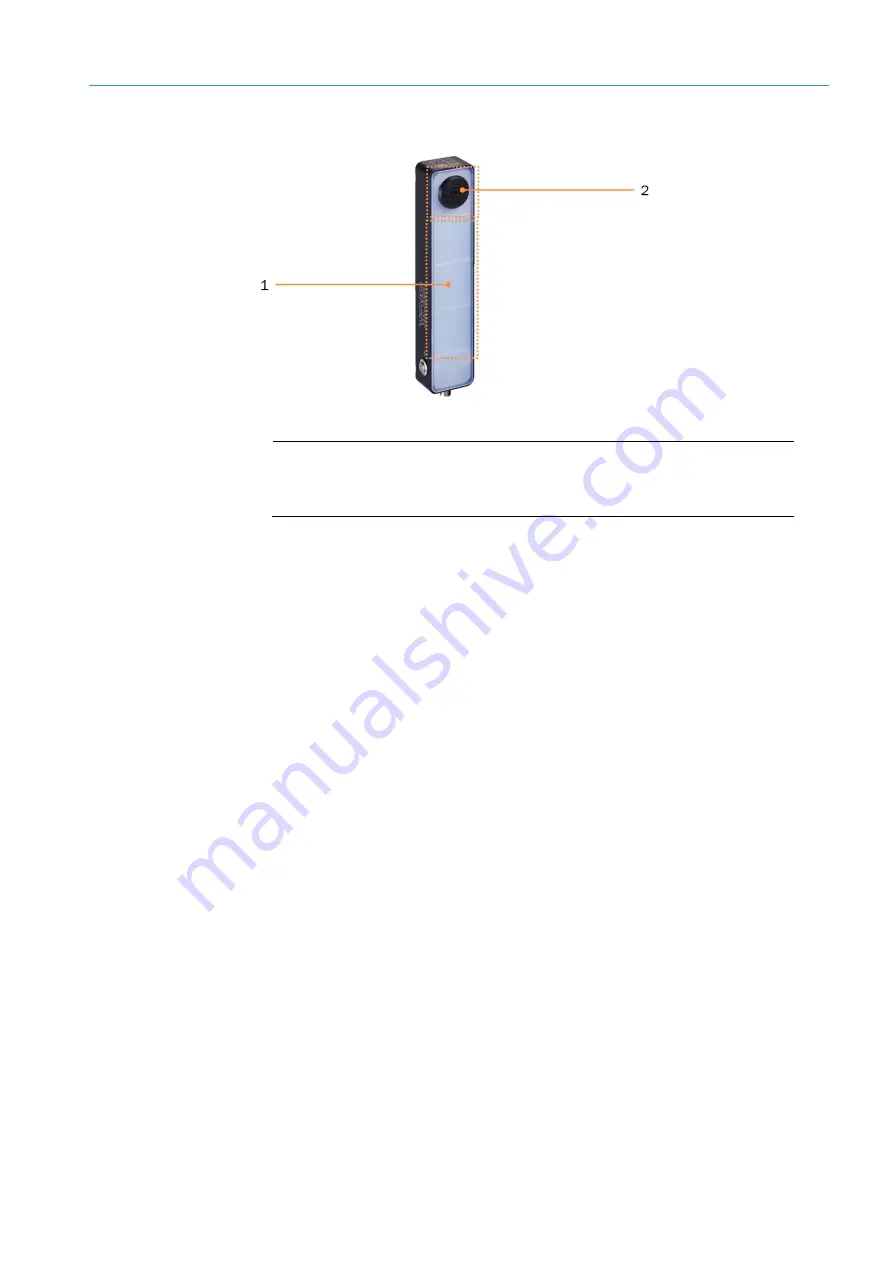
Signal light bar with buzzer 


Fig. 4: 

Signal light bar with buzzer 


Legend 

Light fields 

Beeper 


Signal light bar with bright light fields and integrated buzzer. 


Each 2D LiDAR sensor is connected to its own signal light bar via the control unit.  


Optical and acoustic signaling in the event of object detection within the monitoring 
fields. 


If an object is detected within 

warning field 1

 (=

warning

), the yellow LED lights up and 

a warning tone is audible. 


If an object is detected within 

warning field 2

 (=

stopping field

), the red LED lights up 

and a continuous tone is audible. 


Features 

Function 

Summary of Contents for Backup Assistance System

Page 1: ...OPERATING INSTRUCTION S Backup Assistance System Driver assistance system...

Page 2: ...rotected by copyright The associated rights are reserved by SICK AG Reproduction of this document or parts of this document is only permissible within the limits of the legal provisions of copyright l...

Page 3: ...iDAR sensor 13 3 2 2 Signal light bar with buzzer 15 3 2 3 Control unit 16 3 3 Operating principle 17 3 4 Status indicators 21 4 Mounting 23 4 1 Function test before mounting 23 4 2 Mounting the 2D Li...

Page 4: ...toring fields 51 6 3 1 Opening field set with monitoring fields 51 6 3 2 Adjusting the display view 53 6 3 3 Editing fields 54 6 4 Completing configuration 57 6 4 1 Transmitting parameters to the 2D L...

Page 5: ...ear and tear parts and accessories Unauthorized changes adjustments and or manipulations of software Failure to perform and document regular maintenance work The actual scope of delivery may differ fr...

Page 6: ...system operators new specialist personnel 1 6 Other relevant technical documentation information Technical system documentation Technical data Connection diagram Terminal diagram Documentation of the...

Page 7: ...persons according to the applicable safety standards for machines The system therefore does not comply with safety standards At all times the driver bears the full responsibility for safe operation in...

Page 8: ...ledge of the relevant standards and provisions to work on electrical systems and to detect and avoid any potential dangers independently 2 4 Warranty No warranty claims will be accepted if The safety...

Page 9: ...s or electrical shock Only qualified specialist personnel are permitted to perform electrical work on the driver assistance system Before working on electrical components observe the five safety rules...

Page 10: ...cessively cold or warm temperatures and high levels of dust fog or spray may cause faults and faulty alarms and may result in a complete system crash 2 7 Warning symbols on the system components Warni...

Page 11: ...tors or combustion engines The driver assistance system is designed for indoor and outdoor use Fig 1 BAS scope of delivery for vehicles with electric motor and combustion engine Quantity Part no Descr...

Page 12: ...M12 connection cable 12 pin 5 m 1 2096106 Signal light bar M12 connection cable 8 pin 5 m 1 2086761 TiM351 2D LiDAR sensor mounting kit 1 2122092 Mounting kit with screws and 2 RAM brackets OR 111789...

Page 13: ...ight method To do so a laser beam is emitted and a moving mirror is used to guide it in the required direction The laser beam is emitted through the front screen The scan plane position is indicated b...

Page 14: ...divided into so called monitoring fields A distinction is made between monitoring fields of type Warning field 1 and Warning field 2 stopping field The size and geometry of the monitoring fields can...

Page 15: ...eper Signal light bar with bright light fields and integrated buzzer Each 2D LiDAR sensor is connected to its own signal light bar via the control unit Optical and acoustic signaling in the event of o...

Page 16: ...ted power supply unit Installed near the seat of the vehicle Connection to the voltage supply and the reverse signal of the industrial truck Connection of the individual system components Main control...

Page 17: ...vary and must be parameterized correspondingly during commissioning Each monitoring field is assigned to a switching output of the 2D LiDAR sensor When an object is detected in a monitoring field the...

Page 18: ...vated signaling is active In the figure above the object is detected by the 2D LiDAR sensor but there is no object detection within the defined monitored areas The signal light is green there is no ac...

Page 19: ...object detection in stopping field If an object is detected in the stopping field the signal light bar lights up red In addition a constant warning tone is activated Fig 10 Monitoring with two 2D LiD...

Page 20: ...ion in a monitoring field is signaled by the signal light bar associated with the 2D LiDAR sensor Fig 11 Signaling of object detection in one of the two warning fields If the object is detected in an...

Page 21: ...ach in end of pre warning phase 60 second teach in phase No Teach in completion of teach in phase No Error Yes Device without supply voltage Yes Tab 1 Status displays LED red LED green Status Used in...

Page 22: ...0 1 1 0 Rectangle segmented L 1 5 m W 2 m 8 1 1 1 0 Rectangle segmented L 1 75 m W 2 m 9 0 0 0 1 Rectangle segmented L 1 m W 2 m 10 1 0 0 1 Rectangle segmented L 1 25 m W 2 m 11 0 1 0 1 Rectangle seg...

Page 23: ...eded to be able to perform work assigned to them and to identify and avoid any potential dangers independently 4 1 Function test before mounting Before mounting the system components on the industrial...

Page 24: ...tionally coming loose Select the mounting position so that the connectors can be attached and removed NOTE If the BAS is used in outdoor areas protecting the 2D LiDAR sensor against direct sunlight an...

Page 25: ...egend 1 Laser beam monitored area 2 Monitoring field 3 Distance between monitoring field and ground The tilt angle must be adjusted depending on the mounting height and scanning range of the 2D LiDAR...

Page 26: ...ted Fig 17 Tilt angle of the 2D LiDAR sensor too flat Do not select a tilt angle that is too flat If the laser beam does not strike the ground as shown in the figure above smaller objects located behi...

Page 27: ...ly at the bottom on the counterweight of the industrial truck Recesses in the counterweight of the industrial truck can be used for mounting This mounting position provides additional protection of th...

Page 28: ...sition on the two sides of the driver s cage is an alternative to the top and bottom mounting positions Just like with the top mounting position the tilt angle should not be too flat and not too steep...

Page 29: ...bracket with impact protection It comprises a mounting bracket and a mounting plate for mounting and fine adjustment of the 2D LiDAR sensor Fig 24 Mounting on adapter plate Fasten the 2D LiDAR sensor...

Page 30: ...unting bracket horizontally or vertically to the attachment mechanism of the industrial truck The mounting bracket has two holes with a diameter of 4 3 mm on the bottom and rear sides NOTE The attachm...

Page 31: ...that can be very flexibly adjusted The joints can be moved and easily adjusted when the fixing screw is loosened The bracket is fixed in its set position as soon as the fixing screw is tightened Fig...

Page 32: ...33536 RAM B 201U C 6 socket arm 1 ball 6 socket arm 1 ball Included with delivery 5333537 RAM B 230 Short 1 ball adapter Short 1 ball adapter for lengthening the socket arm Universal clamping systems...

Page 33: ...st be connected at the fuse panel of the manned forklift truck with a fuse rated at 4 amperes Cable Permitted lengths of cable Voltage supply max 3 m Reverse signal max 3 m Sensor and signal light bar...

Page 34: ...ver field of vision in the driver s cab Ensure that the connection on the signal light bar can be easily reached after mounting Otherwise connect the signal light bar before mounting see 5 3 Connectin...

Page 35: ...bar The scope of delivery includes VHB industrial adhesive tape Clean the surface of the back of the housing and dry it well Position the adhesive tape and stick the first side of the tape to the sur...

Page 36: ...al strip holder clockwise using the 4x M5 screws included with delivery Use a 3 mm Allen key for this purpose NOTE The recommended applied tightening torque is 3 5 Nm Fig 34 Screwing down metal strip...

Page 37: ...kills experience and knowledge of the relevant standards and provisions needed to work on electrical systems and to detect and avoid any potential dangers independently DANGER RISK OF INJURY DUE TO EL...

Page 38: ...sensor s to the control unit using the 5 m cable included with delivery Connect the signal light bar s to the control unit using the 5 m cable included with delivery Connect the control unit to the fu...

Page 39: ...le to the control unit as shown Run the connecting cable from the control unit to the 2D LiDAR sensor Screw the M12 round connector on the TiM351 2D LiDAR sensor onto the Power I O female connector NO...

Page 40: ...light bar s is are connected to the control unit via an 8 pin connecting cable with two M12 round connectors The cable is used for supplying the voltage and for signal transmission Screw the M12 round...

Page 41: ...the volume button is pressed the buzzer sounds for approx 1 second and indicates the selected volume level NOTE When changing the volume acoustic feedback is given for 1 second In the operational stat...

Page 42: ...instructions Safety requirements relating to work on electrical systems must be observed and complied with National and regional regulations must be complied with Fig 40 Connecting control unit to ind...

Page 43: ...dependently Electricians have the professional training skills experience and knowledge of the relevant standards and provisions needed to work on electrical systems and to detect and avoid any potent...

Page 44: ...nfiguration software which is installed on a connected PC Download the latest version of SOPAS at www sick com and save it on the configuration PC Start installation by double clicking the exe file Cl...

Page 45: ...ng IP 67 in operation Connect the 2D LiDAR sensor to a free USB female connector on the configuration PC using a suitable shielded high speed USB cable The USB device will be automatically detected by...

Page 46: ...e without notice 6 2 4 Starting the device search Click the Search settings button The connection wizard helps you establish a connection to a connected device Select the Device family oriented search...

Page 47: ...ed and added to the SOPAS project The added sensor is shown in the left area of the window as a device tile NOTE Where applicable a message window will appear indicating that the device driver for the...

Page 48: ...ers are installed The 2D LiDAR sensor will now be detected by the configuration PC It is not yet connected to the system however i e still offline 6 2 6 Setting 2D LiDAR sensor online By connecting th...

Page 49: ...Online appears in the tile The LED lights up green 6 2 7 Opening configuration interface Double click on the device tile All configurable parameters of the device are compiled together in a correspond...

Page 50: ...sistance System Subject to change without notice 6 2 8 Logging into the 2D LiDAR sensor In the SOPAS toolbar click on the icon with the three dots and select Device Login Select Authorized client user...

Page 51: ...ting the monitoring fields is displayed The 2D LiDAR sensor and the scan lines of the surrounding contour scanned by the sensor are visible in the center area The gray area depicts the area that is no...

Page 52: ...n the Field selection area select field set 9 This field set is relevant for the BAS driver assistance system The predefined fields for the driver assistance system are now visible in the scan range T...

Page 53: ...level Click on the Display all active points icon to zoom in or zoom out on the view of all active points of the monitoring field The Display maximum sight range of the sensor icon shows the 2D LiDAR...

Page 54: ...ctangular monitoring fields have four field points at the corners The geometry of the monitoring fields is adapted to the conditions on site by moving adding or deleting field points On the right side...

Page 55: ...he Move function remains active so that the next point can be moved directly afterwards Click on the point The marker square is shown in blue Move point with mouse button pressed Hold down the Ctrl bu...

Page 56: ...to red Click again on the field point to be deleted SOPAS removes the marker square and instead connects the two nearest marker squares with a new line Click on the icon of the active editing functio...

Page 57: ...ld geometry of the warning field as described 6 4 Completing configuration 6 4 1 Transmitting parameters to the 2D LiDAR sensor All geometries modified in SOPAS are transmitted to the connected 2D LiD...

Page 58: ...is commissioned Check monitoring fields along the outer boundaries for detection To do this walk along them or check the functionality with suitable aids The system must trigger accordingly each time...

Page 59: ...ng 2D LiDAR sensor to configuration PC Start SOPAS and perform device search if necessary see chapter 6 2 4 Starting the device search Transfer device to project and open configuration interface by do...

Page 60: ...y potential dangers independently Electricians have the professional training skills experience and knowledge of the relevant standards and provisions needed to work on electrical systems and to detec...

Page 61: ...o monitoring fields In case of unexpected error behavior check the components of the driver assistance system for mechanical damage In case of mechanical damage contact SICK Service 7 1 2 Visual contr...

Page 62: ...r Switch off the device during cleaning Remove dirt from the front screen Then wipe the front screen with a lens cloth NOTE SICK lens cloth with part no 4003353 is recommended Use a mild anti static l...

Page 63: ...roject or device file the replacement device can be configured quickly and conveniently by importing the saved parameter set Part no Meaning 1067299 TiM351 2D LiDAR sensor Loosen the M12 round connect...

Page 64: ...Loosen all M12 round connectors on the control unit and disconnect the connecting cables from the control unit Loosen and remove the retaining plate fixing screws Remove the retaining plate with the...

Page 65: ...configurable audible alarm level up to 98 dB 2 x Mounting kit for sensor and signal light bar 2 x Connection cable for sensor and signal light bar 5 m 2 x Industry Industrial vehicles automotive and p...

Page 66: ...ecting cables 2 320 g without connecting cables Power consumption 10 W typical 13 W maximum Reverse signal voltage of the machine 12 V 24 V 24 V 48 V 60 V 72 V 12 V 24 V 24 V 48 V 60 V 72 V Operating...

Page 67: ...elivery 2 M3 threaded mounting hole 2 8 mm deep blind hole thread 3 Optics cover 4 Receiving range light inlet 5 Transmission range light emission 6 Function button for teach in 7 Red and green LED st...

Page 68: ...Backup Assistance System Subject to change without notice Fig 45 Dimensional drawing of mounting kit TiM351 Legend 1 TiM3xx 2D LiDAR sensor in scope of delivery 2 TiM3xx mounting kit part no 2061776 i...

Page 69: ...f control unit Fig 46 Dimensional drawing of control unit Legend 1 Signal light bar 1 connection 8 pin M12 male connector 2 Sensor 1 connection 12 pin M12 male connector 3 Signal light bar 2 connectio...

Page 70: ...ect to change without notice 9 3 Dimensional drawings of signal light bar Fig 47 Dimensional drawing of signal light bar Legend 1 Red LED segment visual signal display 2 Yellow LED segment 3 Green LED...

Page 71: ...d electronic devices In accordance with international directives and regulations batteries accumulators and electrical or electronic devices must not be disposed of with household waste The owner is o...

Page 72: ...laysia Phone 603 8080 7425 E Mail enquiry my sick com Mexico Phone 52 472 748 9451 E Mail mario garcia sick com Netherlands Phone 31 0 30 229 25 44 E Mail info sick nl New Zealand Phone 64 9 415 0459...

Reviews: