8017035/ZMO9/2017-06-08 • © SICK AG • Subject to change without notice.
57
PRO2-Navigator Setup Software
6.4.3
Camera Settings
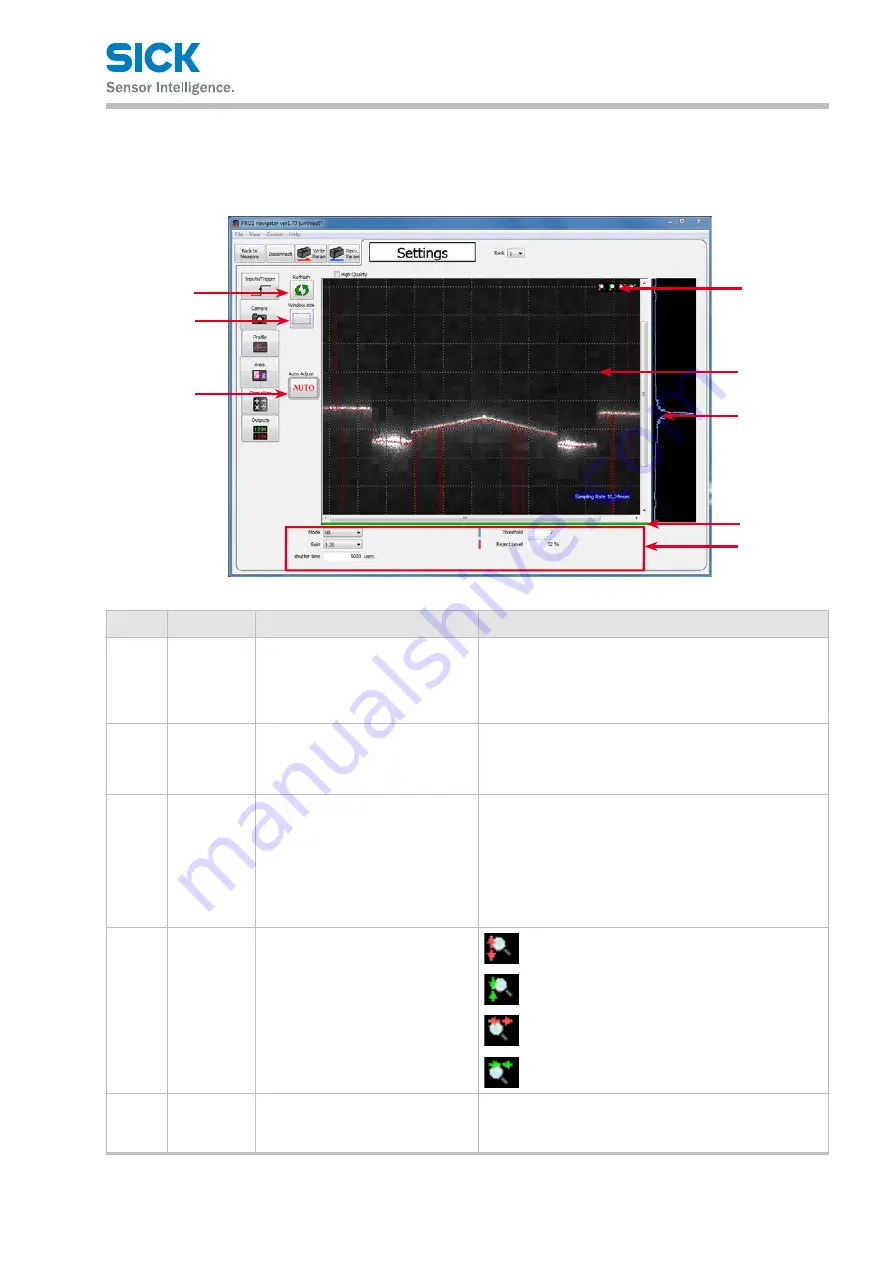
This section explains the details of the camera setup screen.
Reference: For details on the input/trigger settings, see “7.4 Camera Settings.”
1
2
3
4
5
6
7
8
Number Display item Description
Operation
1
Refresh/Stop Updates the display area details to
the latest status.
When you click Refresh button, the latest camera image
is acquired.
(If the communication speed is slow, it may take time
to acquire the image.) When the STOP button is pressed
while the process is on going, the process will be stopped.
2
Window Size Specifys the camera range. Narrow
the range to reduce the time requi-
red to capture the image.
When you click this button, a white, square frame indicating
the range will be drawn on the camera image
6
. Adjust the
range using the mouse by dragging the sides and corners
of the frame.
3
Auto Adjust
Automatically sets the Hi-res or NR
mode to the optimum value.
Click this button to automatically set the shutter time.
• Before automatic adjustment, set the actual
measurement target in place and do not move the target
during adjustment. (If “Trigger Mode” is set to any value
other than “Continuous,” apply the trigger.)
• "Hi-res" and "NR-Mode", “Gain”, “shutter time”,
“Threshold” and “Reject Level” will be adjusted automati-
cally by pressing “Auto adjust” button.
4
Scaling
Expand or shrink the display area.
Expand the display area in the vertical direction.
Shrink the display area in the vertical direction.
Expand the display area in the horizontal direction.
Shrink the display area in the horizontal direction.
5
Camera
image
Displays the camera image captured
when “Refresh” was clicked.
The camera image is displayed here.


