background image

46 


3.8.2


Viewing a Device 

Viewing Information 


Steps


1.


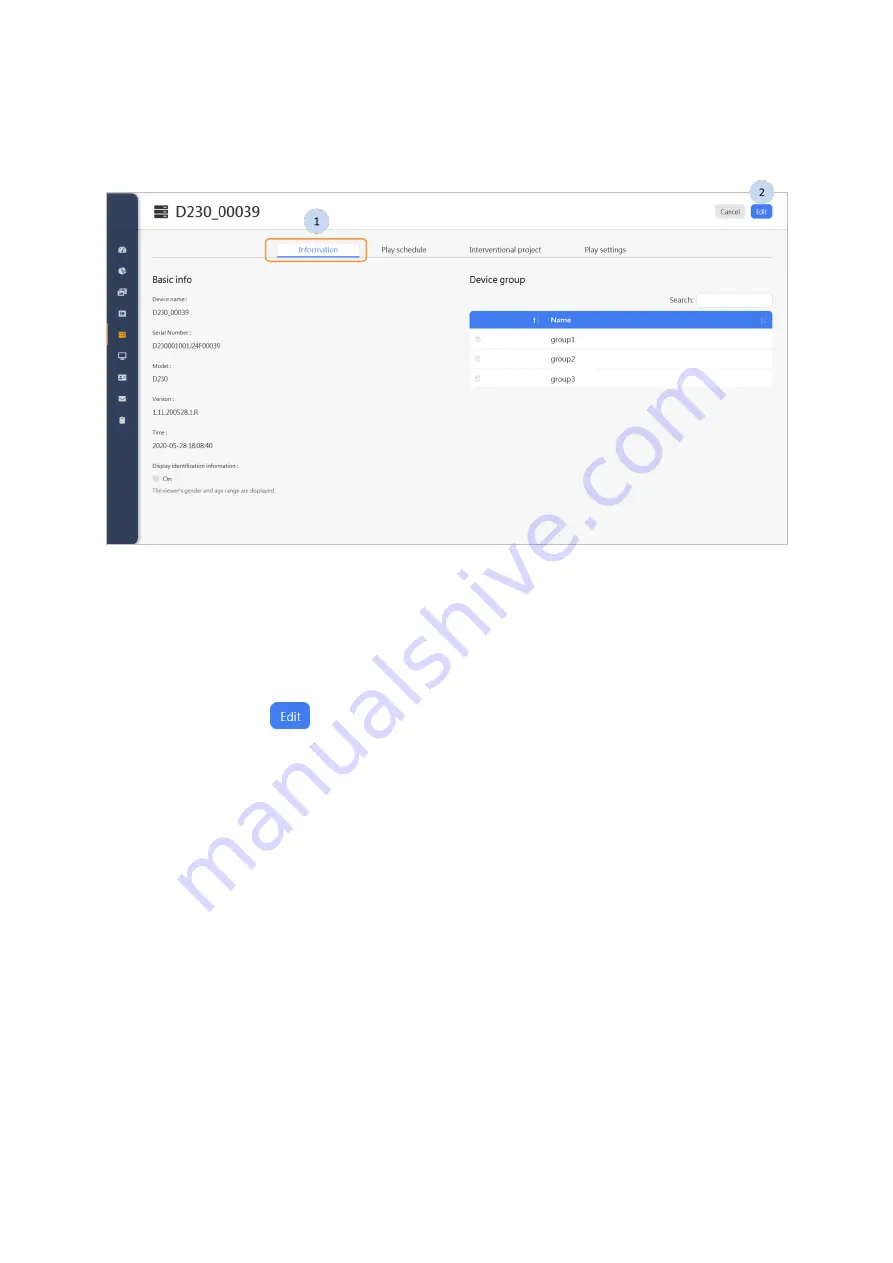
Click on the “Information” tab to view the device information. On this page 

it displays basic information about the device and the group which it 

belongs to. 

2.


Click on the 

  button at the top to edit the device, if required. 

Summary of Contents for D230

Page 1: ...D230 Server Version Software Quick Start Guide English ...

Page 2: ... manual had been carefully checked for accuracy however no guarantee is given as to the correctness of the contents For continuing product improvement Shuttle Inc reserves the right to revise the manual or make changes to the specifications of this product at any time without notice and obligation to any person or entity regarding such change The information contained in this manual is provided fo...

Page 3: ... 2 WEB PAGE AFTER LOGIN 12 3 3 SIDEBAR 12 3 3 1 Menu 12 3 3 2 Logging in to an account 13 3 3 3 Logging out 13 3 4 DASHBOARD 14 3 4 1 System info 14 3 4 2 Usage info 14 3 4 3 Device info 15 3 4 4 Upgrade 16 3 5 STATISTICS 19 3 5 1 Projects 20 3 5 2 Devices 21 3 5 3 Age 22 3 5 4 Gender 24 3 5 5 Analysis Result 26 3 6 MEDIA LIBRARY 27 3 6 1 Adding a media 29 3 6 2 Editing a media 30 3 7 PROJECT MANA...

Page 4: ... Adding an account 66 3 10 3 Editing an account 67 3 10 4 Account group list 68 3 10 5 Creating an account group 69 3 11 VERIFICATION MAILBOX 70 3 12 HISTORY 71 3 12 1 Project 72 3 12 2 Device 72 3 12 3 User 73 4 PLAYING CONTENT ON THE D230 DEVICE 74 4 1 DEVICE STATUS 74 4 2 PLAYING CONTENT 74 4 3 D230 FACTORY RESET 74 APPENDIX 1 VIDEO CROPPING TOOLS 1 VIDEO RESOLUTIONS 2 Tables Table 1 Supported ...

Page 5: ...create advertising content including scrolling text pictures and videos Content can be scheduled and played on the D230 device The D230 Tool is a mobile App that is used to initialize the D230 device network It runs on Android 7 x and iOS 11 x or higher as provided by the manufacturer 2 Setting the environment 2 1 System software activation Enter the server IP in the URL field of your browser to a...

Page 6: ...oner 4 Upon reception of the certificate from the commissioner click on the button on the system page to select the certificate file for verification Table 1 Supported Languages of the Shuttle Software Activation Service System English en US 繁體中文 It is not allowed to install a server on a virtual machine since the product key is bundled with the ID of the hardware equipment ...

Page 7: ...e certificate is verified the software is successfully activated please then press the button to start using the software 6 If credentials are invalid the software cannot be activated please contact a service specialist ...

Page 8: ...Once the network settings are done the D230 will be activated 2 2 1 Preparation Please connect your mobile phone s Wi Fi to the AP Ex AP12345 please check your own AP before launching the D230 Tool 2 2 2 D230 device network settings Steps 1 Download the D230 Tool 2 Tap the screen to start the settings on the D230 Tool 3 Choose the type of network you want the D230 device to connect to 4 Tap Skip n...

Page 9: ...se whether the SSID should be hidden or public 2 Select the security type WEP WPA or disabled Example WPA 3 Enter the password of the AP Example 1234567890 please check your own password If the security type is set to Disabled you will not need to enter a password 4 Enter the server IP or the domain name and the port to set the IP of D230 the server 5 Tap Next to finish the Wi Fi settings ...

Page 10: ...be entered manually IP address Required Net mask Required Gateway Required DNS1 Optional DNS2 Optional 3 Enter the server IP or the domain name and the port to set the IP of the D230 server 4 Tap Next to finish the Ethernet settings LTE settings Steps 1 Enter the server IP or the domain name and the port to set the IP of the D230 server 2 Tap Next to finish the LTE settings ...

Page 11: ...hen connecting to D230 device Network name SSID D230_XXXXX The serial number of the D230 device is on the back of the device The last 5 digits are part of the SSID For example if the S N is D230001001J24F56789 the default SSID then is D230_56789 Security Mode WPA2 Password 12345678 3 Once the D230 device is connected please go back to the D230 Tool 4 Tap start to complete the D230 device Wi Fi set...

Page 12: ...server and devices have firewall restrictions please be sure to open the above ports for use 2 2 4 Device list When the network settings are completed the D230 Tool will list all the devices that have been set Setting up a new device Setting the IP of the D230 server Refresh device list ...

Page 13: ...r 2 Tap Update Server to Device 3 The app will scan for devices for 30s and then list the results You can tap the button to rescan or stop scanning by pressing the Stop button 4 Select the device you want to update from the list 5 Tap the Update button After listing the update results tap the Back button to end the update ...

Page 14: ...browser and enter the server IP port 8000 for example 192 168 1 1 8000 in the URL field to access the website 2 Enter the Email account and password 3 Select the language 4 Click on the button to log in to the website Table 2 Website Supported Languages English en US Français 繁體中文 Deutsche 简体中文 日本語 Español Pусский ...

Page 15: ...r your email address and tap the button 3 After clicking on the button an email will be sent with a link to reset the password Please click on the link 4 Enter a new password and confirm the password then tap the button to reset the password 5 After resetting the password you can click on Login now to login ...

Page 16: ...Guide 3 4 Dashboard 3 5 Statistics 3 6 Media Library 3 7 Project Management 3 8 Device Management 3 9 Screen Settings 3 10 Account Management 3 11 Verification Mailbox 3 12 History Move the mouse over the sidebar and the full size will expand You can switch each function by clicking on the sidebar menu and the following sections will describe these features ...

Page 17: ...he sidebar You can edit the name and password via Modify Profile Steps 1 Click on the button on the sidebar 2 Edit your user name if required 3 Edit your password if required and confirm 4 Click on the button to save and finish 3 3 3 Logging out Click on the button on the sidebar to logout ...

Page 18: ...n the button on the sidebar so that the Dashboard displays on the right 3 4 1 System info You can get the following system information on the top right of the dashboard System uptime Current system time System version 3 4 2 Usage info ...

Page 19: ...hboard Count of Devices Online Amount of online device s Offline Amount of offline device s Approval Pending Approval Pending device s Device list Name Device name Time Date of the last update or upgrade of the device Model Device model Firmware Version Firmware version of device App version App version of device Status Status of device Device status Online Device is online Offline Device is offli...

Page 20: ...tem all logged in accounts will be logged out 3 4 4 Upgrade Upgrading the system When a new system version is available for update the upgrade button will be displayed in the top right corner of the dashboard Press to perform to upgrade Steps 1 Click button 2 Click button to confirm the upgrade ...

Page 21: ...ly restart and the restart process will take about 5 minutes Upgrading of device firmware When a new firmware version of device is available for update the upgrade button will be displayed in the top of the device info list of the dashboard Press to perform to upgrade Steps 1 Click on the button 2 Click on the button to confirm the upgrade ...

Page 22: ...mpleted the device will automatically restart Upgrading of device App When a new App version of device is available for update the upgrade button will be displayed in the top of the device info list of the dashboard Press to perform to upgrade Steps 1 Click on the button 2 Click on the button to confirm the upgrade ...

Page 23: ...roject Project based analysis of the number of times viewed from different genders and ages Device Device based analysis of the number of times viewed from different genders and ages Age Age based analysis of the number of times different projects or devices are viewed Gender Gender based analysis of the number of times different projects or devices are viewed ...

Page 24: ...inimum of 1 project up to a maximum of 5 3 Click on the button to analyze data 4 Enter the table name and select a period of time 5 Click on the button to start analysis 6 The system will generate an analysis table Please refer to chapter 3 5 5 Analysis Result for the details of the table ...

Page 25: ...e device view 3 Select a minimum of 1 device up to a maximum of 5 4 Click one the button to analyze data 5 Enter the table name and select a period of time 6 Click one the button to start the analysis 7 The system will generate an analysis table Please refer to chapter 3 5 5 Analysis for details of the table ...

Page 26: ...on the button 3 Select a minimum of 1 project up to a maximum of 5 4 Click on the button to analysis data 5 Enter the table name and select date range 6 Click on the button to start analysis 7 The system will generate an analysis table Please refer to chapter 3 5 5 Analysis for details of the table ...

Page 27: ... toggle the view of the device 4 Select a minimum of 1 device up to a maximum of 5 5 Click on the button to analyze the data 6 Enter the table name and select a period of time 7 Click on the button to start the analysis 8 The system will generate an analysis table Please refer to chapter 3 5 5 Analysis for details of the table ...

Page 28: ...the button 3 Select a minimum of 1 project up to a maximum of 5 4 Click on the button to analyze the data 5 Enter the table name and select a period of time 6 Click on the button to start the analysis 7 The system will generate an analysis table Please refer to chapter 3 5 5 Analysis for details of the table ...

Page 29: ...o toggle the view of the device 4 Select a minimum of 1 device up to a maximum of 5 5 Click on the button to analyze the data 6 Enter the table name and select a period of time 7 Click on the button to start the analysis 8 The system will generate an analysis table Please refer to chapter 3 5 5 Analysis for details of the table ...

Page 30: ...e between the analysis results 2 Click on the button to show the source of the analyzed 3 Click on the button to reselect a source if required 4 Click on the button to export analyzed data 5 Click on the button at the top of the page to add an analysis table 6 Click on the button to export all tables if required Tips Move your mouse over the pie chart and bar chart to display the meaning of each p...

Page 31: ...ter 3 6 1 Adding a media 3 You can click on the top menu and follow the steps below if required To sort media by name or creation time To filter the type of media as all pictures or videos to display To display media thumbnail as a cover To display media information including name size amount of media used and creation time In the Show info mode you can click on the button to refer which projects ...

Page 32: ...to expand or the button to collapse the filter menu and follow the steps below if required To show the unused media by ticking this checkbox To select all unused media Select none to unselect all the unused media To delete media n is the number of media to be deleted ...

Page 33: ...OV files are allowed Encoding support Video H 264 Audio AAC 3 6 1 Adding a media Steps 1 You can click to select or drag files to add media 2 You can rename the media file or press the button to remove the item 3 Press the button to upload media files 4 The upload result will be displayed in the list press the button to finish adding media ...

Page 34: ...30 3 6 2 Editing a media Steps 1 Click on the media thumbnail 2 Press the button to rename media name and click on the button to save it if required 3 Press the button to delete this media if required ...

Page 35: ... media library page to delete the media Steps 1 If a project uses this media please click the project from the list 2 Remove this media from the project management page 3 Go back to media library page Press the button to recheck whether the media is being used by any project 4 If the media is not used by any project press the button to confirm the deletion ...

Page 36: ...ew the general project list Please refer to the next chapter 3 7 1 General project 3 Click on the Interventional project tab to view the interventional project list Please refer to the next chapter 3 7 2 Interventional project General projects can be used with schedules to play projects as planned The Interventional type project can be inserted and played immediately ...

Page 37: ...a project 2 You can choose a project from the list and follow the steps below if required The description of the preview is described in the chapter 3 7 5 Preview Shows the Project details Edits the Project Deletes the Project 3 You can adjust the layout from the project list and choose Landscape Left 90o or Right 90o by ticking the relevant checkbox if required ...

Page 38: ...on this will be explained in the chapter 3 7 3 Creating a project 2 You can choose a project from the list and follow the steps below if required The description of the preview is described in the chapter 3 7 5 Preview The description of the play is described in the chapter Playing an interventional project Shows the Project details Edits the Project Deletes the Project 3 You can adjust the layout...

Page 39: ...e device to be inserted please refer to Interventional Project in chapter 3 8 3 Editing a device for how to bind Playing an interventional project Steps 1 Choose or setting the play duration 2 Click on the button to play the interventional project ...

Page 40: ...36 3 7 3 Creating a project Setting the basic info of a project Steps 1 Enter a project name 2 Select a layout 3 Select division of the layout 4 Click on the button to save the project name and layout ...

Page 41: ... The details will be explained in the chapter 3 7 4 Content Type Scrolling Text Picture and Video 3 Click on the button to switch to Facial recognition mode if required The next chapter Editing Facial Recognition Content explains more details on this 4 Click on the button to preview the content The description of the preview is described in the chapter 3 7 5 Preview 5 Click on the button to finish...

Page 42: ... or division Full Recognized content plays on full screen Division Recognized content plays on selected divisions on the screen 3 Choose the division where to display Facial Recognition content 4 Click on the button to set the conditions Up to 3 conditions can be set for the full screen and each division 5 Set the Identity selection Choose Gender Choose Age ...

Page 43: ...tent resumes 6 Select Content Type and fill in the content More details on this will be explained in the chapter 3 7 4 Content Type Scrolling Text Picture and Video 7 You can click on the button to back the standard content settings if required 8 Click on the button to preview the content The description of the preview is described in the chapter 3 7 5 Preview 9 Click on the button to finish The t...

Page 44: ... in facial recognition mode 5 Enter the text content upmost 150 characters 6 Select the text color and Background color or select the history color The scrolling text only supports landscape layout and supports English Chinese Japanese and numbers in portrait mode Left 90 and Right 90 The scrolling text set as Facial Recognition Content will play as many times as defined by the playing rounds ...

Page 45: ...required 4 Click on the button to add media files 5 Click on the thumbnail to select files from media library Please refer to chapter 3 6 Media Library about how to use the above menu 6 Click on the button to add media files limit 10 files and go back to the content settings 7 You can hold the thumbnail and drag to change the playing order 8 Select the media and click on the button to remove the f...

Page 46: ...he button to toggle between Facial recognition mode and Standard content 2 In Face recognition mode you can select Gender and Age according to the identity selection A preview of the screen seen that will be shown to the audience of D230 device can be displayed 3 Click on the button to finish the preview ...

Page 47: ...ement page will display on the right 2 Click on the Device tab to view the device list The description of the device is described in the chapter 3 8 1 Device List 3 Click on the Group tab to view the group list The description of the group is described in the chapter 3 8 5Device group list ...

Page 48: ...ete device 3 Click on the Upgrade the license quantity button if you need to upgrade the license quantity After clicking you will enter the Shuttle software activation service system Please download the activation key and send it to the services commissioner After the services commissioner gives the certificate upload this certificate to complete the upgrade the license quantity For detailed flow ...

Page 49: ...wnload the activation key and send it to the services commissioner After the services commissioner gives the certificate upload this certificate to complete the upgrade license quantity For detailed flow please refer to 2 1 System software activation A device with pending approval cannot synchronize information with the system When a device is deleted all schedules on that device will be cleared T...

Page 50: ...nformation Steps 1 Click on the Information tab to view the device information On this page it displays basic information about the device and the group which it belongs to 2 Click on the button at the top to edit the device if required ...

Page 51: ...le tab to view the Play schedule 2 Click on the date in the calendar you want to view You can click on the button to switch months or click button to go back today 3 Click on the button at the top to edit the device if required Viewing the Interventional Project ...

Page 52: ...nterventional projects bundled with this device 2 Click on the button at the top to edit the device if required Viewing the Play Settings Steps 1 Click on the Play settings tab to view the Play settings 2 Click on the button at the top to edit the device if required ...

Page 53: ...isplay the gender and age of the viewer The default is off 4 Assign the device group from the group list if required Each device can only be in one device group at time 5 Click on the button at the top to save the information settings Canceling assign a group will clear the playback schedule and playback settings of this device After assign a group the original device settings will be replaced by ...

Page 54: ...k on the button at the top of the schedule list to create a schedule Please refer to the next chapter Planning a schedule 3 Click on an item in the schedule list you want to edit if required click on the following button To edit the schedule To delete the schedule ...

Page 55: ... and camera will be turned off 4 Click on the button to switch to sleep mode if required 5 After enabling the sleep settings click on the button to add a sleep time if required 6 Click on the time period in the sleep time list you want to edit and click on the following button if required To edit the sleep time To delete the existing sleep time 7 Click on the button at the top to save the play sch...

Page 56: ...lect a Project 2 Click on the button Steps 1 Enter the schedule name 2 Check the All day box if required 3 Set the start and end date time 4 Set the repeat frequency if required More details will be explained in the next section Repeating the schedule 5 Click on the button to finish ...

Page 57: ...edule Repeating a schedule every X day Steps 1 Click on the Every Day tab 2 Enter the number of day s 3 Click on the button to finish Repeating schedule every X week Steps 1 Click on the Every Week tab 2 Enter the number of week s 3 Select the days you want to the schedule to repeat 4 Click on the button to finish ...

Page 58: ...t to bundle with this device 3 After selecting the project click on the button at the top to save the interventional project settings Repeating schedule every X month Steps 1 Click on the Every Month tab 2 Enter the number of month s 3 Select the days you want to the schedule to repeat 4 Click on the button to finish ...

Page 59: ...environment Play settings Here you can replace logo of this device Steps 1 Click on the Play settings tab 2 Click button to view the logo image currently used on this device 3 Click on the button at the top to edit the logo 4 Select the layout of the logo you want to replace and click on the button 5 After selecting the image file click on the button at the top to save the play settings ...

Page 60: ...56 3 8 4 Delete device Steps 1 Click the checkbox to keep device history records for statistical analysis if required The default is clicked 2 Click button to delete this device ...

Page 61: ...ce group 3 Click on the device group item in the list and following the steps below if required Click to view the details of device group The description on how to view a device group can be found in the next chapter 3 8 7 Viewing a device group Edits a device group The description on how to edit a device group can be found in the chapter 3 8 8 Editing a device group Deletes the device group ...

Page 62: ...eating a device group Steps 1 Enter the name of the device group 2 Click on the button to save the group name 3 Select the devices from the list below you want to apply to the group 4 Click on the button to finish ...

Page 63: ...various settings of the device group 2 Click on the button at the top to edit the group settings if required 3 8 8 Editing a device group Steps 1 You can click the tab to edit various settings of the device group 2 After completing all edits click on the button to finish ...

Page 64: ...l display on the right 2 Click on the Basic Settings tab to display the basic settings The description is described in the chapter 3 9 1 Basic settings 3 Click on the Facial recognition tab to set the play content replacement The description is described in the chapter 3 9 2 Facial recognition ...

Page 65: ... the device you want to apply from the device group list or device list via the switch tab 3 After selecting the image file click on the button at the top to save the screen settings 4 You can click on the button to add logo item to the list if required The description of how to add a logo item is described in the next chapter Adding logo item 5 You can click on the button to rename the item name ...

Page 66: ...tem name 3 Select the layout of the logo you want to replace and click on the button 4 Select the device you want to apply from the device group list or from the device list via the switch tab 5 After selecting various layout image files click on the button at the top to save the logo item ...

Page 67: ...63 3 9 2 Facial recognition Steps 1 Choose the replace basic playing time of recognition content in the recognition mode 2 Click on the button at the top to save the settings ...

Page 68: ...ment page will display on the right 2 Click on the User tab to view the user list The description of the user is described in the chapter 3 10 1 Account List 3 Click on the Group tab to view the group list The description of the user group is described in the chapter 3 10 4 Account group list ...

Page 69: ... required The details will be explained in next chapter 2 You can click on the account in the list and use the following functions if required To edit an account The description on how to edit an account can be found in the chapter 3 10 3 Editing an account To delete an account ...

Page 70: ...e enter the following details Email account User name Password Confirm password 2 Choose the privileges To set these please refer to Table 3 Role and permissions Role Admin Role User 3 Select the group 4 Click on the button to save and finish ...

Page 71: ...up to get the permissions of this group If a user is not added to any group this user can only view the data of the function 3 10 3 Editing an account Steps 1 Edit the account name password confirm password if required 2 You can change the permissions of account as admin or user if required 3 You can disable this account by ticking the Disable checkbox and fill in the User suspension reason if req...

Page 72: ...u can click on the button to add a group up to 10 if required The details will be explained in next chapter 2 You can click on a group from the list and use the following functions if required To edit the account To delete the account ...

Page 73: ...69 3 10 5 Creating an account group Steps 1 Enter a Group name 2 Choose the users to join the group 3 Select the privileges of the group 4 Click on the button to save and finish ...

Page 74: ...lick on the button on the sidebar and the verification mailbox page will display on the right 2 The following information needs to be entered manually Email address Password SMTP Server Port 3 Click on the button to verify the SMTP Server settings A test email will be sent to verify that the settings are correct 4 Click on the button to reset settings if required ...

Page 75: ...1 Click on the button on the sidebar and the history page will display on the right 2 You can click on the top menu if required To filter the type of media as all project device or user to display To refresh the history list ...

Page 76: ... the events of the project when the project was added or edited by which user 3 12 2 Device Device history lists the events of the device when the device upgraded the firmware or APP and which user at what time allowed or deleted the device ...

Page 77: ...73 3 12 3User The user history lists the time when the user logged out or logged in ...

Page 78: ...cording to the schedule If the D230 has no project scheduled the default logo will be displayed Sleep mode If the D230 is scheduled for sleep mode it will stop playing a project backlight and camera will be turned off The D230 will automatically wake up and resume playing a project according to the schedule when the scheduled sleep mode ends 4 3 D230 factory reset To perform a factory reset press ...

Page 79: ...ur Windows Mac device to make sure your media files meet the right format and resolution play on your D230 device Windows MAC 1 Joyoshare Media Cutter 2 Video converter ultimate 3 filmora 4 FreeCropVideo easy making of videos only Windows 5 Kdenlive 6 Movavi video editor Online 1 Video cutter online ...

Page 80: ...s Applicable to the resolution of each division Landscape Right 90 Left 90 Full screen 1920 x 158px 158 x 1920px 2 divisions 960 x 158px 158 x 960px 3 divisions 620 x 158px 158 x 620px 4 divisions 480 x 158px 158 x 480px ...

Page 81: ...e Inc http global shuttle com Department E mail Contacts Sales sales tw shuttle com Technical Support E mail support tw shuttle com Media Contact shuttlepr tw shuttle com 2020 SHUTTLE Inc All rights reserved ...

Reviews: