4
ENGLISH
INTRODUCTION
Thank you for buying the P4T Transmitter. The P4T is a component in the PSM
®
400 family of wireless personal monitors. When used
with a P4R Receiver, it provides the many advantages of an in-ear monitoring system, including:
•
Improved Sound Quality
- high fidelity without the risk of feedback,
•
Increased Mobility
- your mix moves with you,
•
Personal Control
- through volume adjustment and MixMode
®
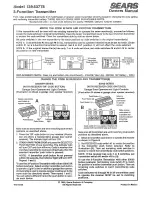
P4T TRANSMITTER FEATURES
1.
Local Earphone Output Jack (1/8 inch)
: Connects to earphones.
2.
Local Earphone Level Control:
This knob adjusts the volume of the
local earphone jack's amplifier. Always listen at low levels.
3.
Input Level LEDs:
Two vertical strings of four LEDs display the input
level of the left and right input channels. The four LEDs on the left dis-
play the status of the signal from channel 1 and the four LEDs on the
right display the status of the signal from channel 2:
4.
Transmission Frequency LED:
This indicates which of the 16 chan-
nels (0-9 or A-F) is transmitting.
5.
Frequency Select Button:
This recessed button changes the trans-
mission channel. (Use a 1/4" plug to press this button.)
6.
Antenna Connector 50
Ω
, BNC type:
This connects to the antenna
to transmit UHF signals to the receiver.
7.
LOOP OUT Jacks:
Two 1/4" TRS jacks allow the audio signal to pass
through the transmitter to other devices, including other transmitters,
tape recorders, or amplifiers.
8.
INPUT Jacks:
Two 1/4" TRS switching jacks are line level audio
inputs.
9.
DC INPUT Connector:
Input for PS40 power cord.
SET UP AND OPERATION
Follow these directions to set up the transmitter for operation.
1.
Plug the power cord into the transmitter's DC INPUT power connector.
Plug the other end of the power cord into a wall outlet.
2.
Attach the antenna to the ANTENNA OUT BNC connector.
3.
Connect line level outputs of an audio source into the audio INPUTS
of the transmitter. Use both of the input jacks for a two-channel
source. Use either input jack for a mono source. The P4T transmits in
MixMode/stereo if both inputs are used, but automatically transmits in
mono if only one input is used.
NOTE
: All inputs are phantom power protected up to 50 VDC.
4.
Select an operating frequency using the Frequency Select Button.
Push the button repeatedly until the LED displays the desired chan-
nel. The display flashes. Push and hold the button until the flashing
stops to confirm the change (use a 1/4" plug to press the button).
IMPORTANT:
Never set more than ONE transmitter to the
same operating frequency.
5.
Once the P4T transmits audio, observe the input level LEDs. If the
LEDs consistently illuminate red, decrease the output level of the
audio source until the red LEDs flicker occasionally.
6.
Set up the P4R receiver as directed in the P4R user's guide. Make
sure that the frequency selected on the receiver matches the fre-
quency selected on the transmitter.
TRANSMITTER FRONT PANEL
TRANSMITTER BACK PANEL
PA715 ANTENNA
LED
Signal Status
RED (top)
Limiter Active
YELLOW (middle)
Nominal Level
GREEN (bottom two)
Signal Present
.
For further information on the PSM 400 system, see the PSM 400 Wireless Personal Performance Pack User's Guide, available on the
web at
Summary of Contents for EP4T
Page 2: ...2 ENGLISH 3 FRAN AIS 8 DEUTSCH 13 ESPA OL 18 ITALIANO 23...
Page 10: ......
Page 11: ......
Page 12: ...2008 Shure Incorporated...