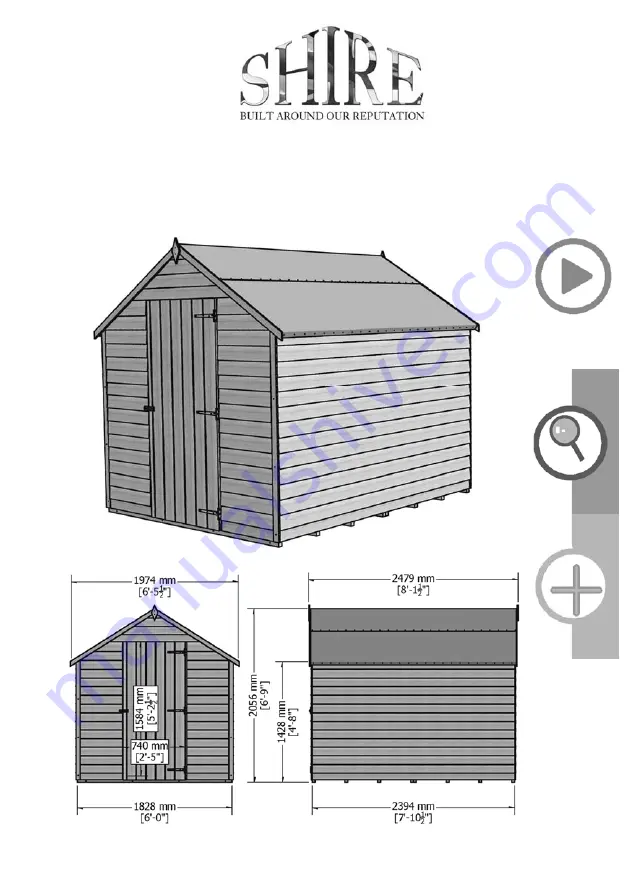
© 8x6 Value Overlap
Version 01 16/
02/2018 Julian Shepherd
These instructions are for your safety. Please read through them thoroughly before use.
PLEASE KEEP THIS LEAFLET FOR FUTURE REFERENCE
Page 1: ...8x6 Value Overlap Version 01 16 02 2018 Julian Shepherd These instructions are for your safety Please read through them thoroughly before use PLEASE KEEP THIS LEAFLET FOR FUTURE REFERENCE...
Page 2: ...j zyku prosimy o wys anie maila lub pisa na adres podany poni ej RUS TR Ba ka bir dilde talimatlar veya bir kopyas n bir kopyas i in bir e posta g nderebilir veya a a daki adrese yaz n z EN For a cop...
Page 3: ...bly Only use child and animal safe wood preservative Do not use creosote Allow the wood preservative to fully dry before use Regularly check the building for wear and tear Getting Started GB IE EVERY...
Page 4: ...iately prior to or after assembly The building must have been re treated and re sealed annually NOTE Wood is a natural product and therefore the following are excluded from the warranty Colour change...
Page 5: ...6 golden rules of maintenance 1 Timber widely recycled 2 Metal fixings widely recycled 3 Glass widely recycled 4 Roofing felt not currently recycled packaging Building 1 Ensure your base is level and...
Page 6: ...Stacked Parts List Description part No Qty 06...
Page 7: ...Fascia Bag Parts List Description part No Qty 07 Nail Bag Parts List Description part No Qty...
Page 8: ...08 Hardware Chart Scale 1 1 A0266 x128 8mm Felt Nail A0025 x89 40mm Round head nail A0032 x24 25mm Posi drive screw A0035 x23 60mm Posi drive screw Nail bag contents 8mm Description part No Qty...
Page 9: ...You will need Hammer Spirit level Ladder 1mm 3mm 5mm 8mm drill bit Drill Tape measure Ruler Sand paper Gloves Saw Pencil Goggles A helper for some tasks Screwdriver Sharp knife Masking tape When you s...
Page 10: ...In more detail GB IE 10...
Page 11: ...In more detail GB IE 11...
Page 12: ...GB IE Drill one floor panel only and fix to the other floor as shown Carefully turn over the floor and put it on your base 12 A0130 A0130 5mm Drill one panel only If using a drill or electric screwdr...
Page 13: ...es into the corner of the floor Filling the entire floor length Mark this panel where the floor bearers are inline with nails and drill The cladding overlaps the floor push the plain end A4387 up to i...
Page 14: ...GB IE Drill the A4386 Door Panel slide it into position and fix as with the other end 03 14 60mm Screws A0035 x03 Door Panel A4386 x01 5mm...
Page 15: ...15 60mm Screws A0035 x03 GB IE Drill one A4388 panel again marking to ensure the bottom hole is in line with a floor bearer 04 Inline with floor bearer 5mm Plain Panel A4388 x01...
Page 16: ...nails Position a roof bearer A3629 under the opposite edge with an even gap at either end 8mm and fix as above Position the final A3629 roof bearer in the middle of the roof sheet with the same end ga...
Page 17: ...the roof outside the walls The shorter roof bearer on the opposite edge of the roof sheet drops into the w shape and against the block at the high point of the roof Drill and screw on the inside at b...
Page 18: ...les shiregb co uk 18 GB IE RIGHT HAND HUNG DOOR POSITION SHOWN Align the A2456 hinge strip flush with the inside face of the doorway framework widest side against framework and fix with 40mm nails 07...
Page 19: ...the door 08 GB IE Carefully hang the doors using 1 screw per hinge at first to ensure they are square before adding the rest of the screws Tip You can use coins or something similar under the doors a...
Page 20: ...e cladding Nail with 3x40mm fort the top and 4x40mm nails each side 10 GB IE Fix the A0123 Hasp and staple so the screws go into the horizontal framework on the back of the door 11 25mm screws A0032 x...
Page 21: ...quare and true Fix the walls to the floor with 1x60mm screw using the holes drilled previously 12 GB IE Fit cover strips at each corner with 4 nails each 13 Rustic Cover strip A2815 x04 48mm 40mm Nail...
Page 22: ...g the felt over the roof edging with an even overhang front and back then secure with a couple of nails at the top to hold the felt in position and at the bottom nail at approximately100mm centres 14...
Page 23: ...23 GB IE The third piece overlaps the lower pair and goes over the ridge Nail at approximately100mm centres 15 2 6m Felt strips A2545 x01 08mm Felt nails A0266 x56 08...
Page 24: ...4 Drill and fix the Fascia s with 3 nails each and the diamonds with 2 nails each Drill 1mm pilot holes to prevent the diamonds from splitting 16 Diamond A0019 x02 40mm Nails A0025 x16 1 mm Fascia A44...