background image


Aoralscan 3_Manual_V1.0.0.30                                                                                      - 10 -


2.2.1.


On the Scanner 

Specification for scanner serial number 


  Serial number AOS3-AH001K13 represents the 001 product manufactured on November 

13, 2018. 


AOS3

……Stands for scanner model, abbreviatio

n for Aoralscan 3. 


AH……Represents the year of production, A –

 J in alphabetical order stands for 1: 9 

(Since letter I and number 1 are easily confused, ignore I), and 0 is represented by the 

letter X. 


001……On behalf of the production flow number, unit 1


K……On behalf of the month, by letter A

-M for 1-12 (Since letter I and number 1 are 

easily confused, ignore I). 


13……Represents the date, expressed in 01 

- 31. 

Specification for serial number of calibrator 

  Serial number iCIII-AH001L05 represents the 001 product produced on December 05, 2018. 


    iCIII......Represents the model of the calibrator. 


    AH......Represents the year of production, A to J in alphabetical order stands for 1:9 

(Since letter I and number 1 are easily confused, ignore I), and 0 is represented by the 

letter X. 


    001......On behalf of the offline water number. 


    L ......On behalf of the month, by letter A-M for 1-12 (Since letter I and number 1 are 

easily confused, ignore I). 


    05......Represents the date, expressed in 01 - 31. 

2.2.2.


On the Scanner/Carry Box/Package 

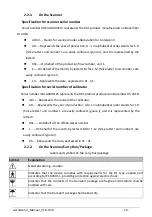
Labels and symbols on the carry box/package 

Symbol 

Explanation 


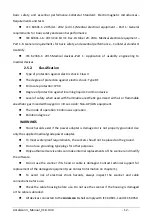
General warning 

 caution. 


Indicates  that  the  device  complies  with  requirements  for  the  BF  type  applied  part 
according to IEC 60601-1, providing protection against electric shock. 


Indicates that the contents of the transport  package are fragile and therefore shall be 
handled with care. 


Indicates that the transport package shall be kept dry. 

Summary of Contents for Aoralscan 3

Page 1: ...Aoralscan 3 Manual V1 0 0 30 ...

Page 2: ... Date 1 V1 0 0 30 Add various types of operational safety precautions required by regulatory information August 2021 2 V1 0 0 0 First release November 2019 About the Manual Copyright 2016 Shining3D Corporation All rights reserved No part of this publication may be reproduced transmitted transcribed stored in a retrieval system or translated into any language or computer language in any form or by ...

Page 3: ...and to make changes from time to time in the contents hereof without obligation of Shining3D Corporation to notify any person of such revision or changes Updates to hardware and or software components are made regularly therefore some of the instructions illustrations and specifications mentioned in the Manual may differ slightly from your particular situation ...

Page 4: ... 7 Contact Information 7 2 Safety Information 8 Precautions 8 Legend of Labels and Symbols 9 2 2 1 On the Scanner 10 2 2 2 On the Scanner Carry Box Package 10 Compliance 11 FCC Compliance Statement 11 Electrical Safety 11 2 5 1 Electrical 11 2 5 2 Classification 12 2 5 3 EMC Notice 13 Biological Safety 20 Laser Protection 20 3 Unpack the Package 22 4 Overview 24 Benefits of the Product 24 Scanner ...

Page 5: ... Scanner 29 Disconnecting the Scanner 30 Calibrating the Scanner 30 6 Scanning Preparations 33 Intraoral Environment 33 Scanner Preparation 33 Scanning Position and Path 33 Heating the Scanner Head 34 7 Clinical Case Quick Guide 36 Connect the Scanner 36 Activate the Scanner 36 Calibration 36 Register Account 36 Create Orders 36 Scan Upper Jaw 37 Scan Lower Jaw 38 Scan Total Jaws 38 View Result Da...

Page 6: ... 43 Scanner Pedestal Care 44 Scanner Body Care 44 Scanner Head Care 46 8 4 1 Cleaning and high level disinfection 46 8 4 2 Cleaning and steam sterilization 48 8 4 3 Attaching the scanner head 49 Scanner Storage 50 8 5 1 Storage for Transport 50 8 5 2 Daily and Long term Storage 51 9 Hardware Specification 52 Specifications 52 Environmental Requirements 52 ...

Page 7: ... residence contact information and after sales service of the manufacturer Manufacturer name SHINING 3D Tech Co Ltd Production Address No 1398 Xiangbin Road Wenyan Xiaoshan Hangzhou Zhejiang China 311258 Product performance main structural composition Product performance Appearance and structure The appearance should be smooth no cracks no stains no obvious deformation flexible and reliable operat...

Page 8: ...torage format shall include 3D digital model format stl and obj Main structural composition The Scanner consists of Scanner body scanner head relay box adapter pedestal USB cable software V1 0 and encryption module The software carrier is USB flash drive and the software release version is V1 0 After the power is switched on ensure that the relay box and scanner are powered on When the power is on...

Page 9: ...ich it needs to be replaced Replacement method is as follows 1 Disconnect the scanner power hold the scanning head firmly with thumb and index finger on both sides and then gently slide the scanning head out of the scanner as shown in the figure 2 Hold the scan head firmly with your thumb and index finger on either side and gently attach the scan head to the scanner with the head facing down CAUTI...

Page 10: ...obing optical scanning head this scanner can directly scan inside the patient s mouth to obtain three dimensional morphology and color texture information of soft and hard tissue surfaces such as teeth gums and mucous membranes in the oral cavity facilitating comfortable mold taking for patients reducing stress for medical care and improving efficiency for back end processing The scanner satisfies...

Page 11: ...f the patient being examined Contraindications No known contraindications Warnings Before using the Aoralscan 3 read these warnings and Safety information on chapter 2 Do not attempt to disassemble repair or modify the scanner and software There are no user serviceable parts inside the scanner Necessary modifications must be made only by the manufacturer or its designated agents Do not allow forei...

Page 12: ...n about recycling of this equipment contact your city office the shop where you purchased the equipment or your household waste disposal service The recycling of materials will help to conserve natural resources and ensure that it is recycled in a manner that protects human health and environment Disposal Caution The scanner must be reprocessed prior to disposal in order to prevent cross contamina...

Page 13: ...tain warranty service contact technical support Contact Information Manufacturer Shining 3D Tech Co Ltd No 1398 Xiangbin Road Wenyan Xiaoshan Hangzhou Zhejiang China www shining3d com Customer Support Email dental_support shining3d com Shining 3D s Representative Lotus NL B V Address Koningin Julianaplein 10 1e Verd 2595AA The Hague Netherlands Telephone 31644168999 Email peter lotusnl com ...

Page 14: ... medical facility under the supervision of trained personnel Only authorized service labs should perform maintenance It is expressly prohibited to open the scanner with tools The hardware and software have been fully adjusted and tested prior to shipment from the factory Unauthorized modifications will void your warranty If the hardware or software is modified appropriate inspection and testing mu...

Page 15: ...t Always handle the scanner with care and avoid hitting or scratching the surfaces as it contains fragile components Dropping the scanner on the floor may cause permanent damage If you accidentally drop the scanner you MUST dispose the scanner head immediately and do not use the same head again The mirror in the head might shatter into small pieces and using it again poses the highest risk of caus...

Page 16: ...ts the 001 product produced on December 05 2018 iCIII Represents the model of the calibrator AH Represents the year of production A to J in alphabetical order stands for 1 9 Since letter I and number 1 are easily confused ignore I and 0 is represented by the letter X 001 On behalf of the offline water number L On behalf of the month by letter A M for 1 12 Since letter I and number 1 are easily con...

Page 17: ...1 1 2000 specification for the safety of medical electrical systems UL 60601 1 Part 1 first edition 2003 is responsible for ensuring that the requirements of these standards are met to the full extent in order to ensure the safety of patients operators and the environment FCC Compliance Statement This device complies with part 15 of the FCC Rules Operation is subject to the following two condition...

Page 18: ...mable anesthetic gas mixed with air or flammable anesthetic gas mixed with oxygen or nitrous oxide Non AP APG equipment The mode of operation Continuous operation Pollution degree 2 WARNINGS Shock hazards exist if the power adapter is damaged or is not properly grounded Use only the supplied medical grade power adapter To meet waterproof requirements the sockets should not be placed on the ground ...

Page 19: ...se in residential environments which may not provide adequate protection for radio reception With the exception of cables sold by the manufacturer of Aoralscan 3 as spare parts for internal components the use of accessories and cables other than those specified may result in an increase in transmission power or a decrease in immunity of Aoralscan 3 Electromagnetic Emissions Medical electrical equi...

Page 20: ...f the Aoralscan 3 should assure that it is used in such an environment Guidance and Manufacturer s Statement Electromagnetic emission Aoralscan 3 is intended to be used in the following electromagnetic environment The purchaser or user of Aoralscan 3 should ensure that it is used in this electromagnetic environment Immunity test IEC 60601 test levels Compliance level Electromagnetic environment gu...

Page 21: ...during power mains interruptions it is recommended that the Aoralscan 3 be powered from an uninterruptible power supply or a battery Power frequency 50 60 Hz magnetic field IEC 61000 4 8 30 A m 30 A m Power frequency magnetic fields should be at levels characteristic of a typical location in a typical commercial or hospital environment If image distortion occurs it may be necessary to position the...

Page 22: ...ity test IEC 60601 test levels Compliance level Electromagnetic environment guidance Conducted RF 3 Vrms 150 kHz to 80 MHz outside ISM bands 3 Vrms Portable and mobile RF communications equipment shouldbe used no closer to any part of the Aoralscan including cables than the recommended separation distance calculated from the equation appliance to the frequency of the transmitter Recommended separa...

Page 23: ...should be less than the compliance level in each frequency rangeb Interference may occur in the vicinity of equipment marked with following symbol Guidance and manufacturer s declaration electromagnetic immunity Guidance and Manufacturer s Statement Electromagnetic emission Aoralscan 3 is intended to be used in the following electromagnetic environment The purchaser or user of Aoralscan 3 should e...

Page 24: ...erference from nearby equipment that can degrade image quality or launch warning messages it is necessary to position the Aoralscan 3 further from sources of electromagnetic interference or install electromagnetic shielding to block unwanted interference The customer or the user of the Aoralscan 3 should operate the device under EMI conditions that minimize power supply transients mechanical inter...

Page 25: ...and the Aoralscan 3 The medical electrical equipment is suitable for the professional healthcare environment per 60601 1 2 2014 It is suitable for use in physician offices clinics hospitals and other professional healthcare environments except near HF surgical equipment and the RF shielded room of an ME system for magnetic resonance imaging or other environments where the intensity of electromagne...

Page 26: ...ocating or re orienting the equipment Biological Safety Meets biological criteria ISO10993 5 2009 Biological evaluation of medical devices Part 5 Tests for in vitro cytotoxicity ISO10993 10 2010 Biological evaluation of medical devices Part 10 Tests for irritation and skin sensitization Laser Protection This product is a class 1 laser product and is only for maintenance replacement and removal by ...

Page 27: ...Aoralscan 3_Manual_V1 0 0 30 21 ...

Page 28: ...ead 4 1 x scanner pedestal 5 1 x AC DC power adapter input 100 240 V 50 60 Hz 1 0 A output 12 V DC 3 A power cord length 1 5 m 6 5 x power cord plugs 7 1 x calibrator 8 1 x USB flash drive the software carrier 9 1 x USB 3 0 cable Use it together with the calibrator 10 1 x relay box 11 1 x package box WARNINGS AC plug types vary by country region Using accessories peripherals or cables not supplied...

Page 29: ...ts other than those specified may cause the warranty to void and result in increased emissions decreased EMI immunity of the device or even damages to the device and personal injuries Use of other accessories results in non compliance Place the USB flash drive in a safe place for later use NOTE We recommend that you keep all the original packaging components in a safe place in case you need to tra...

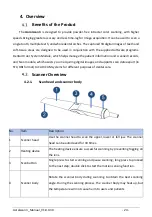
Page 30: ...different purposes of dental care Scanner Overview 4 2 1 Scan head and scanner body No 组成 Item 扫描头 用扫描头扫描上颌 下颌或全颌 扫描头可以高温高压灭菌 30 次 热器件 加热器件防止镜片上起雾 以确保扫描成功 描按钮 扫描按钮 单按开始扫描和暂停扫描 长按则进行下一 步 指示灯 指示扫描仪的状态 绿色闪烁 扫描仪处于连接或预热阶段 绿色 扫描仪处于扫描或待机状态 蓝色 扫描仪扫描时拼接不成功 绿色呼吸 扫描仪处于休眠状态 橙色 设备异常 需要您的注意 Description 1 Scanner head Use the scanner head to scan the upper lower or full jaw The scanner head can be autoclaved for...

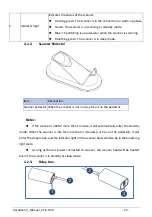
Page 31: ...edestal Item Description Scanner pedestal When the scanner is not in use place it on the pedestal Notes If the scanner is idle for more than 1 minute it will automatically enter the standby mode When the scanner is idle for more than 3 minutes such as on the pedestal it will enter the sleep mode and the indicator light on the scanner body will also be in the breathing light state As long as there ...

Page 32: ...able from getting damaged by excessive bending or twisting you should loosely coil the cable and avoid making kinks or sharp bends CAUTION Do NOT roll the cable over the handle of the scanner or even bend the cable sharply The illustration below demonstrates improper cable storage 4 2 4 Main Cables See the table for main cables No Name Length m 1 Adapter 1 power cable 1 5 2 Adapter 2 power cable 1...

Page 33: ...ough the entire scanning process of acquiring intraoral digital images with the scanner Pre design module Mainly for the user to be more convenient to use in the design software can realize coordinate adjustment mark tooth position extraction edge line and other functions 4 3 1 System requirements Before installing and running the supplied software programs your computer shall meet the following r...

Page 34: ...r adapter to the wall outlet or turn on the scanner yet Follow the steps below to complete the installation of software programs 1 Insert the supplied USB flash drive into the USB port of your computer 2 Find the file named IntraoralScanX X X X exe and run it as administrator 3 The IntraoralScan InstallShield Wizard window appears to start the installation 4 Specify a language from the drop down l...

Page 35: ...nner firmly when lifting from the stand or when using the scanner Do not shake the scanner Always return the scanner to the pedestal when it is not in use Do not place the scanner in heated or wet surfaces as this can cause damage to the head and scanner It is normal that the scanner gets warm when in use Do not block the ventilation holes on the bottom of the scanner If the scanner overheats the ...

Page 36: ...uture use 6 Unplug the power adapter from the wall outlet and remove the power plug from the power connector on the pedestal CAUTION Do not roll the cable over the handle of the scanner or even create any sharp bends in the cable after you disconnect the scanner See USB cable storage in 4 2 3 Relay box for more details Calibrating the Scanner Under these circumstances we recommend that you shall e...

Page 37: ...de the head off from the scanner NOTES Do not place your finger s on the mirror of the head when detaching as this may result in damage to the mirror Store the detached head in a safe place e g a dental instrument tray for future use 6 Connect the supplied Calibrator and your computer with the supplied USB 3 0 cable 7 Gently slide the Calibrator onto the front end of the scanner 8 Click calibratio...

Page 38: ...can 3_Manual_V1 0 0 30 32 Otherwise the Calibrator temperature may get very high 11 Reattach the scanner head to the scanner for later use or put the protection cap onto the scanner to prevent damage and dust ...

Page 39: ... using an oral mirror to help create space while working in the narrow area between the teeth Scanner Preparation Ensure that the scanner head scanner body and pedestal are properly pre cleaned disinfected or sterilized See Pre cleaning disinfection and sterilization on chapter 10 Ensure that the scanner head has no scratches or is not damaged Additionally the head is firmly attached to the front ...

Page 40: ...e of the teeth hold the scanner at a 90 degree angle to scan the buccal and lingual surfaces of the teeth hold the scanner at a 45 degree angle Inspect the scanned image in the 3D scan view window IntraoralScan and pay attention to warning messages Heating the Scanner Head To ensure optimal image quality you should prevent condensation on the scanner mirror before each scan by heating the scanner ...

Page 41: ... The heater maintains constant temperature on the scanner head The scanner head is being heated whenever power is supplied even if the scanner is in standby or sleep mode If the heater does not reach the necessary temperature for preventing condensation during scanning the message of The scanner is pre heating Please wait appears ...

Page 42: ...after successfully activated Otherwise contact technical staff Calibration See 5 3 Calibrating the Scanner To ensure the quality of the scanned data it is necessary to perform calibration periodically every 15 days recommended Register Account For users without cloud platform account register account first Click New User Click here to register The register interface is displayed Select or enter us...

Page 43: ...ck in the right side and then it will turn to The software will automatically remove the buccal and tongue side data during intraoral scanning images unable and enable AI optimization The green frame in the middle of the software interface indicates the data range of the current scanning If the green frame changes to a red frame as shown in the figure below the scan position is incorrect You need ...

Page 44: ...reen and ticked indicating that the scanning process is finished Scan Lower Jaw After the upper jaw scanning and the data processing are completed the lower jaw scanning interface is automatically displayed The procedure is the same as scanning the upper jaw Scan Total Jaws After the lower jaw scanning and the data processing are finished the total jaw scanning interface is automatically displayed...

Page 45: ...1 0 0 30 39 Before aligning After aligning After the upper and lower jaws data are stitched successfully as well as the whole jaw click or press the space bar to pause the scanning check the occlusion and collision results ...

Page 46: ...Aoralscan 3_Manual_V1 0 0 30 40 Click or long press the space bar to post process the data View Result Data View result data in IntraoralScan 7 9 1 View Upper Lower Jaw ...

Page 47: ...Aoralscan 3_Manual_V1 0 0 30 41 7 9 2 View Occlusal Effect ...

Page 48: ...nual_V1 0 0 30 42 Pre Design View Data Storage Path Click under New Order to return to the order interface and click to open the folder path of the current order storage Upload Order Click to upload the scanned order ...

Page 49: ... disinfect and sterilize each part of the scanner Using other methods not approved by Shining3D Corporation will damage your scanner and void your warranty Using detergent disinfection solutions or wipes sterilization procedures other than those specified in the Manual may damage the product and void your warranty Only sterilize the part s for which a sterilization method is specified Do not attem...

Page 50: ...er of the Aoralscan 3 see Disconnecting the scanner on chapter 4 2 Hold the pedestal firmly with your hand 3 Use new cotton gauze moistened with 70 75 solution of ethanol to wipe the surface of pedestal CAUTION Avoid using detergent of any kind as some detergents or surfactants might penetrate into the surface of the pedestal 4 When done store the pedestal in a clean and safe place 5 Proceed to th...

Page 51: ...ward Then align the protection cap blocks to the matching slots on the front end of the scanner body 5 Slide the protection cap onto the scanner to prevent damage and dust CAUTIONS When the scanner head is detached always protect the subtle units and the inner optical components on the front end of the scanner by putting on the supplied protection cap Do not attempt to clean the outer units and in...

Page 52: ...n When inserting the scanner head into the disinfectant solution be sure to follow the instructions on the disinfectant label and limit the time and depth that the head is soaked within the minimum time recommended The scanner head can be sterilized under high temperature up to 100 times and must be disposed of afterwards For more information on disposal see Disposal on chapter 1 High level disinf...

Page 53: ...d insert the soft brush into the head from both the front and rear ends and move the brush lightly in tiny circles When cleaning the outer surface of the head move the brush lightly back and forth and repeat for each side 7 Repeat the previous step for at least two times 8 Rinse the head thoroughly with sterile water for at least 3 minutes 9 If you notice stains fingerprints or smears on the mirro...

Page 54: ...ot damaged during the disinfection process 21 Re attach the scanner head see Attaching the scanner head on chapter 10 Or if you attempt to store the scanner head with other dental instruments e g a dental instrument tray ensure that it is thoroughly dry 8 4 2 Cleaning and steam sterilization Follow the steps below to perform cleaning and steam sterilization 1 Disconnect the power of the Aoralscan ...

Page 55: ...he previous step 10 Dry the head carefully with a clean soft lens tissue or lint free cloth 11 Pay particular attention to inspect the mirror surface of the scanner head again to make sure that the cleaning is done properly and the mirror is not damaged during the cleaning process 12 Wrap the cleaned head with a cloth cautiously 13 Put the packaged scanner head into an autoclave and sterilize it f...

Page 56: ...king your Aoralscan 3 Shipping the device without its original packaging material may cause possible product damage and result in additional service fees For information on temperature and humidity requirements see Environmental requirements on chapter 10 If the original packaging is no longer available or damaged carefully package each part of the scanner with bubble wrap to protect against any p...

Page 57: ...scanner head is detached from the scanner body always protect the subtle units and the inner optical components on the front end of the scanner by putting on the supplied protection cap Ensure the scanner is clean before long term storage Avoid storing the scanner and accessories in areas of extreme temperatures or under direct sunlight Before storing the scanner make sure the scanner head scanner...

Page 58: ...ght Dimension L W H 281 mm 33 mm 46 mm Weight 240 10 g without cables Output STL OBJ PLY Connector USB 3 0 Power Input 12V DC 3 A Pedestal Dimension L W H 146 mm 82 mm 86 mm Weight 400 10 g Product life 8 years Environmental Requirements Operating and storage requirements Operating temperature 10 C 40 C Storage Transport temperature 25 C 60 C Operating altitude 3000 M Storage Transport Relative hu...

Reviews: