background image

17

Setup & Connections

Connecting the Projector

“Plug and Play” Function

This projector is compatible with VESA-standard DDC 1/DDC 2B. The projector and a VESA DDC compatible
computer will communicate their setting requirements, allowing for quick and easy setup.

• The DDC, Plug and Play function of this projector operates only when used in conjunction with a VESA DDC compatible

computer.

Using the Remote Mouse Receiver and 

RS-232C

 Port

• The remote mouse receiver can be used with the “Power” remote control or the simple presentation remote

control  to operate the computer’s mouse. Plug the supplied mouse control cable from the remote mouse receiver
to the computer. (See page 16.)

• When the RS-232C port on the projector is connected to a computer with an RS-232C cable (cross type, sold

separately), the computer can be used to control the projector and check the status of the projector. See pages 41
and 42 for details.

CAUTION

• Do not connect or remove the mouse control cables or RS-232C cable to or from the computer while it is on. This may

damage your computer.

• The wireless mouse functions can operate computers compatible with IBM PS/2, serial (RS-232C) or Apple ADB type mouse

systems.

• The wireless mouse or RS-232C function may not operate if your computer port is not correctly set up. Please refer to the

operation manual of the computer for details on setting up/installing the correct mouse driver.

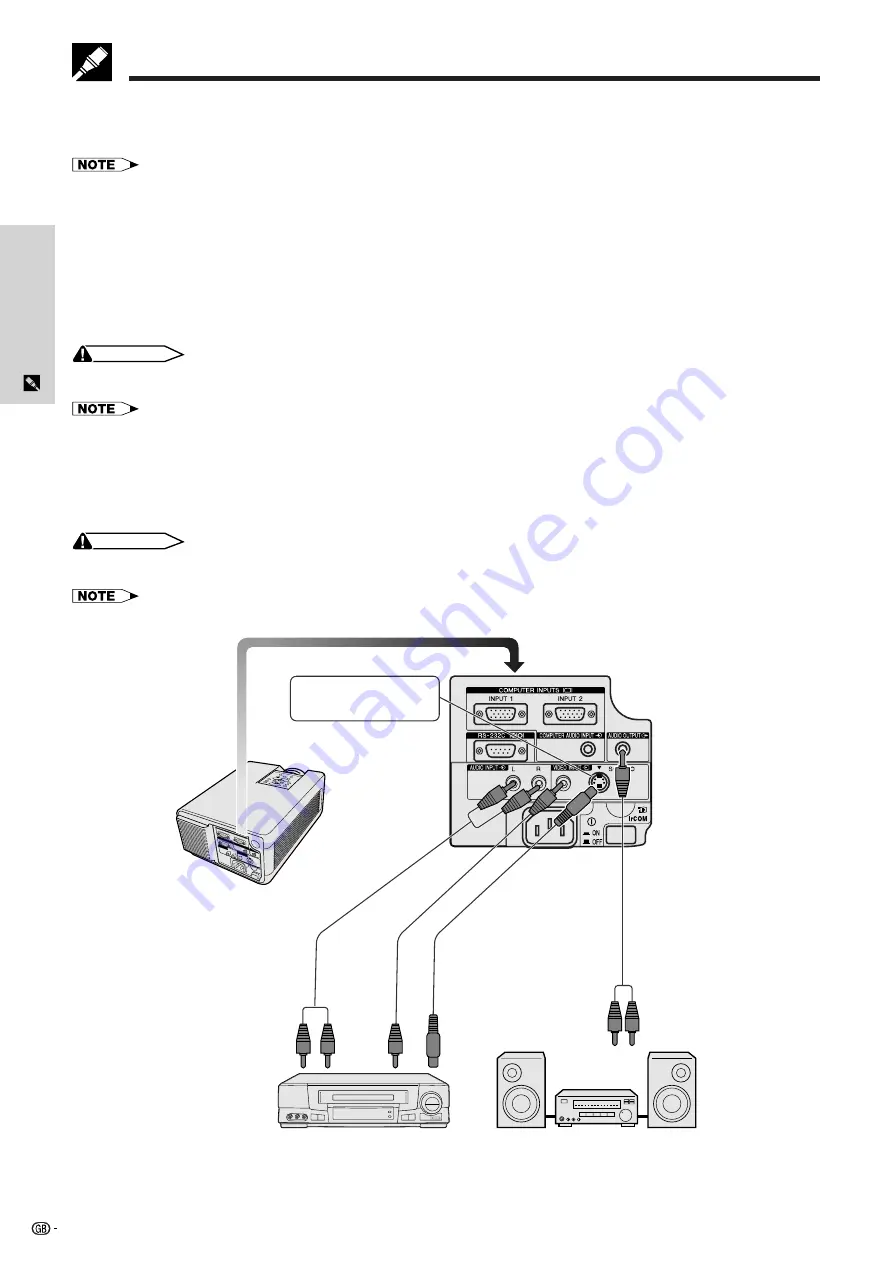
Connecting the Projector to Video Equipment

You can connect your projector to a VCR, laser disk player or external audio components.

CAUTION

• Always turn off the projector while connecting to video equipment, in order to protect both the projector and the equipment

being connected.

• By using external audio components, the volume can be amplified for better sound.

Rear terminals

Use this terminal when the audio-
visual equipment to be connected has
an S-VIDEO output terminal.

VCR

Amplifier

To S-video
output
terminal

To audio

input

terminals

To audio

output

terminals

To video

output

terminal

Summary of Contents for XG-NV51XM

Page 1: ...XG NV51XM H E 99 10 7 18 00 LCD PROJECTOR XG NV51XM OPERATION MANUAL ...

Page 2: ...lied Accessories on page 7 Before using the LCD projector please read this operation manual carefully OPERATION MANUAL ENGLISH Model No XG NV51XM Serial No WARNING Intense light source Do not look into the beam or view it directly Be especially careful that children do not look directly into the beam WARNING To reduce the risk of fire or electric shock do not expose this appliance to liquids CAUTI...

Page 3: ...n Assignments 41 RS 232C Port Specifications 41 Input Signals Recommended Timing 43 Specifications 44 Dimensions 45 Guide to Effective Presentations 46 Glossary 50 Index 51 Setup Connections Setting Up the Projector and Screen 12 Standard Setup Front Projection 12 Reversed Image Setup 12 Ceiling mount Setup 13 Adjusting the Height of the Image 13 Height of Image 13 Using the Adjustment Foot 14 Dig...

Page 4: ... specifications If you are not sure of the type of power supplied to your home consult your LCD Projector dealer or local power company 11 Do not place the LCD Projector where the cord will be abused by persons walking on it 12 Follow all warnings and instructions marked on the LCD Projector 13 To prevent damage to the projector due to lightning and power line surges unplug the projector from the ...

Page 5: ...own on the left are caution labels for the laser beam Do not look into the laser pointer window or shine the laser beam on yourself or others The laser beam used in this product is harmless when directed onto the skin However be careful not to project the beam directly into the eyes Always use the laser pointer at temperatures between 5 C and 40 C Use of controls or adjustments or performance of p...

Page 6: ...ges are resized to 1 024 800 Since the resolution of the projector is 1 024 768 you can use the arrow keys ƒ to scroll and view the entire image 6 DIGITAL KEYSTONE CORRECTION Digitally adjusts an image that is projected at an angle while maintaining image quality and brightness 7 EASY TO USE GRAPHIC USER INTERFACE A multi colour icon based menu system allows for simple image adjustments 8 AUTO SYN...

Page 7: ...k on the CD ROM drive 4 Double click on the manuals folder 5 Double click on the xg nv51xm folder 6 Double click on the language name of the folder that you want to view 7 Double click on the nv51 pdf file to access the projector manuals Double click on the saps pdf file to access the Sharp Advanced Presentation Software manual 8 Double click on the pdf file For Macintosh 1 Insert the CD ROM in th...

Page 8: ...filter PFILD0076CEZZ Mouse control serial cable QCNW 5112CEZZ Power cord Sharp Advanced Presentation Software operation manual TINS 6671CEN1 Sharp Advanced Presentation Software quick reference TINS 6943CEZZ LCD projector quick reference TINS 6942CEN1 LCD projector operation manual TINS 6795CEZZ Quick Reference for Notevision 5 Computer audio cable QCNW 4870CEZZ Remote mouse receiver RUNTK0661CEZZ...

Page 9: ... sensor p 10 p Air filter p 37 Cooling fan Intake vent a Carrying handle p 40 s Kensington Security Standard connector p 39 d Foot release p 14 f Cooling fan Exhaust vent g Speaker h Remote control sensor p 10 j Cooling fan Intake vent k Air filter p 37 l COMPUTER INPUT 1 port HD 15 pp 15 16 41 RS 232C port 9 pin D sub pp 15 17 41 42 J AUDIO INPUT terminals RCA p 17 K AC socket L MAIN POWER switch...

Page 10: ...n pp 30 35 4 RIGHT CLICK ENTER button pp 11 14 20 23 36 5 INPUT button pp 19 22 26 29 6 FREEZE button p 33 7 KEYSTONE button p 14 8 MOUSE ADJUSTMENT switch pp 11 14 20 22 36 9 TRANSMISSION indicator 0 VOLUME buttons p 19 q LASER POINTER MENU button pp 11 20 23 28 30 34 36 w MOUSE ADJUSTMENT buttons ƒ ß pp 14 20 21 23 36 e IrCOM button p 22 r AUTO SYNC button pp 26 27 t ENLARGE button p 29 y BACKLI...

Page 11: ...compartment Battery cover Remote Control Mouse Receiver Positioning Controlling the Projector The Power remote control can be used to control the projector within the ranges shown below The remote mouse receiver can be used with the Power remote control or the simple presentation remote control to control the mouse functions of a connected computer within the ranges shown below See page 15 for det...

Page 12: ...k of a standard desktop mouse For one button mouse systems use either the LEFT CLICK or RIGHT CLICK button Using the laser pointer Slide the MOUSE ADJUSTMENT switch to the MOUSE position and then press LASER POINTER to activate the laser pointer When the button is released the light automatically goes off For safety reasons the laser pointer automatically goes off after 1 minute of continuous use ...

Page 13: ... projector at the required distance from the screen according to the desired picture size see the table below Maximum 14 0 m 9 3 m 7 1 m 4 7 m 3 8 m 2 8 m 1 9 m Minimum 10 8 m 7 2 m 5 5 m 3 6 m 2 9 m 2 2 m 1 4 m Projection distance Picture size diag 762 cm 300 508 cm 200 381 cm 150 254 cm 100 203 cm 80 152 cm 60 102 cm 40 90 Reversed Image Setup Rear projection Place a translucent screen between t...

Page 14: ...sion tube for AN NV4T When the projector is in the inverted position use the upper edge of the screen as the base line Use the projector s menu system to select the appropriate projection mode See page 34 for use of this function Adjusting the Height of the Image 762 cm 300 508 cm 200 381 cm 150 254 cm 100 203 cm 80 152 cm 60 102 cm 40 45 4 cm 30 3 cm 23 2 cm 15 5 cm 12 4 cm 9 3 cm 6 2 cm Distance...

Page 15: ... your fingers caught in the area between the adjustment foot and the projector Using the Adjustment Foot You can adjust the height of the image by raising the projector with the foot release Foot release Digital Keystone Correction When the image is distorted due to the projection angle the Digital Keystone Correction function allows you to correct it For use with the Power remote control slide th...

Page 16: ...nded Timing for a list of computer signals compatible with the projector Use with computer signals other than those listed may cause some of the functions not to work Mouse control serial cable supplied Mouse control cable for Mac supplied Mouse control cable for IBM PS 2 supplied Computer cable supplied RS 232C cable cross type sold separately Computer audio cable 3 5 mm stereo minijack cable sup...

Page 17: ...ctor 5 Secure the plugs by tightening the thumb screws Once the adaptor is connected to a computer and the computer is turned on the display mode cannot be changed even if the switches on the adaptor are reset The supplied Macintosh adaptor is only for use with H SYNC and V SYNC output When connecting a Macintosh computer that only outputs C SYNC use a C SYNC output adaptor sold separately 3 Conne...

Page 18: ...nd 42 for details CAUTION Do not connect or remove the mouse control cables or RS 232C cable to or from the computer while it is on This may damage your computer The wireless mouse functions can operate computers compatible with IBM PS 2 serial RS 232C or Apple ADB type mouse systems The wireless mouse or RS 232C function may not operate if your computer port is not correctly set up Please refer t...

Page 19: ...ops flashing before operating the projector If the power is turned off and then immediately turned on again it may take a short while before the lamp turns on After the projector is unpacked and turned on for the first time a slight odour may be emitted from the exhaust vent This odour will soon disappear with use 5 4 When the main power is on the POWER indicator lights up red When the power is on...

Page 20: ...andby mode The power can be turned on again by pressing POWER ON on the projector or the Power remote control When the power is turned on the POWER indicator and the LAMP REPLACEMENT indicator light green 7b 7a The POWER indicator flashes if the bottom filter cover is not securely installed 8 6 Selecting and Checking the Input Mode Press INPUT on the projector or the Power remote control to select...

Page 21: ... bar 2 Press ß to select an adjustment menu on the menu bar 3 Press ƒ to select a specific adjustment item 4 To display only the adjustment item press ENTER after selecting the item Only the menu bar and the selected adjustment item will appear 5 Press ß to adjust the item 6 Press LEFT CLICK to return to the previous screen 7 Press MENU to exit from the GUI For details on items on the menu screen ...

Page 22: ...tion 800 600 640 480 Vert Freq 75 Hz 72 Hz Mode 60 60 Bright 30 30 Red 30 30 Blue Reset 30 30 1 2 7 Resolution 800 600 640 480 Vert Freq 75 Hz 72 Hz Svenska Only the items highlighted in the tree charts above can be adjusted To adjust the items under the sub menu press after entering the sub menu Main menu Sub menu Items on the VIDEO Mode Menu Bar Contrast Picture Audio 30 30 I P Conversion Option...

Page 23: ...r See the operation manual of the software for installation details The distance between the projector and transmitting device may have to be less than 10 cm depending on the transmitting device When using the digital still camera set it to the image transmission mode and set the computer to the image reception mode 2 Align the projector and transmitting device at the same height and angle at a di...

Page 24: ...rom the GUI press MENU Selecting theVideo Input System Mode VIDEO mode only ON MUTE TOOLS R CLICK ENTER INPUT IrCOM FREEZE AUTO SYNC MENU LASER BLACK SCREEN VOL OFF 5 2 3 4 1 6 Projector MOUSE ADJ The video input system mode is preset to Auto however it can be changed to a specific system mode if the selected system mode is not compatible with the connected audiovisual equipment For use with the P...

Page 25: ... For less sharpness For weaker red For weaker blue Selected item in VIDEO mode Contrast Bright Color Tint Sharp Red Blue Reset For more contrast For more brightness For more colour intensity Skin tones become greenish For more sharpness For stronger red For stronger blue ß button button All video image adjustment items are returned to the factory preset settings For use with the Power remote contr...

Page 26: ...ecific adjustment item 4 Press ß to move the mark of the selected adjustment item to the desired setting 5 To exit from the GUI press MENU To reset all adjustment items select Reset on the Audio menu screen and press ENTER For weaker treble For weaker bass Treble Bass Reset For stronger treble For stronger bass All audio adjustment items are returned to the factory preset settings Description of A...

Page 27: ... noise Adjusts horizontal noise similar to tracking on your VCR Centres the on screen image by moving it to the left or right Centres the on screen image by moving it up or down Clock Phase H Pos V Pos Description of Adjustment Items Select the desired computer input mode with INPUT on the projector or the Power remote control For use with the Power remote control slide the MOUSE ADJUSTMENT switch...

Page 28: ...e control When the optimum image cannot be achieved with Auto Sync adjustment use manual adjustments See the previous page During Auto Sync adjustment the On screen Display changes as shown on the left Auto Sync adjustment may take some time to complete depending on the image of the computer connected to the projector GUI On screen Display Computer Image Adjustments ON MUTE TOOLS R CLICK ENTER INP...

Page 29: ...TO IBM PC COMPUTERS Ordinarily the type of input signal is detected and the correct resolution mode Text or Graphics is automatically selected However for the following signals set Mode on the Fine Sync menu screen to ON or OFF to select the projector s resolution mode to match the computer display mode properly For use with the Power remote control slide the MOUSE ADJUSTMENT switch to the ADJ pos...

Page 30: ...e image by using ƒ ß Each time ENLARGE is pressed image magnification toggles as shown below 1 When the input resolution is smaller than XGA VGA SVGA Dot by dot 1 2 4 8 2 When the input resolution is XGA 1 2 4 8 3 When the input resolution is larger than XGA SXGA UXGA Dot by dot 1 2 4 8 If the input signal is changed during digital image magnification the image will return to 1 The input signal is...

Page 31: ...t to turn on or to turn off the function 5 To exit from the GUI press MENU ON MUTE TOOLS R CLICK ENTER INPUT IrCOM FREEZE AUTO SYNC MENU LASER BLACK SCREEN VOL OFF 2 3 4 1 5 Projector This function allows you to turn off the on screen messages that appear during input select and the IrCOM function Once OSD Display is set to in the projector s GUI menu the on screen messages will not appear when IN...

Page 32: ... SCREEN VOL OFF 2 3 4 1 5 Projector GUI On screen Display MOUSE ADJ I P Conversion VIDEO mode only This function allows you to select either an interlaced display or a progressive display of a video signal The progressive display projects a smooth video image For use with the Power remote control slide the MOUSE ADJUSTMENT switch to the ADJ position 1 Press MENU 2 Press ß to select Options 3 Press...

Page 33: ...r MOUSE ADJ GUI On screen Display GUI On screen Display Setting a Background Image This function allows you to select the image displayed when no signal is being sent to the projector Description of Background Images For use with the Power remote control slide the MOUSE ADJUSTMENT switch to the ADJ position 1 Press MENU 2 Press ß to select Options 3 Press ƒ to select Background and then press 4 Pr...

Page 34: ...image i e your company logo as the startup image Custom image must be 256 colour BMP Please see the Sharp Advanced Presentation Software s operation manual for how to save or change a custom image Selected item Sharp Custom None Startup image SHARP default image User customised image i e company logo Black screen ON MUTE TOOLS R CLICK ENTER INPUT MOUSE LIGHT LCD PROJECTOR ADJ IrCOM FREEZE AUTO SYN...

Page 35: ...ed image For use with the Power remote control slide the MOUSE ADJUSTMENT switch to the ADJ position 1 Press MENU 2 Press ß to select PRJ Mode 3 Press ƒ to select the desired projection mode 4 Press ENTER to save the setting 5 To exit from the GUI press MENU This function is used for the reversed image and ceiling mount setups See pages 12 and 13 for these setups ON MUTE TOOLS R CLICK ENTER INPUT ...

Page 36: ... clear all the stamped presentation tools on the screen press ƒ ß to select and ENTER Using the Presentation Tools ON MUTE TOOLS R CLICK ENTER INPUT IrCOM FREEZE AUTO SYNC MENU LASER BLACK SCREEN VOL OFF 2 3 5 4 6 On screen Display R C OFF ON 7 Red Green Blue Yellow Orange White Black Menu Window Displaying the break time 1 Slide the MOUSE ADJUSTMENT switch to the ADJ position 2 Press TOOLS to dis...

Page 37: ...utoff function does not operate Checking the Adjustment Status This function can be used to display all the adjusted settings on the screen simultaneously For use with the Power remote control slide the MOUSE ADJUSTMENT switch to the ADJ position 1 Press MENU 2 Press ß to select Status 3 Press ENTER to display all the adjusted settings 4 To exit from the GUI press MENU ON MUTE TOOLS R CLICK ENTER ...

Page 38: ...ress the tab and lift open the filter cover in the direction of the arrow Remove the air filter Replace the filter cover Insert the tab on the end of the filter cover into the filter cover opening and press the filter cover into position Place the air filter underneath the tabs on the filter frame Clean the dust off the air filter and cover with a vacuum cleaner extension hose Turn off the MAIN PO...

Page 39: ...ooled down completely before turning the power back on At least 5 minutes If the power is turned off and then turned on again as during a brief rest the LAMP REPLACEMENT indicator may be triggered preventing the power from going on Should this occur take the power cord out of the wall outlet and put it back in again Problem Lamp has been used for over 1 400 hours Lamp has been used for over 1 500 ...

Page 40: ...Screen function is turned on creating a black image See page 30 Color and Tint adjustments are not correct See page 24 Adjust the focus See page 18 Projection distance is too long or too short to allow for proper focus See page 12 Cables improperly connected to rear panel of the projector See pages 15 16 and 17 Volume is set to minimum See page 19 If the picture is normal the sound is due to cabin...

Page 41: ...ojector or use the bag to transport items other than the projector and its accessories This bag is provided merely to transport the projector and its accessories not to protect these products from damage as a result of rough handling Do not expose these products to shocks or impact when transported in the carrying bag Wait until the projector has sufficiently cooled before placing it into the carr...

Page 42: ...ication conditions Set the serial port settings of the computer to match that of the table on the next page Signal format Conforms to RS 232C standard Baud rate 9 600 bps Data length 8 bits Parity bit NON Stop bit 1 bit Flow control None Basic format Commands from the computer are sent in the following order command parameter and return code After the projector processes the command from the compu...

Page 43: ...M M M E E T B R R P B R B R R P B R B R R D D J C P H V R R F F D D R R I I A A I I B B B B M M E A E E I R D E E E I R D E E E J J S L H P P E E S S I I E E N N S S P P K K O O S L _ _ _ _ _ _ _ _ _ _ _ _ _ _ _ _ _ _ _ _ _ _ _ _ _ _ _ _ _ _ _ _ _ _ _ _ _ _ _ _ _ _ _ _ _ _ _ _ _ _ _ _ _ _ _ _ _ _ _ _ _ _ _ _ _ _ _ _ _ _ _ _ _ _ _ _ _ _ _ _ _ _ _ _ _ _ _ _ _ _ _ _ _ _ _ _ _ _ _ _ _ 0 1 0 1 0 1 0 1 ...

Page 44: ...08 900 1 000 1 066 1 066 1 250 525 525 667 804 915 H 11 754 11 754 11 759 16 683 13 735 13 333 11 764 17 778 16 579 13 853 13 333 11 756 23 000 16 666 14 272 13 328 11 765 13 333 16 667 16 661 13 329 16 667 15 00 15 00 13 423 13 387 13 2826 Hz 85 080 85 080 85 039 59 940 72 809 75 000 85 008 56 250 60 317 72 188 75 000 85 061 43 479 60 004 70 069 75 029 84 997 75 000 60 000 60 020 75 025 60 000 66...

Page 45: ...ng an adjustment foot and projecting parts 4 9 kg Power remote control Simple presentation remote control Four AA size batteries Two AAA size batteries Power cord 3 m Computer cable 3 m Computer audio cable 3 m Macintosh adaptor Mouse control serial cable 1 m Mouse control cable for IBM PS 2 1 m Mouse control cable for Mac 17 cm Remote mouse receiver Extra air filter Lens cap attached Carrying bag...

Page 46: ...45 Appendix Dimensions Rear View 261 61 142 237 5 33 5 310 25 4 11 27 5 346 4 61 121 128 93 77 24 243 5 229 25 11 10 5 43 62 70 77 84 84 22 19 7 259 Front View Side View Top View Units mm Bottom View ...

Page 47: ...nal Digital Assistants PDAs For highly compact and portable presentations still cameras digital video cameras document cameras and PDAs are ideal for transferring data without cumbersome conversions Multimedia Presentations You can integrate all of the above methods for a full multimedia presentation including video audio computer applications and World Wide Web information Wireless Presentations ...

Page 48: ...various sizes try this Draw a 15 cm 20 cm box on a piece of paper and print out several lines of text inside the box with your computer printer at 300 or 600 dpi resolution Vary the sizes of text to simulate headline body and text call outs for any charts or graphs Hold the printout at arm s length This is how your text will look on a 1 2 meters wide screen at 3 meters on a 2 3 meters wide screen ...

Page 49: ... is to communicate with an audience Podiums The best presenters avoid podiums because they hide 75 of the body and restrict movement However many people feel more comfortable with a podium to hold their notes and hide their discomfort If you must use a podium angle it at 45 degrees to the audience so that you are not completely hidden Visuals It is imperative that you make sure your visuals are la...

Page 50: ...ack Avoid standing in these problem areas during your presentation e Presentation Tips Before beginning visualise yourself delivering an outstanding presentation Know your speech memorising at least the first three minutes of your presentation will allow you to focus on your rhythm and pacing Speak to early arrivals to help you build a rapport with the audience and make you feel more comfortable D...

Page 51: ...ing of lower and higher resolution images to fit the projector s native resolution IrCOM Function to transmit still images from a computer hand held PC or digital still camera via infrared communication for Wireless Presentations IrDA Standard protocol for wireless communication IrTran P Standard format protocol for transmission of images PDF Portable Document Format Documentation format used to t...

Page 52: ...olution 5 Z Zoom knob 18 A AA size batteries 10 AC socket 18 ADJUSTMENT buttons 20 Air filter 37 Aspect ratio saving 31 Audio adjustment 25 AUDIO INPUT terminals 17 AUDIO OUTPUT terminal 17 Auto sync adjustment 27 AUTO SYNC button 27 Automatic power shutoff when receiving no signals 36 B Background selection 32 BACKLIGHT button 11 BLACK SCREEN button 30 C Carrying bag 40 Carrying handle 40 Ceiling...

Page 53: ...XG NV51XM H E 99 10 7 18 00 SHARP CORPORATION Osaka Japan Printed in Japan TINS 6795CEZZ T2339 A 9P11 JWG ...

Reviews: