

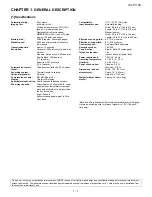
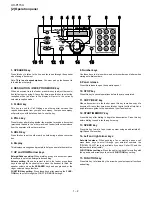


UX-P115U
1 – 8
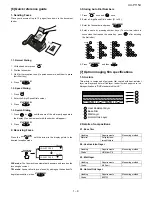
[5] Quick setup guide
5
4. Insert the film into the print compartment.
5. Rotate the front spool as shown
until the film is taut.
6. Close the operation panel (press
down on both sides to make sure it
clicks into place).
Fit ends of
rolls onto hubs
6
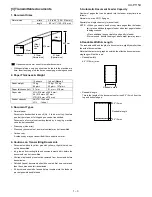
Load paper.
Note: If you loaded legal paper, see of the operation manual to change the paper size
setting to LEGAL.
7
Select the reception mode for incoming faxes and
voice calls:
FAX mode:
The machine automatically answers all
calls and begins fax reception.
TEL mode:
Lift the handset when the machine rings.
Press
to begin fax reception.
START/MEMORY
FAX
TEL
JAN-01 10:30
FAX
TEL
JAN-01 10:30
The arrow points
to the selected
reception mode.
RESOLUTION/
RECEPTION MODE
Insert the
paper
side down.
The stack
should not be
higher than this
line
• GENTLY LOAD PAPER INTO THE PAPER TRAY.
• DO NOT FORCE IT DOWN INTO THE FEED SLOT.
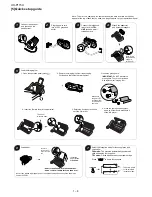
1
3
Plug the power cord
into a 120 V grounded
outlet.
Connect the telephone
line cord to the
TEL.
LINE
jack and a wall
telephone jack.
Attach the paper tray
and document support.
Note: To enter your name and fax number and set the date and time so that they
appear at the top of each fax you send, see page Chapter 1 of your operation manual.
2
Connect the handset
and place it on the
handset rest.
TEL.L
INE
Click!
4
Note: If the
support does
not go in,
turn it over.
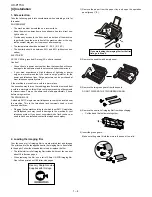
Load the imaging film.
1. Open the operation panel (press
).
3. Insert the green gears.
IMPORTANT:
Do NOT discard the
green gears. They are not included
with replacement imaging film.
2. Remove the imaging film from its packaging.
Cut the band that holds the rolls together.
1 slot
2 slots
Make sure
the gears fit
into the slots
in the ends of
the rolls.
1
2
1