background image

E

9

INSTALLATION INSTRUCTIONS FOR FLUSH MOUNT

 Always take caution lifting heavy products.

2. Use a minimum of 2 people to lift and install oven. 
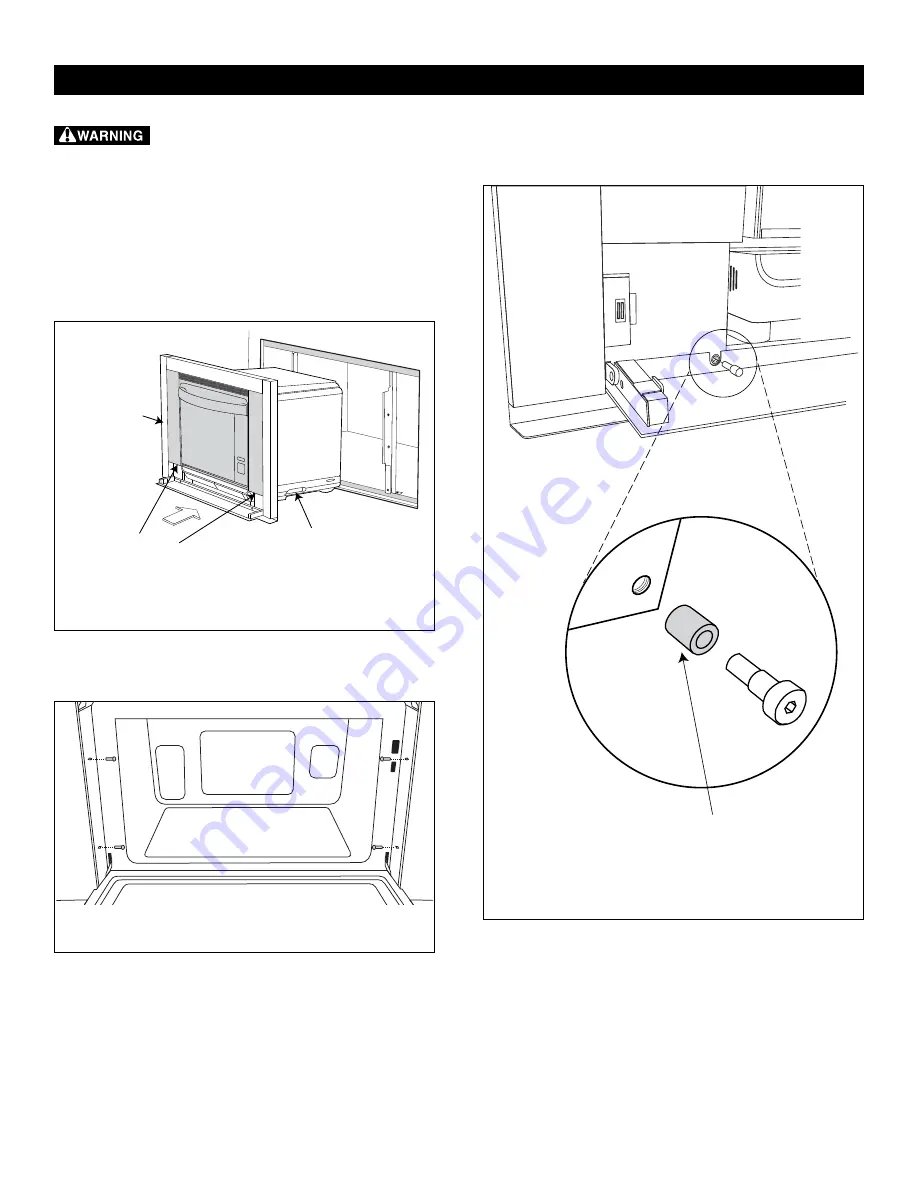
  Place the oven adjacent to the cabinet opening, see Figure 9. 

Plug the power supply cord into the electrical outlet.

3.  Carefully guide the oven between the mounting brackets. Avoid 

pinching the cord between the oven and the brackets.

4. Slide the oven all the way back until the oven frame is seated 

against the cabinet and the mounting brackets.

Side Handle (x2)

Lift point

on frame

DO NOT

lift this unit

using the outer

oven frame

Figure 9

5. Open the oven door and insert the 4 mounting bolts supplied. 

Do not completely tighten. 

Figure 10

6.  Open the drip tray door and insert the 2 shoulder bolts supplied.

See Figure 11. Do not completely tighten.

NOTE:

SLIDE ON SHOULDER BOLT 

SLEEVES BEFORE MOUNTING

Figure 11

7.  Check alignment of oven then tighten the 4 mounting bolts in 

Figure 10 and the 2 shoulder bolts in Figure 11 to secure oven.

Summary of Contents for SuperSteam+ SSC3088AS

Page 1: ...n Remove all packing material before connecting the electrical supply Observe all governing codes and ordinances Be sure to leave these instructions with the consumer IMPORTANT NOTES TO THE CONSUMER Keep this manual with your Operation Manual for future reference As when using any oven generating heat there are certain safety precautions you should follow These are listed in the Operation Manual R...

Page 2: ...Y PART CODE 1 Left Mounting Bracket 1 LANGTB372MRP0 2 Right Mounting Bracket 1 LANGTB378MRP0 3 Wood Screws 8 XTSS740P20000 4 Mounting Bolts 4 LX CZB069MRE0 5 Shoulder Bolts 2 LX CZB068MRE0 6 Shoulder Bolt Sleeves 2 PCOVPB226MRE0 1 2 3 4 5 6 ...

Page 3: ...E 3 15 21 32 397 6 mm 1 1 4 32 mm 2 1 64 51 18mm 16 15 16 430 2 mm 30 762 mm 19 7 8 504 8 mm 19 1 16 484 1 mm 3 4 19 05 mm FRONT BACK Figure 1A Figure 1B OVEN MEASUREMENTS OVEN MEASUREMENTS ...

Page 4: ... Figure 2 CLEARANCES AND DIMENSIONS FOR STANDARD SURFACE MOUNT A 27 15 16 cutout B 18 1 8 cutout C 15 3 4 min depth D 33 min height E 4 F 18 Critical dimension Note Platform must be able to support 70 lbs ...

Page 5: ...ach other and centered in the cabinet opening Locate position center punch and drill pilot hole 1 8 See Figure 3 19 1 4 19 1 4 Front of flange even with front of cabinet face Front of flange even with front of surface 90 90 9 5 8 C L Note Square the mounting bracket to the opening and shelf Note Platform must be able to support 70 lbs Figure 3 ...

Page 6: ...ide the oven all the way back until the oven frame is seated against the cabinet and the mounting brackets DO NOT lift this unit using the outer oven frame Side Handle x2 Lift point on frame Figure 4 5 Open the oven door and insert the 4 mounting bolts supplied Do not completely tighten Figure 5 6 Open the drip tray door and insert the 2 shoulder bolts supplied See Figure 6 Do not completely tight...

Page 7: ... by cabinet installer Steam oven face Steam oven face Note the mounting surface of the top block must sit 1 back from the face of the cabinet allowing the face of the steam oven out 1 4 Detail A Top View Block added by cabinet installer Note the front surface of the platform must sit 1 back from the face of the cabinet allowing the face of the oven out 1 4 Note the top of the 3 4 shelf sits 1 from...

Page 8: ...ided Locate position center punch and drill pilot hole 1 8 See Figure 8 90 Note Square the mounting bracket to the opening and shelf 19 1 4 9 5 8 C L Front of flange even with front of the platform 19 1 4 Front of flange even with front of surface of the installed block Note Platform must be able to support 70 lbs 90 ...

Page 9: ...oven all the way back until the oven frame is seated against the cabinet and the mounting brackets Side Handle x2 Lift point on frame DO NOT lift this unit using the outer oven frame Figure 9 5 Open the oven door and insert the 4 mounting bolts supplied Do not completely tighten Figure 10 6 Open the drip tray door and insert the 2 shoulder bolts supplied See Figure 11 Do not completely tighten NOT...

Page 10: ...rcuit grounding reduces risk of electric shock by providing an escape wire for the electric current Improper use of the grounding plug can result in a risk of electric shock Do not use an extension cord If the power supply cord is too short have a qualified electrician or serviceman install an outlet near the appliance BEFORE YOU CALL FOR SERVICE Read the BEFORE YOU CALL and operating instruction ...

Reviews: