background image

E-14

Setup & Connections

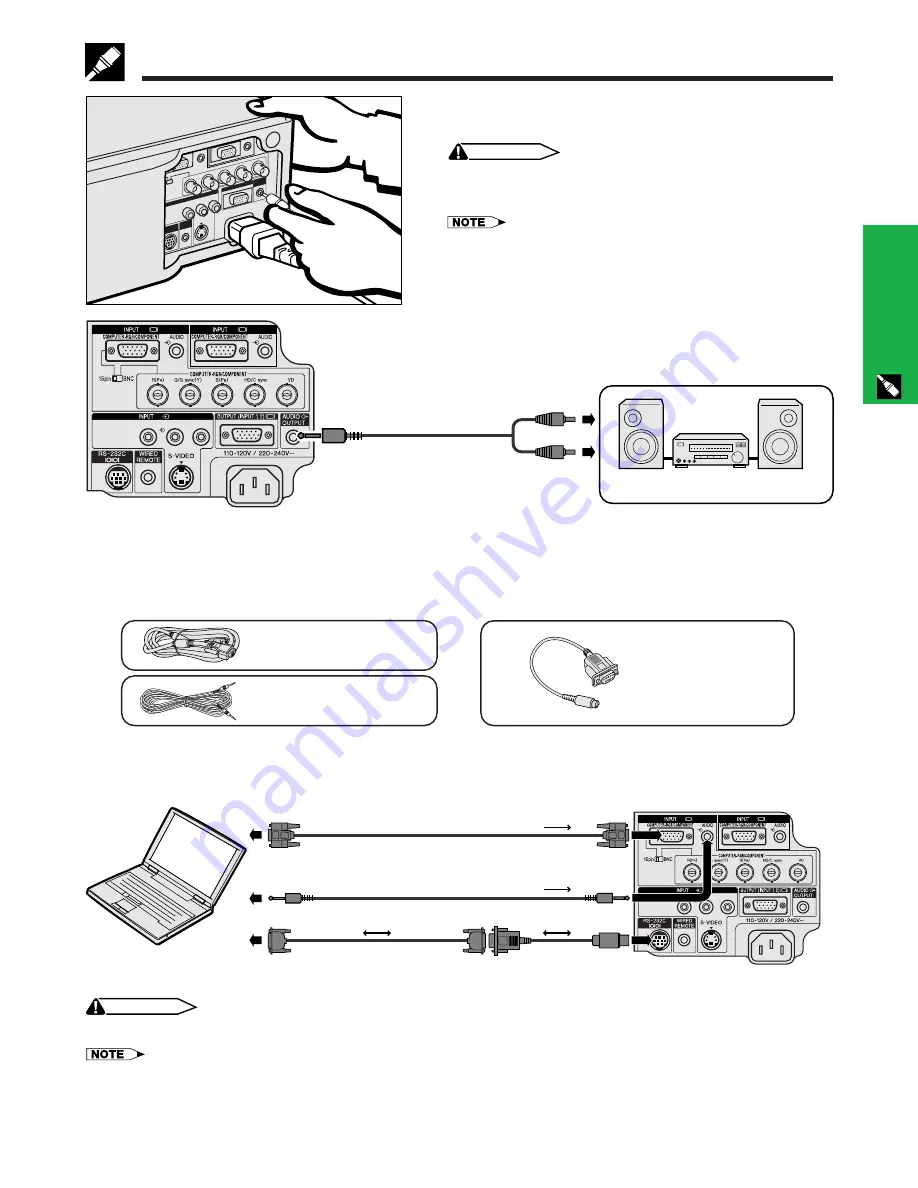
Connecting an amplifier and other audio
components

CAUTION

• Always turn off the projector while connecting to audio

components, in order to protect both the projector and the
components being connected.

• By using external audio components, the volume can be amplified for

better sound.

• The AUDIO OUTPUT terminal allows you to output audio to audio

components from the selected AUDIO INPUT 1, 2 or 3 terminals
connected to audiovisual equipment.

MONITOR

VIDEO

R

L

AUDIO

1

3

2

To audio input terminals

Audio cable (sold separately)

Connecting 

RS-232C

 Port

When the RS-232C port on the projector is connected to a computer with an RS-232C cable (null modem, cross
type, sold separately), the computer can be used to control the projector and check the status of the projector.
See pages 52 and 53 for details.

DIN-D-sub RS-232C
cable
QCNW-5288CEZZ

Computer audio cable
QCNW-4870CEZZ

Computer RGB cable
QCNW-5304CEZZ

Amplifier

1

Connect the supplied DIN-D-sub RS-232C cable to the RS-232C port on the projector.

2

Connect an RS-232C cable (null modem, cross type, sold separately) to the other end of DIN-D-sub RS-
232C cable and to the serial port on the computer.

MONITOR

VIDEO

R

L

AUDIO

1

3

2

Computer RGB cable

Computer audio cable

(3.5 mm stereo minijack cable)

DIN-D-sub RS-232C cable

CAUTION

• Do not connect or disconnect an RS-232C cable to or from the computer while it is on. This may damage your computer.

• The wireless mouse or RS-232C function may not operate if your computer port is not correctly set up. Please refer to the operation manual

of the computer for details on setting up/installing the correct mouse driver.

• The arrows (

) indicate the direction of the signals.

• A Macintosh adaptor may be required for use with some Macintosh computers. Contact your nearest Authorized Sharp Industrial LCD

Products Dealer or Service Center.

2

 RS-232C cable

(null modem, cross type,

sold separately)

Connecting the Projector

Summary of Contents for Notevision XG-P10XU

Page 1: ...LCD PROJECTOR OPERATION MANUAL Important Information Setup Connections Operation Useful Features Maintenance Troubleshooting Appendix MODEL XG P10XU ...

Page 2: ...ed and used in accordance with the operation manual may cause harmful interference to radio communications Operation of this equipment in a residential area is likely to cause harmful interference in which case the user will be required to correct the interference at his own expense U S A ONLY U S A ONLY The enclosed computer cable must be used with the device The cable is provided to ensure that ...

Page 3: ... three wire grounding type plug a plug having a third grounding pin This plug will only fit into a grounding type power outlet This is a safety feature If you are unable to insert the plug into the outlet contact your electrician to replace your obsolete outlet Do not defeat the safety purpose of the grounding type plug 13 Power Cord Protection Power supply cords should be routed so that they are ...

Page 4: ...ining image quality and brightness Page 20 8 DIGITAL IMAGE SHIFT FUNCTION Allows digital adjustment of 16 9 wide screen images up or down for easier viewing Page 20 9 EASY TO USE GRAPHICAL USER INTERFACE GUI A multi color icon based menu system allows for simple image adjustments Page 23 10 USER FRIENDLY DESIGN The two color design along with an intuitive Graphical User Interface GUI makes this pr...

Page 5: ... Mode Adjustment 31 Checking the Input Signal 31 Auto Sync Adjustment 32 Auto Sync Display Function 32 Operation Air Filter Maintenance 46 Lamp Maintenance Indicators 47 Replacing the Projection Lamp 48 Using the Kensington Lock 49 Troubleshooting 49 Appendix Optional Lenses 50 Transporting the Projector 50 Connection Pin Assignments 51 RS 232C Port Specifications 52 Wired Remote Control Terminal ...

Page 6: ...duce the overall operation life Please note that all internal cleaning must be performed by an Authorized Sharp Industrial LCD Products Dealer or Service Center 104 F 40 C 41 F 5 C The exhaust vent the lamp cage cover and adjacent areas may be extremely hot during projector operation To prevent injury do not touch these areas until they have sufficiently cooled Allow at least 4 inches 10 cm of spa...

Page 7: ...ndows 1 Insert the CD ROM in the CD ROM drive 2 Double click on the My Computer icon 3 Double click on the CD ROM drive 4 Double click on the manuals folder 5 Double click on the xg p10xu folder 6 Double click on the language name of the folder that you want to view 7 Double click on the p10 pdf file to access the projector manuals Double click on the saps pdf file to access the Sharp Advanced Pre...

Page 8: ...MP REPLACEMENT indicator Numbers next to the part names refer to the main pages in this manual where the topic is explained AUDIO INPUT 2 terminal 3 5 mm stereo minijack 1 2 12 39 14 11 13 11 11 21 46 49 50 11 11 11 14 22 13 13 WIRED REMOTE control input terminal RS 232C port 9 pin Mini DIN AUDIO INPUT 3 terminals RCA VIDEO INPUT 3 terminal RCA 15 pin BNC switch INPUT 1 port HD 15 S VIDEO INPUT te...

Page 9: ...nsert the side tabs of the battery cover into their slots and press the cover in until it is properly seated VOLUME buttons BACKLIGHT button MUTE button Bottom View 22 POWER buttons ON OFF LASER POINTER MENU button LENS BLACK SCREEN button RIGHT CLICK ENTER button UNDO button INPUT button AUTO SYNC button FREEZE button RESIZE button ENLARGE button GAMMA button TOOLS button MOUSE ADJUSTMENT switch ...

Page 10: ...E 9 Setup Connections Setup Connections ...

Page 11: ... Lens cap PCAPH1056CESA Extra air filter PFILD0088CEZZ Supplied Accessories DIN D sub RS 232C cable QCNW 5288CEZZ Remote mouse receiver RUNTK0673CEZZ USB mouse control cable QCNW 5680CEZZ PS 2 mouse control cable QCNW 5113CEZZ CD ROM UDSKA0022CEN1 LCD projector operation manual TINS 7052CEZZ LCD projector quick reference TINS 7053CEZZ Sharp Advanced Presentation Software operation manual TINS 7054...

Page 12: ...mputer audio cable to the AUDIO INPUT 1 or 2 terminal on the projector 5 Connect the other end to the Audio output terminal on the computer CAUTION Before connecting be sure to turn both the projector and the computer off After making all connections turn the projector on first The computer should always be turned on last Please read the computer s operation manual carefully Refer to page 55 Compu...

Page 13: ... HD C sync and VD output terminals To RGB switcher RGB switcher sold separately Computer RGB cable 5 BNC cable sold separately 4 To audio output terminal Computer RGB cable QCNW 5304CEZZ 1 To use the 5 BNC connectors slide the 15 pin BNC switch on the rear terminals to the BNC position Connect each BNC connector to the corresponding BNC INPUT 1 terminals on the projector 2 Connect the other end of...

Page 14: ...omponent output terminals Component cable sold separately Connecting aVCR laser disc player and other audiovisual equipment using the standard video Input MONITOR VIDEO R L AUDIO 1 3 2 2 Audio cable sold separately 1 Video cable sold separately To video output terminal To audio output terminals S video cable sold separately To S video output terminal VCR or Laser disc player Connecting a DVD playe...

Page 15: ...ter audio cable QCNW 4870CEZZ Computer RGB cable QCNW 5304CEZZ Amplifier 1 Connect the supplied DIN D sub RS 232C cable to the RS 232C port on the projector 2 Connect an RS 232C cable null modem cross type sold separately to the other end of DIN D sub RS 232C cable and to the serial port on the computer MONITOR VIDEO R L AUDIO 1 3 2 Computer RGB cable Computer audio cable 3 5 mm stereo minijack ca...

Page 16: ... the PS 2 port on a PC 1 Turn off the power of the PC 2 Connect one end of the supplied PS 2 mouse control cable to the corresponding terminal on the PC 3 Connect the other end to the PS 2 port on the remote mouse receiver 4 Turn on the power of the PC CAUTION Do not connect or disconnect the mouse control cables to or from the computer while it is on This may damage your computer Do not connect b...

Page 17: ...Make the necessary connections before proceeding Connect the power cord to a wall outlet The POWER indicator lights up red and the projector enters standby mode If the bottom filter cover is not securely installed the POWER indicator flashes 1 ...

Page 18: ...OWER OFF is pressed twice the POWER indicator will light up red and the cooling fan will run for about 90 seconds The projector will then enter standby mode Wait until the cooling fan stops before disconnecting the power cord The power can be turned on again by pressing POWER ON When the power is turned on the POWER indicator and the LAMP REPLACEMENT indicator light green The POWER indicator flash...

Page 19: ...1 35 29 20 Diag 300 200 150 133 106 100 92 84 72 60 40 9 22 9 cm 6 15 2 cm 4 1 2 11 4 cm 3 7 6 cm 2 33 64 6 4 cm 2 5 32 5 5 cm 1 51 64 4 6 cm 1 13 64 3 1 cm Distance from the lens center to the bottom of the image H Maximum 47 14 3 m 32 2 9 8 m 23 6 7 2 m 15 11 4 9 m 13 2 4 0 m 11 1 3 4 m 9 6 2 9 m 6 1 1 9 m Minimum 36 2 11 0 m 24 3 7 4 m 18 4 5 6 m 12 3 7 m 10 1 3 1 m 8 6 2 6 m 7 3 2 2 m 4 7 1 4 ...

Page 20: ...nce between the projector and screen is not sufficient for normal rear projection you can use a mirror to reflect the image onto the screen Place a mirror normal flat type in front of the lens Project the normal image onto the mirror The image reflected from the mirror is projected onto the translucent screen Optimal image quality can be achieved when the projector is positioned perpendicular to t...

Page 21: ...t or Press Press ƒ Straight lines and the edges of the displayed image may appear jagged when adjusting the KEYSTONE setting Do not touch the lens when adjusting the focus or zoom Digital Shift When a WIDE or NORMAL WIDE image is projected this function can be used to shift the image up or down Slide the MOUSE ADJUSTMENT switch on the remote control to the ADJ position MOUSE ADJ 1 Press LENS to se...

Page 22: ...pointer The remote control can be used to control the projector within the ranges shown below The remote mouse receiver can be used with the remote control to control the mouse functions of a connected computer within the ranges shown below The signal from the remote control can be reflected off a screen for easy operation However the effective distance of the signal may differ due to the screen m...

Page 23: ...hts refer to mouse operations and red lights to projector adjustments Position of MOUSE ADJUSTMENT switch ON RED MOUSE LASER POINTER GREEN BLACK SCREEN GREEN RIGHT CLICK GREEN MOUSE NOT LIT ON NOT LIT ADJ MENU RED LENS RED ENTER RED ADJUSTMENT NOT LIT Button name LASER POINTER MENU BLACK SCREEN LENS RIGHT CLICK ENTER MOUSE ADJUSTMENT LEFT CLICK POWER ON OFF VOLUME MUTE Position of MOUSE ADJUSTMENT...

Page 24: ...nt item press ENTER after selecting the item Only the menu bar and the selected adjustment item will appear 5 Press ß to adjust the item 6 Press UNDO to return to the previous screen 7 Press MENU to exit from the GUI For details on items on the menu screen see the tree charts on the next page ß 2 ß 2 MOUSE ADJ Projector Remote control This projector has two sets of menu screens INPUT 1 or 2 and IN...

Page 25: ... CLR Temp I P Conversion Signal Type 3 3 Resolution Hor Freq Vert Freq 640 480 37 5 kHz 72 Hz Signal Info Normal Level A Level B Keylock Level Old Password New Password Reconfirm Password Contrast Audio Options Video System Language English PRJ Mode Status Ceiling Front Ceiling Rear Deutsch Español Nederlands Français Italiano Svenska Português Front Rear Background Startup Image Interlaced Progre...

Page 26: ...ting theVideo Input System Mode INPUT 3 VIDEO mode only 5 2 3 4 1 6 Projector The video input system mode is preset to Auto however it can be changed to a specific system mode if the selected system mode is not compatible with the connected audiovisual equipment Slide the MOUSE ADJUSTMENT switch on the remote control to the ADJ position 1 Press MENU 2 Press ß to select Options 3 Press ƒ to select ...

Page 27: ... Tint Sharp Red Blue Reset GUI On screen Display COMPUTER RGB input in INPUT 1 or 2 mode 1 2 Color Tint and Sharp do not appear for COMPUTER RGB input in INPUT 1 or 2 mode Slide the MOUSE ADJUSTMENT switch on the remote control to the ADJ position 1 Press MENU Menu bar and Picture menu screen appear GUI operation guide is also displayed 2 Press ƒ to select a specific adjustment item 3 Press ß to m...

Page 28: ...mp 3 Press ß to move the mark of the selected adjustment item to the desired setting 4 To exit from the GUI press MENU GUI On screen Display 5 2 3 4 1 6 Projector GUI On screen Display Remote control Selecting the Signal Type This function allows you to select the input signal type COMPUTER RGB or COMPONENT for INPUT 1 or 2 port Slide the MOUSE ADJUSTMENT switch on the remote control to the ADJ po...

Page 29: ...rce still images 5 2 3 4 1 6 Projector Remote control MOUSE ADJ This projector s audio is factory preset to standard settings However you can adjust it to suit your own preferences by adjusting the following audio settings Slide the MOUSE ADJUSTMENT switch on the remote control to the ADJ position 1 Press MENU Menu bar and Picture menu screen appear GUI operation guide is also displayed 2 Press ß ...

Page 30: ...ers the on screen image by moving it to the left or right Centers the on screen image by moving it up or down Clock Phase H Pos V Pos Description of Adjustment Items Select the desired computer input mode with INPUT Slide the MOUSE ADJUSTMENT switch on the remote control to the ADJ position 1 Press MENU Menu bar and Picture menu screen appear GUI operation guide is also displayed 2 Press ß to sele...

Page 31: ... Press ENTER to save the setting 6 To exit from the GUI press MENU Selecting a saved setting Slide the MOUSE ADJUSTMENT switch on the remote control to the ADJ position 1 Press MENU 2 Press ß to select Fine Sync 3 Press ƒ to select Select Setting and then press 4 Press ƒ to select the desired memory setting 5 Press ENTER to select the setting 6 To exit from the GUI press MENU If a memory position ...

Page 32: ... the optimal resolution mode 5 Press ENTER to save the setting 6 To exit from the GUI press MENU Avoid displaying computer patterns which repeat every other line horizontal stripes Flickering may occur making the image hard to see When inputting DTV 480P signals select 480P in step 4 above 5 2 3 4 1 6 Projector GUI On screen Display Remote control MOUSE ADJ Slide the MOUSE ADJUSTMENT switch on the...

Page 33: ...tments can be made by pressing AUTO SYNC When the optimum image cannot be achieved with Auto Sync adjustment use manual adjustments See page 29 During Auto Sync adjustment the On screen Display changes as shown on the left Auto Sync adjustment may take some time to complete depending on the image of the computer connected to the projector GUI On screen Display 2 3 4 1 5 Projector g s f On screen D...

Page 34: ...age from a computer or video giving you more time to explain the image to the audience You can also use this function to display a still image from a computer while you make preparations for the next computer images to be presented 1 Press FREEZE to freeze the image 2 Press FREEZE again to return to the moving image Projector 1 2 On screen Display Remote control ...

Page 35: ...essed the image will be magnified 2 When the image is magnified you can pan and scan around the image by using ƒ ß Each time ENLARGE is pressed image magnification toggles as shown below 1 2 3 4 6 8 If the input signal is changed during digital image magnification the image will return to 1 The input signal is changed a when INPUT is pressed b when the input signal is interrupted or c when the inp...

Page 36: ...ives the impres sion of greater depth in the image Gamma Modes On screen Display s s s STANDARD GAMMA 1 GAMMA 2 CUSTOM Gamma mode Selected Mode STANDARD GAMMA 1 GAMMA 2 CUSTOM Standard picture without gamma correction Brightens darker portions of image for more enhanced presentations Gives greater depth to darker portions of image for a more exciting theater experience Allows you to adjust gamma v...

Page 37: ...SXGA 1280 1024 1024 768 1024 768 1024 768 960 768 800 600 1024 768 1600 1200 1280 1024 1024 768 480I P NTSC PAL SECAM 720P 1080i 4 3 480I P 720P 1080i 1024 768 1024 768 768 576 768 576 768 576 1024 576 1024 576 1024 576 1024 576 The digital image shift function can be used with these picture display modes VIDEO DTV EXAMPLE 4 3 aspect ratio Other aspect ratios NORMAL FIT TO SCREEN DOT BY DOT NORMAL...

Page 38: ...switch on the remote control to the ADJ position 1 Press MENU 2 Press ß to select Options 3 Press ƒ to select BLK SCRN Disp 4 Press ß to select to turn on or to turn off the On screen Display 5 To exit from the GUI press MENU 2 3 4 1 5 Projector GUI On screen Display Projected Image This function allows you to turn off the on screen messages that appear during input select Once OSD Display is set ...

Page 39: ... This function allows you to specify the image to be displayed upon the projector s startup A custom image i e your company logo can be uploaded to the projector via an RS 232C cable See page 14 in this operation manual and also the supplied Sharp Advanced Presentation Software operation manual for detailed instructions Description of Startup Images Slide the MOUSE ADJUSTMENT switch on the remote ...

Page 40: ...ese functions allow you to reduce the power consumption when the projector is in standby mode Monitor Out RS 232C Off Function This projector consumes power when using a monitor connected to the OUTPUT port for INPUT 1 2 and a computer connected to the RS 232C port When not using these ports MNTR Out RS232C can be set to to reduce standby power consumption Description of Monitor Out RS 232C Off Sl...

Page 41: ...maining three digits and then press ENTER 5 Enter the password again Reconfirm using ƒ ß and then press ENTER 6 To exit from the GUI press MENU After setting the password be sure to write it down in a secure location so as not to forget it Changing the Password Slide the MOUSE ADJUSTMENT switch on the remote control to the ADJ position 1 Follow steps 1 to 3 in Setting the Password above 2 Enter th...

Page 42: ...escription of Keylock Levels 2 3 4 1 5 Projector Remote control Slide the MOUSE ADJUSTMENT switch on the remote control to the ADJ position 1 Press MENU 2 Press ß to select Options 3 Press ƒ to select Keylock Level and then press 4 Press ƒ to select the desired level 5 To exit from the GUI press MENU To cancel the keylock level perform the above procedure using the remote control If a password has...

Page 43: ...erted image Reversed image Reversed and inverted image Slide the MOUSE ADJUSTMENT switch on the remote control to the ADJ position 1 Press MENU 2 Press ß to select PRJ Mode 3 Press ƒ to select the desired projection mode 4 Press ENTER to save the setting 5 To exit from the GUI press MENU 4 2 3 1 5 Projector When Front is selected When Ceiling Front is selected When Rear is selected When Ceiling Re...

Page 44: ...n 6 Press UNDO to individually delete tools stamped on the screen You can stamp each tool as many times as you want on the screen To clear all the stamped presentation tools from the screen press ƒ ß to select and then press ENTER MOUSE ADJ Displaying the BreakTime Slide the MOUSE ADJUSTMENT switch on the remote control to the ADJ position 1 Press TOOLS to display the presentation tools menu windo...

Page 45: ...settings on the screen simultaneously Slide the MOUSE ADJUSTMENT switch on the remote control to the ADJ position 1 Press MENU 2 Press ß to select Status 3 Press ENTER to display all the adjustment settings 4 To exit from the GUI press MENU Projector GUI On screen Display MOUSE ADJ 2 3 Remote control ...

Page 46: ...E 45 Maintenance Troubleshooting Maintenance Troubleshooting ...

Page 47: ...xtension hose Tab Tab Cleaning and replacing the bottom air filter Bottom View Be sure the filter cover is securely installed The power will not turn on unless it is correctly installed Cleaning the side air filter not removable If dust or dirt has collected inside the air filter clean the filter with a vacuum cleaner extension hose The side air filter cannot be removed Side and Rear View Air filt...

Page 48: ...sible solutions and then wait until the projector has cooled down completely before turning the power back on At least 5 minutes If the power is turned off and then turned on again as during a brief rest the LAMP REPLACEMENT indicator may be triggered preventing the power from going on Should this occur take the power cord out of the wall outlet and put it back in again Lamp The lamp in this proje...

Page 49: ...ur nearest Authorized Sharp Industrial LCD Products Dealer or Service Center Then carefully change the lamp by following the instructions below If you wish you may have the lamp replaced at your nearest Authorized Sharp Industrial LCD Products Dealer or Service Center IMPORTANT NOTE TO U S CUSTOMERS The lamp included with this projector is backed by a 90 day parts and labor limited warranty All se...

Page 50: ...e wall outlet The bottom filter cover is not securely installed Selected input is wrong See page 17 Cables incorrectly connected to rear panel of the projector See pages 11 15 Remote control batteries have run down See page 8 Remote control s MOUSE ADJUSTMENT switch is set to MOUSE Cables incorrectly connected to rear panel of the projector See pages 11 15 Contrast and Bright adjustments are set t...

Page 51: ...ce Optional Lenses Tele zoom lens AN T6EZ Using the Carrying Handle CAUTION Always put on the lens cap to prevent damage to the lens when transporting the projector Do not lift or carry the projector by the lens or the lens cap as this may damage the lens Transporting the Projector Wide zoom lens AN W6EZ When transporting the projector carry it by the carrying handle on the side 15 10 20 8 6 11 2 ...

Page 52: ...l circuit 6 DR Data Set Ready Output Not connected 7 RS Request to Send Output Connected to internal circuit 8 CS Clear to Send Input Connected to internal circuit 9 CI Not connected Pin No Signal Name I O Reference 1 VCC 3 3V Reserved Output Not connected 2 RD Receive Data Input Connected to internal circuit 3 SD Send Data Output Connected to internal circuit 4 EXIR Detector of Option Unit Input ...

Page 53: ...the status by transmitting the display commands for each adjustment menu and checking the status with the On screen Display If the projector receives a command other than a menu display command it will execute the com mand without displaying the On screen Display Commands EXAMPLE When BRIGHT of INPUT 1 IMAGE ADJUSTMENT is set to 10 R A B R 1 0 _ O K Projector Computer CONTROL ITEM COMMAND C1 P P I...

Page 54: ...B B A A A M M M M F F S S S S S S B B B B S S S O O Y L L L L L L L L L L L M M M M M M M M S S S S S S S S S R R I I I I Y Y Y Y Y E G G G G I I I W W L A A A A A A A A A A A R R R R V V V V R R R R R R V V V E E N N L L _ _ _ _ _ _ _ _ _ _ _ _ _ _ _ _ _ _ _ _ _ _ _ _ _ _ _ _ _ _ _ _ _ _ _ _ _ _ _ _ _ _ _ _ _ _ _ _ _ _ _ _ _ _ _ _ _ _ _ _ _ _ _ _ _ _ _ _ _ _ _ _ _ _ _ _ _ _ _ _ _ _ _ _ _ _ _ _ _ ...

Page 55: ... 1 1 1 0 0 0 0 C13 1 1 1 1 1 1 1 1 1 1 C14 0 0 0 0 0 0 0 0 0 0 C15 No Control Item System Code Data Code External Code Function To operate the mouse left click and right click functions through the wired remote control input connect the cable from the WIRED REMOTE control input terminal on the projector to the remote control The codes for these functions are complex and are therefore not listed he...

Page 56: ... 60 1 600 1 200 VESA Standard SXGA UXGA 91 1 85 74 7 52 75 7 75 78 1 74 74 6 70 81 3 65 90 1 72 93 8 75 106 3 85 75 0 60 108 4 100 87 5 70 MAC 16 MAC 21 HP WS WS PC MAC 13 PC MAC 19 PC MAC 21 PC WS SGI WS SUN WS Intelligent Compression 640 480 832 624 Upscale Upscale 34 9 1 152 870 68 5 67 1 280 1 024 60 0 75 1 280 1 024 78 1 72 60 0 60 1 024 768 1 280 960 VGA SVGA SXGA SXGA SXGA XGA True Advanced...

Page 57: ...6 A 50 60 Hz 300 W 41 F to 104 F 5 C to 40 C 4 F to 140 F 20 C to 60 C Plastic 38 kHz Wave length 650 nm Max output 1 mW Class II Laser Product 10 9 32 W 5 15 32 H 14 1 64 D 261 139 356 mm main body only 10 9 32 W 6 9 64 H 16 13 64 D 261 156 411 5 mm including adjustment feet and projecting parts 16 1 lbs 7 3 kg Remote control Two AA size batteries Power cord 11 10 3 6 m Computer RGB cable 9 10 3 ...

Page 58: ... Dimensions Units inches mm Rear View 11 1 16 281 14 1 64 356 2 3 16 55 5 5 15 32 139 2 3 8 60 5 2 5 64 53 3 4 19 43 64 17 3 3 16 81 10 9 32 261 1 9 64 29 5 32 4 7 53 64 199 Top View Side View Front View Bottom View ...

Page 59: ...uctional or illustrative information that is difficult to present Digital Cameras and Personal Digital Assistants PDAs For highly compact and portable presentations digital still cameras digital video cameras document cameras and PDAs are ideal for transferring data without cumbersome conversions Multimedia Presentations You can integrate all of the above methods for a full multimedia presentation...

Page 60: ... the most common mistakes in any type of presentation visual is the selection of type fonts that are too small too thin or too difficult to read If you are not sure how well a given font will read on a screen at various sizes try this Draw a 6 8 box on a piece of paper and print out several lines of text inside the box with your computer printer at 300 or 600 dpi resolution Vary the sizes of text ...

Page 61: ... is to communicate with an audience Podiums The best presenters avoid podiums because they hide 75 of the body and restrict movement However many people feel more comfortable with a podium to hold their notes and hide their discomfort If you must use a podium angle it at 45 degrees to the audience so that you are not completely hidden Visuals It is imperative that you make sure your visuals are la...

Page 62: ...back Avoid standing in these problem areas during your presentation e Presentation Tips Before beginning visualize yourself delivering an outstanding presentation Know your speech memorizing at least the first three minutes of your presentation will allow you to focus on your rhythm and pacing Speak to early arrivals to help you build a rapport with the audience and make you feel more comfortable ...

Page 63: ...ession and expansion High quality resizing of lower and higher resolution images to fit the projector s native resolution Magnification Digitally zooms in on a portion of an image PDF Portable Document Format Documentation format used to transfer text and images from the CD ROM Phase Phase shift is a timing shift between isomorphic signals with the same resolution When phase level is incorrect the...

Page 64: ... 11 INPUT button 17 Intelligent compression and expansion 3 I P conversion 28 K Kensington Security Standard connector 49 L LAMP REPLACEMENT indicator 47 LASER POINTER button 22 Laser pointer window 5 LEFT CLICK button 22 LENS button 20 Lens cap 50 M MENU button 23 MOUSE ADJUSTMENT switch 21 MOUSE buttons 22 MUTE button 17 O On screen display language 25 OUTPUT port for INPUT 1 2 39 P PDF 6 Phase ...

Page 65: ...SHARP CORPORATION ...

Reviews: