Sharp MX-NB10 Operation Manual Download Page 36

35

4

TROUBLESHOOTING

TROUBLESHOOTING

If a problem or question arises, try to solve the situation using the following information before contacting your 
authorized SHARP dealer.
Image transmission problems are explained here.
For image scanning problems, see the "Operation manual (for general information and copier)".
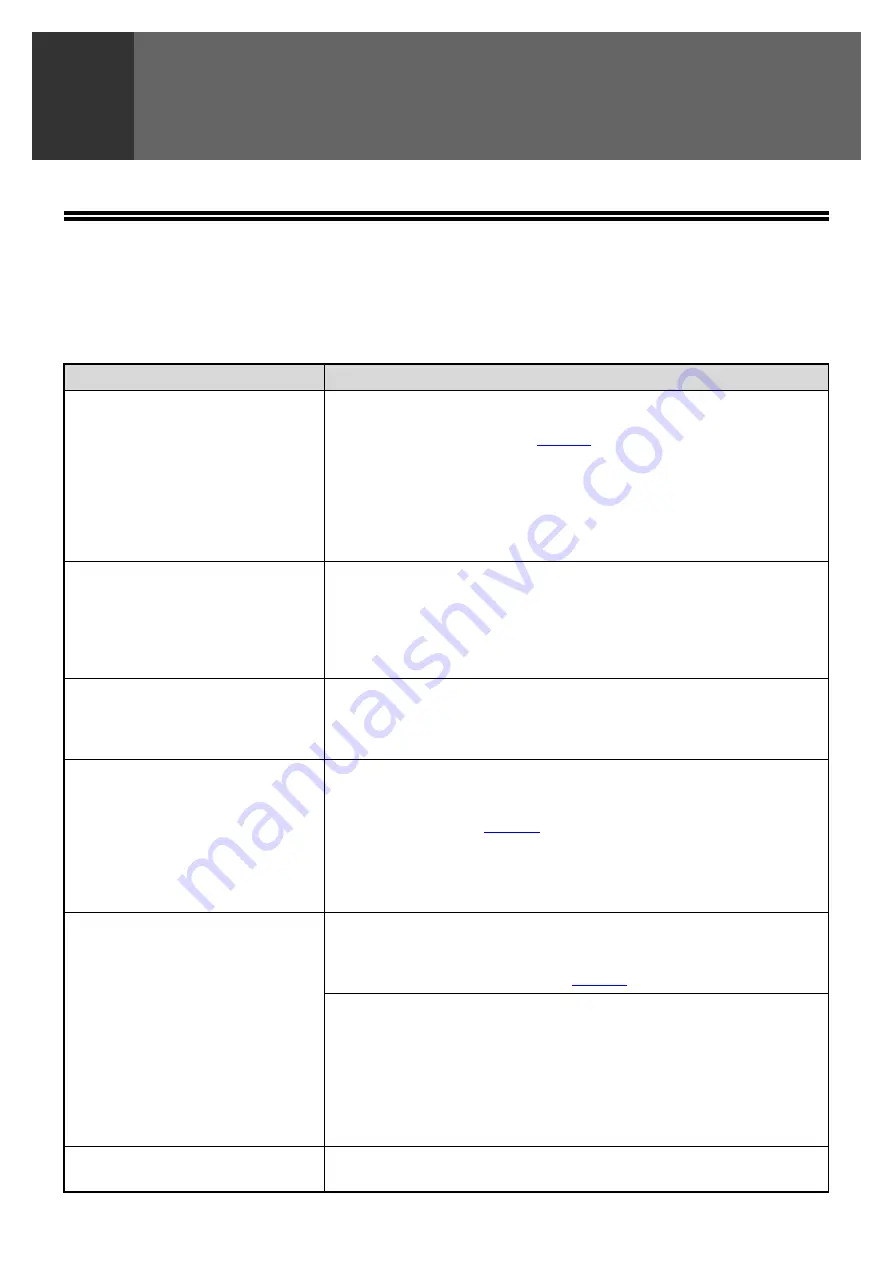
Problem

Cause and solution

The scanned image is clipped.

The original scan size setting is smaller than the actual original
size.

Set the actual original size (

page 26

).

If you have intentionally set a smaller size than the actual original size, 
place the original taking into account the guides for the set original 
size. For example, if the actual size is 8-1/2" x 11" (A4) and you 
selected 5-1/2" x 8-1/2" (B5) for the size setting, place the original so 
that the part that you wish to scan is within the 5-1/2" x 8-1/2" (B5) area 
indicated by the guides at the far left corner of the document glass.

The received image data
cannot be opened.

The viewer program used by the recipient does not support the
format of the received image data.

Try selecting a different file type (TIFF, JPEG, or PDF) and/or a different 
compression format (None, G3, or G4) for the image data. 
Otherwise, have the recipient use Sharpdesk or a viewer program that 
supports the above combinations of file types and compression formats.

When the same file name is
used for two successive Scan
to FTP transmissions, the
second file is not sent.

The first file may still remain in the cache of the file server client. Disable 
use of the cache in the client software.

The recipient does not receive
a transmitted data.

There is a mistake in the stored destination information or the
wrong destination was selected.

Make sure that the correct destination information is stored. If there is a 
mistake, correct it. (

Page 10

)

* If delivery by e-mail (Scan to E-mail) is unsuccessful, an error 

message such as "Undelivered Message" may be sent to the 
designated administrator's e-mail address. This information may help 
you determine the cause of the problem.

The recipient does not receive
data sent by e-mail (Scan to
E-mail).

Check the Web page to see if a limit has been set for the size of image 
files sent using Scan to E-mail (the factory default setting is "Unlimited").
A limit can be set from 1 MB to 10 MB. Consult the administrator of the 
Web page to select a suitable limit. (

Page 12

)

The amount of data that can be sent in one e-mail transmission is 
sometimes limited by the administrator of the mail server. Even if the file 
size is within the limit explained above, if it exceeds the limit set by the 
administrator of the mail server, the file will not be delivered to the 
recipient.
Decrease the amount of data sent in the e-mail transmission (reduce the 
number of pages scanned). (Ask your mail server administrator what the 
data limit is for one e-mail transmission.)

Transmission takes a long
time.

When there is a large amount of image information, the data file is also 
large and transmission takes a long time.

Summary of Contents for MX-NB10

Page 1: ...OPERATION MANUAL for network scanner MODEL MX NB10 Page INTRODUCTION 1 CONTENTS 2 BEFORE USING THE NETWORK SCANNER FUNCTION 3 HOW TO USE THE NETWORK SCANNER FUNCTION 15 SYSTEM SETTINGS 33 TROUBLESHOOTING 35 SPECIFICATIONS 39 ...

Page 2: ...eens may vary in other versions of the operating systems The explanations in this manual are based on American English and the North American version of the software Software for other countries and regions may vary slightly from the North American version This manual refers to the digital multifunctional system equipped with the network function as the machine This manual refers to the Reversing ...

Page 3: ...ANSMISSION PROCEDURE 20 SELECTING A DESTINATION USING THE ADDRESS KEY 22 TRANSMITTING A TWO SIDED ORIGINAL 25 CHECKING THE SIZE OF A PLACED ORIGINAL 26 STORING SCANNING SETTINGS 26 MANUALLY SETTING THE SCANNING SIZE 26 SELECTING THE COLOR MODE 27 SELECTING THE RESOLUTION 27 SELECTING THE FILE FORMAT 28 ADJUSTING THE THRESHOLD VALUE 29 ADJUSTING THE SCANNING EXPOSURE 29 SETTING THE LIGHT SOURCE COL...

Page 4: ...d directory on an FTP server This is called Scan to FTP in this manual When sending a scanned image to an FTP server an e mail message can also be sent to a preset e mail address to inform the recipient of the location of the scanned image data This is called Scan to FTP Hyperlink in this manual 2 A scanned image can be sent to a computer connected to the same network as the machine This is called...

Page 5: ...network from the machine s Web pages For the settings of each function see the explanations in Help 1 Open the Web browser on your computer Supported browsers Internet Explorer 6 0 or higher Windows Netscape Navigator 9 Windows Firefox 2 0 or higher Windows Safari 1 5 or higher Macintosh 2 In the Address field of your Web browser enter the IP address of the machine To check the IP address see CHEC...

Page 6: ...appear in red Device Configuration Shows what options are installed Network Status Shows general information as well as the status of TCP IP NetWare AppleTalk and NetBEUI 3 Image Send Management This is the base screen for storing editing and deleting destination information Destination page 6 Store destinations for Scan to FTP Scan to FTP Hyperlink Scan to Desktop and Scan to E mail You can also ...

Page 7: ...ubmit The entries will be stored E mail destination information Click here to store destinations To perform Scan to E mail the SMTP server settings must first be established Page 13 Item Description Name Required Enter the name of the destination up to 36 characters Initial Optional Enter initial text for the destination maximum of 10 characters When the destination list is displayed in the destin...

Page 8: ...When the destination list is displayed in the destination control screen the initial text is used to group the destinations Custom Index Names can be assigned to the custom indexes as desired page 5 allowing convenient grouping of destinations Drop down list Select a custom index for the destination to be stored User checkbox When this is selected the destination is stored in the user tab of the a...

Page 9: ...ick Submit If there are several destinations that you wish to use on the new machine repeat this procedure as needed If the information entered here differs from the information entered on the host computer transmission reception will not be possible For the settings see the following table Scan to Desktop destination information If you entered a host name in Hostname or IP Address you will need t...

Page 10: ... displayed in the destination control screen the initial text is used to group the destinations Custom Index Names can be assigned to the custom indexes as desired page 5 allowing convenient grouping of destinations Drop down list Select a custom index for the destination to be stored User checkbox When this is selected the destination is stored in the user tab of the address book Page 22 Address ...

Page 11: ...s of programmed destinations You can print lists showing the destinations that have been programmed The following lists can be printed Print individual list Shows the information programmed in e mail FTP desktop and group destinations Print group list Shows only the information programmed in group e mail destinations 1 Click Destination in the menu frame of the Web page 2 To print the individual l...

Page 12: ...n A password can be set for the administrator and users 3 Clock Adjust This is used to set the time in the machine Make sure the time is set correctly when performing Scan to E mail This setting does not appear on models that have the fax function If your model has the fax function see the Operation manual for facsimile to set the time at the operation panel of the machine 4 Quick Setup page 13 Th...

Page 13: ...t limit the image file is discarded The limit can be set from 1 MB to 10 MB in increments of 1 MB The factory default setting is Unlimited If you wish to set a limit remove the checkmark from the Unlimited checkbox and enter the desired limit 5 Select the method for assigning a file name to a scanned image Select the method for assigning a file name to a scanned image In File Naming click the item...

Page 14: ...l addresses are managed on your network by an LDAP server the e mail addresses stored in the LDAP server can be used for Scan to E mail To allow the machine to use the e mail addresses in the LDAP server the LDAP server settings must be configured in the Web page Configuring SMTP DNS and LDAP server settings 1 Click Quick Setup in the menu frame 2 Enter the required information in SMTP DNS and LDA...

Page 15: ...d When establishing a password for the first time enter Sharp in Admin Password 3 Enter passwords in User Password and Admin Password A maximum of 7 characters and or numbers can be entered for each password passwords are case sensitive Be sure to enter the same password in Confirm Password as you did in New Password 4 When you have completed all entries click Submit The entered password is stored...

Page 16: ...ing the network scanner function the destination is specified by selecting a previously stored destination at the operation panel There are three methods for transmitting images 1 The scanned image can be sent to a designated directory on an FTP server Scan to FTP 2 The scanned image can be sent to a computer desktop on the network Scan to Desktop 3 The scanned image can be sent to an e mail recip...

Page 17: ...meric values for various settings One digit is cleared each time the key is pressed The key is also used to cancel a job 7 SCAN key Press to switch to scan mode The initial screen of scan mode will appear in the display 8 MODE SELECT keys step 1 on page 20 Use these keys to change current operation mode 9 SPECIAL FUNCTION key This key is used to select a special transmission function configure fun...

Page 18: ...peration is canceled and the display returns to the base screen described on page 18 This key is also used to cancel a resolution paper size or special function setting that was selected at the time of transmission 18 START key This is used at the following times 1 When starting transmission 2 When scanning an original 3 When configuring and storing settings ABC DEF JKL GHI MNO TUV PQRS WXYZ _ REA...

Page 19: ...his shows the image data file type to be created 5 Original display page 26 This displays an icon to indicate the original scanning mode when an original has been placed One sided scanning in the SPF Document glass Two sided scanning in the RSPF The size of the original is also displayed 6 Transmission mode display When appears to the right of the icon the key can be pressed to show a list of the ...

Page 20: ...appears 2 When you have finished using scan mode press the ACC C key Enter your account number ACCOUNT If you enter an account number for copy mode has also been programmed for scan mode you can change to scan mode after completing the copy operation and continue with the scan operation without re entering your account number If you enter an account number for copy mode that has not been programme...

Page 21: ...o adjust the color mode press the COLOR MODE key See SELECTING THE COLOR MODE page 27 5 If needed select the resolution setting page 27 The initial factory setting is 150dpi 6 If needed select the format page 28 The initial factory setting is PDF 7 Press the ADDRESS key You cannot place originals in both the document feeder tray and on the document glass and send them in a single transmission LINE...

Page 22: ... xxx XXXXX COLOR 150dpi PDF MULTI 8 x11 1 2 Complete XXXXX COLOR 150dpi PDF MULTI 8 x11 1 2 Using the document glass MNO WXYZ _ AD END Reading P xxx XXXXX COLOR 150dpi PDF MULTI 8 x11 1 2 START CONTINUE READ END COLOR 150dpi PDF MULTI 8 x11 1 2 _ READ END C START CONTINUE READ END COLOR 150dpi PDF MULTI 8 x11 1 2 Canceling transmission To cancel the transmission while Reading appears or before the...

Page 23: ... the checkmark To select multiple destinations repeat steps 4 and 5 6 Press the OK key Multiple destinations can be selected for a Scan to E mail transmission Maximum of 20 Only one destination can be selected for a Scan to FTP or Scan to Desktop transmission 7 Continue from step 9 of BASIC TRANSMISSION PROCEDURE page 21 8 ZOOM ADDRESS ADDRESS E E M PAPER RESOLUTION RESOLUTION AUTO FORMAT BROADCAS...

Page 24: ... The base screen appears 7 To enter another address repeat steps 2 through 6 Multiple destinations can be selected for a Scan to E mail transmission Maximum of 20 8 Continue from step 9 of BASIC TRANSMISSION PROCEDURE page 21 9 10 ZOOM ADDRESS ADDRESS E E M PAPER RESOLUTION RESOLUTION AUTO FORMAT BROADCAST O ORIG ORIG DESTINATION SELECT ADDRESS BOOK ADDRESS ENTRY ADDRESS SEARCH PQ ACC LEXSCAN LEXS...

Page 25: ...m another search repeat steps 2 through 8 Multiple destinations can be selected for a Scan to E mail transmission Maximum of 20 10 Continue from step 9 of BASIC TRANSMISSION PROCEDURE page 21 ZOOM ADDRESS ADDRESS E E M PAPER RESOLUTION RESOLUTION AUTO FORMAT BROADCAST O ORIG ORIG DESTINATION SELECT ADDRESS BOOK ADDRESS ENTRY ADDRESS SEARCH PQ ACC LEXSCAN LEXSCAN UPLEX DESTINATION SELECT ADDRESS BO...

Page 26: ... OK key You will return to the base screen and the duplex scanning mode icon will appear 9 Continue from step 4 of BASIC TRANSMISSION PROCEDURE page 20 Do not use an original that is not a standard size 11 x 17 8 1 2 x 14 8 1 2 x 11 8 1 2 x 11 R 5 1 2 x 8 1 2 A3 B4 A4 A4R B5 B5R or A5 Otherwise a scanning error or cut off image may result Note LINE DATA DATA ON LINE FAX SCAN PRINT DUPLEXSCAN DUPLE...

Page 27: ...RIGINAL SIZE key and set the original size manually Perform the following steps after loading the document in the document feeder tray or on the document glass 1 Press the ORIGINAL SIZE key The original size selection screen will appear 2 Select the original size with the or key The selected original size is highlighted To select an AB size press the key and go to step 4 When the key is pressed th...

Page 28: ...will return to the base screen and the selected mode will appear in the color mode display SELECTING THE RESOLUTION The scanning resolution can be selected After selecting scan mode and placing the original steps 1 to 3 on page 20 perform the procedure below The factory default setting for the resolution is 150dpi e mail FTP mode If you need to change the resolution follow these steps 1 Press the ...

Page 29: ... setting is 150 dpi For typical text documents a resolution of 200 dpi or 300 dpi produces sufficiently legible image data A resolution of 200 dpi corresponds to the generally used FINE in fax mode For this reason the 600 dpi setting should only be used in cases where high clarity image reproduction is required such as an original that includes photographs or illustrations When an original is scan...

Page 30: ... 254 5 Press the OK key The set value is stored and you return to the base screen ADJUSTING THE SCANNING EXPOSURE The exposure for an image can be adjusted when scanning in color mode or gray mode The larger the value the darker the image Select scan mode place the original steps 1 to 3 on page 20 and then follow the procedure below The scanning exposure is set to 3 by factory default 1 Press the ...

Page 31: ...SPECIAL FUNCTION key in scan mode Perform this operation from the base screen of scan mode When the SPECIAL FUNCTION key is pressed the special function menu appears To select scan mode see step 1 on page 20 2 Select LIGHT SOURCE with the or key 3 Press the OK key 4 Select the desired light source color with the or key 5 Press the OK key The setting is stored and you return to the base screen GHI ...

Page 32: ...e top and bottom edges 1 8 3 0 mm from the left and right edges 1 Press the SPECIAL FUNCTION key in scan mode Perform this operation from the base screen of scan mode When the SPECIAL FUNCTION key is pressed the special function menu appears To select scan mode see step 1 on page 20 2 Select VOID AREA with the or key 3 Press the OK key 4 Select ON or OFF with the or key 5 Press the OK key The sett...

Page 33: ...ration panel The letters entered with each numeric key are shown below Document glass SPF Scanning result Document glass SPF Scanning result Characters that can be entered Key Directly entering an e mail address Searching for an address on an LDAP server 1 1 1 Space 2 a b c 2 A B C A B C 2 a b c 3 d e f 3 D E F D E F 3 d e f 4 g h i 4 G H I G H I 4 g h i 5 j k I 5 J K L J K L 5 j k l 6 m n o 6 M N...

Page 34: ...r functions are shown in the following table Factory default settings are indicated in bold For the initial administrator password set at the factory see PROGRAMMING AN ADMINISTRATOR PASSWORD in the System settings guide Mode System settings Settings Explanation SCANNER DISABLE USB SCAN YES NO Select whether or not scanning from a computer and scanning from the machine are disabled when a USB conn...

Page 35: ...nce again to clear the checkmark After making the selection go to step 9 If a checkbox does not appear by a program press the OK key to display the settings screen for the program 8 Press the OK key and follow the instructions in the program screen 9 To use another program for the same mode select the desired program with the or key To use a program for a different mode press the BACK key and sele...

Page 36: ...s the second file is not sent The first file may still remain in the cache of the file server client Disable use of the cache in the client software The recipient does not receive a transmitted data There is a mistake in the stored destination information or the wrong destination was selected Make sure that the correct destination information is stored If there is a mistake correct it Page 10 If d...

Page 37: ...nistrator to make sure that no problems exist on the network or in the server If the error is not cleared after turning the power off and on turn off the power and contact your dealer CE 02 CE 04 The scanned image was not sent because a connection to the server could not be established Make sure that the SMTP server settings or Scan to FTP destination settings in the Web page are correct The proce...

Page 38: ...y Size of each image as indicated above x Number of images scanned Although the actual limitation depends on your network environment a general guideline for the maximum file size for Scan to E mail is 2000 KB 2 MB In cases where you need to send multiple images in one transmission try such measures as lowering the resolution mode Original image samples The original images shown below are samples ...

Page 39: ... out a Printer Setting List How to reset the network expansion kit To reset the network expansion kit power on the machine while holding down the status button on the network expansion kit Network scanner destination information and scanning settings will remain after the network expansion kit is reset however the network settings and network printer settings will revert to the factory default set...

Page 40: ...BEUI EtherTalk TCP IP SMTP LDAP FTP Supported client PC operating systems Windows 2000 Professional Windows XP Home Edition Windows XP Professional Windows Vista Windows 2000 Server Windows Server 2003 Windows Server 2008 File formats File types PDF TIFF JPEG Compression modes None G3 G4 Two sided originals Possible Optical resolution 600dpi File creation method One file per each 1 to 6 pages One ...

Page 41: ...OPERATION MANUAL for network scanner MXNB10 EN2 SCANNER ...

Reviews: