background image

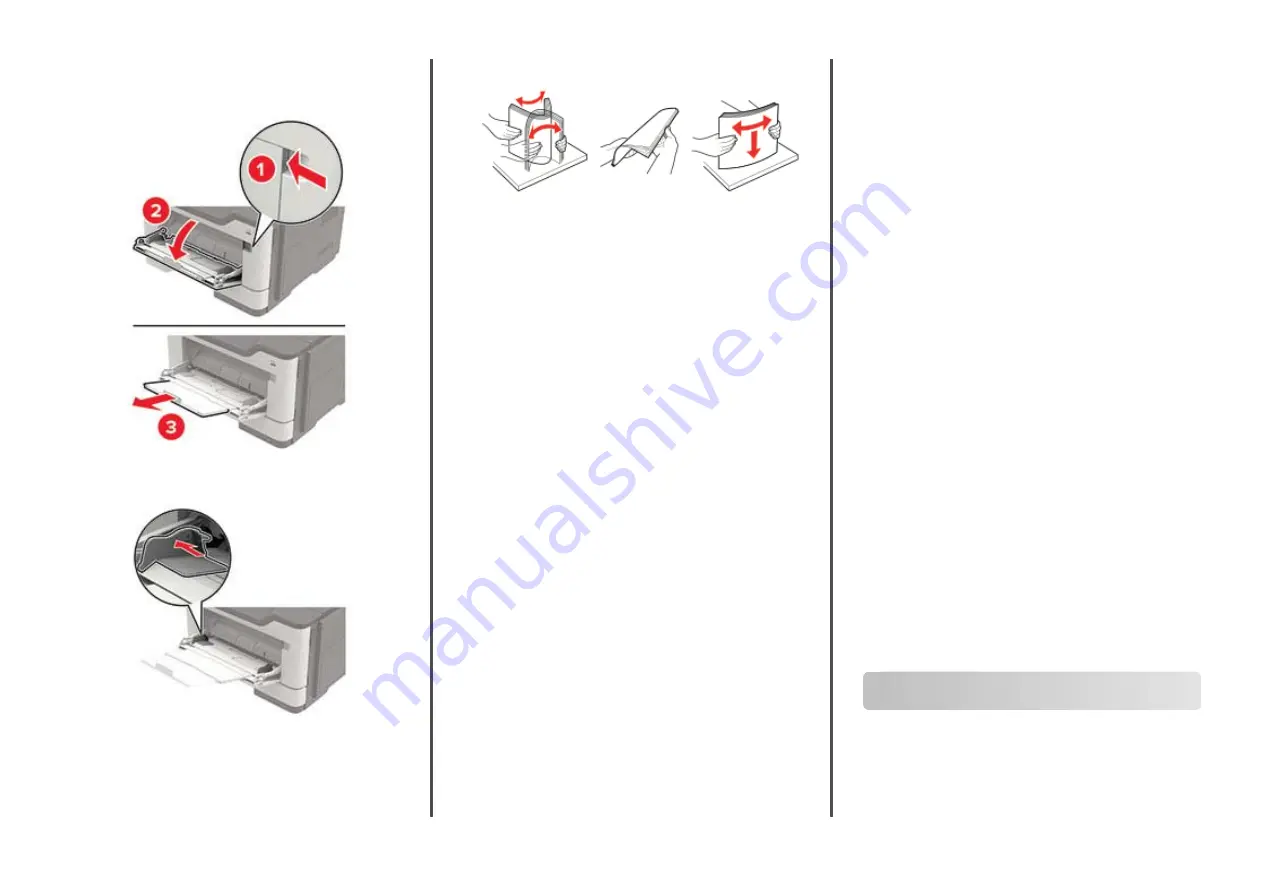
Loading the multipurpose feeder

1

Open the multipurpose feeder.

2

Adjust the guide to match the size of the paper that you are
loading.

3

Flex, fan, and align the paper edges before loading.

4

Load paper with the printable side faceup.

Notes:

Load letterhead faceup with the top edge of the sheet
toward the front of the tray for one

sided printing.

Load letterhead facedown with the bottom edge of the
sheet toward the front of the tray for two

sided printing.

Load envelopes with the flap facedown on the left side.

Load European envelopes with the flap facedown and
entering the printer first.

Warning—Potential Damage: 

Do not use envelopes with

stamps, clasps, snaps, windows, coated linings, or self

stick

adhesives.

5

From the control panel, set the paper size and paper type to
match the paper loaded.

Setting the paper size and type

1

From the home screen, navigate to:

Settings

 > 

Paper

 > 

Tray Configuration

 > 

Paper Size/Type

 >

select a paper source

2

Set the paper size and type.

Connecting a mobile device to the
printer

Before connecting your mobile device, make sure to do the
following:

Enable Wi

Fi Direct in the printer. From the control panel,

navigate to: 

Settings

 > 

Network/Ports

 > 

Wireless

 > 

Enable

Wi

Fi Direct

.

Show the preshared key (PSK) on the Network Setup Page.
From the control panel, navigate to: 

Settings

 > 

Network/Ports

Wi

Fi Direct

 > 

Show PSK on Setup Page

.

Print the Network Setup Page. From the control panel, navigate
to: 

Settings

 > 

Reports

 > 

Network

 > 

Network Setup Page

.

Connecting using Wi

Fi Direct

1

From the mobile device, go to the settings menu.

2

Enable Wi

Fi, and then tap 

Wi

Fi Direct

.

3

Select the printer SSID.

4

Confirm the connection on the printer control panel.

Connecting using Wi

Fi

1

From the mobile device, go to the settings menu.

2

Tap 

Wi

Fi

, and then select the printer SSID.

Note: 

The string 

DIRECT-xy

 (where 

x

 and 

y

 are two

random characters) is added before the SSID.

3

Enter the PSK.

Note: 

The PSK is the password.

Notes:

You can change the SSID on the control panel. Navigate to:

Settings

 > 

Network/Ports

 > 

Wi

Fi Direct

 > 

SSID

.

You can also change the PSK on the control panel. Navigate
to: 

Settings

 > 

Network/Ports

 > 

Wi

Fi Direct

 > 

Set PSK

.

Connecting the printer to a Wi

Fi

network

Make sure that Active Adapter is set to Auto. From the home
screen, touch 

Settings

 > 

Network/Ports

 > 

Network Overview

 >

Active Adapter

.

1

From the home screen, touch 

Settings

 > 

Network/Ports

 >

Wireless

 > 

Setup On Printer Panel

 > 

Choose Network

.

2

Select a Wi

Fi network, and then type the network password.

Note: 

For Wi

Fi

network

ready printer models, a prompt for

Wi

Fi network setup appears during initial setup.

Clearing jams

Avoiding jams

Load paper properly

Make sure that the paper lies flat in the tray.


6

Summary of Contents for MX-B467F

Page 1: ...nd then click Properties Preferences Options or Setup 3 Click Fax Enable fax and then enter the recipient number 4 If necessary configure other fax settings 5 Send the fax job For Macintosh users 1 With a document open choose File Print 2 Select the printer and enter the recipient number 3 If necessary configure other fax settings 4 Send the fax job E mail Configuring the e mail server settings You c...

Page 2: ... Google Cloud Print Google Cloud PrintTM is a printing service that allows you to print to any Google Cloud Print ready printer Before you begin make sure that The printer is registered to the Google Cloud Print server The Cloud Print plugin is downloaded from the Google PlayTM store and is enabled in the mobile device 1 From your AndroidTM mobile device open a document or select a document from y...

Page 3: ...bs select your user name select the print job configure the settings Print For Macintosh users 1 With a document open choose File Print 2 From the Preview or Media Quality menu choose PIN Printing 3 Enable Print with PIN and then enter a four digit PIN 4 Click Print 5 From the printer home screen release the print job Touch Held jobs select your computer name Confidential enter the PIN select the pr...

Page 4: ...ing the scanner 1 Open the scanner cover 2 Using a damp soft lint free cloth wipe the following areas ADF glass ADF glass pad Scanner glass Scanner glass pad 3 Close the scanner cover 4 Open the ADF cover 4 ...

Page 5: ... loading 3 Flex fan and align the paper edges before loading 4 Load the paper stack with the printable side facedown and then make sure that the side guides fit snugly against the paper Notes Load letterhead facedown with the top edge of the sheet toward the front of the tray for one sided printing Load letterhead faceup with the bottom edge of the sheet toward the front of the tray for two sided p...

Page 6: ... the Network Setup Page From the control panel navigate to Settings Network Ports Wi Fi Direct Show PSK on Setup Page Print the Network Setup Page From the control panel navigate to Settings Reports Network Network Setup Page Connecting using Wi Fi Direct 1 From the mobile device go to the settings menu 2 Enable Wi Fi and then tap Wi Fi Direct 3 Select the printer SSID 4 Confirm the connection on t...

Page 7: ...ex fan and align the paper edges before loading Do not use paper that has been cut or trimmed by hand Do not mix paper sizes weights or types in the same tray Make sure that the paper size and type are set correctly on the computer or printer control panel Store paper according to manufacturer recommendations Identifying jam locations Notes When Jam Assist is set to On the printer automatically flu...

Page 8: ... light may cause print quality problems Warning Potential Damage Do not touch the photoconductor drum Doing so may affect the quality of future print jobs 5 Remove the jammed paper CAUTION HOT SURFACE The inside of the printer might be hot To reduce the risk of injury from a hot component allow the surface to cool before touching it Note Make sure that all paper fragments are removed 8 ...

Page 9: ...e printer as guides 8 Close door A 9 Insert the tray Paper jam in the rear door 1 Open the rear door CAUTION HOT SURFACE The inside of the printer might be hot To reduce the risk of injury from a hot component allow the surface to cool before touching it 2 Remove the jammed paper Note Make sure that all paper fragments are removed 9 ...

Page 10: ...ere the cables plug in before accessing or touching interior areas of the printer 2 Remove the jammed paper Note Make sure that all paper fragments are removed 3 Insert the tray Paper jam in trays 1 Remove the tray Warning Potential Damage To prevent damage from electrostatic discharge touch the metal plate at the back of the printer where the cables plug in before accessing or touching interior a...

Page 11: ...all paper fragments are removed 3 Flex fan and align the paper edges before loading 4 Reload paper and then adjust the paper guide Paper jam in the automatic document feeder 1 Remove all original documents from the ADF tray 2 Open the ADF cover 3 Remove the jammed paper Note Make sure that all paper fragments are removed 4 Close the ADF cover 11 ...

Reviews: