background image

4-52

FACSIMILE

CONVENIENT FAX FUNCTIONS

SETTINGS THE DESTINATION

Specify a sending source of received data and forwarding destination E-mail address or network folder to configure a 
forwarding table.
Up to 10 forwarding tables can be configured.

For each forwarding table, set the following items:

• Forward Condition (enabling/disabling forwarding, and the conditions to determine forwarding)
• Sender number (fax number)
• Forwarding destinations (network folder)
• Forwarding destinations (E-mail address)

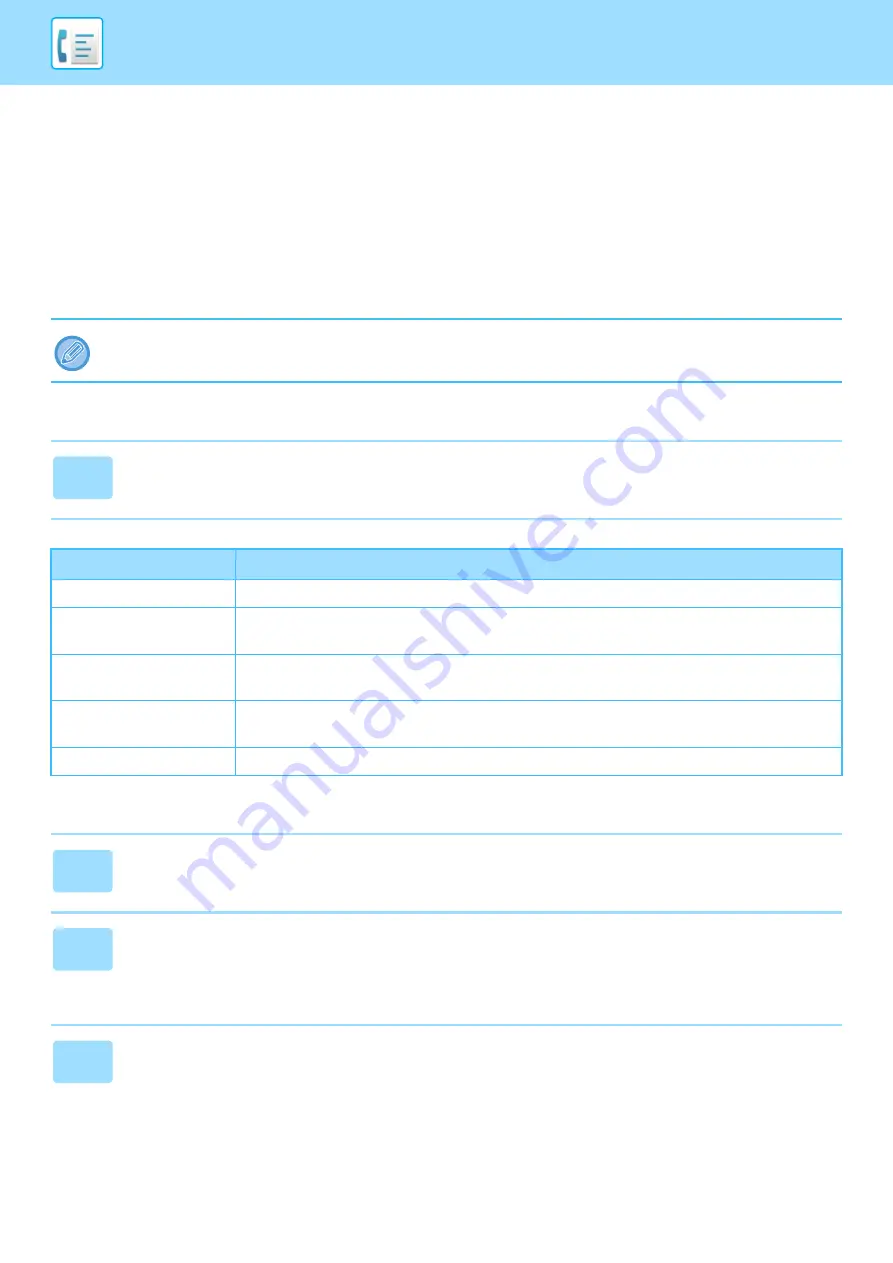
Viewing the destination list

Settings the destination

• The names of the destination number (Forward destination 1 to 10) cannot be changed.
• The E-mail address or  the network folder can be specified for a forwarding destination. Scan to FTP, Scan to Desktop, 

and fax number cannot be specified.

1

Click [Destination].

The destination list appears.

Item

Description

Inbound Routing

Displays whether Inbound Routing function is enabled.

Number

Displays the forwarding destination number (Forward Destination 1 to 10).
Each of setup menu is displayed by clicking each number.

Forward Condition

Displays the forward condition of the destination (enabling/disabling and determining the 
destination setting).

[Delete] button

To delete the forwarding condition stored in a destination number, select the "Number" checkbox 
of the destination number and click the [Delete] button.

[Clear Checked] button

Clicking this clears all "Number" checkboxes.

1

Click [Destination] and click the destination number to be set.

2

Select [Enable] in "Forward Condition" and select the determining condition 
for forwarding.

Select [Forward (All)] or [Forward (Sender)].

3

If you wish to forward received data from a specific sender, enter the 
sender's fax number in "Sender Number".

Enter the fax number using up to 20 digits. To enter the fax number from the fax addresses stored in the machine, click 
the [Select from Address Book] button. The "Fax Destination" screen appears, and you can select the sender's number 
from the fax address list.

Summary of Contents for MX-B350W

Page 1: ...sing the fax function SCANNER Using the scan function TROUBLESHOOTING What to do when a paper misfeed or other problem occurs SYSTEM SETTINGS Configuring settings to make the machine easier to use Click to jump to the table of contents of the desired chapter User s Manual DIGITAL MULTIFUNCTIONAL SYSTEM WEB PAGES Machine settings configured from the Web page MODEL MX B350W MX B450W ...

Page 2: ...ne page button Displays the previous page 3 Forward one page button Displays the next page 4 Return to previously displayed page button Displays the page that was displayed before the current page 5 Title button Displays the page of the title indicated by the button 6 Contents button Displays the contents of each chapter For example if the current page is part of the printer chapter the table of c...

Page 3: ... responsible for failures occurring during the use of the product or its options or failures due to incorrect operation of the product and its options or other failures or for any damage that occurs due to use of the product Warning Reproduction adaptation or translation of the contents of the manual without prior written permission is prohibited except as allowed under copyright laws All informat...

Page 4: ...LATED TO HEARING 1 15 UNIVERSAL DESIGN FEATURES 1 16 LOADING PAPER IMPORTANT POINTS ABOUT PAPER 1 17 NAMES AND LOCATIONS OF TRAYS 1 17 APPLICABLE PAPER TYPES 1 17 TRAY 1 2 1 21 LOADING PAPER INTO THE BYPASS TRAY 1 24 TRAY SETTINGS 1 29 HOW TO PLACE THE ORIGINAL SELECTING A PROCEDURE FOR PLACING THE ORIGINAL DEPENDING ON THE TYPE AND STATUS OF THE ORIGINAL 1 30 AUTOMATIC DOCUMENT FEEDER 1 30 DOCUME...

Page 5: ...d operation keys OPERATION PANEL page 1 5 4 USB port A type This is used to connect a USB device such as a USB memory device to the machine Supports USB 2 0 Hi Speed 5 Bypass tray Use this tray to feed paper manually When loading paper also open the extension tray LOADING PAPER INTO THE BYPASS TRAY page 1 24 6 Handle Grasp it when moving the machine 7 Tray 1 Store paper in this tray TRAY 1 2 page ...

Page 6: ...RTRIDGE page 1 36 6 Side cover Open this cover to remove a paper misfeed 7 Telephone line jack LINE When the fax function of the machine is used the telephone line is connected to this jack 8 Extension phone jack TEL When the fax function of the machine is used an extension phone can be connected to this jack 9 The main power switch Use this switch to turn on the power for the machine When using t...

Page 7: ...t feeder tray Place the original Place the original with the print side facing up AUTOMATIC DOCUMENT FEEDER page 1 30 4 Original exit tray The original is discharged to this tray after scanning 5 Scanning area Originals placed in the automatic document feeder are scanned here CLEANING THE DOCUMENT GLASS AND AUTOMATIC DOCUMENT FEEDER page 1 34 6 Document glass If you want to scan books or other thi...

Page 8: ...g 7 Numeric keys Enter characters numbers 8 C key Press to clear the set number of copies or stop a copy run 9 ENERGY SAVE key indicator Press to enter the energy save mode 10 PROGRAM 1 PROGRAM 2 key Press to use the scanner settings already stored USING STORED SETTINGS PROGRAM page 5 19 11 ZOOM key Press to select a reduction or enlargement copy ratio ENLARGE REDUCE page 2 10 12 ID CARD COPY key ...

Page 9: ...ress this key to log out after you have logged in and used the machine When using the fax function this key can also be pressed to send tone signals on a pulse dial line 25 Error indicator Lights solidly or blinks to indicate the status of the error 26 SPEAKER key This is used to dial without lifting an extension phone connected to the machine page 4 16 27 REDIAL PAUSE key This is used to redial t...

Page 10: ... number Description 600 sheet paper feed unit MX CS14 Additional tray A maximum of 600 sheets of paper can be loaded into the tray One paper feed unit can be installed High stand MX DS22 This is an additional dedicated stand The stand has legs to prevent toppling Low stand MX DS23 Sharpdesk 1 license kit MX USX1 This software enables integrated management of documents and computer files Sharpdesk ...

Page 11: ...ll appear 3 Paper size display Displays the selected paper size 4 Exposure display Indicates the selected exposure mode 5 Copy ratio display Displays the copy ratio for reduction or enlargement 6 Original size display When the original size is specified in Original Size in the right menu this shows the specified size The following icons appear when the original is placed None Document Glass Automa...

Page 12: ... of the selected setting item Press OK in the setting screen to save your settings Selecting an item with the arrow keys left right The left right arrow keys indicated in this manual by are used to set the exposure and numbers in setting screens Press the OK key to save your settings Use the BACK key to return to the previous setting screen 7 8 9 Wireless infrastructure mode Connecting Wireless in...

Page 13: ... jobs can be accepted Blinks Errors that stop machine operation such as misfeeds and out of toner A fax is being received Fax reception hold print standby printing a fax On Blinking Priority Blinking Priority Blinking Priority Blinking Priority To set the status indicated by the data notification indicator Select System Settings administrator Device Control Status Light Setting To set the error in...

Page 14: ...he machine Turn the main power switch off and then on Turn off the main power switch and unplug the power cord if you suspect a machine failure if there is a bad thunderstorm nearby or when you are moving the machine When using the fax function always keep the main power switch in the position Print and other functions cannot be used during a brief period of time after the power is turned on or af...

Page 15: ...SAVE key is not lit This mode is cleared when print data is being received fax data is being output or when the ENERGY SAVE key is pressed while it is blinking Function Description Page AUTO POWER SHUT OFF MODE If no operations take place this mode will turn off the power to the operation panel and the fusing unit and makes the machine wait in the lowest power consumption state Although the power ...

Page 16: ...he operation panel is pressed an original is placed or a print job or fax is received ENTER AUTO POWER SHUT OFF AFTER THE REMOTE JOB Printing or outputting received fax data in Auto Power Shut Off Timer turns on the power and then the machine returns to Auto Power Shut Off Mode immediately after completing the print job To set preheat mode In System Settings administrator select Energy Save Prehea...

Page 17: ...incorrect digit press C key and re enter the correct digit 2 When the copy job is finished press the LOGOUT key When a valid account number is entered the current count of the account will appear in the message display of the base screen After 6 seconds factory default setting the base screen appears page 1 8 In copy mode the number of sheets remaining until the limit is reached is also shown if F...

Page 18: ... however that when a longer setting is selected more care is required when pressing keys to ensure that key input is registered Disable Auto Key Repeat This is used to disable key repeat Key repeat causes a setting to change continuously not only each time the key is pressed but while a key is pressed UNIVERSAL DESIGN RELATED TO HEARING Audible alert sounds when changing settings When moving throu...

Page 19: ... store groups of settings for copying fax and other functions By storing groups of settings that you frequently use you can easily select those settings FREQUENTLY USED SETTINGS PROGRAMS page 2 24 USING A PROGRAM page 4 49 USING STORED SETTINGS PROGRAM page 5 19 Easier operation at the machine Darkened output tray color Output tray colors are darkened to make it easy to distinguish the tray to whi...

Page 20: ...ty and toner fusibility of paper may change due to ambient conditions operating conditions and paper characteristics resulting in image quality inferior to that of Sharp standard paper Before using any paper consult the dealer or nearest SHARP Service Department The use of non recommended or non usable paper may result in skewed feeding misfeeds poor toner fusing the toner does not adhere to the p...

Page 21: ...s cover 177 g m2 to 220 g m2 Thin paper 13 lbs to 16 lbs 55 g m2 to 59 g m2 For paper specifications see the specifications in the Start Guide Recycled paper colored paper and pre punched paper must meet the same specifications as plain paper Before using any paper consult the dealer or nearest SHARP Service Department If the paper that was output is significantly curled remove the paper from the ...

Page 22: ... the Start Guide Recycled paper colored paper and pre punched paper must meet the same specifications as plain paper Before using any paper consult the dealer or nearest SHARP Service Department Tray 1 Tray 2 1 Bypass tray Plain Paper 1 2 Permitted Permitted Permitted Plain Paper 2 2 Permitted Permitted Permitted Heavy Paper 1 3 Permitted Permitted Heavy Paper 2 3 Permitted Permitted Thin Paper Pe...

Page 23: ... or thermal paper Pasted paper Paper with clips Paper with fold marks Torn paper Oil feed transparency film Thin paper less than 15 lbs 55 g m2 Heavy paper as thick as 80lbs cover 220 g m2 over Irregularly shaped paper Stapled paper Damp paper Curled paper Paper whose print side or reverse side has been already printed on by another printer or multifunction device Paper with a wave like pattern du...

Page 24: ...AY SETTINGS page 1 29 Incorrect setting affects automatic paper selection action It may cause print failure printing on paper of a wrong size or type or paper misfeeds Do not place heavy objects on the tray or press down on the tray To set the paper type or size Press the SPECIAL FUNCTION key and set in Paper Size Set or Paper Type Setup TRAY SETTINGS page 1 29 1 Tray 1 Tray 2 Pull out the paper t...

Page 25: ...e divider plate A all the way to the paper feed opening right side and pull up When setting 8 1 2 x 14 size paper in tray 2 check if the holder in the cassette is positioned at A4 8 1 2 x 14 in tray 2 When setting 8 1 2 x 11 size paper in tray 2 remove the 2 regulation plates with green color on the front and back side of the tray before setting the paper The plates are contained in the inside sto...

Page 26: ...00 sheets If a paper misfeed occurs turn the paper over and or around and reload If the paper is curled fix the curl before loading the paper Adjust the divider plate so that there is no gap between the paper and divider plate Do not add paper Do not load the paper as shown below 5 Gently push the paper tray into the machine Push the tray firmly all the way into the machine slowly Forcefully inser...

Page 27: ...al media other than SHARP recommended transparency film glossy paper or when printing on the reverse side of paper that has been printed on one side load paper one sheet at a time Loading more than one sheet at a time will cause misfeeds Before loading paper straighten any curling in the paper When adding paper remove any paper remaining in the bypass tray combine it with the paper to be added and...

Page 28: ...arge step like change of thickness such as on four layer parts or parts less than three layers Print quality is not guaranteed on envelopes having peel off flaps for sealing the envelopes Important points when using label sheets For more information consult the dealer or nearest SHARP Service Department Some labels may have to be loaded into the bypass tray in the specified orientation Follow such...

Page 29: ...g the fusing unit pressure adjusting levers from their normal pressure position to the lower pressure position Follow the procedure on the this page 1 Open out the side cover Gently open the cover 2 Move the fusing unit pressure adjusting levers two to the lower pressure position as shown 3 Close the side cover 4 Return the lever to the normal position when finished feeding envelopes A B Normal po...

Page 30: ...ss tray and the extension tray Do not place heavy objects on the bypass tray or press down on the tray 2 Push the center of the pressure plate down until it locks into place 3 Load the paper with the print side facing down Insert the paper along the bypass tray guides all the way into the bypass tray until it stops slowly Inserting the paper with excessive force may cause the leading edge to fold ...

Page 31: ...uides so that they slightly contact the loaded paper Do not forcefully push in paper that you are loading This may cause misfeeds If the bypass tray guides are set wider than the paper move the bypass tray guides in until they correctly fit the width of the paper If the bypass guides are set too wide the paper may skew or be creased ...

Page 32: ...per size Press the OK key Disabling enabling auto tray switching When auto tray switching is enabled and paper runs out during copying or printing the job will continue using paper from a different tray if that tray has the same size of paper in the same type This function does not operate when using the bypass tray or when a fax is being printed This function has been enabled at the factory If yo...

Page 33: ... are dry before making copies Otherwise the interior of the machine or the document glass may be soiled Do not use the following originals Original misfeeds and smudges may result Transparency film or other transparent material for backup copy tracing paper carbon paper thermal paper or originals printed with thermal transfer ink ribbon should not be fed through the document feeder Originals to be...

Page 34: ...y 4 1 4 longitudinal 5 1 2 transversal 105 mm longitudinal 140 mm transversal Business card 2 longitudinal x 3 1 2 transversal 51 mm longitudinal x 89 mm transversal Standard size 8 1 2 longitudinal 14 transversal 210 mm longitudinal 297 mm transversal or A4 Non standard size Maximum size that can be specified manually Copy mode Scanner mode 8 1 2 longitudinal 14 transversal 216 mm longitudinal 35...

Page 35: ...d size 8 1 2 longitudinal x 14 transversal 210 mm longitudinal x 297 mm transversal or A4 Non standard size 8 1 2 longitudinal x 14 transversal 216 mm longitudinal x 356 mm transversal 1 Open the automatic document feeder 2 Load the paper with the print side facing down Place the original face down and align the top left corner of the original with back left at the tip of the mark of the document ...

Page 36: ...tom of the screen ADJUSTING THE DISPLAY CONTRAST The contrast of the display can be adjusted as explained below MAINTENANCE You can also check by pressing the SPECIAL FUNCTION key and selecting Total Count in the function menu screen Each two sided sheet that is output is counted as two pages Blank copies and blank prints are included in the count If the last page of a two sided printing job is bl...

Page 37: ...clean at all times Wipe the parts with a clean soft cloth If necessary moisten the cloth with water or a small amount of neutral detergent After that wipe with a clean dry cloth Examples of lines in the image Document glass Document backplate sheet Do not use a flammable spray to clean the machine If gas from the spray comes in contact with hot electrical components or the fusing unit inside the m...

Page 38: ...g envelopes or heavy paper through the bypass tray wipe the surface of the feed roller with a clean soft cloth moistened with water or a neutral detergent CLEANING THE PAPER FEED ROLLER If lines or other dirt appear on the scanned original when the automatic document feeder is used wipe the surface of the roller with a clean soft cloth moistened with water or a neutral detergent 1 Open the automat...

Page 39: ... change to the following screen If you continue printing the following message appears When this message appears prepare a toner cartridge for replacement and replace it In this state printing is possible However this message does not appear during printing When you press the any key the dialog above will be deleted and the screen will change to the following screen If you continue to use the mach...

Page 40: ...tally If the cartridge is pulled out abruptly toner may spill out Hold the toner cartridge with both hands as shown and slowly pull it out of the machine 3 Take out a new toner cartridge from its package and shake it horizontally five or six times 4 Slowly insert the new toner cartridge on the level 5 Press in firmly until you hear a click sound ...

Page 41: ...re toner cartridges on their side If a toner cartridge other than a SHARP recommended toner cartridge is used the machine may not attain full quality and performance and there is a risk of damage to the machine Be sure to use a SHARP recommended toner cartridge Depending on your conditions of use the color may become light or the image blurred Your service technician will collect used toner cartri...

Page 42: ...e entered for an account name or sender s name Upper case alphabet lower case alphabet numbers special characters symbols Characters that can be used for search characters The following characters can be used Up to 10 characters can be entered for search characters Upper case alphabet lower case alphabet numbers special characters CHARACTER ENTRY Search characters are normally the first 10 charact...

Page 43: ... F d e f 3 D E F 4 g h i 4 G H I g h i 4 G H I 5 j k l 5 J K L j k l 5 J K L 6 m n o 6 M N O m n o 6 M N O 7 p q r s 7 P Q R S p q r s 7 P Q R S 8 t u v 8 T U V t u v 8 T U V 9 w x y z 9 W X Y Z w x y z 9 W X Y Z _ 0 0 0 Use to enter special characters Use to enter special characters To enter two characters in succession that require the same key press the key to move the cursor after entering the...

Page 44: ...PECIFYING THE SIZE OF THE ORIGINAL 2 11 MAKING COPIES USING THE BYPASS TRAY 2 13 SPECIFYING A TYPE AND SIZE OF PAPER LOADED ON BYPASS TRAY 2 13 CONVENIENT COPY FUNCTIONS OUTPUT 2 15 SORT SETTING 2 15 ID CARD COPY 2 17 RESOLUTION SETTINGS 2 18 SPECIAL MODES COPYING MULTIPLE ORIGINALS ONTO A SINGLE SHEET OF PAPER 2 Up 4 Up COPY 2 19 COPYING BOTH SIDES OF A CARD AS A SINGLE PAGE CARD SHOT 2 21 ADJUST...

Page 45: ...2 2 COPIER BEFORE USING THE MACHINE AS A COPIER COPY MODE Press the COPY key on the operation panel to change to copy mode BEFORE USING THE MACHINE AS A COPIER ...

Page 46: ...can refer to the following functions for the setting Paper Select page 2 4 2 Sided Copy page 2 7 Copy Ratio page 2 10 Original page 2 11 Exposure page 2 8 N Up page 2 19 Card Shot page 2 21 4 Press the START key to start copying When making only one set of copies you do not need to specify the number of copies To cancel all settings press the CA key When the CA key is pressed all settings selected...

Page 47: ...o select the tray and press the OK key If the selected tray runs out of paper during a copy job and there is another tray that has the same size and type of paper that tray will be automatically selected and the copy job will continue If the Ready to copy message does not appear in the base screen of copy mode If a list is being printed in the system settings copying is not possible Wait until lis...

Page 48: ... the paper tray you want to use for copying and press the keys for any other settings you want to select Paper Select page 2 4 2 Sided Copy page 2 7 Copy Ratio page 2 10 Original page 2 11 Exposure page 2 8 N Up page 2 19 Card Shot page 2 21 3 Press the START key to start copying When making only one set of copies you do not need to specify the number of copies To make two or more sets of copies P...

Page 49: ...e copying appears on the display 1 Place the original on the document glass DOCUMENT GLASS page 1 32 2 Check the paper tray you want to use for copying and press the keys for any other settings you want to select Paper Select page 2 4 2 Sided Copy page 2 7 Copy Ratio page 2 10 Original page 2 11 Exposure page 2 8 N Up page 2 19 Card Shot page 2 21 3 Press the START key to start copying When making...

Page 50: ...t side turn the original over on the glass and press the START key Duplex copying starts To change the orientation of the copy image on the front and back sides of the paper set Binding Change to On with the keys Original Paper Usable paper Document glass One sided original Two sides 8 1 2 x 14 8 1 2 x 11 5 1 2 x 8 1 2 A4 B5 A5 Document feeder One sided original Two sides Duplex original Two sides...

Page 51: ...hange the default exposure In System Settings administrator select Copy Default Exposure To change the default exposure In System Settings administrator select Copy Default Exposure 1 Press the Exposure key COPY MODE page 2 2 2 Select the copy exposure Select the original type with the keys Three exposure modes are available Text Text Print Photo and Photo Original image type select keys Text Use ...

Page 52: ...or Manual 5 levels for the exposure If needed adjust the exposure with the keys Guidelines for the exposure level when Text is selected for Exposure Original Type 1 to 2 Dark originals such as a newspaper 3 Normal density originals 4 to 5 Originals written in pencil or light colored text 4 Press the OK key ...

Page 53: ...to the ratio selection screen Specifying a ratio from 25 to 400 Preset ratios zoom When the document feeder is being used the zoom copy ratio range is 25 to 200 1 Press the ZOOM key COPY MODE page 2 2 2 Select Zoom Select the ratio with the keys 3 To set the ratio in increments of 1 set a numerical value with the keys 4 Press the OK key ...

Page 54: ... before scanning the original Document glass Document feeder 1 Select Original Size in the right menu of the base screen of copy mode and press the OK key 2 Select Inch or AB with the keys 3 Select the size with the keys For a standard original size select Original Size press the OK key and specify the original size The set original size will appear in the Original Size field of the base screen If...

Page 55: ...COPIES 5 Specify the original size 1 Select X width with the or key 2 Enter the width with the or key then do the same for the length Y 3 Press the OK key The original size is set Custom appears in the original size field of the base screen ...

Page 56: ...K key 3 Press the SPECIAL FUNCTION key select Paper Type Set and select the type of paper to be used in the bypass tray Select the paper type with the keys When finished press the OK key To use an envelope go to step 7 4 Press the SPECIAL FUNCTION key select Paper Size Set and select the paper size used in the bypass tray Select the paper size with the keys If the paper size is a standard size sel...

Page 57: ...specify the size in increments of 1 mm In inch you can specify the size in increments of 1 8 inch 3 Press the OK key The paper size is set Custom appears in the paper size field of the base screen 7 Envelope Select the envelope size to be used with the keys and press the OK key The envelope size is set Envelope appears in the paper size field of the base screen Envelope Size ...

Page 58: ...matic document feeder and enables the group mode when the original is placed on the document glass Sort Sorts the scanned original on a set basis and outputs them Group Groups the scanned original on a page basis and outputs them 1 Select Output in the right menu of the base screen of copy mode and press the OK key 2 Select No Sort or Sort with the keys Originals When 5 is set for the number of co...

Page 59: ...anned Memory is full will appear in the display To start copying the originals that have been scanned to that point press the START To cancel the copy job press the CA key The auto select setting for the sort function of the automatic document feeder can be changed in Sort Auto Select in the system settings page 7 17 ...

Page 60: ... key on the operation panel 2 Place the ID card on the upper left hand corner of the document glass and press the START key 3 Turn the ID card over and press the START key The ID card copy function cannot be used at the same time as the 2 sided copy 2 Up 4 Up copy sort copy and card shot functions Paper sizes that can be used with ID Card Copy are standard sizes In ID card copy mode scan area and ...

Page 61: ...or high speed as appropriate for your needs 1 Press the SPECIAL FUNCTION key select Resolution with the keys and press the OK key 2 Select Document Feeder with the keys and press the OK key You can also select the document glass however the document glass is fixed at 600 x 600 dpi you can not change the setting 3 Select 600 300dpi or 600 600dpi with the keys and press the OK key Document Feeder ...

Page 62: ...is convenient for compiling multi page reference materials into a compact format or for providing an overview of all pages of a document on a single page SPECIAL MODES 2 Up copying 4 Up copying 1 Press the SPECIAL FUNCTION key select with the keys and press the OK key 2 Select 2 Up 4 Up with the keys and press the OK key 3 Select 2 Up or 4 Up with the keys and press the OK key Pattern 1 Pattern 2 ...

Page 63: ... functions The function selected first will take precedence Card shot ID card copy A special paper size cannot be used for 2 Up 4 Up copy An appropriate ratio setting will be automatically selected based on the original size the paper size and the selected number of images Certain combinations of original size paper size and number of images may result in images being cut off 4 Up Pattern 1 ...

Page 64: ...K key 3 Specify the card size in the Card Shot screen Select horizontal X or vertical Y with the keys specify the dimension with the keys and press the OK key Repeat for the other dimension The horizontal and vertical dimensions can each be set to value from 1 to 8 1 2 Paper cannot be fed from the bypass tray The card shot function cannot be used in combination with 2 Up 4 Up copy and ID card copy...

Page 65: ...ness must be specified before scanning the original 1 Press the SPECIAL FUNCTION key select Special Modes with the keys and press the OK key 2 Select Sharpness with the keys and press the OK key 3 Select Off Soft or Sharp with the keys and press the OK key To cancel the sharpness setting Select Off with the keys and press the OK key Softer Sharper ...

Page 66: ...th the keys and press the OK key 3 Select level adjustment with the keys and adjust with the keys To select change the level 3 levels are available with the keys and press the OK key Only light backgrounds are suppressed Light to dark backgrounds are suppressed To cancel the Background Adjustment setting Select Off with the keys and press the OK key When Background Adjustment is selected the copy ...

Page 67: ...and press the OK key 2 Select Enter with the keys and press the OK key 3 Select the number of the program you want to store with the keys and press the OK key No Store appears in locations where a program has not been stored Program 1 3 appears in locations where a program is already stored 4 Refer to the copy setting procedures to configure settings for the selected items A checkmark appears in f...

Page 68: ... Up and Card Shot 1 Press the SPECIAL FUNCTION key select Register Program with the keys and press the OK key 2 Select Change with the keys and press the OK key 3 Select the number of the program you want to modify with the keys and press OK Modify the settings as explained in step 4 of STORING A PROGRAM page 2 24 and resave the program ...

Page 69: ... the keys and press the OK key 3 Select Delete with the keys and press the OK key The selected program location changes to No Store 1 Select Program in the right menu of the base screen of copy mode and press the OK key 2 Select the number of the program you want to use with the keys and press the OK key The settings in the selected program are applied to the copy job ...

Page 70: ... 3 19 FITTING THE PRINT IMAGE TO THE PAPER 3 20 PRINTING MULTIPLE PAGES ON ONE PAGE 3 22 CONVENIENT PRINTING FUNCTIONS CONVENIENT FUNCTIONS FOR CREATING PAMPHLETS AND POSTERS 3 24 CREATE A PAMPHLET BOOKLET 3 24 PRINTING WITH MARGIN SHIFT SETTING MARGIN 3 26 CREATE A LARGE POSTER POSTER PRINTING 3 28 FUNCTIONS TO ADJUST THE SIZE AND ORIENTATION OF THE IMAGE 3 29 ADJUST PRINT POSITION ON ODD AND EVE...

Page 71: ...RENDERING METHOD AND PRINTING JPEG IMAGES USE DRIVER TO RENDER JPEGS 3 46 CONVENIENT PRINTER FUNCTIONS 3 47 SAVING AND USING PRINT FILES RETENTION 3 47 PRINTING WITHOUT THE PRINTER DRIVER EXTENSION OF PRINTABLE FILES 3 50 DIRECTLY PRINTING A FILE IN USB MEMORY 3 51 DIRECTLY PRINTING FROM A COMPUTER 3 53 FTP PRINT 3 53 APPENDIX PRINTER DRIVER SPECIFICATIONS LIST 3 54 ...

Page 72: ... 3 compatible printer If it is desired to use the Windows standard PS printer driver the PPD driver must be used To install the printer driver and configure settings in a Windows environment see the Software Setup Guide The User s Manual mainly uses PCL6 printer driver screens to explain how to print in a Windows environment The printer driver screens may differ slightly depending on the printer d...

Page 73: ... to open the printer driver properties window usually Property or Preferences may vary depending on the application The machine name that normally appears in the Printer menu is MX xxxx xxxx is a sequence of characters that varies depending on the machine model 1 Select Print from the File menu of WordPad 2 Select the printer driver for the machine and click the Preferences button The button that ...

Page 74: ...utton To select settings on other tabs click the desired tab and then select the settings PRINTER DRIVER SETTINGS SCREEN REFERRING TO HELP page 3 6 If an original size larger than the largest paper size that the machine supports is set select the paper size for printing in Output Size If an Output Size different from the Original Size is selected the print image will be adjusted to match the selec...

Page 75: ...h as two sided printing and booklet Job Handling Set retention and user authentication Inserts Select cover insertion functions Stamp Select the watermark or stamp function Image Quality Select various image quality settings Detailed Settings Select tandem print and other detailed print settings 2 Favorites Settings configured on each tab at the time of printing can be saved as Favorite FREQUENTLY...

Page 76: ... that paper of that type is actually loaded into the bypass tray and then select the appropriate paper type When Paper Type is set to Auto Select A tray with plain paper or recycled paper of the size specified in Output Size is automatically selected The factory default setting is plain paper only When Paper Type is set to anything other than Auto Select A tray with the specified type of paper and...

Page 77: ... Selected Paper Type in Bypass Tray enabled by factory default is enabled in Web page set the paper type of the bypass tray to Envelope For the types of paper that can be used in the bypass tray see APPLICABLE PAPER TYPES page 1 17 For the procedure for loading paper in the bypass tray see LOADING PAPER INTO THE BYPASS TRAY page 1 24 For more information on the procedure for loading paper see SELE...

Page 78: ...ed in the machine In System Settings administrator select User Control Disable Print by Inv User 1 In the printer driver properties window of the application select the printer driver of the machine and click the Preferences button The button that is used to open the printer driver properties window usually Property or Preferences may vary depending on the application 2 Enter your user information...

Page 79: ... allowing you to check the settings as you save them Deleting saved settings In step 2 of USING SAVED SETTINGS page 3 11 select the user settings that you want to delete and click the Delete button 1 Select the machine s printer driver from the print window of the application and click the Preferences button The button that is used to open the printer driver properties window usually Property or P...

Page 80: ...exit the application 1 Select the machine s printer driver from the print window of the application and click the Preferences button The button that is used to open the printer driver properties window usually Property or Preferences may vary depending on the application 2 Select favorite settings 1 Select the favorite settings you want to use 2 Click the OK button 3 Start printing 1 Click the Sta...

Page 81: ...ING IN A WINDOWS ENVIRONMENT 2 Right click the printer driver icon of the machine and select Printing preferences 3 Configure the settings and click the OK button For explanations of the settings see printer driver Help ...

Page 82: ...Select paper settings Paper size paper orientation and enlarge reduce settings can be selected 3 Click the OK button 3 Select Print from the File menu MX xxxx MX xx MX xx M M M MX MX xx MX xx MX MX X X X X x X X xx X MX xx MX xx X xx xx M M MX xx MX xx MX M MX X X X X X X X x xx xx M MX xx M M M M M MX X MX X X X xx xx xx M M M M M M M M MX X X MX X X xx xx x x x X xx x M M M M M M M MX X x x xx x...

Page 83: ...ype When a paper type is specified A tray with the specified type of paper and the size specified in Paper Size on the page setup screen is used for printing 4 Select print settings 1 Make sure that the correct printer is selected 2 Select an item from the menu and configure the settings as needed 3 Click the Print button Special media such as envelopes can also be placed in the bypass tray For th...

Page 84: ...G THE PAPER page 3 14 When using media such as envelopes that can be loaded only in a specific orientation you can rotate the image 180 degrees For more information see ROTATING THE PRINT IMAGE 180 DEGREES ROTATE 180 DEGREES page 3 30 It is recommended that you carry out a test print to check the print result before using an envelope 1 Select print settings 1 Select the envelope size from the Pape...

Page 85: ...ing on the authentication method being used so check with the administrator of the machine before printing The menu used to execute printing may vary depending on the application To prohibit printing by users whose user information is not stored in the machine In System Settings administrator select User Control Disable Print by Inv User 1 In the application select Print from the File menu ...

Page 86: ...8 digits in User Number 5 Enter the user name and job name as necessary User Name Enter your user name using up to 32 characters The entered user name will appear on the display of the machine If you do not enter a user name your PC login name will appear Job Name Enter a job name using up to 80 characters The entered job name will appear as a file name on the display of the machine If you do not ...

Page 87: ...solution 1 Click the Image Quality tab 2 Select Print Mode 1 Select Printer Features and then select Advanced 2 Select Print Mode FREQUENTLY USED FUNCTIONS 600 dpi This mode is suitable for printing data such as regular text or a table 600 dpi High Quality The print quality of photos and text are high Windows Mac OS 2 1 1 2 ...

Page 88: ...n tab 2 Select the paper orientation 3 Select Long Edge or Short Edge Paper orientation Print results Portrait Long Edge Short Edge Landscape Short Edge Long Edge The pages are printed so that they can be bound at the left or right side The pages are printed so that they can be bound at the top Windows If necessary you can select the method of implementing 2 sided printing Click the Other Settings...

Page 89: ...hine This function is convenient when enlarging an Invoice or A5 size document to letter or A4 size to make it easier to view or when printing a document on paper that is different in size from the original document The following example explains how to print an Invoice or A5 size document on a letter or A4 size paper Mac OS If A0 A1 or A2 size is selected in Original Size A4 or Letter is automati...

Page 90: ...or printing from Output Size for example Letter If the output size is larger than the original size the printed image will be automatically enlarged 1 Check the paper size for the print image for example Invoice 2 Select Paper Handling 3 Select Scale to fit paper size 4 Select the actual paper size to be used for printing for example Letter Windows Mac OS 2 1 3 2 1 3 4 ...

Page 91: ...results Left to Right Right to Left Top To Bottom When the print orientation is landscape 2 Up 2 pages per sheet N Up Pages per sheet Right and Down Down and Right Left and Down Down and Left 4 Up 4 pages per sheet N Up that can be set on the Layout tab can also be set on the Main tab Order can only be set in the Layout tab Note the following when printing multiple pages on one sheet The page orde...

Page 92: ... cover select the N Up with cover checkbox PCL6 only When 100 N Up is selected for jobs such as N Up copying of two A5 size pages onto one A4 sheet the pages will be printed at the full size of the original If you select Border at this time only the border will be printed 1 Select Layout 2 Select the number of pages per sheet 3 Select the order of the pages 4 If you wish to print borderlines selec...

Page 93: ...nts on the front and back of each sheet of paper so that the sheets can be folded and bound to create a pamphlet 1 Click the Layout tab 2 Select Standard in Booklet The printed image will be enlarged or reduced to fit the paper selected in Output Size 3 Select the specified output size and the binding edge CONVENIENT PRINTING FUNCTIONS Windows 2 1 3 ...

Page 94: ...3 25 PRINTER CONVENIENT PRINTING FUNCTIONS 1 Select Printer Features and then select Output 2 Select 2 Up Left 2 Up Right Tiled Left or Tiled Right Mac OS 2 1 ...

Page 95: ...p of the paper By shifting the image the part of the image that is outside the print area will not be printed 1 Click the Layout tab 2 Click the Print Position button 3 Select Margin Shift 4 Select the shift width Select from the Margin Shift menu If you wish to configure another numeric setting select the setting and click buttons or directly enter the number Windows 2 1 3 4 ...

Page 96: ...3 27 PRINTER CONVENIENT PRINTING FUNCTIONS 1 Select Printer Features and then select Output 2 Select Margin Shift Mac OS 2 1 ...

Page 97: ...er to create a large poster To enable precise alignment of the edges of the sheets during attachment borderlines can be printed or overlapping edges can be created overlap function 1 Click the Layout tab 2 Select the number of sheets to be used in Poster Printing If you wish to print borderlines and or use the overlap function click the corresponding checkboxes so that the appears This function is...

Page 98: ... This function sets different print positions margins separately for odd and even pages and prints the pages 1 Click the Layout tab 2 Click the Print Position button 3 Select Custom 4 Set the amount of shifting of the print position for odd numbered pages and even numbered pages 5 Click the OK button This function is available in a Windows environment Windows 2 1 3 4 5 ...

Page 99: ... degrees so that it can be printed correctly on paper that can be loaded in only one orientation such as envelopes or paper with punch holes 1 Click the Main tab 2 Select Portrait Rotated or Landscape Rotated in Orientation 1 Select Layout 2 Select the Reverse page orientation checkbox so that appears Windows Mac OS ABCD ABCD 1 2 2 1 ...

Page 100: ...ightly reducing an image 1 Click the Main tab 2 Click the Zoom checkbox so that appears and click the Settings button 3 Enter the percentage By clicking the button you can specify the value in increments of 1 In addition select Upper Left or Center for the base point on the paper 4 Click the OK button When using the PS printer driver Windows you can set the width and length percentages separately ...

Page 101: ...3 32 PRINTER CONVENIENT PRINTING FUNCTIONS 1 Select Page Setup from the File menu and enter the ratio 2 Click the OK button Mac OS 2 1 ...

Page 102: ...t a design for a woodblock print or other printing medium 1 Click the Detailed Settings tab 2 If you wish to reverse the image horizontally select Horizontal If you wish to reverse the image vertically select Vertical 1 Select Layout 2 Select the Flip horizontally checkbox In a Windows environment this function is only available when using the PS printer driver Windows Mac OS B B 2 1 2 1 ...

Page 103: ...mage is printed This function makes simple corrections even if image editing software is not installed on your computer 1 Click the Image Quality tab 2 Click the Image Adjustment button 3 To adjust objects text graphics photos individually select the Adjust at each object checkbox and select the object 4 Drag the slide bar or click buttons to adjust the image This function is available in a Window...

Page 104: ...e faint and difficult to see when printed in grayscale 1 Click the Image Quality tab 2 Select the Text To Black checkbox and or the Vector To Black checkbox so that appears When Text To Black is selected all text other than white text is printed in black When Vector To Black is selected all vector graphics other than white lines and areas are printed in black Raster data such as bitmap images cann...

Page 105: ...Click the Image Quality tab 2 Specify the settings Graphics mode Select the graphics mode from Raster or Vector Bitmap compression The data compression ratio of bitmap is set If the ratio is higher the image quality becomes lower Screening Select the screening to modify the image to suit specific preferences according to the appropriate image processing method Windows 1 2 ...

Page 106: ...3 37 PRINTER CONVENIENT PRINTING FUNCTIONS 1 Select Printer Features 2 Click the Advanced2 tab 3 Specify the settings Mac OS 2 1 3 ...

Page 107: ... text can be adjusted The watermark text can be selected from the previously registered text in the list When necessary you can enter text to create an original watermark 1 Click the Stamp tab 2 Select Watermark from Stamp and click the Settings button 3 Select the watermark to be used and click the OK button Windows If you want to create a new watermark enter the text of the watermark in the text...

Page 108: ...UNCTIONS 1 Select Watermarks 2 Click the Watermark checkbox and configure watermark settings Configure detailed watermark settings such as selection of the text Adjust the size and angle of the text by dragging the slide bar Mac OS 2 1 ...

Page 109: ...a The size position and angle of the image can be adjusted 1 Click the Stamp tab 2 Select Image Stamp from Stamp and click the Settings button 3 Select the image stamp to be used and click the OK button If an image stamp has already been stored it can be selected from the menu If you have not stored an image stamp click the Image File select the file you wish to use for the image stamp and click t...

Page 110: ...he need for complex manipulations Creating an overlay file 1 Open the driver properties window from the application that is used for creating overlay data 2 Click the Stamp tab 3 Click the Settings button 4 Click the New button and specify the name and folder to be used for the overlay file that you wish to create The file will be created when the settings are completed and printing is started Thi...

Page 111: ...nting with an overlay file 2 Click the Stamp tab 3 Select an overlay file A previously created or stored overlay file can be selected from the menu When printing is started a confirmation message will appear The overlay file will not be created until the Yes button is clicked When you click the Open button the existing overlay file is registered 3 2 ...

Page 112: ...n when you wish to print only the front cover on heavy paper 1 Click the Inserts tab 2 Select Cover Page from Inserts Option and click the Settings button 3 Select the paper insertion settings Enable Cover Page and select the paper tray and the paper type you will use Windows When Bypass Tray is selected in Paper Tray be sure to select the Paper Type and load that type of paper in the bypass tray ...

Page 113: ... PRINTER CONVENIENT PRINTING FUNCTIONS 1 Select Printer Features 2 Select Cover Page 3 Select the cover insertion settings Select the print setting paper tray and paper type for the front cover Mac OS 2 1 3 ...

Page 114: ... page 1 Click the Stamp tab 2 Click the Settings button 3 Select Page Interleave from the Printing Method 4 Set the overlay data to be inserted and set its insertion position This function is available in a Windows environment This function can be used when the PCL6 printer driver is used Windows You have to create page data to be inserted in advance For the procedure for creating page data see Cr...

Page 115: ...d When you print an original containing JPEG images this function allows you to select whether the images are rendered in the printer driver or the machine 1 Click the Detailed Settings tab 2 Click the Other Settings button 3 Click the Use driver to render JPEGs checkbox so that appears 4 Click the OK button This function is available in a Windows environment When images are rendered in the printe...

Page 116: ... computer a PIN code 5 to 8 digits can be set to maintain the secrecy of information in a stored file When a PIN code is set the PIN code must be entered to print a stored file from the machine 1 Click the Job Handling tab 2 Select On in Retention To enter a PIN code 5 to 8 digit number click the PIN Code checkbox Print data is erased when the power is turned off Print data that exceeds 5 MB canno...

Page 117: ...he button to lock the PIN code This allows you to readily set the same PIN code the next time you use it Printing a job stored by retention When retention is performed the display appears as follows 1 Select the print job with the keys If the screen appears as below press the key to display the list of print hold jobs 2 Press the OK key Mac OS 2 1 ...

Page 118: ...he job Select Delete to delete the job without printing it Selecting No Print returns you to step 1 4 Press the OK key The print job is printed or deleted If a PIN code is set the job will be printed or deleted after you enter the PIN code with the numeric keys and press the OK key Please enter Pin code Pin code ...

Page 119: ...rint directly to the machine without using the printer driver The file types and corresponding extensions that can be printed directly are shown below PRINTING WITHOUT THE PRINTER DRIVER File Type TIFF JPEG PCL PS PDF Encrypt PDF Compact PDF PDF A Compact PDF A Extension tiff tif jpeg jpg jpe jfif pcl prn txt ps prn pdf Some files may not print correctly even if shown in the above table A PDF that...

Page 120: ... device to the machine 2 Select Print from the memory device with or key and select the file that you wish to print A name with to its left is the name of a folder in the USB memory To display the files and folders in a folder select the folder and press the OK key A total of 100 files and folders can be displayed Press the READ END key to move up one folder level 3 Press the OK key 4 Select Print...

Page 121: ...VER CANCELING A PRINT JOB FROM THE MACHINE When STOP key is pressed while showing Printing on the display after starting a print job the confirmation screen whether or not to cancel the print job will appear Then select Yes to cancel the printing ...

Page 122: ...s bar of your PC s Web browser as shown below Example ftp 192 168 1 28 In Windows enter ftp IP address of machine in Explorer and drag and drop the file you want to print to that window Printing will automatically begin If you selected a PS or PCL file that includes print conditions the print conditions in the file will be given priority When user authentication is enabled in the settings of the m...

Page 123: ... Yes Yes No No Orientation 3 30 Yes Yes Yes Yes Scale to fit Paper Size 3 20 No No No Yes Zoom 3 31 Yes 2 Yes No No 2 Sided 3 19 Yes Yes Yes Yes N Up 3 22 2 4 6 8 9 16 2 4 6 8 9 16 2 4 6 9 16 2 4 6 9 16 Staple No No No No Document Filing No No No No Retention 3 47 Yes Yes No Yes Color Mode No No No No Paper Source Output Size 3 4 Yes Yes No No Paper Tray 3 7 Yes Yes Yes Yes Paper Type 3 7 Yes Yes ...

Page 124: ...No No No Document Filing No No No No Create PDF for PC Browsing No No No No Print and Send No No No No Notify Job End No No No No Retention 3 47 Yes Yes No Yes Authentication 3 9 Yes Yes No Yes Inserts Cover 3 43 Yes Yes Yes Yes Transparency Inserts No No No No Carbon Copy No No No No Tab Paper No No No No Stamp Watermark 3 38 Yes Yes Yes Yes Image Stamp 3 40 Yes Yes No No Overlay 3 41 Yes Yes No ...

Page 125: ... Image 3 33 No Yes Yes Yes PS Error Information No Yes Yes No PS Pass Through No Yes No No Job Compression No Yes No No Tandem Print No No No No Disable Blank Page Print No No No No Custom Image Registration No No No No Other Settings Input Resolution Yes Yes No No Shade Pattern Yes No No No Spool Data Format Yes Yes No No Printable Area No No No No Rip Style No No No No Duplex Style 3 19 Yes Yes ...

Page 126: ...ME DOCUMENT TO MULTIPLE DESTINATIONS IN A SINGLE OPERATION 4 30 SENDING OPTIONS 4 32 POLLING MEMORY 4 34 STORING EDITING AND DELETING AUTO DIAL NUMBERS SPEED DIAL NUMBERS AND GROUP DIALS 4 37 STORING EDITING AND DELETING PROGRAMS 4 43 PRINTING LISTS OF PROGRAMMED INFORMATION AND SETTINGS 4 45 INCLUDING SENDER INFORMATION ON FAXES OWN NUMBER SENDING 4 46 FORWARDING FUNCTION 4 47 USING SETTINGS STOR...

Page 127: ...gramming your sender s name and number Before using the fax function you must set the date and time and program your sender s name and number in the machine This procedure is explained in POINTS TO CHECK AND PROGRAM AFTER INSTALLATION page 4 3 of this manual Lithium battery The date and time are protected by a lithium battery in the machine When the battery dies please contact your local Sharp dea...

Page 128: ... one name and number can be programmed The programmed name and number are printed at the top of each transmitted fax page The sender s number is also used as an identification number when you use the Polling function to request transmission from another fax machine see SENDING OPTIONS page 4 32 Paper sizes that can be used for fax mode The machine can use 8 1 2 x 14 8 1 2 x 13 8 1 2 x13 2 5 8 1 2 ...

Page 129: ...ceiving faxes automatic reception and manual reception This shows the currently selected reception mode 8 Original display This displays an icon to indicate the original scanning mode when an original has been placed One sided original scanning in the document feeder Two sided original scanning in the document feeder None Document glass This also shows the currently selected original scanning size...

Page 130: ...lution setting and the width of the original there may not be sufficient space in memory to hold a long original When a long original cannot be entirely scanned use direct transmission or manual transmission on hook dialing Originals 8 1 2 x 14 or 8 1 2 x 11 or A4 can be placed in the document glass and 8 1 2 A4 width and up to 500mm long can be placed in the automatic document feeder ...

Page 131: ...simply pressing the REDIAL key and then the START key If you pressed a numeric key during the previous call the REDIAL key may not dial the correct number Redialing is not possible to broadcast transmission page 4 30 serial polling page 4 32 timer transmission page 4 29 or group dialing page 4 12 destinations ON HOOK DIALING This feature allows you to dial without lifting an extension phone connec...

Page 132: ...orrect destination When a fax number is entered with the numeric keys or selected with the REDIAL key a screen appears after you enter the number prompting you to reenter the number for confirmation When a Speed Dial number page 4 12 is used for transmission a screen appears for confirmation of the stored name and number When a group dial number page 4 12 is used for transmission a screen appears ...

Page 133: ...age 1 30 This is a single transmission operation and therefore originals cannot be scanned in succession from both the document feeder and the document glass 3 Specify the original size One side scanning When the original is placed in the document feeder the icon changes to AUTO The original size cannot be changed by selecting Orig Size in the right menu Two side scanning For the procedure for spe...

Page 134: ...VIEW FUNCTION page 4 7 8 Press the OK key 9 Press the START key Scanning begins If scanning is completed normally the display returns to the base screen If the line is free the machine will dial the receiving machine and begin transmission as soon as the first page is scanned Quick On line page 4 17 If there is a previously stored job or a job is in progress or if the line is being used all pages ...

Page 135: ...original on the document glass DOCUMENT GLASS page 1 32 This is a single transmission operation and therefore originals cannot be scanned in succession from both the document feeder and the document glass 3 Specify the original size Select the Original Size on the right menu The paper size that can be selected is 8 1 2 x 11 8 1 2 x 14 or A4 4 If needed adjust the resolution and exposure settings 5...

Page 136: ...anned press the READ END key Open the document feeder and remove the original When the original is removed or any key operation is performed the display returns to the base screen The destination is automatically called and the document transmitted after any previously stored jobs are completed To cancel transmission To cancel transmission while Reading appears or before the READ END key is presse...

Page 137: ... press the C key and then enter the correct number If you enter a 3 digit number that is not programmed in the machine press the C key and then enter the correct number If you do not know the Speed Dial number print out the Speed List or Group List PRINTING LISTS OF PROGRAMMED INFORMATION AND SETTINGS page 4 45 2 Press the OK key Check the destination If correct press the OK key again To cancel tr...

Page 138: ...r key The search results appear in the following order upper case letters lower case letters special characters and numbers If not all letters of the destination name appear press the READ END key to display the full name Press the READ END key once again to return to the original screen To cancel transmission while Reading appears or before the READ END key is pressed press the C or CA key To can...

Page 139: ...ing is canceled when the transmission is completed or when the CA key is pressed Duplex scanning of two sided originals is only possible when a Document feeder is used Automatic scanning of both sides of an original is not possible when the document glass is used The image of the back side of the original is rotated 180 degrees if needed at the time of transmission and thus there is no need to cha...

Page 140: ...ransmission When direct transmission is used transmission begins after the current job is completed allowing you to give priority to a transmission job As such direct transmission is a convenient means of performing an interrupt transmission when there are a large number of stored transmission jobs To switch between memory transmission and direct transmission see the following Faxing by direct tra...

Page 141: ...ge 7 20 function is turned on the SPEAKER key cannot be used for transmission To cancel dialing using the SPEAKER key when you need to redial the number or because transmission was interrupted press the SPEAKER key once again As the original is not stored in memory when direct transmission and manual transmission are used the following functions cannot be used Broadcast transmission SENDING THE SA...

Page 142: ...a document the transmission job is automatically canceled If the memory becomes full while scanning the second page or a following page scanning stops In this case you can either press the C key to cancel the transmission or press the OK key to transmit only those pages which were completely scanned Quick On line When you use the document feeder to send a multi page document and there are no previ...

Page 143: ...occurs that prevents transmission or the receiving machine does not answer the call within 45 seconds 2 the transmission is stopped and then automatically re attempted later One attempt is made at an interval of 1 minute 2 If you do not want the machine to re attempt the transmission press the FAX STATUS key and cancel the job page 4 21 This machine also supports error correction mode ECM and is s...

Page 144: ...Use for photo or shaded color originals color documents etc Transmits a clearer image than with Fine or Super Fine alone The transmission time is slightly longer when halftone is selected The factory default settings for the resolution and contrast are Standard and Auto respectively The default settings for the resolution and contrast can be changed in the system settings Set Res Con page 7 20 Whe...

Page 145: ...ure can be changed to match the darkness of the original 1 Select the EXPOSURE key 2 Adjust the exposure 1 Select the item with the or key 2 Adjust the exposure with the or key To dark the exposure select the key and to lighten the exposure select the key 3 Select the OK key ...

Page 146: ...g the original from the document glass the C or CA key can be pressed 1 Press the FAX STATUS key When a transmission is in progress the job being transmitted is displayed If the displayed job is not the job that you wish to cancel it is likely that the job to be canceled is a stored job waiting for transmission Press the BACK key to display the fax status selection screen and then follow the proce...

Page 147: ...ype Note column of the report Additional information on the display during transmission A Destination name The name of the destination appears if programmed B Transmission method name In the case of a timer transmission the timer icon appears at the beginning of the transmission method name C Number of pages currently transmitted D Document number The document number assigned at the time of scanni...

Page 148: ... progress the job being transmitted is displayed Press the BACK key to display the fax status selection screen 2 Select TX RX Reserve with the or key 3 Press the OK key The first stored transmission job appears Press the or key until the transmission job that you wish to cancel appears 4 Press the C key The transmission cancel confirmation screen appears 5 Select Yes with the or key 6 Press the OK...

Page 149: ...f programmed C Transmission method name In the case of a timer transmission the timer icon appears at the beginning of the transmission method name D Number of pages stored In the case of a stored transmission job the document number assigned at the time of scanning appears E In the case of a timer transmission the timer job number appears F In the case of a timer transmission the specified reserv...

Page 150: ...atic reception If the Duplex Reception page 7 21 function is on you can press the SPEAKER key when the machine rings to select whether the fax will be received Select Yes to receive the fax or No to reject the fax with and press the OK key In order to receive faxes paper must be loaded in the paper tray See LOADING PAPER page 1 17 to load appropriate paper 1 The machine will ring and reception wil...

Page 151: ... 1 If Actual Size is set up the image is printed at actual size without being split 2 1 If the loaded paper is of the B5 size or less the received image may not be printed depending upon the width and length of the image data 2 The received image won t be printed until you load the paper larger than the actual size In fax mode printing is not possible on 8 1 2 x 14 and 8 1 2 x 13 sizes If the pape...

Page 152: ...x press the START key and select RX 1 Press the COMM SETTING key in the initial state of Fax mode The communication setting screen can also be displayed from the function selection screen Press the SPECIAL FUNCTION key to display the function selection screen select Comm Setting with the keys and press the OK key 2 Select Manual and press the OK key To return to auto reception select Auto in step ...

Page 153: ...Fax print hold and then select Print CONVENIENT FAX FUNCTIONS When fax print hold is enabled and received faxes are held in memory the DATA indicator above the FAX key on the operation panel blinks and a message appears in the display When the received faxes are printed the indicator stops blinking and the message no longer appears If the remaining free memory reaches 0 fax reception will no longe...

Page 154: ...ation with a timer setting see Serial polling mode page 4 33 1 Select Timer Mode and press the OK key If a time has been specified a checkmark appears in front of Timer Mode To cancel a specified time press the LOGOUT key in the above display with Timer Mode highlighted The current time appears in the screen If the current time is not correct press the CA key to cancel the operation and see Date T...

Page 155: ...ion the broadcast transmission will have five destinations 1 Enter a full fax number with the numeric keys or press an auto dial key Speed Dial number or group key to select the first destination TRANSMISSION BY AUTO DIALING SPEED DIALING AND GROUP DIALING page 4 12 The destination selection screen appears To clear a mistake when entering a full number with the numeric keys press the C key to clea...

Page 156: ... are selected If you use two group dials that have 50 stations each the total number of destinations entered will be 100 3 Continue from step 7 of BASIC PROCEDURE FOR SENDING FAXES page 4 8 After entering a full number with the numeric keys press the OK key to complete the entry If you pressed an auto dial key in step 1 it is not necessary to press the OK key You can immediately press another auto...

Page 157: ...e diagram is successively repeated for each sending machine selected When using the Public Box function do not set the fax reception mode to Manual See MANUAL FAX RECEPTION page 4 27 If the other machine is using polling security see Restricting polling access polling security page 4 36 your fax number sender s number must be programmed in the system settings see Own Passcode Set page 7 19 and you...

Page 158: ... START key Polling reservation has been set appears in the screen After communicating with the other machine your machine prints the received fax To cancel the operation During communication Cancel as explained in Canceling a fax transmission page 4 21 While the job is stored Cancel as explained in Canceling a stored transmission job page 4 23 The receiving machine bears the expense phone charges ...

Page 159: ...7 1 Select Memory Polling 2 Press the OK key and select 1 Time or Repeat If you select 1 Time the document data is automatically cleared from memory after your machine is polled once If you select Repeat the document data in memory can be used repeatedly If there are no previously stored documents in the polling memory the above screen appears If there are previously stored documents in the pollin...

Page 160: ...ave been scanned and then press the READ END key 4 Make sure that the reception mode is set to auto reception Setting the reception mode page 4 27 Transmission begins when the other machine calls and polls your machine To cancel scanning To cancel scanning of a document while scanning is in progress press the CA key To erase the documents in the Public Box follow the procedure in Deleting document...

Page 161: ...s passcode numbers Up to 10 fax numbers can be programmed as passcode numbers To enable the polling security function and program passcode numbers see Polling Passcode Mode page 7 22 in the system settings 1 Follow steps 1 of Scanning a document into polling memory page 4 34 and then follow the steps below 2 Select Print with the or key and press the OK key Printing begins automatically 1 Select D...

Page 162: ...of the digits press the REDIAL PAUSE key The pause appears as a hyphen To set the duration of the pause see Pause Time page 7 19 5 Enter search characters see CHARACTER ENTRY page 1 39 6 To finish the storing procedure press the START key If you wish to program an option such as chain dialing transmission speed or international transmission mode press the OK key If you pressed the START key you wi...

Page 163: ...s maximum speed 14 400 bps high speed 9600 bps middle speed or 4800 bps low speed The initial setting is 33 600 bps maximum speed page 4 38 International transmission mode The international transmission mode can be set to Off or one of modes 1 to 3 The initial setting is Off page 4 39 When a number is set as a Chain Dial number the destination fax number can be up to 48 digits long 1 Select Chain ...

Page 164: ...ey When sending a fax to a foreign country telephone line conditions can sometimes distort the fax or interrupt the transmission Selecting the right international transmission mode can help alleviate these problems If errors frequently occur when sending a fax to a foreign country try each of modes 1 to 3 and select the mode that enables the best transmission 1 Select International TX with the or ...

Page 165: ...ions using Speed Dial numbers and the numeric keys To store a Speed Dial number press the SPEED key and then enter the desired Speed Dial number 000 to 299 with the numeric keys If you press an incorrect key press the C key and then press the correct key Chain dialing transmission speed and international transmission mode options cannot be selected If you need to select an option for the destinati...

Page 166: ...meric keys Move the cursor to the digit s that you wish to edit with the or key and then enter the correct digit s with the numeric keys To delete a digit move the cursor to the digit that you wish to delete with the or key and then press the C key 3 To finish the storing procedure press the START key If you wish to program an option such as chain dialing transmission speed or international transm...

Page 167: ... group dial is stored in a program 1 Select Group with the or key and Select Change with the or key 2 Press the group dial number that you wish to edit and edit the group name the search characters See CHARACTER ENTRY page 1 39 3 When you have finished editing the destinations press the START key 1 Select Delete with the or key and press the group that you wish to edit 2 Select Delete with the or ...

Page 168: ...xt follow the steps in Editing programs page 4 44 To delete a program select Delete and press the OK key Next follow the steps in Deleting programs page 4 44 3 Select the program that you wish to store with the or key and enter the program name See CHARACTER ENTRY page 1 39 If you select a program that has already been stored a message appears Select a program that has not been stored or clear the...

Page 169: ...that you wish to edit with the or key 4 Edit the program name see CHARACTER ENTRY page 1 39 See step 3 of Storing a program page 4 43 If you do not wish to edit the program name go to the next step 5 Select the stored setting that you wish to edit with the or key See steps 4 of Storing a program page 4 43 If you do not wish to edit the stored settings press the START key and then press the BACK ke...

Page 170: ...st Shows the destinations stored in each group dial number Program List Shows the operations stored in each program Timer List Shows timer transmissions and recall transmissions Mem Polling List Shows the documents stored for memory polling For other lists that can be printed refer to List Print page 7 15 1 Press the SPECIAL FUNCTION key 2 Select Data List Print and select Fax with the or key 3 Se...

Page 171: ...itted image is longer than the scanned image and thus when both the sender and the receiver use the same size of paper the printed fax may either be reduced or split up and printed on two pages Inside the scanned data document data The top edge of the scanned image will be cut off by the sender s information however when both the sender and the receiver use the same size of paper the printed fax w...

Page 172: ...e FAX DATA light blinks see If received data cannot be printed page 4 26 All received faxes are forwarded a particular fax cannot be selected for forwarding Faxes that have been received to memory by the fax print hold function page 4 28 are also forwarded The result of forwarding is indicated in the activity report see REPORT AT REGULAR INTERVALS COMMUNICATION ACTIVITY REPORT page 4 60 Your machi...

Page 173: ...ding in the same way as a regular fax transmission See CANCELING A FAX TRANSMISSION page 4 21 The fax es that was going to be forwarded will return to print standby status in your machine If forwarding is not possible because the other machine is busy or a transmission error occurs recall attempts will be made according to the recall times setting If forwarding is still not successful after the se...

Page 174: ...ace A program thus allows you to repeatedly perform the same type of transmission Note however that programs do not allow you to establish a timer setting for transmission A setting that can be stored in a program cannot be changed at the time that a program is used for a transmission even if the setting is not stored in the program The only settings that can be selected when using a program are t...

Page 175: ...or rights For the procedure for accessing the Web pages see HOW TO ACCESS THE WEB PAGE page 8 2 To activate Inbound Routing configure the basic settings before specifying the destination In the menu frame click Inbound Routing Settings Click the Submit button after settings CONFIGURING THE BASIC SETTINGS Configure the basic settings of Inbound Routing Enabling the Inbound Routing function Select E...

Page 176: ... Serial Number adds the unit serial number to the file name Sender Name Selecting Sender Name adds the sender name to the file name Date Time Selecting Date Time adds the date and time to the file name Session Page Counter Selecting Session Page Counter adds the counter to the file name Unique Identifier Selecting Unique Identifier adds the unique identifier to the file name Characters To add a ch...

Page 177: ... Inbound Routing function is enabled Number Displays the forwarding destination number Forward Destination 1 to 10 Each of setup menu is displayed by clicking each number Forward Condition Displays the forward condition of the destination enabling disabling and determining the destination setting Delete button To delete the forwarding condition stored in a destination number select the Number chec...

Page 178: ...r network folder from the list To delete a set E mail address or network folder select the checkbox at the left of the E mail address or network folder you wish to delete and then click the Delete button Item Settings Description Forward Condition Enable Disable Enable or disable the destination to be set in this screen Forward All Forward Sender Select the determination condition for forwarding t...

Page 179: ...PC Fax driver as the printer driver on your computer and then select the Print command in the software application Image data for transmission will be created and sent as a fax To use the PC Fax function the PC Fax driver must be installed For more information see the Software Setup Guide This function can only be used on a Windows computer This function can only be used for transmission Faxes can...

Page 180: ...mote operation CONNECTING AN EXTENSION PHONE Insert the end of the extension phone cord into the extension phone jack on the left side of the machine Make sure you hear a click sound indicating that the cord is securely connected USING AN EXTENSION PHONE Only use an extension telephone that can be connected to a modular jack If the shape of the cord plug is not compatible with the jack consult you...

Page 181: ... phone to answer a call before the machine automatically begins reception The machine is initially set to answer calls on two rings The number of rings can be changed to any number from 0 to 15 in the system settings Of Rings Man RX page 7 21 A call cannot be placed on hold The following procedure is not possible if you are on a pulse dial line and your extension phone cannot produce tone signals ...

Page 182: ...t breaking the connection Automatic redialing page 4 18 will not take place if the line is busy 1 Follow steps 1 to 4 of BASIC PROCEDURE FOR SENDING FAXES page 4 8 and then follow the steps below 2 Lift the extension phone 3 Dial the number of the other party 4 Speak to the other party when they answer 5 After the other party switches to fax reception press your START key Transmission begins If yo...

Page 183: ...ect whether or not part of the transmitted original is printed with transaction reports that are printed for normal transmissions and broadcast transmissions INFORMATION APPEARING IN THE TYPE NOTE COLUMN Information such as the type of transmission and type of error appears in the TYPE NOTE column of the REPORT AT REGULAR INTERVALS COMMUNICATION ACTIVITY REPORT page 4 60 The following notes may ap...

Page 184: ...ore could not be received NO RX ROLL When polling was attempted Your fax number sender s number was not programmed in your machine Your fax number was not programmed as a polling passcode number in the other machine RX NO POLL When polling was attempted The other machine did not have a polling function The other machine did not have a document stored in polling memory ERRORXXXXXX Line conditions p...

Page 185: ...will appear in the display If one of the following messages appears follow the instructions in the table If another messages appears see INDICATORS AND DISPLAY MESSAGES page 6 12 SELF DIAGNOSTIC FUNCTION The machine has a self diagnostic function that automatically stops operation if a problem occurs in the machine If a problem occurs in fax mode the following display appears Refer to the table on...

Page 186: ...1 P xxx This appears when a direct transmission ends xx indicates the number of pages READING xx No 001 P xxx The original is being scanned into memory during memory transmission Stand by 100 22 AUG FRI 10 25 The machine is in the standby state ENTER DIAL This appears when the SPEAKER key has been pressed ...

Page 187: ...OLOR MODE 5 13 ADJUSTING THE SCANNING EXPOSURE 5 14 ENABLING SCANNING MARGINS VOID AREA 5 14 ADJUSTING THE BACKGROUND BY MAKING LIGHT AREAS OF THE ORIGINAL DARKER OR LIGHTER SUPPRESS BG 5 15 ADJUSTING THE SHARPNESS OF AN IMAGE SHARPNESS 5 16 SCANNING BUSINESS CARDS BUSINESS CARD SCAN 5 17 IMAGE ORIENTATION AND STANDARD ORIGINAL PLACEMENT ORIENTATION 5 18 STORING AND EDITING DELETING A PROGRAM 5 19...

Page 188: ...et or the Internet To send originals using the scanner function specify the stored destination delivery address information name from the operation panel display of the machine BEFORE USING THE MACHINE AS A NETWORK SCANNER 1 Scanning from a TWAIN compliant application 3 Sending the scanned data to FTP server 4 Sending the scanned data to a computer connected to the same network 2 Storing the scann...

Page 189: ...tion on USB Memory Scan see USB MEMORY SCAN page 5 24 Sending the scanned data to FTP server The scanned image can be sent to a memory storage device on a network a designated directory on an FTP server This is called Scan to FTP in this manual Sending the scanned data to a computer connected to the same network The scanned file is sent to a shared folder on a Windows computer on the same network ...

Page 190: ... original scanning mode and scanning size One sided scanning in the document feeder Two sided scanning in the document feeder None Document glass 4 File format display This shows the image data file type and file method to be created 5 Resolution display The shows the scanning resolution 6 Original size page 5 11 This is used to set the size of the original to be transmitted 7 Resolution page 5 12...

Page 191: ...n you switch to scan mode Enter your account number five digits with the numeric keys User Authentication page 7 12 2 Place the original s Place the original in the document feeder tray of the automatic document feeder AUTOMATIC DOCUMENT FEEDER page 1 30 3 Check the original size To change the original size change as explained in STORING SCANNING SETTINGS page 5 11 4 If needed select the resolutio...

Page 192: ...r name is normally set to the name stored in Reply E mail Address in SMTP Setup in the Web page 9 Press the START key Scanning begins If scanning is completed normally the following screen is appears briefly and then the display returns to the base screen Canceling transmission Canceling transmission page 5 8 If a misfeed occurs during scanning in scan mode scanning will be canceled and the data s...

Page 193: ...ed destinations directly from the operation panel Address entry page 5 9 Directly enter the e mail address Only for Scan to E mail Address search page 5 9 Access a directory data base on the Internet or your intranet and search for a destination e mail address During a global address search multiple addresses can be entered to perform a broadcast transmission When you have finished searching for t...

Page 194: ...other unrelated data transmissions and in some cases may even cause the mail server or network to go down In cases where you need to send a large file or multiple images try lowering the resolution or reducing the scanned original size SELECTING A DESTINATION USING THE ADDRESS KEY A destination can be selected using one of three methods Selecting from ADDRESS BOOK using ADDRESS ENTRY or ADDRESS SE...

Page 195: ...to remove the checkmark To select multiple destinations repeat steps 1 Press the ADDRESS key and select Address Entry with the key and press the OK key 2 Enter the destination address 3 Press the OK key 1 Press the ADDRESS key and select Global Address Search with the key and press the OK key 2 Enter the search characters 3 Select the desired destination with the or key 4 Press the OK key ...

Page 196: ...LEX key and Select 2 Sided with the or key and press the OK key 3 Select Portrait Booklet Portrait tablet Landscape Booklet Landscape tablet with the or key and press the OK key 4 Press the OK key Booklets and tablets Two sided originals that are bound at the side are booklets and two sided originals that are bound at the top are tablets Duplex scanning is cancelled when the transmission is comple...

Page 197: ...t Original Size with the or key and then select the original size To select an inch size press the key The original scanning size can be set manually In the Inch original size selection screen select Size Input and press the OK key to display the screen below Select the width X or the length Y with or key and adjust in increments of 1 8 or 1 mm with or key Input range X 5 1 2 to 14 140 to 356 mm Y...

Page 198: ... the or key and then select the resolution 2 Press the OK key Resolution The default resolution setting is 200 dpi For typical text documents a resolution of 200 dpi or 300 dpi produces sufficiently legible image data A resolution of 200 dpi corresponds to the generally used Fine in fax mode For this reason the 600 dpi setting should only be used in cases where high clarity image reproduction is r...

Page 199: ...k and white as shades of gray grayscale 1 Select Format with the or key and select Color Grayscale or Mono2 and press the OK key 2 Select the file type with the or key and select the file creation method When Single is selected a one page file is created for the scanned image When Multi is selected all scanned images can be combined into a single file 3 Press the OK key When the file type is set t...

Page 200: ...s maximum scanning area Select scan mode place the original steps 1 to 3 on page 5 5 and then follow the procedure below The factory default setting for the void area is Off disabled If you need to change the void area setting follow these steps Void area 7 64 2 5 mm from the top and bottom edges 1 8 3 0 mm from the left and right edges 1 Press EXPOSURE key and select Text Txt Prt Photo or Photo f...

Page 201: ...cial Modes with the keys and press the OK key 2 Select Suppress BG with the keys and press the OK key 3 Select level adjustment with the keys and adjust with the keys To select change the level 3 levels are available with the keys and press the OK key Only light backgrounds are suppressed Light to dark backgrounds are suppressed To cancel the Background Adjustment setting Select Off with the keys ...

Page 202: ...rpness must be specified before scanning the original 1 Press the SPECIAL FUNCTION key select Special Modes with the keys and press the OK key 2 Select Sharpness with the keys and press the OK key 3 Select Off Soft or Sharp with the keys and press the OK key To cancel the sharpness setting Select Off with the keys and press the OK key Softer Sharper ...

Page 203: ...s the SPECIAL FUNCTION key and press the or key to select Bus Card Scan The original size is set to business card size custom 2 Press the OK key When business card scan mode is selected the original size cannot be changed When business card scan mode is selected duplex scanning cannot be used When using the automatic document feeder it may not be possible to feed or read the card correctly dependi...

Page 204: ...ginal should be placed face down in the far left corner of the glass with the top edge of the original at the left edge of the glass When using the document feeder the original should be placed face up in the middle of the document feeder tray with the top of the original to the left Document glass Document feeder Scanning result ...

Page 205: ...NCTION key and select Register Program with the or key and press the OK key The original size is set to business card size custom 2 Select Enter Change Delete and press the OK key Register program 1 Select No Store and press the OK key 2 Select the program you want to store with the or key and press the OK key Setting each screen will be displayed 3 Press the OK key to perform the required setting...

Page 206: ...riginal s that you wish to scan on the document glass document feeder Press the SPECIAL FUNCTION key select PC SCAN and press the OK key 2 After starting TWAIN compliant application click the File menu and select a menu to scan The method for accessing the menu to select the scanner depends upon the application For more information refer to the manual or the help file of your application 3 Select ...

Page 207: ...5 23 If you set multiple pages in the document feeder the machine previews only the top page of the originals and then sends it to the original exit area Return the previewed original to the document feeder before starting the scanning job 7 Specify the scanning area and set the scan preferences For information on specifying the scan area and setting the scan preferences see scanner driver Help Sc...

Page 208: ...mage type and resolution before scanning switch to the Custom Settings or Professional screen For details on the settings click the Help button in the preview screen to display Help 3 Image Area menu Set the scanning area To scan the original size detected by the machine select Auto The scanning area can also be specified as desired in the preview window 4 Zoom Preview checkbox When this is select...

Page 209: ...he image file is created in the orientation shown in the preview screen 3 Image Size button Click to open a dialog box that allows you to specify the scanning area by entering numbers Pixels mm or inches can be selected for the units of the numbers By initially specifying a scanning area numbers can be entered to change that area relative to the top left corner as a fixed origin 4 Auto Scan Area J...

Page 210: ...y If auditing mode has been enabled for the scan function in the system settings a message will appear prompting you to enter your account number when you switch to scan mode Enter your account number five digits with the numeric keys User Authentication page 7 12 2 Place the original s Place the original in the document feeder tray of the automatic document feeder AUTOMATIC DOCUMENT FEEDER page 1...

Page 211: ...pears briefly and then the display returns to the base screen 1 Make sure the machine is in scan mode When the SCAN indicator is lit the machine is in scan mode If the indicator is not lit press the SCAN key If auditing mode has been enabled for the scan function in the system settings a message will appear prompting you to enter your account number when you switch to scan mode Enter your account ...

Page 212: ...en and press the OK key to select the USB flash memory as the destination 6 Press the START key Scanning begins 7 If you have another page to scan change pages and then press START key Repeat this sequence until all pages have been scanned If no action is taken for one minute the START key is not pressed scanning automatically ends and transmission begins 8 When the final original page has been sc...

Page 213: ...6 FAX PROBLEMS 6 10 INDICATORS AND DISPLAY MESSAGES 6 12 IF YOUR E MAIL IS RETURNED 6 13 PAPER JAM MISFEED REMOVAL 6 14 MISFEED IN THE DOCUMENT FEEDER 6 14 MISFEED IN THE BYPASS TRAY 6 16 MISFEED IN THE MACHINE 6 17 MISFEED IN THE PAPER TRAY 1 6 21 MISFEED IN THE PAPER TRAY 2 Option 6 22 TROUBLESHOOTING ...

Page 214: ... to solve the problem using the troubleshooting guide turn off the power switch and unplug the machine and contact your SHARP Service Department represents a code consisting of numbers and letters When contacting your dealer inform your dealer of the code that is displayed Problem Cause and solution Page The machine does not connect to the network The LAN cable is disconnected Make sure that he LA...

Page 215: ...bled 1 12 Misfeed occurs To remove the misfeed see MISFEED REMOVAL 6 14 The tray is out of paper Load paper 1 17 The power is on but copying does not take place Press the COPY key to select copy mode 2 2 Copies are too dark or too light An appropriate exposure for the original has not been selected Select a suitable exposure mode with the EXPOSURE key and set an appropriate exposure level with the...

Page 216: ... prevent moisture absorption Paper is not loaded properly Make sure the paper is properly installed 1 17 Pieces of paper inside machine Remove all pieces of misfed paper 6 14 Several sheets of paper stick together Fan the paper well before loading it A paper misfeed has occurred in the tray Turn the paper over and or turn it around and reload 6 21 Too much paper is loaded in the tray If the stack ...

Page 217: ...e the output in the paper output tray to resume printing The tray is out of paper Load paper 1 17 The display turns off Any other indicators turned off If other indicators are lit the machine is in Preheat mode Press any key on the operation panel to resume normal operation 1 13 ENERGY SAVE indicator blinks The machine is in auto power shut off mode Press the ENERGY SAVE key to resume normal opera...

Page 218: ... Devices Printers and Scanner In Windows 7 click the Start button click Devices and Printers 2 If the SHARP MX XXXX printer driver icon is shown but you still cannot print the printer driver may not have been installed correctly In this case delete the software and then reinstall it The port setting is not correct Printing is not possible if the printer driver port setting is not correct Set the p...

Page 219: ...margins in the software application within the specified print quality area Black dots or smudges appear on the printed output Run fixing cleaning mode The letter V is printed on a sheet of paper and the fusing unit is cleaned 7 13 The printed image is skewed or it runs off the paper The paper loaded in the tray is not the same size as that specified in the printer driver Check if the Paper Size o...

Page 220: ...not placed face up in the document feeder or face down on the document glass Place the original face up in the document feeder or face down on the document glass 1 30 The original was not placed in the correct position Place the original correctly 1 30 Unable to scan the image Your application is not TWAIN compliant If your application is not TWAIN compliant scanning will not be possible Make sure...

Page 221: ...e number of pages scanned Ask your mail server administrator what the data limit is for one e mail transmission Transmission takes a long time When there is a large amount of image information the data file is also large and transmission takes a long time The START indicator is not lit in the USB Memory Scan mode The USB flash memory is not recognized or not inserted or any device other than USB f...

Page 222: ...ze detected correctly Check size of the original 1 30 The message Reading canceled Please retry sending operation appears If you attempt transmission while the message Warming up appears the transmission may not take place correctly Repeat the transmission The transmitted image prints out blank at the receiving side Was the original placed so that the correct side is scanned Make sure the original...

Page 223: ... received faxes will only be printed when an error occurs A received fax prints out blank Was the wrong side of the original scanned in the transmitting machine Check with the operator of the transmitting machine The received image is faint Is the original faint Ask the other party to re send the fax using a suitable exposure setting The received image is distorted Were line conditions poor due to...

Page 224: ...ist on the network or in the server If the error is not cleared after turning the power off and on turn off the power and contact your dealer CE 02 CE 04 The scanned image was not sent because a connection to the server could not be established Make sure that the SMTP server settings or Scan to FTP destination settings in the Web page are correct The procedure for configuring the SMTP server is ex...

Page 225: ... of destinations of a global address search has been exceeded Increase the number of search characters to narrow the range of the global address search 8 13 CE 14 Check if the USB flash memory is not set to write protect CE 15 Check that the USB flash memory has enough free space to accept the data size to be scanned CE 16 Check that the USB flash memory has no problem CE 17 Check that the file na...

Page 226: ...r when you remove a misfeed In this event be sure to remove all torn pieces of paper from the machine 1 Section A Remove the misfed original Remove the original from the document feeder Check sections A B and C in the left shows the illustration see the next page and remove the misfed original Push the release lever up and remove the misfed original from the document feeder tray Pull down the rele...

Page 227: ... to remove the original remove from part C Section C Remove the misfed original from the exit area 2 Press the OK key to make the misfeed location indicator stop blinking 3 Return the originals indicated by the number in the display to the document feeder tray and press the START key Copying will resume from the originals that still remained when the misfeed occurred ...

Page 228: ...de cover open close handle and gently open the side cover 4 Turn the paper feed knob and feed out the paper that is inside Misfeed in the paper feed area A page 6 18 5 Close the auxiliary tray and then the bypass tray grasp the side cover open close handle and gently open and close the side cover The message Clear paper path will be cleared and copying will be possible 1 2 ...

Page 229: ... paper remains in the bypass tray remove the paper MISFEED IN THE BYPASS TRAY page 6 16 2 Check the misfeed location Remove the misfed paper following the instructions for each location in the illustration below If paper is misfed here go to Misfeed in the transport area C page 6 20 If paper is misfed here go to Misfeed in the paper feed area A page 6 18 If the misfed paper is visible here go to M...

Page 230: ...t Do not touch the fusing unit when removing misfed paper Doing so may cause a burn or injury When removing misfed paper do not touch or damage the photoconductive drum and the transfer roller 2 Close the side cover The message Clear paper path will be cleared and copying will be possible When closing the side cover press on around the handle If the message does not clear check again to make sure ...

Page 231: ... so may cause a burn or injury When removing misfed paper do not touch or damage the photoconductive drum and the transfer roller Be careful about unfixed toner on the misfed paper not to soil your hands or clothes 3 If the misfed paper cannot be removed remove the paper by pulling it into the paper output area Be careful not to tear the misfed paper during removal 4 Lower the fusing unit pressure...

Page 232: ...r check again to make sure that no pieces of paper remain 1 Remove the misfed paper Be careful not to tear the misfed paper during removal 2 Return the duplex conveyor lever to its original position and close the side cover The message Clear paper path will be cleared and copying will be possible When closing the side cover press on around the handle If the paper was torn make sure that no torn pi...

Page 233: ...t the upper paper tray and remove the misfed paper Be careful not to tear the misfed paper during removal 3 Push the upper paper tray in completely Push the tray in completely 4 Grasp the side cover open close handle and gently open and close the side cover The message Clear paper path will be cleared and copying will be possible When closing the side cover press on the handle If the message does ...

Page 234: ...moval 3 Close the lower side cover The message Clear paper path will be cleared and copying will be possible 4 If the misfed paper is not seen in step 2 lift and pull out the lower paper tray and remove the misfed paper Be careful not to tear the misfed paper during removal 5 Close the lower paper tray Push the tray in completely If the message does not clear check again to make sure that no piece...

Page 235: ...ADMINISTRATOR PIN CODE 7 2 SYSTEM SETTINGS LIST USING THE SYSTEM SETTINGS SYSTEM SETTINGS Change Admin PIN 7 10 Initial Setting 7 10 Network 7 10 User Control 7 12 Device Control 7 13 Operation Setting 7 14 Energy Save 7 15 List Print 7 15 Auto Calibration 7 16 Security Settings 7 16 Copier 7 17 Printer 7 17 Fax 7 18 Scanner 7 23 SYSTEM SETTINGS ...

Page 236: ...naging printer page counts If Disable Print by Inv User is enabled in the system settings printing will be prohibited if an invalid account number is entered PROGRAMMING AN ADMINISTRATOR PIN CODE The administrator PIN code is a 5 digit number that must be entered in order to access the system settings The administrator administrator of the machine should change the default administrator PIN code t...

Page 237: ...rs for each digit that you enter The special modes screen will appear with Change Admin PIN selected 5 Press the OK key The administrator PIN code change screen appears 6 Enter the new 5 digit administrator PIN code with the numeric keys Any 5 digits can be used for the administrator PIN code 7 Press the OK key The previously programmed administrator PIN code is replaced by the new administrator P...

Page 238: ...ing 7 13 Blink Setting for Received Data 7 13 Operation Setting Auto Clear 7 14 Disable Display Timeout 7 14 Language Setting 7 14 Message Time 7 14 Key Touch Sound 7 14 Keys Touch Sound At Initial Point 7 14 Key Press Time 7 14 Disable Auto Key Repeat 7 14 Disable Paper Size Set 7 14 Energy Save Auto Power Shut Off 7 15 Auto Power Shut Off Timer 7 15 Preheat Mode 7 15 Enter Auto Power Shut Off af...

Page 239: ...ize Enter 7 20 Set Res Con 7 20 Send Mode 7 20 Quick On Line TX 7 20 Print Station In Rcvd Data 7 20 Address Review 7 20 Recall Setting Busy 7 20 Recall Set Err 7 20 Ring Timeout In Auto TX 7 20 Rcv Function Of Rings At RX 7 21 Of Rings Man RX 7 21 Tray Selection 7 21 Received Data Print Condition 7 21 Auto Rcv Reduce To Regular Size 7 21 Duplex Reception 7 21 FW RX Data 7 22 Received Data FW Stat...

Page 240: ...aylight Saving Time Copier ID Card Setting Card Shot Default Default Tray Set Default Exposure Sort Auto Select Limit Of Copies Printer Notice Page Scanner Disable USB Scan New Default Fax List Setting Print Selection Auto Listing Initial Setting Dial Mode Pause Time Own Passcode Set Set Volume TX RX End Sound End Sound Length Distinctive Ring Remote Reception Disable Fax Print Hold Sending Functi...

Page 241: ...ired settings IPv4 Settings IPv6 Settings Wireless Infrastructure Manual Input of SSID Wireless Access Point Setting of SSID Security Settings Device IP Address Settings Channel Settings Sending Output Settings Bandwidth Settings IP Addr Distribution Range User Control User Authentication User Registration Function Limit Setting Account Limit Setting User Count Display User Count Reset A Warning w...

Page 242: ...epeat Disable Paper Size Set Energy Save Auto Power Shut Off Auto Power Shut Off Timer Preheat Mode Enter Auto Power Shut Off after the Remote Job Toner Save Mode Copy Toner Save Mode Print List Print Fax Settings Inbound Routing User Usage List Activity Report Junk Fax List User Info Print Auto Calibration Security Settings IPsec Settings Initialize Private Data and Data in Machine Level 1 Level ...

Page 243: ...y 7 Press the OK key and follow the instructions in the setting screen Several settings will have checkboxes in front of them To enable a function make a checkmark appear press the OK key To disable the setting press the OK once again to remove the checkmark To configure a setting that has a checkbox go to step 8 8 To use another setting for the same mode select the desired setting with the or key...

Page 244: ...s setting to have the IP address obtained automatically using DHCP Dynamic Host Configuration Protocol When this setting is enabled it is not necessary to manually enter an IP address IPv4 Address Enter the IP address of the machine Subnetmask Entry the Subnetmask Default Gateway Enter the Default Gateway IPv6 Settings When using the machine on a TCP IP IPv6 network use this setting to configure t...

Page 245: ...f Encrypt Select the encryption method based on the Setting of Security Type setting none WEP AES TKIP AES Security Key Settings Set the security key used for wireless connection Device IP Address Settings Set the IP address of the access point Channel Settings Set the channel used for the access point Sending Output Settings Set the transmission output of the access point Bandwidth Settings Set t...

Page 246: ... for the same account as well as the page limits with the or key To change to a different account number press the or key User Count Reset This setting is used to reset the copy print and scan page counts of an individual account or all accounts to zero A Warning when Login Fails When this setting is enabled the machine will not allow operation for one minute if an incorrect account number is ente...

Page 247: ...that is not compatible with plain paper 1 and plain paper 2 you can set which paper type to use for printing Status Light Setting Set the operation of the data notification indicator on the machine Select from Pattern 1 Pattern 2 or Not Use For explanations of the patterns refer to Data notification indicator and error indicator page 1 10 Error Light Setting Set the operation of the error indicato...

Page 248: ...ting is Short Select the desired length with the or key To turn the key touch sound off select Off Keys Touch Sound At Initial Point This setting is used to select whether or not a beep will sound at preset base settings as you press a key to select a setting The factory default setting is no beep Key Press Time This setting is used to set the duration of time that a key must be pressed to take ef...

Page 249: ...g is 1 minute Enter Auto Power Shut Off after the Remote Job This function works in Auto Power Shut Off mode When the machine completes a print job received from the PC or outputs received fax data the machine immediately returns to the Auto Power Shut Off mode Toner Save Mode Copy Toner Save Mode Print You can reduce the amount of toner used for copying printing List Print This is used to print l...

Page 250: ...sec is used for transmission IKEv1 Settings Configure the IKEv1 settings Pre Shared Key Enter the Pre Shared Key to be used for IKEv1 SA Lifetime time Set the SA lifetime IKE Lifetime Set the IKE lifetime Initialize Private Data and Data in Machine The system set values can be restored to the factory default state after eliminating the data stored in the machine All information displayed in the fa...

Page 251: ... vary depending on the optional trays that have been installed The factory default setting is Tray 1 Default Exposure This setting is used to select the original type and exposure mode that is initially selected when the EXPOSURE key is pressed Three exposure modes are available Text Text Print Photo and Photo Depending on the settings set Auto or one of five levels for the exposure Select the ori...

Page 252: ...ecified time every day only once per day You can also enable both print methods The report is normally set to not print out To have the report automatically printed when the number of stored transactions the combined total of transmissions and receptions exceeds 50 select Auto Print Rept At Limit 50 To have the report printed at a specified time enable Print Time Set and enter the desired time The...

Page 253: ...our selection you can press the key to listen to the selected pattern End Sound Length This setting is used to select the length of the end sound in seconds Selections are 2 0 sec 2 5 sec 3 0 sec 3 5 sec and 4 0 sec 3 0 sec is normally selected Distinctive Ring If multiple telephone numbers have been assigned to your telephone line the number called can be identified by its ringing pattern By usin...

Page 254: ...printed inside the original image select In Data For more detailed information on the position of each setting see INCLUDING SENDER INFORMATION ON FAXES OWN NUMBER SENDING page 4 46 Address Review You can specify whether a screen appears for confirmation of the destination when sending a fax Recall Setting Busy This setting is used to set the number of recall attempts and the interval between reca...

Page 255: ...e without dividing it onto multiple sheets of paper If the same size of paper or larger paper is not loaded the fax will be received in memory and will not be printed until a suitable size of paper is loaded Auto Rcv Reduce To Regular Size When you receive a fax that includes the sender s name and number the received image is slightly larger than the standard size This setting lets you select whet...

Page 256: ...ll be allowed to poll your machine or only machines that have been programmed in your machine Normally this setting is enabled The setting is enabled and a checkmark appears in the checkbox If this procedure is performed when the setting is enabled the checkmark will be cleared and the setting disabled Polling Passcode Mode When Polling Security is enabled use this setting to program or delete the...

Page 257: ...omputer and scanning from the machine are disabled when a USB connection is used Default setting is No disabled New Default This is used to change the default settings for the original size resolution color mode and format For details see STORING SCANNING SETTINGS page 5 11 For details on each setting see the pages below Original Size Enter page 5 8 Resolution page 5 8 Color mode page 5 13 Format ...

Page 258: ...ITION SETTINGS 8 7 STORING DESTINATIONS 8 7 BASIC SETTINGS FOR NETWORK SCAN FOR THE ADMINISTRATOR 8 13 ABOUT THE WEB PAGES FOR THE ADMINISTRATOR 8 14 CONFIGURING SMTP DNS AND LDAP SERVER SETTINGS 8 15 PROTECTING INFORMATION PROGRAMMED IN THE WEB PAGE Passwords 8 16 ADMINISTRATOR SETTINGS 8 17 CONFIGURING A SETTING IN THE ADMINISTRATOR SETTINGS 8 17 ADMINISTRATOR SETTINGS 8 17 E MAIL STATUS AND E M...

Page 259: ...re these settings HOW TO ACCESS THE WEB PAGE Use the following procedure to access the Web pages WEB FUNCTIONS IN THE MACHINE 1 Open the Web browser on your computer Recommended Web browsers Internet Explorer 11 or later Windows Firefox Windows Safari Mac OS Chrome Windows Latest version or immediately previous major release 2 In the Address field of your Web browser enter the IP address that has ...

Page 260: ... and page counts Out of paper and other warnings appear in red Device Configuration Shows what options are installed Network Status Shows the network status Information on General and TCP IP is shown on the respective pages 3 List Print You can print out the various settings that you have selected 4 Condition Settings Configure basic printer settings and printer language settings CONFIGURING THE P...

Page 261: ...ttings This displays the page for configuring the printer condition settings 2 Default Settings PCL PS Select the type of condition settings that you wish to configure 3 Settings The factory default settings are displayed Change the settings as desired by selecting from drop down lists PRINTER CONDITION SETTINGS page 8 5 4 Submit Click to store the Web page settings in the machine When the printer...

Page 262: ...ect Portrait when the image is longer in the vertical direction or Landscape when the image is longer in the horizontal direction Default Paper Size Letter Invoice Executive A4 B5 A5 Set the default paper size used for printing Default Paper Type Plain 1 Plain 2 Letter head Pre printed Pre punched Recycled Color Set the type of paper used for printing Default Resolution 600dpi 600dpi High Quality ...

Page 263: ...ified from among the internal fonts The factory default setting is 0 Courier Line Feed Code CR CR LF LF FF FF CR CR LF LF LF FF FF CR CR LF CR LF FF CR FF CR CR LF LF CR LF FF CR FF This specifies the line break code by means of a combination of the CR return code LF line break code and FF page break code The factory default setting is printing based on the transmitted code The setting can be chan...

Page 264: ... Scan to E mail the SMTP server settings must first be established CONFIGURING SMTP DNS AND LDAP SERVER SETTINGS page 8 15 Item Description Name Required Enter the name of the destination up to 36 characters Initial Optional Enter initial text for the destination maximum of 10 characters When the destination list is displayed in the destination control screen the initial text is used to group the ...

Page 265: ...stinations Custom Index Names can be assigned to the custom indexes as desired page 8 3 allowing convenient grouping of destinations Drop down list Select a custom index for the destination to be stored User checkbox When this is selected the destination is stored in the user tab of the address book page 5 8 Hostname or IP Address Required Enter the IP address or host name of the FTP server maximu...

Page 266: ...0 characters When the destination list is displayed in the destination control screen the initial text is used to group the destinations Custom Index Names can be assigned to the custom indexes as desired page 8 3 allowing convenient grouping of destinations Drop down list Select a custom index for the destination to be stored User checkbox When this is selected the destination is stored in the us...

Page 267: ... this procedure as needed If the information entered here differs from the information entered on the host computer transmission reception will not be possible For the settings see the following table Scan to Desktop destination information If you entered a host name in Hostname or IP Address you will need to enter the DNS server settings CONFIGURING SMTP DNS AND LDAP SERVER SETTINGS page 8 15 Ite...

Page 268: ...oup the destinations Custom Index Names can be assigned to the custom indexes as desired page 8 3 allowing convenient grouping of destinations Drop down list Select a custom index for the destination to be stored User checkbox When this is selected the destination is stored in the user tab of the address book page 5 8 Address es Required Select the address of each destination from the E mail list ...

Page 269: ...s can be printed Destination List Shows the information programmed in e mail FTP desktop and group destinations Print group list Shows only the information programmed in group e mail destinations To print the individual list click Sending Address List Print at the bottom of the destinations list To print the group list click Print Group List at the bottom of the destinations list If you attempt to...

Page 270: ...inistrator 1 Click Network Scanning in the menu frame The Network Scanning setup page appears 2 Select the scanner mode In the Enable Scanner Delivery to field click the checkbox so that a checkmark appears in the checkbox 3 Select the method for assigning a file name to a scanned image Select the method for assigning a file name to a scanned image In File Naming click the items that you wish to u...

Page 271: ... like to establish and click the Submit button One password can be established for the administrator and one password can be established for users PROTECTING INFORMATION PROGRAMMED IN THE WEB PAGE Passwords page 8 16 3 Administrator Settings Setting changes can be prohibited and interface settings can be configured ADMINISTRATOR SETTINGS page 8 17 4 Status Message Configure parameters required for...

Page 272: ...stinations for Scan to Desktop LDAP server If mail addresses are managed on your network by an LDAP server the e mail addresses stored in the LDAP server can be used for Scan to E mail To allow the machine to use the e mail addresses in the LDAP server the LDAP server settings must be configured in the Web page 1 Click Quick Setup in the menu frame 2 Enter the required information in SMTP DNS and ...

Page 273: ...assword in Admin Password When establishing a password for the first time enter admin in Admin Password Be sure to enter admin in lower case passwords are case sensitive 3 Enter passwords in User Password and Admin Password A maximum of 255 characters and or numbers can be entered for each password passwords are case sensitive Be sure to enter the same password in Confirm Password as you did in Ne...

Page 274: ... 3 2 Click the desired setting and make a selection for the setting in the screen that appears See ADMINISTRATOR SETTINGS page 8 17 for descriptions of the settings 3 Click Submit to store the entered information Item Settings Description Prohibit Test Page Printing YES NO This setting is used to prohibit printing of a printer test page Disable Default Setting Changes YES NO This setting is used t...

Page 275: ...and the weight of Plain Paper 2 is 24 28 lb 90 105g m2 Item Settings Description I O Timeout 1 60 999 sec During reception of a print job if remaining data is not received after the time set here elapses the port connection is broken and the next print job is begun Emulation Switching Auto PostScript PCL Select the printer language When Auto is selected the language is automatically selected from ...

Page 276: ...included in status and alert e mail messages SMTP SETUP The Status and alert e mail functions use SMTP Simple Mail Transport Protocol to send e mail The following procedure is used to set up the e mail environment This must be done by the system administrator or other person familiar with the network 1 Click Information in the menu frame The Information Setup screen will appear 2 Enter the machine...

Page 277: ...on addresses and time schedule 3 Click Submit to store the entered information When the E mail Status settings are completed printer count information will be sent periodically by e mail to the specified e mail addresses If you quit the browser before clicking Submit the settings will be canceled To send printer information immediately to the specified e mail addresses click Send Now 1 Click Alert...

Page 278: ... are held by SHARP is not distributed Software Copyrights Copyright c 2000 Carnegie Mellon University All rights reserved Redistribution and use in source and binary forms with or without modification are permitted provided that the following conditions are met 1 Redistributions of source code must retain the above copyright notice this list of conditions and the following disclaimer 2 Redistribut...

Page 279: ...ademarks of the Massachusetts Institute of Technology MIT No commercial use of these trademarks may be made without prior written permission of MIT Commercial use means use of a name in a product or other for profit manner It does NOT prevent a commercial firm from referring to the MIT trademarks in order to convey information although in doing so recognition of their trademark status should be gi...

Page 280: ...tribution as the author of the parts of the library used This can be in the form of a textual message at program startup or in documentation online or textual provided with the package Redistribution and use in source and binary forms with or without modification are permitted provided that the following conditions are met 1 Redistributions of source code must retain the copyright notice this list...

Page 281: ...ing to freedom not price Our General Public Licenses are designed to make sure that you have the freedom to distribute copies of free software and charge for this service if you wish that you receive source code or can get it if you want it that you can change the software or use pieces of it in new free programs and that you know you can do these things To protect your rights we need to make rest...

Page 282: ...er of warranty keep intact all the notices that refer to this License and to the absence of any warranty and give any other recipients of the Program a copy of this License along with the Program You may charge a fee for the physical act of transferring a copy and you may at your option offer warranty protection in exchange for a fee 2 You may modify your copy or copies of the Program or any porti...

Page 283: ...of the work for making modifications to it For an executable work complete source code means all the source code for all modules it contains plus any associated interface definition files plus the scripts used to control compilation and installation of the executable However as a special exception the source code distributed need not include anything that is normally distributed in either source o...

Page 284: ...the rest of this License 8 If the distribution and or use of the Program is restricted in certain countries either by patents or by copyrighted interfaces the original copyright holder who places the Program under this License may add an explicit geographical distribution limitation excluding those countries so that distribution is permitted only in or among countries not thus excluded In such cas...

Page 285: ...inter to where the full notice is found one line to give the program s name and a brief idea of what it does Copyright C year name of author This program is free software you can redistribute it and or modify it under the terms of the GNU General Public License as published by the Free Software Foundation either version 2 of the License or at your option any later version This program is distribut...

Page 286: ...ublic Licenses are intended to guarantee your freedom to share and change free software to make sure the software is free for all its users This license the Lesser General Public License applies to some specially designated software packages typically libraries of the Free Software Foundation and other authors who decide to use it You can use it too but we suggest you first think carefully about w...

Page 287: ...ry the combination of the two is legally speaking a combined work a derivative of the original library The ordinary General Public License therefore permits such linking only if the entire combination fits its criteria of freedom The Lesser General Public License permits more lax criteria for linking other code with the library We call this license the Lesser General Public License because it does...

Page 288: ...For a library complete source code means all the source code for all modules it contains plus any associated interface definition files plus the scripts used to control compilation and installation of the library Activities other than copying distribution and modification are not covered by this License they are outside its scope The act of running a program using the Library is not restricted and...

Page 289: ... based on the Library with the Library or with a work based on the Library on a volume of a storage or distribution medium does not bring the other work under the scope of this License 3 You may opt to apply the terms of the ordinary GNU General Public License instead of this License to a given copy of the Library To do this you must alter all the notices that refer to this License so that they re...

Page 290: ...hat the Library is used in it and that the Library and its use are covered by this License You must supply a copy of this License If the work during execution displays copyright notices you must include the copyright notice for the Library among them as well as a reference directing the user to the copy of this License Also you must do one of these things a Accompany the work with the complete cor...

Page 291: ... automatically terminate your rights under this License However parties who have received copies or rights from you under this License will not have their licenses terminated so long as such parties remain in full compliance 9 You are not required to accept this License since you have not signed it However nothing else grants you permission to modify or distribute the Library or its derivative wor...

Page 292: ...n number If the Library specifies a version number of this License which applies to it and any later version you have the option of following the terms and conditions either of that version or of any later version published by the Free Software Foundation If the Library does not specify a license version number you may choose any version ever published by the Free Software Foundation 14 If you wis...

Page 293: ...ibrary is free software you can redistribute it and or modify it under the terms of the GNU Lesser General Public License as published by the Free Software Foundation either version 2 1 of the License or at your option any later version This library is distributed in the hope that it will be useful but WITHOUT ANY WARRANTY without even the implied warranty of MERCHANTABILITY or FITNESS FOR A PARTI...

Page 294: ...e freedoms that you received You must make sure that they too receive or can get the source code And you must show them these terms so they know their rights Developers that use the GNU GPL protect your rights with two steps 1 assert copyright on the software and 2 offer you this License giving you legal permission to copy distribute and or modify it For the developers and authors protection the G...

Page 295: ...1 Source Code The source code for a work means the preferred form of the work for making modifications to it Object code means any non source form of a work A Standard Interface means an interface that either is an official standard defined by a recognized standards body or in the case of interfaces specified for a particular programming language one that is widely used among developers working in...

Page 296: ...egal power to forbid circumvention of technological measures to the extent such circumvention is effected by exercising rights under this License with respect to the covered work and you disclaim any intention to limit operation or modification of the work as a means of enforcing against the work s users your or third parties legal rights to forbid circumvention of technological measures 4 Conveyi...

Page 297: ...y and only if you received the object code with such an offer in accord with subsection 6b d Convey the object code by offering access from a designated place gratis or for a charge and offer equivalent access to the Corresponding Source in the same way through the same place at no further charge You need not require recipients to copy the Corresponding Source along with the object code If the pla...

Page 298: ...ditional permissions apply only to part of the Program that part may be used separately under those permissions but the entire Program remains governed by this License without regard to the additional permissions When you convey a copy of a covered work you may at your option remove any additional permissions from that copy or from any part of it Additional permissions may be written to require th...

Page 299: ...ently reinstated you do not qualify to receive new licenses for the same material under section 10 9 Acceptance Not Required for Having Copies You are not required to accept this License in order to receive or run a copy of the Program Ancillary propagation of a covered work occurring solely as a consequence of using peer to peer transmission to receive a copy likewise does not require acceptance ...

Page 300: ...identifiable patents in that country that you have reason to believe are valid If pursuant to or in connection with a single transaction or arrangement you convey or propagate by procuring conveyance of a covered work and grant a patent license to some of the parties receiving the covered work authorizing them to use propagate modify or convey a specific copy of the covered work then the patent li...

Page 301: ...al or different permissions However no additional obligations are imposed on any author or copyright holder as a result of your choosing to follow a later version 15 Disclaimer of Warranty THERE IS NO WARRANTY FOR THE PROGRAM TO THE EXTENT PERMITTED BY APPLICABLE LAW EXCEPT WHEN OTHERWISE STATED IN WRITING THE COPYRIGHT HOLDERS AND OR OTHER PARTIES PROVIDE THE PROGRAM AS IS WITHOUT WARRANTY OF ANY...

Page 302: ... of the GNU General Public License along with this program If not see http www gnu org licenses Also add information on how to contact you by electronic and paper mail If the program does terminal interaction make it output a short notice like this when it starts in an interactive mode program Copyright C year name of author This program comes with ABSOLUTELY NO WARRANTY for details type show w Th...

Page 303: ...fic prior written permission of Sam Leffler and Silicon Graphics THE SOFTWARE IS PROVIDED AS IS AND WITHOUT WARRANTY OF ANY KIND EXPRESS IMPLIED OR OTHERWISE INCLUDING WITHOUT LIMITATION ANY WARRANTY OF MERCHANTABILITY OR FITNESS FOR A PARTICULAR PURPOSE IN NO EVENT SHALL SAM LEFFLER OR SILICON GRAPHICS BE LIABLE FOR ANY SPECIAL INCIDENTAL INDIRECT OR CONSEQUENTIAL DAMAGES OF ANY KIND OR ANY DAMAG...

Page 304: ... may terminate this License at any time by destroying the Software and related documentation and all copies thereof This License will terminate immediately without notice from SHARP and or SHARP s Licensors if you fail to comply with any provision of this License Upon termination you must destroy the Software and related documentation and all copies thereof 4 Export Law Assurances You agree and ce...

Page 305: ...OR WRITTEN INFORMATION OR ADVICE GIVEN BY SHARP OR A SHARP AUTHORIZED REPRESENTATIVE SHALL CREATE A WARRANTY OR IN ANY WAY INCREASE THE SCOPE OF THIS WARRANTY SHOULD THE SOFTWARE PROVE DEFECTIVE YOU AND NOT SHARP OR A SHARP AUTHORIZED REPRESENTATIVE ASSUME THE ENTIRE COST OF ALL NECESSARY SERVICING REPAIR OR CORRECTION SOME JURISDICTIONS DO NOT ALLOW THE EXCLUSION OF IMPLIED WARRANTIES SO THE ABOV...

Page 306: ...2018D US1 ...

Reviews: