


OPERATION GUIDE - INBOUND ROUTING SETTINGS
file:///G|/Documents/Products/MX2610_3110_3610N/Operation%20Manual/MX3610OP_0122A1/mx3610_ex_ope/contents/07-050a.htm[24/03/2011 3:04:26 PM]
MX-2610N / MX-3110N / MX-3610N
INBOUND ROUTING SETTINGS
SETTING MODE
The fax and Internet fax received data can be forwarded according to the stored forwarding
table.
When this function is enabled, you can also have the received Internet faxes forwarded to a
specified e-mail address without printing them.
Registration of Forward Table
You can store or edit the data forwarding table that has the received data forward settings.
Up to 50 data forwarding tables can be stored.
A single forwarding table can store up to 500 sets of sender number and source address
combinations.
Up to 1000 destinations can be stored in all data forwarding tables combined.
Up to 100 destinations of FTP/Desktop/Network Folder data can be stored.
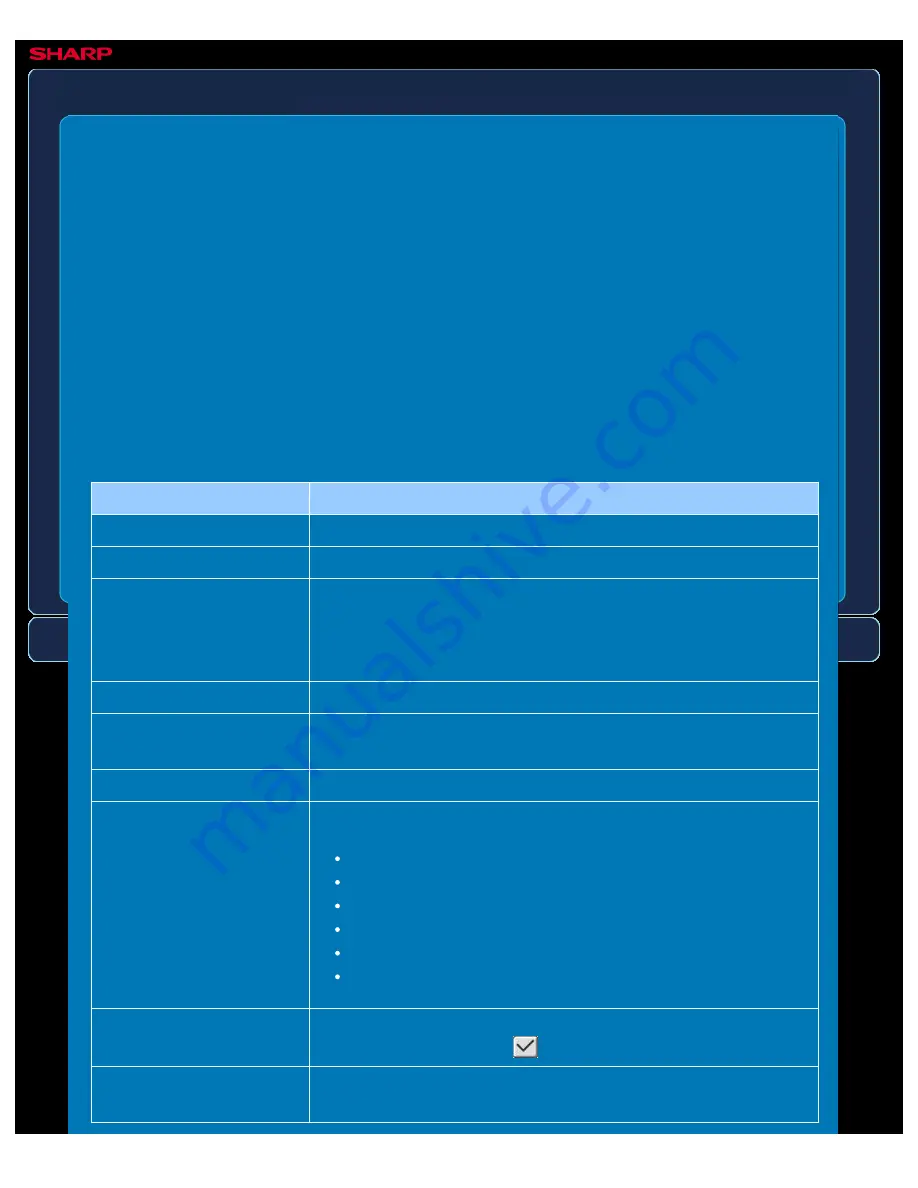
Item
Description
Forward Table Name
Enter a forward table name.
Receive Line Select
Selects a data receive line.
Sender Number/Address
Setting
Select the sender facsimile number or the Internet fax address.
Before you select a sender number or address, store the
destination number or address.
To forward all received data, select [Forward All Received Data].
Add
Enters your selection.
Sender Number/Address
used on Forward Table
Displays the address that has been selected by the [Add] key.
Delete
Deletes the selected address.
Destination 1/2/3
You can set the forwarding date and destination.
Forwarding conditions: Set the data forwarding conditions.
Day of week: Select a day of week to start data forwarding.
Forwarding time: Set a clock time to start data forwarding.
Start time: Set a time to start data forwarding.
End time: Set a time to end the data forwarding.
Format: Select a format of forwarding data.
Destination Settings
Lists the addresses that can be set as the destination. Select a
destination by setting it to
.
Destination Settings (Direct
Entry)
Enter the destination name directly. Tap the [Add to forwarding
destinations.] key to add the destination to the list.