


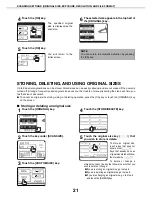


9
CONDITION SETTINGS SCREEN OF SCANNER MODE
The condition settings screen of scanner mode is displayed by pressing the [IMAGE SEND] key (refer to page 1-12
of "Operation manual (for general information and copier operation)") while the document filing mode, copy mode,
or job status screen appears in the touch panel
*1
. In the explanations that follow, it is assumed that the initial screen
that appears after pressing the [IMAGE SEND] key is the condition setting screen (shown below). If you have set the
display to show the address book screen (
following page
) when the [IMAGE SEND] key is pressed, touch the
[CONDITION SETTINGS] key in the address book to display the condition setting screen.
The key operator program "Default display settings" (refer to
page 54
) can be used to set the display to show either
the condition setting screen (shown below) or the Address book screen (
following page
) when the [IMAGE SEND]
key is pressed.
*1 Depending on the feature to be used, touch the [MODE SWITCH] key to select the E-MAIL/FTP mode or the
INTERNET-FAX mode.
Q
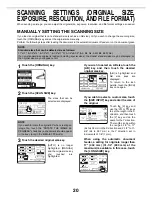
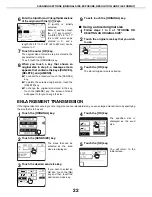
Condition settings screen
The display is initially set (factory setting) to show the following condition setting screen as the initial screen.
The illustration below shows the screen in the E-MAIL/FTP mode.
Message display
Messages appear here to indicate the current
status of the machine.
When the machine is ready to send, an icon
appears to the left.
[
] (Quick) key (
page 17
)
When you add a one-touch key or a group key, the
machine will automatically assign a shortened
number (in this manual, this key is called the Quick
key). Use this key for a three-digit shortened
number to simplify the transmission procedure.
[MODE SWITCH] key
Touch this key to switch between the E-MAIL/FTP
mode and the INTERNET-FAX mode. If the
machine is equipped with the facsimile feature, this
key can also be used for selecting the FAX mode.
[RESEND] key
Touch this key to send to the address to which
transmission was previously made. After an
address is specified, the [NEXT ADDRESS] button
is displayed here.
[ADDRESS BOOK] key (
page 14
)
This displays the Address Book screen (
next
page
). Touch this key when you wish to use a one-
touch key that has a destination (or group)
programmed in it.
[ADDRESS REVIEW] key (
page 18
)
When performing a broadcast transmission, touch
this key to check your selected destinations. Your
selected destinations will appear as a list, and the
list can be edited.
[SPECIAL MODES] key
Touch this key to set the special modes.
O
Erase (
page 25
)
O
Dual page scan (
page 26
)
O
Timer (
page 27
)
O
2 in 1 (
page 28
)
O
Card shot (
page 29
)
O
Job build (
page 31
)
O
Program (
page 32
)
NOTE
For information on the parts of the unit and the operation panel that are used for network scanning, refer to pages
1-9 to 1-12 of Operation manual (for general information and copier operation). For parts that are used for both
network scanning and printing, refer to chapter 4 of Operation manual (for printer).
ADDRESS BOOK
AUTO
READY TO SEND
.
ORIGINAL
300x300dpi
RESOLUTION
PDF MMR(G4)
FILE FORMAT
AUTO
E-MAIL/FTP
EXPOSURE
SPECIAL MODES
ADDRESS REVIEW
RESEND
FILE
ADDRESS ENTRY
MODE SWITCH
QUICK FILE
SEND SETTINGS