background image

16

BEFORE USING THE MACHINE

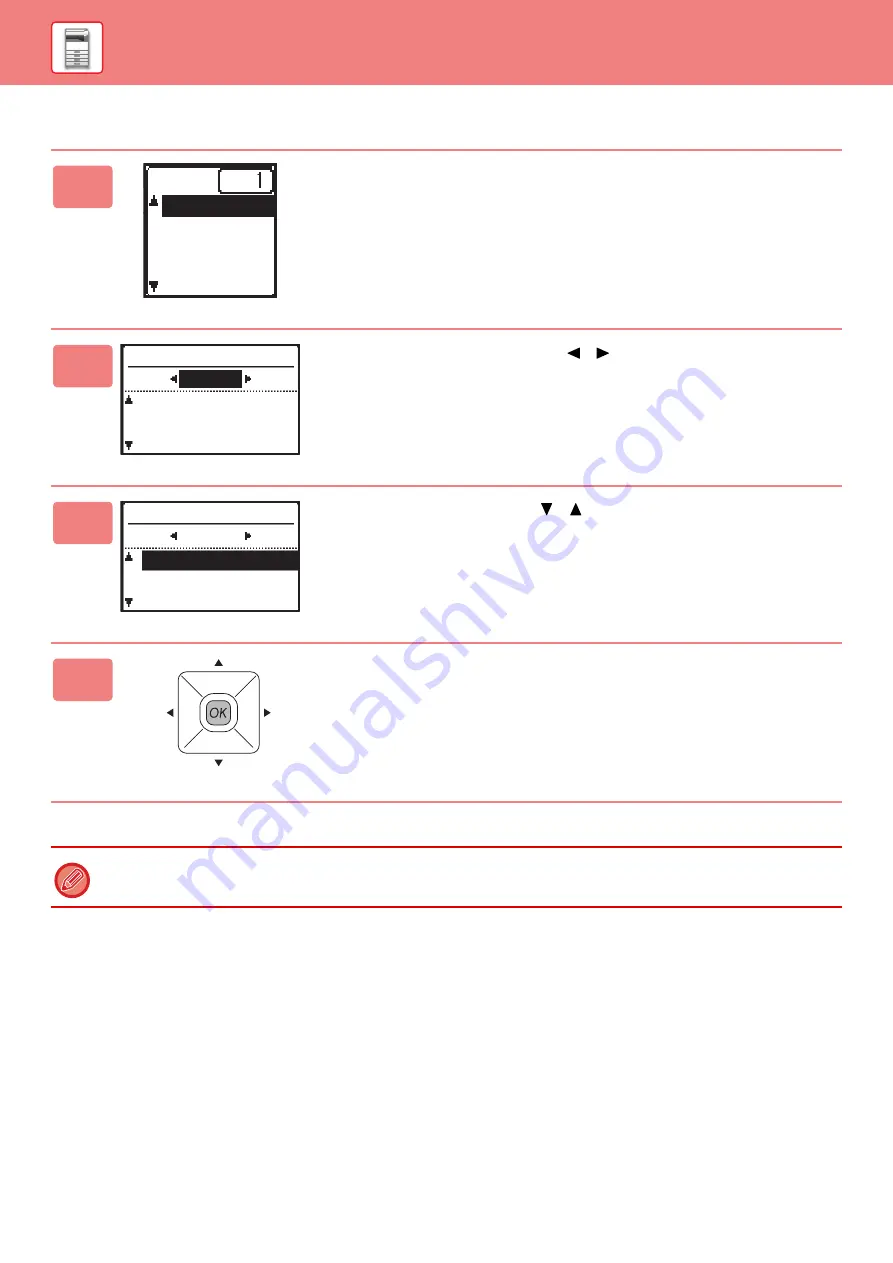
Specifying the size of the original (Document glass)

1

Select "Orig. Size" in the right menu of the base screen 
of copy mode and press the [OK] key.

2

Select Inch or AB with the [ ][ ] keys.

3

Select the size with the [ ][ ] keys.

4

Press the [OK] key.

Set the orientation of the image to ensure that the orientation of the placed original is correctly recognized.
For details, see the User's Manual.

Orig. Size

Paper
Output
Program

Orig. Size Enter

A4R

A4

B5

AB

Orig. Size Enter

AB

A4

A4R
B5

Summary of Contents for BP-20M22

Page 1: ...4 BP 20M24L BP 20M28 BP 20M31 BP 20M22 BP 21M22 BP 20M24 BP 20M24L BP 20M28 BP 20M31 MODEL BEFORE USING THE MACHINE Functions of the machine and procedures for placing originals and loading paper COPIER Using the copy function PRINTER Using the printer function SCANNER Using the scan function SYSTEM SETTINGS Configuring settings to make the machine easier to use ...

Page 2: ...ead this manual before using the machine For detailed operating procedures and troubleshooting information see the manuals in PDF format User s Manual Detailed explanations of the functions that can be used on the machine are provided in the User s Manual Download the User s Manual from the Web pages in the machine For the downloading procedure see DOWNLOADING THE OPERATION GUIDE page 5 ...

Page 3: ...achine User s Manual Web Page Settings This manual is intended to help you get started using the basic and convenient functions of the machine This manual provides answers to frequently asked questions regarding the operation of the machine in each mode Quick Start Manual Troubleshooting This manual explains how to register edit and delete the address book This guide explains how to install the so...

Page 4: ...ter that is connected to the same network as the machine and enter the IP address of the machine Recommended Web browsers Internet Explorer 11 or higher Windows Microsoft Edge Windows Firefox Windows Safari macOS Chrome Windows Latest version or immediately previous major release The Web page will appear The machine settings may require that user authentication is performed in order to open the We...

Page 5: ...ed manual can be downloaded from the machine s Web pages 1 Click Operation Manual Download in the menu of the Web page 2 Select the desired language Only the displayed languages are supported 3 Select the manual you want to download and click the Download button Logout 1 2 O 3 ...

Page 6: ...ING ORIGINALS 15 LOADING PAPER 17 TRAY SETTINGS 22 USER AUTHENTICATION MODE 23 MAKING COPIES 24 COPYING ON SPECIAL PAPER Bypass Copy 25 PRINTING IN A WINDOWS ENVIRONMENT 26 PRINTING IN A macOS ENVIRONMENT 28 DIRECTLY PRINTING A FILE IN USB MEMORY 30 ABOUT THE SCANNER FUNCTIONS 31 SCANNING AN ORIGINAL 32 SYSTEM SETTINGS 33 BEFORE USING THE MACHINE COPIER PRINTER SCANNER SYSTEM SETTINGS ...

Page 7: ...such as a USB memory device to the machine Supports USB 2 0 Hi Speed 4 Operation panel This panel hosts indicators and operation keys 5 Bypass tray Use this tray to feed paper manually When loading paper also open the extension tray 6 Handle Grasp it when moving the machine 7 Tray 1 Store paper in this tray 8 Tray 2 when a 500 sheet paper feed tray is installed 1 Store paper in this tray 9 Tray 3 ...

Page 8: ...etwork Use a shielded LAN cable 4 USB port B type The machine does not use this connector 5 Toner cartridge This cartridge contains toner When the toner in a cartridge runs out replace with new one 6 Side cover Open this cover to remove a paper misfeed 7 The main power switch Use this switch to turn on the power for the machine 8 Power cord 5 2 6 7 1 2 3 4 8 The fusing unit is hot Take care not to...

Page 9: ...original is scanned correctly Adjust the guides to the width of the original 4 Document feeder tray Place the original Place the original with the print side facing up 5 Original exit tray The original is discharged to this tray after scanning 6 Scanning area Originals placed in the automatic document feeder are scanned here 7 Document glass If you want to scan books or other thick originals that ...

Page 10: ...move the highlighting which indicates that an item is selected in the display 5 OK key Press to enter the selected setting 6 Numeric keys Enter characters numbers 7 C key Press to clear the set number of copies or stop a copy run 8 ENERGY SAVE key indicator Press to enter the energy save mode 9 PROGRAM 1 PROGRAM 2 key Press to use the scanner settings already stored 10 EXPOSURE key Use to select t...

Page 11: ...en print data is being received Lights steadily during printing 21 Data notification indicator The indicator lights solidly or blinks to indicate the status of a job 22 DUPLEX key Select the duplex copy scan mode 23 READ END key When copying in sort mode from the document glass press this key when you have finished scanning the original pages and are ready to start copying 24 Error indicator Light...

Page 12: ...elected exposure mode 5 Copy ratio display Displays the copy ratio for reduction or enlargement 6 Original size display When the original size is specified in Orig Size in the right menu and the document is loaded in the automatic document feeder this shows the specified size The following icons appear when the original is placed None Document Glass Automatic document feeder one sided scanning Aut...

Page 13: ... to save your settings Selecting an item with the arrow keys left right The left right arrow keys indicated in this manual by are used to set the exposure and numbers in setting screens Press the OK key to save your settings Use the BACK key to return to the previous setting screen Orig Size Paper Output Program 7 8 9 Wireless infrastructure mode Connecting Wireless infrastructure mode Not connect...

Page 14: ...ch to the position Restart the machine Turn the main power switch off and then on Turn off the main power switch and unplug the power cord if you suspect a machine failure if there is a bad thunderstorm nearby or when you are moving the machine Print and other functions cannot be used during a brief period of time after the power is turned on or after the machine is wakened from sleep mode This ti...

Page 15: ...nal has not been placed on the document glass USING THE DOCUMENT GLASS Take care that your fingers are not pinched when closing the automatic document feeder After placing the original be sure to close the automatic document feeder If left open parts outside of the original will be copied black causing excessive use of toner Adjust the original guides to the width of the originals Place the origin...

Page 16: ...mode and press the OK key 2 Select Inch or AB with the keys 3 Select the size with the keys 4 Press the OK key Set the orientation of the image to ensure that the orientation of the placed original is correctly recognized For details see the User s Manual Orig Size Paper Output Program Orig Size Enter A4R A4 B5 AB Orig Size Enter AB A4 A4R B5 ...

Page 17: ...ad and Pre Printed set the paper in the reverse orientation Place with the print side facing the direction indicated below LOAD PAPER INTO THE TRAY 1 1 2 3 4 5 Tray In normal status With letter head or pre printed paper set Trays 1 4 Facing up Facing down Bypass tray Facing down Facing up 1 Pull out the paper tray Gently pull the tray out until it stops Push the centre of the pressure plate down u...

Page 18: ...fore loading it If the paper is not fanned multiple sheets may feed at once and cause a misfeed After loading the paper close the guides to the paper width not to leave the gap from the guides A and B Do not load the paper as shown below The stack must not be higher than the indicator line Do not add paper 4 Gently push the paper tray into the machine Push the tray firmly all the way into the mach...

Page 19: ...per size 3 Insert the paper into the tray Load the paper with the print side facing up The stack must not be higher than the indicator line Maximum of 500 sheets If a paper misfeed occurs turn the paper over and or around and reload If the paper is curled fix the curl before loading the paper Adjust the divider plate so that there is no gap between the paper and divider plate Do not add paper Do n...

Page 20: ... Load the paper with the print side facing down Insert the paper along the bypass tray guides all the way into the bypass tray until it stops slowly Inserting the paper with excessive force may cause the leading edge to fold back Inserting the paper too loosely may cause skewed feeding or misfeeds The paper must not exceed the maximum number of sheets 4 Set the bypass tray guides correctly to the ...

Page 21: ...rectly fit the width of the paper If the bypass guides are set too wide the paper may skew or be creased How to close the bypass tray Remove any paper remaining in the bypass tray and press down the centre of the pressure plate until it locks After you have locked the pressure plate close the extension tray and then close the bypass tray When loading envelopes in the bypass tray set the paper type...

Page 22: ...during copying and printing Press the SPECIAL FUNCTION key and press the or key to select Paper Size Set Press the or key to select the paper tray for which the paper size is being changed Press the key and press the keys to select the paper size Press the OK key Changing the paper type of a tray To change the paper type setting for a tray follow the steps below Press the SPECIAL FUNCTION key sele...

Page 23: ...to asterisks If you enter an incorrect digit press C key and re enter the correct digit 2 When the copy job is finished press the LOGOUT key When a valid account number is entered the current count of the account will appear in the message display of the base screen After 6 seconds factory default setting the base screen appears In copy mode the number of sheets remaining until the limit is reache...

Page 24: ...the automatic document feeder or on the document glass If you placed the original on the document glass select Orig Size in the right menu Specifying the size of the original Document glass page 16 3 Press the ZOOM key Select the ratio with the keys 4 Press the OK key 5 Press the START key to start copying When making only one set of copies you do not need to specify the number of copies Copy Rati...

Page 25: ...ecting the settings from SPECIAL FUNCTION key see User s Manual 2 Select the Heavy Paper 1 Select the paper type with the keys When finished press the OK key 3 Select the A4 size Select the paper size with the keys When finished press the OK key 4 Press the START key to start copying When making only one set of copies you do not need to specify the number of copies Paper Type Set Set Completed Pla...

Page 26: ...MENT The following example explains how to print an A4 size document from WordPad which is a standard accessory program in Windows To install the printer driver and configure settings in a Windows environment see the Software Setup Guide For information on the available printer drivers and the requirements for their use see the User s Manual 1 Select Print from the File menu of WordPad 2 Select th...

Page 27: ...ck the Main tab 2 Select the original size To select settings on other tabs click the desired tab and then select the settings 3 Click the OK button Help can be displayed for a setting by clicking the setting and pressing the F1 key Click the Help button the Help window will open to let you view explanations of the settings on the tab 4 Click the Print button Printing begins Set the paper type of ...

Page 28: ...ure settings in a macOS environment see the Software Setup Guide On the PS3 expansion kit is required to use the machine as a printer in a macOS environment 1 Select Page Setup from the File menu 2 Select paper settings 1 Make sure that the correct printer is selected 2 Select the paper settings Set the paper size paper orientation and copy ratio 3 Click the OK button 3 Select Print from the File ...

Page 29: ...s 1 Select the envelope size from Paper Size 2 Select Paper Feed 3 Select Bypass Tray Envelope from the All Page From 4 Select print settings 1 Make sure that the correct printer is selected 2 Select items from the menu and configure the settings as needed 3 Click the Print button Set the paper type of the bypass tray to Envelope and load an envelope into the bypass tray Loading envelopes page 21 ...

Page 30: ...e to the machine 2 Select Print from the memory device with or key and select the file that you wish to print A name with to its left is the name of a folder in the USB memory To display the files and folders in a folder select the folder and press the OK key 3 Select Print with the or key and then press the OK key When forwarding of the selected file is completed printing starts Print settings ca...

Page 31: ...NCTIONS With this machine a document or photo can be scanned into an image file 1 Scanning from a TWAIN compliant application 2 Storing the scanned image to a USB flash memory 3 Sending the scanned data to FTP server 4 Sending the scanned data to a computer connected to the same network 5 Sending the scanned data by E mail SCANNER ...

Page 32: ...f you placed the original on the document glass select Orig Size in the right menu Specifying the size of the original Document glass page 16 3 Press the ADDRESS Key select Address Book with the key and press the OK key 4 Enter the desired address press the LOGOUT key and then press OK key 5 Press the START key Scanning begins If scanning is completed normally the following screen is appears brief...

Page 33: ...rocedure for opening the system settings screen and the items in the screen are explained below USING THE SYSTEM SETTINGS 1 Press the SPECIAL FUNCTION key and select System Settings with the or key and press the OK key 2 Enter the administrator PIN code with the numeric keys appears for each digit that you enter The mode selection screen appears 3 Select the desired mode with the or key and press ...

Page 34: ...e system settings press the CA key Menu Overview System Settings Configure the main settings for the machine such as date settings and paper tray settings You can configure the following settings Change Admin PIN Use this function to change administrator PIN code Initial Setting The default settings for operation of the machine can be configured Copier You can select copy settings Printer You can ...

Page 35: ...act your dealer or nearest SHARP Service Department Aside from instances provided for by law SHARP is not responsible for failures occurring during the use of the product or its options or failures due to incorrect operation of the product and its options or other failures or for any damage that occurs due to use of the product Warning Reproduction adaptation or translation of the contents of the ...

Page 36: ...2022A EX2 ...

Reviews: