


23
BEFORE USING THE MACHINE
2
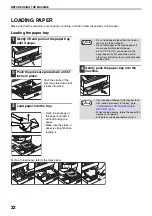
Loading the bypass tray
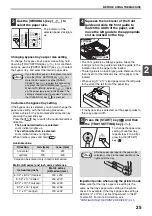
1
Unfold the bypass tray.
When feeding large
paper such as B4 and A3
(8-1/2" x 14" and
11" x 17"), pull out the
bypass tray extension.
2
Set the paper guides to the copy
paper width.
3
Insert the paper (print face down) all
the way into the bypass tray.
To prevent a misfeed,
verify once more that the
paper guides are
adjusted to the width of
the paper.
Important points when inserting paper in the bypass tray
• Up to 100 sheets of standard copy paper can be set in the bypass tray.
• Be sure to place A6, B6 or 5-1/2" x 8-1/2" size paper or envelopes horizontally as shown in the following diagram
(
).
• When loading envelopes, make sure that they are straight and flat and do not have loosely glued construction
flaps (not the closure flap).
• Special papers except SHARP recommended transparency film, labels, and envelopes must be fed one sheet at a
time through the bypass tray.
• When adding paper, first remove any paper remaining in the tray, combine it with the paper to be added and then
reload as a single stack. The paper to be added must be the same size and type as the paper already in the tray.
• Do not use paper that is smaller than the original. This may cause smudges or unclean images.
• Do not use paper that has already been printed on by a laser printer or plain paper fax machine. This may cause
smudges or unclean images.
• If you loaded paper in the bypass tray,
press the [PAPER SELECT] key (
) to
select the bypass tray. The bypass tray will
not be selected automatically.
• If you load thick paper in the bypass tray,
hold down the [TRAY SETTING] key
(
) for more than 5 seconds, use the
[PAPER SELECT] key (
) to select the
bypass tray, and press the [AUTO IMAGE]
key (
). When AUTO IMAGE
indicator (
) lights up, the paper type
is set to thick paper. The setting is cleared
when "Auto clear" works or the [CLEAR
ALL] key (
) is pressed.
Note
AUTO %
AUTO %
Available
Not
available
Summary of Contents for AR-5618
Page 2: ......
Page 108: ...OPERATION GUIDE AR5623D EX1 ...


