background image

7

ENGLISH

FRANÇAIS

ESPAÑOL

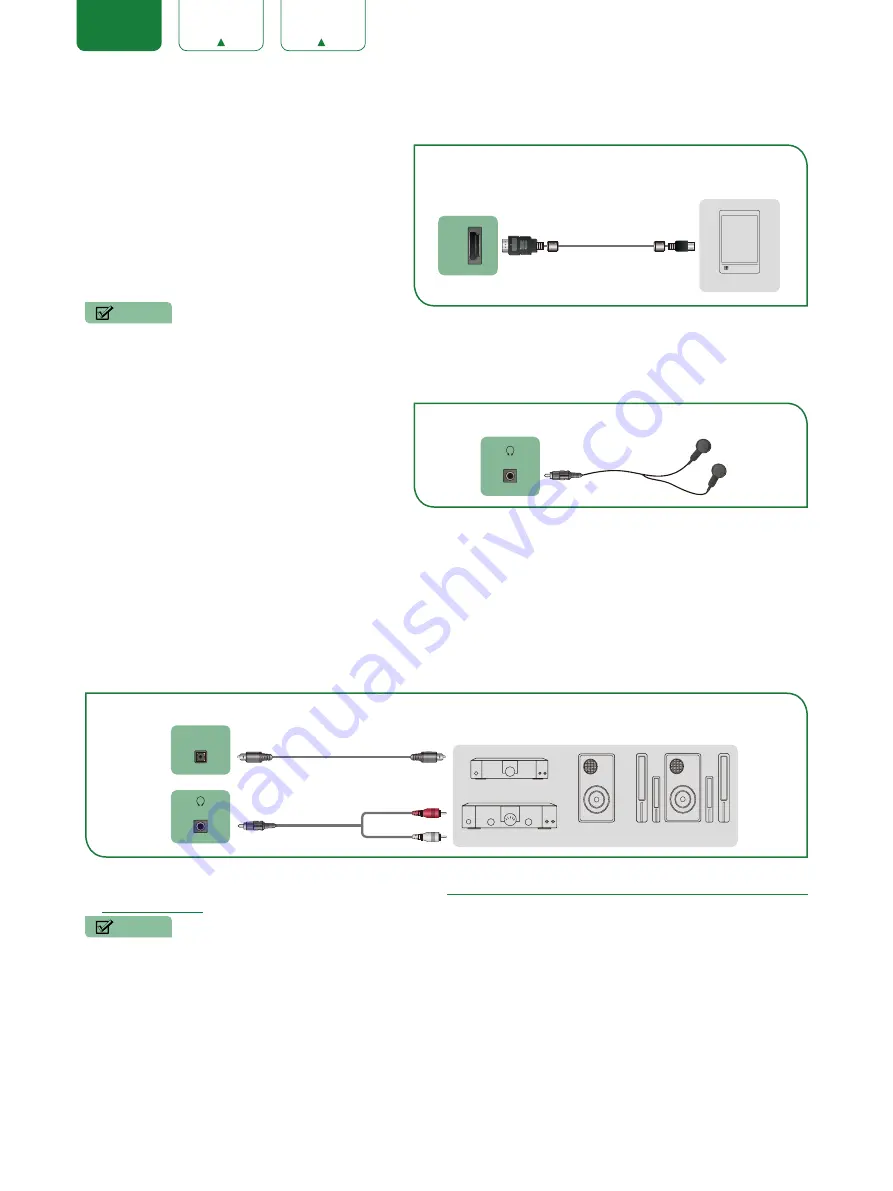
Connecting an MHL-Enabled device

You can connect an MHL-enabled device, such as 

a cell phone, and view the screen of your device on 

the TV.
1.  Connect one end of an HDMI-to-MHL cable (not 

provided) to the micro USB port on the device.

2.  Connect the other end of the cable to the 

HDMI / 

MHL

 port.

3.  Select the corresponding source from the TV. 

NOTES

•  This feature may be unavailable on some TV series.

•  We strongly recommend to use MHL Cable with 2 core as shown in the figure.

Connecting a headphone

You can connect headphone (not provided) to the 

AUDIO OUT

 port on your TV. While the headphone 

is connected, the sound from the built-in speakers 

will be disabled.

Connecting speakers or other audio receivers

To connect speakers or other audio receivers with an audio cable (not provided):
1.  Use an audio cable to connect the digital audio in port of the audio receiver device to the 

DIGITAL AUDIO OUT


port of the TV. Another option is to use an RCA Y-cable (1/8”-stereo mini to L/R phono) to connect an analog sound 

system to the 

AUDIO OUT

 port of the TV.

2.  Plug the connected devices into the main power socket before switching on the TV.

• 

TIP:

 If you prefer to use Audio Return Channel, then see 

Connecting a digital sound bar to use Audio Return Channel 

(ARC) on page 8

.

NOTES

•  When a digital audio system is connected to the 

DIGITAL AUDIO OUT 

port, decrease the TV and system volume. 

•  5.1 CH (channel) audio is available when the TV is connected to an external device that supports a 5.1 channel 

surround sound 

•  You can receive 5.1 channel audio in one of two ways. The first way is to connect the 

DIGITAL AUDIO OUT

 port 

from the device to the Amplifier. The second way is to connect the 

DIGITAL AUDIO OUT

 port on the back of the 

TV to the Optical port on the Amplifier.After you’ve completed one of the two methods then be sure to go into the 

Advanced Audio Settings

 of the TV and select RAW to receive the 5.1 channel audio. You will need to also go 

into the sound or audio settings of your device to ensure it is set to 5.1 Channel output. It may read ‘Bitstream’, ‘RAW’ 

or ‘Digital’.

HDM

I

MH

L

EXTERNAL

DEVICE

Cell Phone

TV PORT

HDMI-to-MHL Cable 


/

AUDIO OUT

TV PORT

EXTERNAL DEVICE

Headphone 

EXTERNAL DEVICES

Powerless 

Bass Speaker

Speaker

Digital Sound Bar

Audio Amplifier

DIGITAL

AUDIO OUT


/

AUDIO OUT

TV PORTS

Audio Cable 

White(L)

Red(R)

Audio Cable 

Summary of Contents for Aquos LC-65N9000U

Page 1: ...USER MANUAL Before using the TV please read this manual thoroughly and retain it for future reference ENGLISH FRANÇAIS ESPAÑOL ES G154912 ...

Page 2: ...USER MANUAL Before using the TV please read this manual thoroughly and retain it for future reference ENGLISH ...

Page 3: ...equests for permission to store reproduce transmit or distribute materials may be made in writing to the following address USA Hisense USA Corporation PO Box 3289 Suwanee GA 30024 CANADA Hisense Canada Co Ltd 405 Britannia Rd E Suite 11 Mississauga Ontario L4Z 3E6 MEXICO Hisense Mexico S de RL de CV Boulevard Miguel de Cervantes Saavedra No 301 Torre Norte Piso 2 Colonia Ampliación Granada C P 115...

Page 4: ...d or implied that the Application Service will be uninterrupted or error free including but not limited to vagaries of weather disruption of Service acts of God warranties of title local or regional limitations no infringement NOR IMPLIED WARRANTIES OF MERCHANTABILITY OR FITNESS FOR A PARTICULAR PURPOSE No advice or information given by the licensors or manufacturers providers affiliates or contra...

Page 5: ... audio receivers 7 Connecting a digital sound bar to use Audio Return Channel ARC 8 Connecting a USB device 8 Connecting Your TV to a Wireless or Wired Network 9 Connecting to a wireless network 9 Connecting to a wired Ethernet network 10 Using Your TV Remote Control 11 Buttons on your TV remote 11 Remote control range information 11 Begin using your remote 12 Completing the First Time Setup Menu ...

Page 6: ... Advanced TV Settings 24 Getting familiar with the Home screen 24 Inputs 24 Media 25 Apps 26 Using Anyview Cast to mirror content from your device to the TV screen 27 Software updates for your TV 28 Quick Problem Solving Tips 29 ...

Page 7: ...BLE port on the side of TV 3 Using your remote press the INPUT button and select TV as the input source Connecting a satellite receiver DVD player or other audio visual AV device with a composite video cable yellow red white To connect an AV device with a composite video cable not provided 1 Use the audio and video cables to connect the composite video audio ports of the external AV device to the ...

Page 8: ...he TV screen For example if you have an X box or Blu ray player that supports the 2 0 standard The two HDMI version 1 4 inputs are great for any of your external devices that support a standard full high definition resolution of 1080p Please refer to the User Manual that came with your device for step by step instructions To connect an AV device with an HDMI cable not provided 1 Use an HDMI cable ...

Page 9: ...the connected devices into the main power socket before switching on the TV TIP If you prefer to use Audio Return Channel then see Connecting a digital sound bar to use Audio Return Channel ARC on page 8 NOTES When a digital audio system is connected to the DIGITAL AUDIO OUT port decrease the TV and system volume 5 1 CH channel audio is available when the TV is connected to an external device that...

Page 10: ...C and select ARC First NOTES Only digital sound bars that require a wired connection are compatible with the TV If the device has an Input Selector feature then make sure to change it to TV Connecting a USB device You can connect the USB devices such as hard drives USB sticks and digital cameras for browsing photos listening music and watching recorded movies 1 Connect a USB device into the USB po...

Page 11: ...Configuration Protocol DHCP your TV can use a DHCP or static IP address to connect to the wireless network Select a channel for the wireless IP sharer that is not currently being used If the channel set for the wireless IP sharer is currently being used by another device nearby this will result in interference and communication failure If you apply a security system other than the systems listed b...

Page 12: ...supports Dynamic Host Configuration Protocol DHCP Modems and routers that support DHCP automatically provide the IP address subnet mask gateway and DNS so you don t have to enter them manually Most home networks are Dynamic Networks Some networks require a Static IP address If your network requires a Static IP address you must enter the IP address subnet mask gateway and DNS values manually on you...

Page 13: ...nels input numbers Media content control function buttons Dash button Select a digital sub channel D pad up down left right navigation buttons Volume up down Mute and restore sound Adjust Sleep timer setting The Gear button for the Quick setup menu Return to the previous place in the menu or app Live TV Infrared transmitter Change TV input source Channel up down Exit the application Turn Closed Ca...

Page 14: ...your new SHARP television please refer to the User s Manual supplied by your Cable or Satellite provider The Cable or Satellite providers User s Manuals should include instructions on how to program their remote to your television A list of SHARP codes for the most common Cable and Satellite providers are listed below Use the SHARP code that is associated with your Cable or Satellite provider if a...

Page 15: ...done then navigate to the Forward arrow and press OK Select Home which appears by default and then navigate to the Forward arrow to press OK NOTE Store Mode should only be selected by Retailers who plan to demonstrate the TV LANGUAGE AND LOCATION Language Country Time Zone United States Eastern English Language Terms Mode Network Input Done TERMS OF SERVICE Accept EULA Accept Terms of Accept all T...

Page 16: ...complete the first time setup menu in order to run a channel scan Press the OK button on your remote if you are fine with the selections that appear on the screen Otherwise navigate to the back arrow on the screen to change your selection NETWORK CONNECTION Select a Network Ethernet WiFi A2F4 05 A3F6 01 A6F5 19 A1F2 02 A2F4 03 A2F5 01 R22 Language Terms Mode Network Input Done LIVE TV INPUT SOURCE...

Page 17: ... connected to your TV To select the input source 1 Turn on your TV then press the INPUT button on the remote the list of Source appears 2 Press the buttons to select the input source 3 Press the OK button to confirm your selection Using the Live TV To view broadcast programs press the Live TV button on your remote Channel search guide When you select TV as input if no TV channels were saved before...

Page 18: ...ll see the channel list display on the right side of the screen Creating a Favorites List To quickly access your most watched channels you can create a Favorites List To create your Favorites List 1 Press the button on your remote 2 Press the button to display the Settings Menu 3 Select Channel Favorites List 4 Using the v v buttons of your remote select a channel and press OK button A heart shape...

Page 19: ...the button to access the Quick Settings Menu then press the button on the D pad to view the Settings Menu The Settings Menu consists of the following settings Picture Sound Channel Network System About TV In each menu you can Press the v v buttons to select an item Press the OK buttons to enter the submenu Press the buttons to adjust the value Press the BACK button to return to the previous menu P...

Page 20: ...ges to appear This is a money saving feature because it reduces power consumption Advanced Picture Settings Adjust advanced picture settings based on your viewing preference Display Adjust advanced picture settings in the component source Overscan Change the video size settings slightly crop the edges of the displayed image Tint Adjust the colors from a green to magenta tint to view the natural sk...

Page 21: ...suits the audio device type For example choose RAW which is uncompressed audio in RAW form if you have 5 1 Channel Surround Sound Speaker set up Choose PCM if you have an amplifier that does not support Dolby Digital technology Digital Audio Delay Adjust the digital audio output delay time to sync sound from an external speaker with the images on the TV TV Speaker ARC Select the TV speaker or an e...

Page 22: ...play in a 12 or 24 hour format Daylight Savings Select whether to apply Daylight Savings Time to the TV Date Time Set the Date and Time Power On Timer Enable the Power On Timer to Off Once or Daily Power Off Timer Enable the Power Off Timer to Off Once or Daily Sleep Timer Set the sleep timer to automatically turn the TV Off within a specified time Off 10 Minutes 20 Minutes 30 Minutes 40 Minutes 5...

Page 23: ...View a list of all CEC enabled devices NOTES HDMI cables must be used to connect HDMI CEC compatible devices to your TV The HDMI CEC feature of the connected device must be turned on If you connect an HDMI device that is not HDMI CEC compatible all the HDMI CEC Control features do not work Depending on the connected HDMI device the HDMI CEC Control feature may not work Advanced Settings Access the...

Page 24: ...nd programs during certain periods of time Channel Block Block programs by channels when you turn on the Parental Controls feature Program Block Block programs according to their TV or MPAA movie rating when you have turned on the Parental Controls feature and selected that rating to be blocked Input Block Block content from devices that are connected to certain TV ports Change PIN Change your PIN...

Page 25: ...tain little to no violence or sexual content 8ans General but inadvisable for young children could contain scenes disturbing to children under eight Recommended for viewing with parent 13ans Programming is appropriate for children 13 and older and may contain moderate violence language and some sexual situations 16ans Recommended for children 16 and older and may contain strong violence language a...

Page 26: ...on will display in the top right corner of the screen This location makes it very convenient for you to determine if you still have Internet connectivity as you use the TV If your TV is connected to the Internet then the weather current conditions will display in the top right conner of the screen In addition if you have connected a device such as a thumb drive to a USB port and your TV recognizes...

Page 27: ...um File Format Video avi MPEG2 Divx mkv Divx mpeg MPEG2 wmv Divx XviD Picture JPG Music mp3 Browsing Content To browse through content based on the type that you wish to access 1 Navigate to the appropriate menu tab on the left side of the screen and select Music Video Picture or All The library of items displays on the right side of the screen 2 Navigate to the right side of the screen and click ...

Page 28: ...s on your remote to select the app that you want to remove NOTE The app which has a icon at the upper right conner can be removed 3 Press the OK button on your remote A dialog message displays that asks if you re sure you want to remove the app 4 Click on OK A confirmation message displays and the icon is removed from the Apps list screen NOTE If an app is deleted the information related to that a...

Page 29: ...ur remote press the button then press the button to display the Settings Menu Go to Network Network Configuration and select Wireless 2 Press the button on your remote and select the Anyview Cast app 3 Turn on the wireless display function on your Android based device NOTE Some Android based devices may not support casting 4 Find your TV in the list of devices that displays and select it 5 Wait fo...

Page 30: ... is turned to On by factory default NOTE While your TV is on and checking for updates the program that you are watching will not be interrupted Disabling the Auto Firmware Upgrade feature If you do not want your TV to automatically check for updates and to receive notifications when they are available then 1 Using your remote press the button 2 Press the button to display the Settings Menu 3 Go to...

Page 31: ...plug it after 60 seconds Check that the Color is set to 50 or higher Try different TV channels The sound and or picture is distorted or appears wavy An electric appliance may be affecting the TV Turn off any appliances that are nearby and move it farther away from the TV Insert the power plug of the TV set into another power outlet The sound and picture is blurry or cuts out If using an external a...

Page 32: ...MANUAL DE USUARIO Lea cuidadosamente el manual y asegúrese de comprender completamente el contenido antes de operar este dispositivo por primera vez ESPAÑOL ...

Page 33: ...e Hisense Company Ltd Las solicitudes de autorización para almacenar copiar transmitir o distribuir materiales pueden ser realizados a una de las siguientes direcciones EE UU Hisense USA Corporation PO Box 3289 Suwanee GA 30024 CANADÁ Hisense Canada Co Ltd 405 Britannia Rd E Suite 11 Mississauga Ontario L4Z 3E6 MÉXICO Hisense Mexico S de RL de CV Boulevard Miguel de Cervantes Saavedra No 301 Torre...

Page 34: ...e que el Servicio de aplicación será ininterrumpido o no tendrá errores incluido pero no limitado a las inclemencias del clima suspensión del Servicio desastres naturales garantías de título limitaciones locales o regionales sin violaciones NI GARANTÍAS IMPLÍCITAS DE COMERCIABILIDAD O IDONEIDAD PARA UN PROPÓSITO EN PARTICULAR Ningún consejo o información proporcionados por los licenciantes o fabri...

Page 35: ...s receptores de audio 7 Conectando una barra de sonido digital para usar Canal de Retorno de Audio ARC 8 Conexión de un dispositivo USB 8 Conexión del TV a una red por cable o inalámbrica9 Conexión a una red inalámbrica 9 Conexión a una red por cable Ethernet 10 Uso del mando a distancia del TV 11 Botones del mando de su TV 11 Información de Rango del Control remoto 11 Empiece a usar su control re...

Page 36: ...el TV 24 Familiarizarse con la pantalla de Inicio 24 Entradas 24 Multimedia 25 Aplicaciones 26 Uso de Anyview Cast para reflejar el contenido de su dispositivo en la pantalla del TV 27 Actualización de software de su TV 28 Solución de problemas 29 ...

Page 37: ... su control remoto presione el botón INPUT y seleccione Televisor como fuente de entrada Conectando un receptor satelital un reproductor de DVD u otro dispositivo Audio Visual AV con un cable de video compuesto Amarillo Rojo Blanco Para conectar un dispositivo AV con un cable de video compuesto no proporcionado 1 Use los cables de audio y vídeo para conectar los puertos de vídeo audio del disposit...

Page 38: ...itir en la pantalla del TV Por ejemplo si cuenta con un X Box o reproductor Blu ray que sea compatible con el estándar 2 0 Las dos entradas HDMI versión 1 4 son grandiosas para cualquier dispositivo externo que sea compatible con la resolución de alta definición estándar de 1080p Por favor consulte el Manual de Usuario que viene con su dispositivo para obtener las instrucciones paso a paso Para co...

Page 39: ...tados al puerto de corriente principal antes de encender el Televisor CONSEJO Si prefiere usar el Canal de retorno de audio consulte Conectando una barra de sonido digital para usar Canal de Retorno de Audio ARC en la página 8 NOTAS Cuando se conecte un sistema de audio digital en el puerto DIGITAL AUDIO OUT disminuya el volumen tanto del TV como del sistema Está disponible el audio de 5 1 canales...

Page 40: ...dispositivos de sonido digital que requieren una conexión por cable son compatibles con el TV Si el dispositivo cuenta con la función selectora de Entrada y enseguida asegúrese de cambiarlo a TV Conexión de un dispositivo USB Puede conectar los dispositivos USB tales como discos duros memorias USB y cámaras digitales para explorar fotos escuchar música y ver vídeos grabados 1 Conecte un dispositiv...

Page 41: ...l protocolo de configuración de host dinámica DHCP el TV podrá usar una dirección con IP estático o DHCP para conectarse a redes inalámbricas Seleccione un canal para el dispositivo usado para compartir IP inalámbrico que no sea el que está en uso Si se establece el canal en uso por otro dispositivo cercano para el dispositivo usado para compartir IP inalámbrico se producirá interferencia y fallos...

Page 42: ...omática la dirección IP la máscara de subred la puerta de enlace y el DNS de tal modo que no tiene que introducirlos manualmente La mayoría de las redes son redes dinámicas Algunas redes requieren una dirección de IP estática Si su red requiere una dirección de IP estática debe introducir la dirección de IP la máscara de subred la puerta de enlace y los valores de DNS manualmente en la pantalla de...

Page 43: ... media Botón de guion Selección de un canal secundario digital Botones de navegación arriba abajo izquierda derecha del teclado Volumen subir bajar Silenciar y reactivar el sonido Ajustar el temporizador de apagado El botón de acceso directo para el menú de configuración rápida Regresar a la opción anterior en el menú o aplicación Live TV Transmisor infrarrojo Cambiar la fuente de entrada del TV C...

Page 44: ...por favor consulte el Manual de Usuario suministrado por su proveedor de Cable o Satélite El Manual del Usuario del proveedor de Cable o Satélite debería incluir instrucciones sobre cómo programar el control remoto a su televisor Una lista de códigos SHARP para los proveedores más comunes de Cable y Satélite se enumeran a continuación Use el código SHARP que está asociado con su proveedor de Cable...

Page 45: ... navegue con la flecha de Adelante y pulse OK Seleccione Modo doméstico opción predeterminada A continuación navegue con la flecha de Adelante y pulse OK NOTA Modo Tienda sólo debe ser seleccionado por distribuidores que planean demostrar el TV IDIOMA Y LOCALIZACIÓN Idioma País Zona horaria México Oriental Español Idioma Condiciones Moda Red Entrada Hecho TÉRMINOS DEL SERVICIO Acepte EULA Acepte l...

Page 46: ...el menú inicial para poder ejecutar la exploración de canales Pulse OK de su mando a distancia si está de acuerdo con lo que aparece en la pantalla De lo contrario navegue con la flecha de retroceso de la pantalla para cambiar su selección CONEXIÓN DE RED Seleccionar una Red Ethernet Wifi A2F4 05 A3F6 01 A6F5 19 A1F2 02 A2F4 03 A2F5 01 R22 Idioma Condiciones Moda Red Entrada Hecho FUENTE DE ENTRAD...

Page 47: ...sor Para seleccionar la fuente de entrada 1 Encienda el televisor y a continuación pulse el botón INPUT en el mando a distancia la lista de Fuentes aparece 2 Pulse los botones para seleccionar la fuente de entrada 3 Pulse el botón OK para confirmar su selección Uso de Live TV Para ver programas de emisoras pulse el botón Live TV en el mando a distancia Guía de búsqueda de canales Cuando seleccione...

Page 48: ...á la lista de canales en el lado derecho de la pantalla Creación de la lista de Favoritos Para acceder rápidamente a los canales más vistos puede crear la lista de Favoritos Para crear la lista de favoritos 1 Pulse el botón del mando a distancia 2 Pulse el botón para visualizar el menú Ajustes 3 Seleccione Canal Lista de favoritos 4 Con los botones v v del mando seleccione un canal y pulse el botó...

Page 49: ...e pulsar el botón para tener acceso al menú Ajustes rápidos enseguida pulse el botón en el teclado para ver el menú Ajustes El Menú Ajustes consiste de los siguientes ajustes Imagen Sonido Canal Red Sistema Acerca TV En cada menú usted puede Pulse los botones v v para seleccionar un elemento Pulse los botones OK para ingresar al submenú Pulse los botones para ajustar el valor Pulse el botón BACK p...

Page 50: ...orro económico porque reduce el consumo de energía Configuración avanzada de la imagen Ajustar la configuración avanzada de las imágenes basada en sus preferencias de visualización Visualización Realice la configuración avanzada de la imagen en la fuente de componente Sobreescaneo Cambie la configuración del tamaño de vídeo para recortar ligeramente los bordes de la imagen mostrada Tono Ajuste los...

Page 51: ... audio Por ejemplo seleccione RAW que es audio no comprimido en la forma de RAW si tiene un Sistema de altavoces con sonido envolvente 5 1 Seleccione PCM si tiene un amplificador que no es compatible con la tecnología Dolby Digital Retraso audio digital Ajustar el tiempo de retardo de salida de audio digital para sincronizar el sonido de un altavoz externo con las imágenes en el televisor Altavoz ...

Page 52: ... Horario de verano Seleccionar si desea aplicar el horario de verano al TV Fecha Hora Configurar Fecha y Hora Temporizador de encendido Activa el Temporizador de encendido y alterna entre Apagado Una vez o Diario Temporizador de apagado Activa el Temporizador de apagado y alterna entre Apagado Una vez o Diario Temporizador de reposo Ajuste el Temporizador de reposo para que se apague automáticamen...

Page 53: ...HDMI deben usarse para conectar dispositivos compatibles con CEC HDMI a su TV La función HDMI CEC del dispositivo conectado debe estar activada Si conecta un dispositivo HDMI que no es compatible con CEC HDMI no funcionarán todas las funciones de control HDMI CEC Dependiendo del dispositivo HDMI conectado la función de control HDMI CEC podría no estar disponible Configuración avanzada Acceso al me...

Page 54: ...al Bloquear los programas por canal cuando se enciende la función de control parental Bloqueo de programa Bloque programas en conformidad con su TV o clasificación MPAA vídeo cuando tenga activada la función Control parental y haya seleccionado la clasificación que será bloqueada Bloqueo de entrada Bloquear el contenido de los dispositivos que están conectados a ciertos puertos de televisión Cambi...

Page 55: ...des y debe contener muy poca o nada de violencia o contenido sexual 8ans General pero no aconsejable para niños podría contener escenas que afecten a niños menores a ocho años Recomendado para verlo con los padres 13ans Programación apropiada para niños de 13 años y mayores y puede contener violencia o lenguaje moderados y algunas situaciones sexuales 16ans Programación apropiada para niños de 16 ...

Page 56: ...e visualizará en la esquina superior derecha de la pantalla Esta ubicación es muy conveniente para que determine si todavía está conectado a Internet durante el uso de su TV Si su TV está conectado a Internet en la esquina superior derecha de la pantalla se visualizarán las condiciones actuales del clima Adicionalmente si tiene conectado un dispositivo como una memoria en un puerto USB y su TV lo ...

Page 57: ...x mkv Divx mpeg MPEG2 wmv Divx XviD Imagen JPG Música mp3 Exploración de contenido Para explorar a través del contenido basándose en el tipo que desea acceder 1 Navegue a la pestaña de menú apropiada en el lado izquierdo de la pantalla y seleccione Música Vídeo Imagen o Todo La biblioteca de elementos se muestra en el lado derecho de la pantalla 2 Navegue al lado derecho de la pantalla y haga clic...

Page 58: ...n del mando a distancia para seleccionar la aplicación que desea eliminar NOTA La aplicación que tiene el icono en la esquina superior derecha se puede eliminar 3 Pulse el botón OK del mando a distancia Aparece un mensaje de diálogo que le pregunta si está seguro de que desea eliminar la aplicación 4 Haga clic en OK Aparece un mensaje de confirmación y se elimina el icono de la pantalla de la list...

Page 59: ...botón enseguida pulse el botón para visualizar el menú Ajustes Vaya a Red Configuración de la red y seleccione Inalámbrica 2 Pulse el botón de su mando a distancia y seleccione la aplicación Anyview Cast 3 Encienda la función de visualización inalámbrica en su dispositivo basado en Android NOTA Algunos dispositivos Android podrían no ser compatibles 4 Ubique su TV en la lista de dispositivos que s...

Page 60: ...TV y se buscan actualizaciones el programa que se está visualizando no será interrumpido Desactivación de la función Actualización automática del Firmware Si no desea que su TV compruebe de forma automática actualizaciones y recibir notificaciones cuando están disponibles realice lo siguiente 1 En el mando a distancia pulse el botón 2 Pulse el botón para visualizar el menú Ajustes 3 Vaya a Acerca ...

Page 61: ...te CA y vuelva a conectar después de 60 segundos Verifique que el Color esté establecido en 50 o más Pruebe los diferentes canales del TV El sonido y la imagen están distorsionados o no son claros Un aparato eléctrico podría estar afectando al TV Apague los aparatos si aún existe interferencia aleje el aparato del TV Inserte la clavija del cable de alimentación del TV en otra toma de corriente El ...

Reviews: