17
Product Version 1.0 | Revision E | Released 2023-01-11
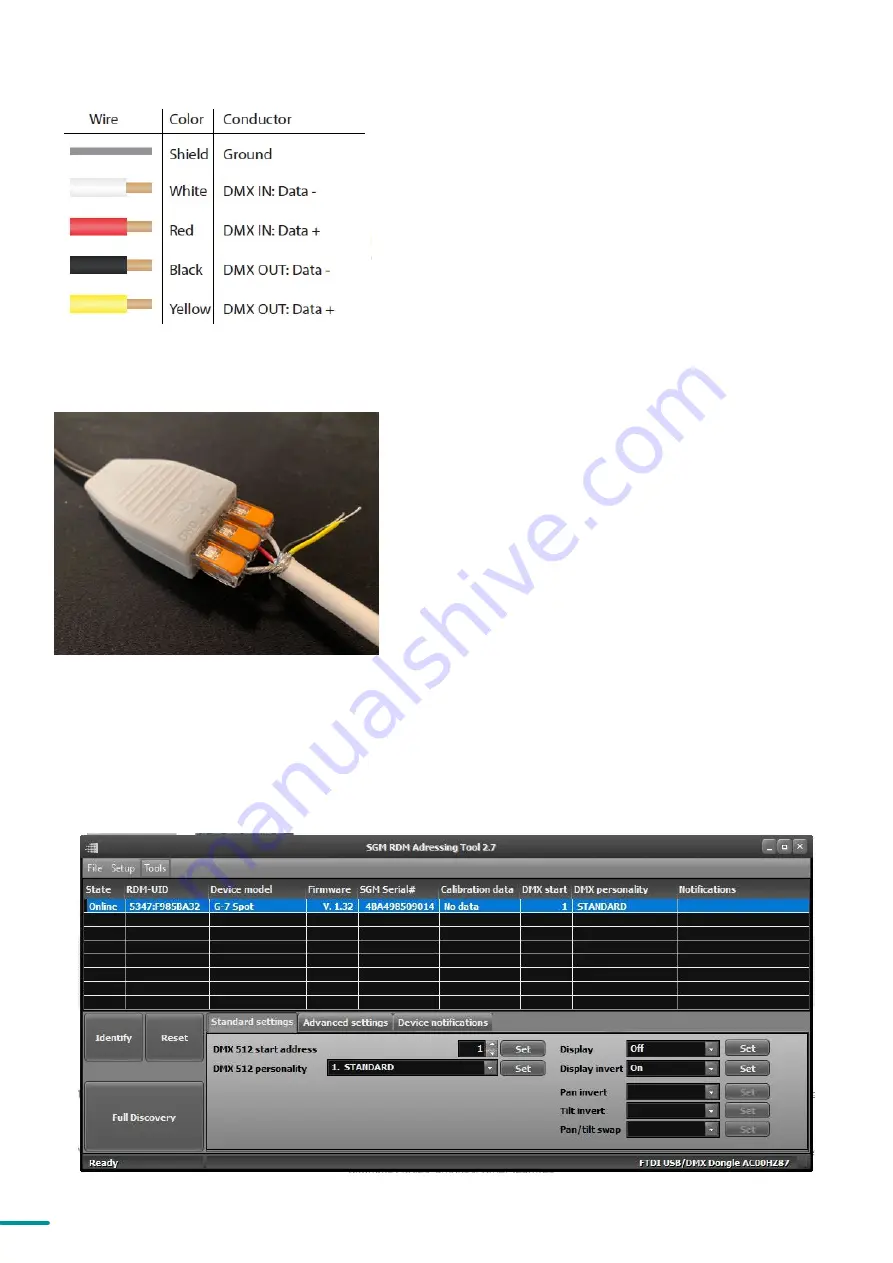
CONNECTING TEMPORARY SIGNAL
The fixture is compatible with DMX512 (ANSI E1.11 – 2008)
only. It can be connected using either the SGM POI
up-loader cable, or via the fixture’s built-in CRMX wireless
receiver system.
STEP 1: Download and install the SGM RDM Addressing
tool.
< https://sgmlight.com/products/rdm-addressing-tool >
STEP 2: Connect the bare end data cable to the POI
Up-loader cable for POI fixtures.
STEP 3: Connect the USB up-loader cable for POI fixtures
to a computer with a USB Type-A port.
STEP 4: Launch SGM RDM Addressing Tool. Click Full
Discovery and look for the green light to illuminate on the
fixture. Configure all settings as needed. See Settings and
Fixture Defaults for more configuration instructions.
Step 5 Disconnect up-loader cable from computer, then
disconnect up-loader cable from fixture.
Repeat Steps 2-5 for more fixtures. Multiple fixtures can be
addressed and configured. Contact your SGM representa-
tive for more information on multiple fixture addressing.
Please NOTE! At a minimum, all fixtures will need to be
given a DMX address and DMX personality in order to
patch and program on a controller. Refer to manuals for
more details.
Figure 10: Data wiring guide for setup
Figure 11: Connecting data to USB up-loader cable for
POI fixtures
SETTINGS AND FIXTURE DEFAULTS
All configuration of POI fixtures is done through the SGM Addressing Tool. The SGM Addressing Tool is a Windows®
based program designed to allow the user to configure the fixture through the RDM protocol. All settings on a
standard fixture are available on a POI fixture. But on POI, these settings are changed through the Addressing Tool.
Figure 12: SGM Addressing tool


