EN
Version 07/19
Ident. no. Y05-0614
INSTRUCTIONS FOR INSTALLATION AND USEEnglish
Sauna heater
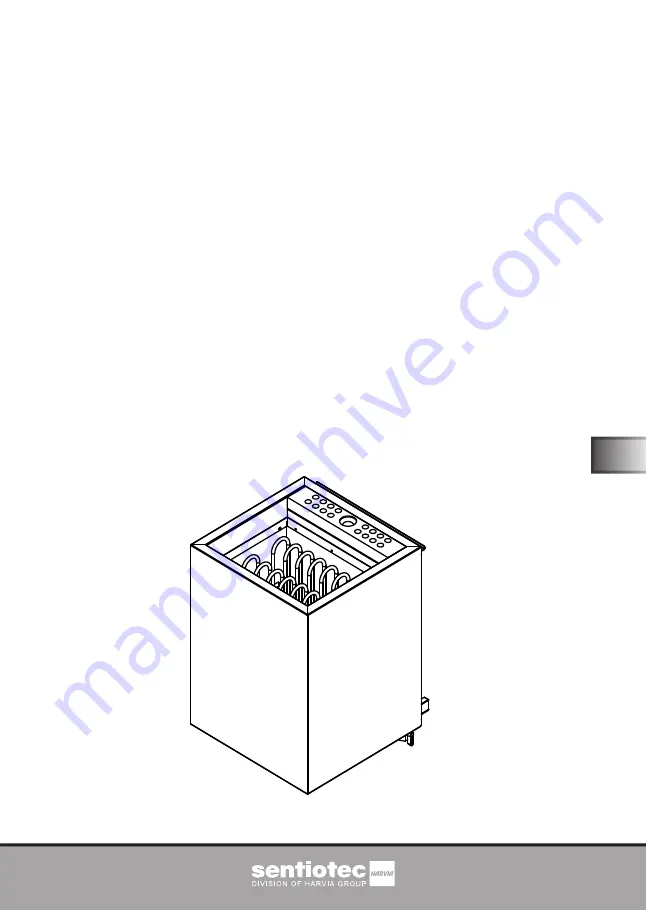
Home combi
HOME-C60 / 1-050-408: Home combi 6.0 kWHOME-C90 / 1-050-411: Home combi 9.0 kW
Page 1: ...EN Version 07 19 Ident no Y05 0614 INSTRUCTIONS FOR INSTALLATION AND USE English Sauna heater Home combi HOME C60 1 050 408 Home combi 6 0 kW HOME C90 1 050 411 Home combi 9 0 kW...
Page 2: ...roduct features 8 4 Installation and connection 8 4 1 Installation location and sensor position 9 4 2 Safety distances 9 4 3 Installation on the cabin wall 10 4 4 Connection diagram for 400 V 3 N 12 4...
Page 3: ...f non use 21 7 2 Cleaning the sauna heater 21 7 3 Changing the sauna stones 22 7 4 Cleaning the evaporator tank 22 7 5 Descaling the evaporator tank 23 8 Disposal 23 9 Problem solving by the installer...
Page 4: ...o property and injuries which in the worst case may be fatal The warning notices contain keywords which have the following meanings DANGER Serious or fatal injury will occur if this warning notice is...
Page 5: ...combi may only be used for heating sauna cabins and for increasing the humidity inside the sauna cabin The Home combi may only be used in conjunction with a sauna control unit without a remote start...
Page 6: ...thermally treated wood e g Nordic spruce KHPORFN SLQH RU U RU IURP ODPLQDWHG ZRRGHQ PDWHULDOV I ODPL nated wooden materials are used make sure that the adhesive used in them does not give off formald...
Page 7: ...are supervised RU KHDOWK UHDVRQV GR QRW XVH WKH VDXQD ZKHQ XQGHU WKH LQ X ence of alcohol medication or drugs Never operate the sauna heater without sauna stones as this FDQ FDXVH UHV 0DNH VXUH WKDW...
Page 8: ...idity decreases with increasing temperature 4 Installation and connection Take the following points into account when positioning and connecting the sauna heater 7KH HOHFWULFDO FRQQHFWLRQ PD RQO EH SH...
Page 9: ...WKH FDELQ ZDOO VSHFL HG LQ Fig 1 Install the temperature sensor with excess temperature cut out to the cabin wall above the centre of the sauna heater Maintain a distance of 15 cm to the sauna cabin...
Page 10: ...mum distances for the heater shown in Fig 1 2 Suspend the heater 3 from the mounting rail from above moving it down ZDUGV 0DNH VXUH WKDW WKH KHDWHU LV XVK ZLWK WKH ZDOO 3 Secure the heater 3 using the...
Page 11: ...Installation instructions only for experts p 11 26 POSITIONOFTHEMOUNTINGRAIL 27 5 15 15 Fig 3 Position of mounting rail for Home combi Dimensions in mm Fig 4 Securing the Home combi mounting rail 1 3...
Page 12: ...ns only for experts p 12 26 4 4 Connection diagram for 400 V 3 N Fig 5 2 4 5 1 Connection diagram for 400 V 3 N Home combi 6 0 kW and 9 0 kW HOME C60 HOME C90 1 Sauna control unit 2 Temperature sensor...
Page 13: ...ram for 230 V 1 N Home combi 6 0 kW and 9 0 kW HOME C60 HOME C90 L1L2 N L3 U V N W r r w w U V NW W 230V 1N NV NU L PE N N V1Wm N U1WM 2 4 5 1 1 Sauna control unit 2 Temperature sensor with excess tem...
Page 14: ...E C60 6 0 kW U V W NW 2 0kW 2 0kW 2 0kW NV NU to the control unit U V W NW 3 0kW 3 0kW 3 0kW NV NU to the control unit 4 7 Electrical connection 1 Unscrew the screws 2 with a screwdriver 2 Remove the...
Page 15: ...control and the connection diagrams on page 12 and 13 1 Guide the connection cable for the evaporator through the feed through 7 2 Connect the connectors of the evaporator cable to the PE N U1 Wm term...
Page 16: ...6WDFN WKH VDXQD VWRQHV ORRVHO VR WKDW DLU FDQ RZ WKURXJK WKH JDSV 4 Do NOT allow the heating rods to make contact with one another 5 Make sure that the sauna stones do not protrude beyond the edge of...
Page 17: ...highest possible temperature on the sauna control unit b Heat up the sauna heater for half an hour Do NOT remain in the sauna cabin during this period 2 HDWLQJ WKH HYDSRUDWRU IRU WKH UVW WLPH a Select...
Page 18: ...ish sauna mode only the heating system operates Dry heat is produced The temperature in the cabin is high 80 to 100 C The maximum humidity level of 10 is low The temperature in the sauna cabin is regu...
Page 19: ...DWHU Do not put herbs essences or fragrances directly into the evaporator tank and only into the ceramic bowl over the evaporator Descale the evaporator regularly see 7 5 on page 23 on page 0 10 20 30...
Page 20: ...ack of water allow the evapora tor to cool down BEFORE you pour water into the evaporator tank Filling the evaporator CAUTION Risk of scalding If the evaporator tank is too full boiling water will spr...
Page 21: ...accumulate in the heating rods in humid ambient conditions or during long periods of non use This is a physical process and not a manufacturing fault Accumulation of moisture in the heating rods can l...
Page 22: ...not use any cleaning additives 4 HIRUH OOLQJ WKH KHDWHU ZLWK WKH VDXQD VWRQHV FKHFN WKHP IRU IRUHLJQ REMHFWV and remove any remaining packaging 5 Place the stones in the stone container Stack the sau...
Page 23: ...ouse KROG DSSOLDQFHV 2EVHUYH WKH VSHFL FDWLRQV and safety information provided by the man ufacturer 1 Remove the soapstone 2 Empty the evaporator tank 3 Prepare the descaling solution according to the...
Page 24: ...eaker must be switched off The baking out procedure takes approximately 10 minutes The safety function of the FI circuit breaker must subsequently be reactivated If the problem persists consult your s...
Page 25: ...ng kW Power rating of the evap orator kW Cabin volume m3 Amount of stones kg Weight without stones kg HOME C60 6 0 2 0 5 9 approx 20 30 17 HOME C90 9 0 2 0 8 14 approx 20 30 17 Item number Minimum siz...
Page 26: ...ating elements 2000 W HP HOME 200 1 043 618 3 1 Heating elements 3000 W HP HOME 300 1 043 620 3 2 Heating element for evaporator 2000 W VZH 104 1 047 023 1 3 Complete evaporator unit WX671 1 051 000 1...