UltraWave Product Guide
Page 17
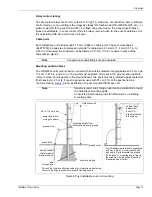
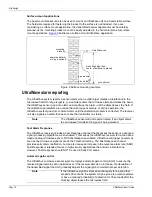
Mounting the UltraWave units
Mount the transmitter and receiver units on their respective posts, using the hardware provided in
the post-mounting kit (p/n E4KT0300, see
). The mounting height of the transmitter and
receiver units is measured from the center of the antenna to the ground’s surface. As an alignment
aid, the cover over the antenna includes an embossed X-pattern, that indicates the center of the
antenna (see
).The UltraWave units can also be mounted on a wall or other flat stable
surface (see
). Both the transmitter and receiver units must be mounted at the same
height above ground. After mounting, the two units must be aligned to point directly at each other.
For microwave pairs that are separated by 50 m (164 ft.) or less, each UltraWave unit should be
mounted with a 5º pitch (toward the ground). The 5º pitch combines the reflected signal and the
direct signal to create the strongest received signal possible for short range applications (see
). The mounting bracket and the post collar each include a central
alignment hole, that when lined up, create a precise 5º angle. The calibration testing will determine
if the mounting angle is correct for your installation.
Note
Senstar recommends hiring a local fencing contractor to install
the UltraWave mounting posts.
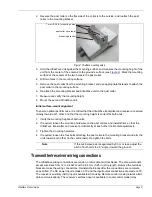
Figure 12 Post mounting/surface mounting setup
mounting
post collar
The mounting kit comes with the post collar attached to the mounting bracket with finger tight hardware.
To use the mounting bracket for a surface mount application, reverse the post collar so the flat side of the
collar will be against the mounting surface.
reversed post collar for
surface mount application
bracket
for surface mounting
for post mounting

