MX-7000 Installation and operation manual
P a g e
| 35
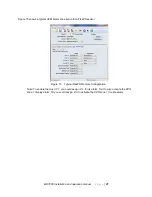
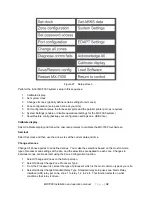
5. From the relay drive type list, select:
•
relay off:
the MX-7000 will not activate the standard relay in response to alarm conditions
•
alarm only:
the MX-7000 will activate the standard relay in response to a sensor intrusion
alarm condition
•
alarm and tamper:
the MX-7000 will activate the standard relay in response to sensor alarm
intrusion and tamper alarm conditions.
6. Select Globally Change Self Test. Self test enable or disable dictates to the MX whether it can
perform a self test on the zone. This typically matches whether the zone is of a testable type.
From the Change Self Test screen select yes or no for self test enabled.
7. Select Globally Change Zone Audio. Audio enable or disable dictates to the MX whether it can
activate audio output of a zone, this typically matches whether the zone has audio available.
From the Change Zone Audio screen select yes or no for Audio enabled.
8. Select Globally Change EDAPT Counts. EDAPT capable and enabled processors will use an
EDAPT count setting not the processor DIP switch setting for event count.
From the Change EDAPT Counts set the event count.
9. Select Globally Set Separate Tampers. EDAPT configured Rev D FPS processor main boards
(and newer) can be set for combined or separate zone tamper alarm reporting. Previous revs
provide only combined tampers.
From the Set Separate Tampers screen select yes or no for separate tampers.
10. Select Globally Set Access Timeout. Accessed zones will re-secure after this time period.
On the Set Access Timeout screen, enter the period of time in hours, minutes, seconds, 00:00:00
for disable access timeout.
Zone configuration
Select Zone configuration to setup and configure the individual zones at your site. Each zone will be
configured identically as setup in Change All Zones.
1. Enter the total number of zones at the site (1 to 60). The total number of zones need only be
entered once.
2. Select the MX Display Zone number.
3. If the type of processor is different from the one in the Change All Zones step, change the type of
processor used for this zone. You may need to set the loop number to access different processor
(XPO) types. To access Silver types, set the loop to 4 which signifies the USB interface.
4. Identify the mx loop (line module) on which the transponder is connected, 1 to 3. For Silver
processors, use loop 4 which signifies the USB interface.
5. I
dentify the transponder’s address (1 to 10 for copper loop, 1 to 30 for fiber loop and Silver loop).
6. Identify the transponder zone 1 or 2. For Silver devices FlexZone-4 and Senstar LM100 zones 1,
2, 3. or 4 and for UltraWave only zone 1.
7. If required, change the Standard Relay configuration for this zone.
8. If required, change the Audio enable setting for this zone. Silver Network devices do not have
audio monitoring capability.
9. If required, change the Self-test enable setting for this zone.
10. If required, change the Access timeout setting for this zone.
11. If this zone will use zone associations, specify the period of time within which an alarm must
occur on an associated zone to cause the MX-7000 to declare a high priority alarm. For zone
associations, an alarm on a primary zone followed by an alarm on an associated zone within the
time period results in a high priority alarm for both zones.
Then specify one to three associated zones.

