


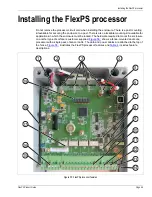


Installing the sensor cable
Page 40
FlexPS Product Guide
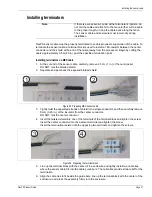
Installation instructions
1.
Place the male cap stay wire over the open end of the lead-in cable on the male connector.
Put the cap in place on the connector during installation.
2.
Wrap a gear clamp (customer supplied) around the fixed post on the opening side of the fence
on which the gate disconnect will be mounted.
3.
Before tightening the clamp, position the L-bracket against the post under the clamp.
4.
Tighten the clamp until the assembly is firmly attached to the post.
5.
Dress the lead-in cables to the splice kits with cable ties.
6.
Follow the directions for a standard splice.
7.
Attach the rubber cover over the disconnect assembly.
Installing Armour-FLEX sensor cable
•
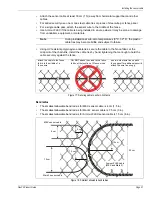
Handle Armour-FLEX cable carefully to prevent twisting, bending, kinking, jerking, or
stretching the cable. Take extra care when deploying Armour-FLEX around curves and
corners. Mishandling the cable can damage the jacket, and adversely affect the sensor cable.
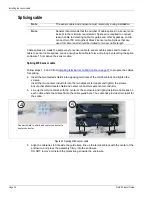
Figure 40: Gate disconnect assembly
Note
When caps are not in use, they fit into one another for
protection and storage. Cap the connectors when the gate will
be open for extended periods.
Note
Mark 2 Armour-FLEX sensor cable must be conditioned before it is
attached to the fence.
MEX Armour-FLEX sensor cable does not require conditioning.
cable tie
female disconnect
female cap
splice kit (X 2)
male disconnect
male cap
cable tie
gear clamp
gear clamp
bracket
disconnect
assembly
protective rubber cover