


Installing the sensor cable
Page 30
FlexPS Product Guide
Installing cable on chain-link
1.
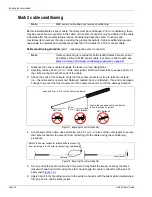
Dispense the sensor cable alongside the installation location on the secure side of the fence.
Do not allow the sensor cable to fall off the spool, as it may twist and kink.
2.
Beginning at the start point of the zone, attach the sensor cable to the fence fabric (point a).
Leave enough extra sensor cable at this point to install a splice kit, or form a service loop and
connect the sensor cable to the processor (app. 1 m, 3.3 ft.).
3.
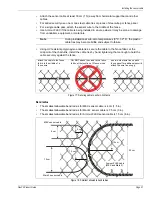
Hold the sensor cable straight and level along the fence while you attach the cable to the
fence fabric beside the second post at point b. Ensure that there is no slack in the sensor
cable.
4.
Attach the cable to the fence at point c.
5.
Attach the cable to the fence beside the second post at point d.
6.
Return to the start point and install cable ties every 25 to 30 cm (10 to 12 in.) along the first
fence panel at points e to j.
7.
Hold the sensor cable straight and level along the fence while you attach the cable to the
fence fabric beside the third post at point k.
8.
Attach the cable to the fence at point l.
9.
Attach the cable to the fence beside the third post at point m.
10. Return to the second post and install cable ties every 25 to 30 cm (10 to 12 in.) along the
second fence panel at points n to r.
11. Repeat this procedure, one fence panel at a time, until the cable is fully installed.
12. Verify that there are no slack or loose sections of cable, and that the cable ties are properly
tightened. Trim and properly discard the ends of the cable ties.
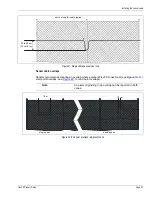
Drip loops
•
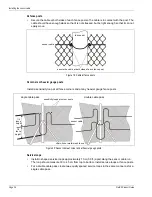
Install drip loops at every cable connector. Form the drip loop by raising the connector 15 cm
(6 in.) above the level of the cable run before securing it, horizontally, to the fence fabric.
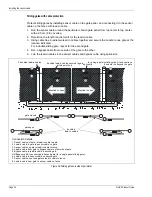
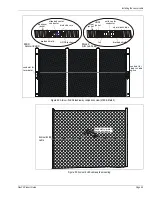
Figure 23: Installation procedure diagram
Figure 24: Drip loops
start point post
second post
third post
spacing
25 - 30 cm (10 - 12 in.)
15 cm
(6 in.)
splice connector
terminator