11-Powering Up the System
Noggin
48
11 Powering Up the System
Once all the cable connections are made between the Noggin, the Digital Video Logger (DVL)
and any accessories like odometers and GPS’s, the final step is to connect the system to a 12
volt power source, typically one of the batteries shown in
Figure 11-1
.
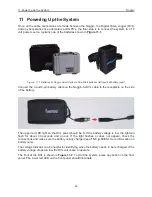
Figure: 11-1 Batteries for Noggin Smart Systems: SmartCart batteries (left) and belt battery (right).
Connect the round 4-pin battery cable on the Noggin-to-DVL cable to the receptacle on the side
of the battery.
The upper red LED light on the DVL panel should be lit. If the battery voltage is low, the light will
flash for about 30 seconds and go out. If the light flashes or does not appear, check the
connections and make sure the battery is fully charged (see
15.1: p.126
for more information on
battery care).
The voltage indicator can be helpful for identifying when the battery needs to be recharged. If the
battery voltage drops too low the DVL will cease to operate.
The front of the DVL is shown in
Figure 11-2
. To start the system, press any button on the front
panel. The lower red LED on the front panel should illuminate.
Summary of Contents for Noggin 100
Page 1: ...User s Guide Copyright 2012 Sensors Software Inc 2011 00022 02 Noggin ...
Page 2: ......
Page 4: ......
Page 8: ......
Page 17: ...Noggin 2 Noggin Components 3 Figure 2 3 Noggin 100 components ...
Page 156: ...Appendix D Instrument Interference Noggin D 2 ...
Page 158: ...Appendix E Safety Around Explosive Devices Noggin E 2 ...
Page 162: ...Noggin G 4 ...


