background image

Monthly Closing

Setting the Pay Period 
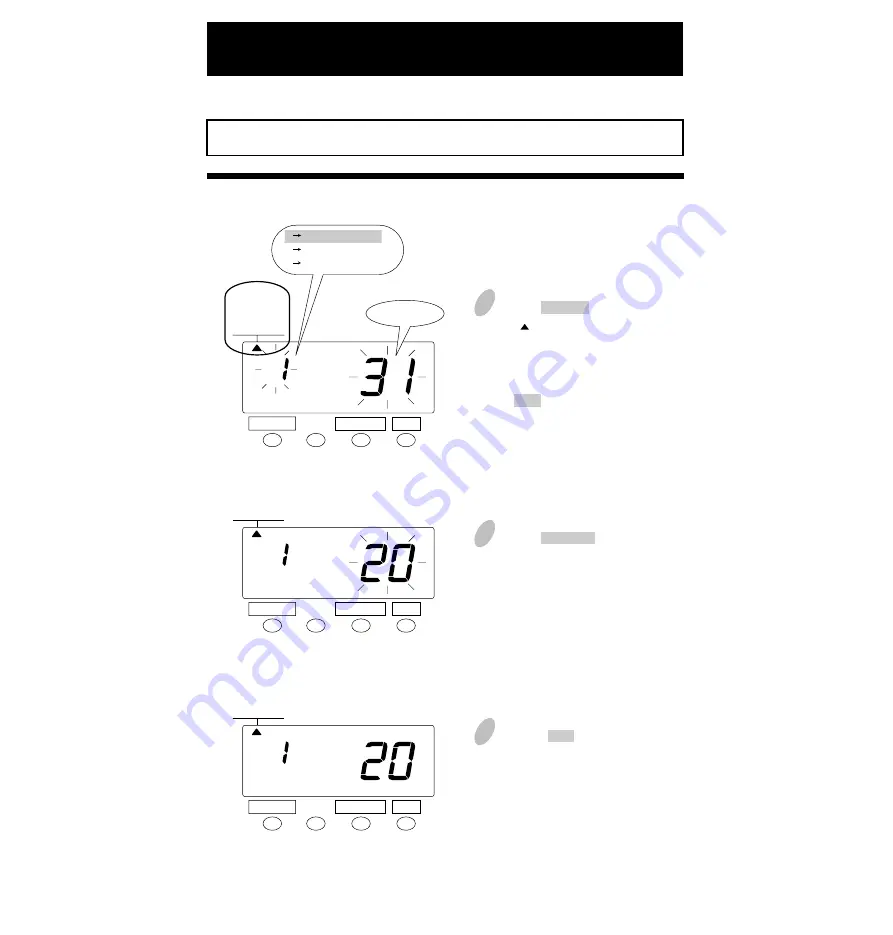
SELECT

CHANGE

SET

1. MONTHLY
2. WEEKLY
3. BI-WEEKLY

 
PAY PERIOD

1. MONTHLY
2. WEEKLY
3. BI-WEEKLY

 
PAY PERIOD

1. MONTHLY
2. WEEKLY
3. BI-WEEKLY

 
PAY PERIOD

2

Push the CHANGE button to position 

it next to the desired closing date.

For example, if the closing date is 

the 20th, set the closing date at 20.

1

Push the SELECT button and position 

the "  " mark at the upper side of the 

display next to the first item from 

the left, "PAY PERIOD". 

If the case is monthly closing, push 

the SET button. At that moment, the 

flashing of the display will change 

to the closing date.

3

Push the SET button to finish the 

setting. At that moment, the display 

will change from flashing to steady, 

and the setting is now completed.

Closing date

SELECT

CHANGE

SET

SELECT

CHANGE

SET

The closing date is factory-set at the end of a month (31st).

1    Monthly closing
2    Weekly closing
3    BI-Weekly closing

10

Summary of Contents for QR-350

Page 1: ...QUARTZ TIME RECORDER OPERATION MANUAL...

Page 2: ...and limits No part of this publication may be reproduced stored in a retrieval system or transmitted in any form or by any means mechanical photocopying recording or otherwise Replace battery with TOS...

Page 3: ...uage Setting the Minutes Printing 1 60 or 1 100 printing Setting the 12 24 HOUR format Setting the Daylight Saving Time D S T Setting the starting date of daylight saving time Setting the ending date...

Page 4: ...possibly leading to an electric shock Do not use any voltage of the power source other than designated Do not share a single outlet with another plug These may lead to fire or shock hazards Do not da...

Page 5: ...ord may be damaged possibly leading to a fire or electric shock Remove the line cord plug from the outlet before transferring the unit or it may damage the cord possibly leading to a fire or electric...

Page 6: ...e front or back of the card thereby ensuring that the time is printed on the correct side of a monthly card If the closing date for payroll processing does not fall on the end of a month the unit can...

Page 7: ...s Operation Manual Wall Mount Screws Ribbon Cassette Keys Daylight saving time indication Display Key hole Cover Display Control button Card slot Wall mounting hole Day of the week indication Current...

Page 8: ...to tighten the ribbon 3 Place the ribbon cassette inside the time recorder as shown in the figure Keep on pushing in the ribbon cassette until the clasps at both sides catch and you hear a pop sound...

Page 9: ...is placed behind the ribbon mask see the figure on the right 4 Precautions to take when replacing the ribbon 6 5 Replace the cover by fitting the plugs at both sides of the cover into the holes locat...

Page 10: ...come off if used on other materials Install wall mount screws supplied into a wall 3 94 inches 10 cm apart Be sure to keep about 0 12 inch 3 mm of the screw head out of the wall Environmental Conditio...

Page 11: ...easy to operate the unit Just insert a time card The card is then automatically pulled in printed and then ejected The unit is designed to print on the first column when no time table program is set...

Page 12: ...o the following page for the details of each setting 4 After the setting has been completed fit the plugs at the lower sides of the cover into the holes of the unit 5 Pull back the cover while returni...

Page 13: ...T button and position the mark at the upper side of the display next to the first item from the left PAY PERIOD If the case is monthly closing push the SET button At that moment the flashing of the di...

Page 14: ...y and the setting is now completed SELECT CHANGE SET SELECT CHANGE SET IN OUT IN OUT IN OUT 1 2 3 4 5 6 7 Today Tuesday January 9 2001 Set closing day Sunday January 14 2001 1 MONTHLY 2 WEEKLY 3 BI WE...

Page 15: ...ton to set the left hand number of the display at 3 and then push the SET button At that moment the flashing of the display will change to the right hand number 3 Push the SET button to finish the set...

Page 16: ...ing the Minute for example from 8 minutes to 9 minutes Push the CHANGE button to set Minute at 09 and then push the SET button Now the minutes of 9 have been set At that moment the flashing of the dis...

Page 17: ...ber has been set At that moment the flashing of the display will change from Month to Date 4 Change Date for example from 20 to 21 Push the CHANGE button to set Date at 21 and then push the SET button...

Page 18: ...because Minute is not to be changed Now 00 minute has been set At that moment Minute on the display will change from flashing to steady and the setting of the day advance time is now completed DAY AD...

Page 19: ...rint style can be selected from the following six styles Setting the Print Style Order Options Line Format Print Example Monday 21 3 30 p m 1 DD 24HOUR 2 D O W 24HOUR 3 24HOUR LARGE FONT 4 12HOUR 5 DD...

Page 20: ...dy and the setting is now completed LANGUAGE SELECT CHANGE SET SELECT CHANGE SET 1 ENGLISH 2 SPANISH 3 GERMAN 4 FRENCH 5 ITALIAN 6 PORTUGUESE LANGUAGE 1 ENGLISH 2 SPANISH 3 GERMAN 4 FRENCH 5 ITALIAN 6...

Page 21: ...2 if 1 100 printing is desired 2 Push the SET button to finish the setting At that moment the display will change from flashing to steady and the setting is now completed Setting the Minutes Printing...

Page 22: ...24 HOUR For example set 2 if 24 HOUR is desired 2 Push the SET button to end the setting At that moment the display will change from flashing to steady and the setting is now completed DISPLAY SELECT...

Page 23: ...he above the unit remembers the start date as the last Sunday of March and the end date as the last Sunday of October Once set the unit automatically updates the settings every year thereafter No furt...

Page 24: ...the setting of the month is completed At that moment the flashing of the display will change from Month to Date 4 Set the date when the daylight saving time starts Push the CHANGE button to set the da...

Page 25: ...to and push the SET button twice to change the display as shown in the left figure This cancels the daylight saving time settings Setting the ending date of daylight saving time Example If daylight s...

Page 26: ...lly Work day ends at 17 00 Automatic column shift and Special mark printing cannot be set simultaneously Day advance time Example 5 00 17 00 5 00 Next day Print in Column 1 Print in Column 4 P1 The fo...

Page 27: ...ng will change from Hour to Minute 4 Push the CHANGE button to move the Minutes to 00 Then push the SET button The flashing will change from Minute to the of Column 1 PROGRAM SELECT CHANGE SET Minute...

Page 28: ...00 Day advance time 17 00 5 00 5 00 9 00 12 00 Next day Standard printing Standard printing Special mark printing Print Column 25 1 DD 24HOUR 2 D O W 24HOUR 3 24HOUR LARGE FONT 4 12HOUR 5 DD 12HOUR 6...

Page 29: ...from Hour to Minute PROGRAM SELECT CHANGE SET ON OFF Hour Minute Minute ON OFF Hour ON OFF Hour PROGRAM SELECT CHANGE SET PROGRAM SELECT CHANGE SET The following is the time table based on above case...

Page 30: ...Push the SET button to flash P1 Then push the CHANGE button to flash P2 7 Follow the same procedure from to to set 17 00 8 Push the CHANGE button to position the under OFF of Special mark ON OFF The p...

Page 31: ...ECT CHANGE SET PROGRAM SELECT CHANGE SET To confirm the programs that have been set flash Program No and push the CHANGE button To delete a program flash Hour and push the CHANGE button Change the dis...

Page 32: ...leted and will revert to the factory defaults when the reset switch is pushed To make new settings please refer to SETTING To return all settings to their factory defaults push the reset switch with a...

Page 33: ...sition the battery as shown in the figure to the left The connector cord should be on the right side as shown in the figure Connect the connector Tuck away the connector cord into the open space in th...

Page 34: ...inserted is wrong The card is not pulled in properly The card is not pulled in properly Card sensor error Cannot print The printer motor or home position sensor is not normal The card is not pulled in...

Page 35: ...mulative power failure hours after the date of shipment Optional Ni Cd battery 100 time printing or 24 hours Temperature 5 to 45 C 25 to 113 F Humidity 20 to 80 RH no condensation The unit operates no...

Page 36: ...9 TIME CARD SPECIFICATIONS Monthly Card Front Side S Card double sided Reverse Side Note Recommended Paper Thickness 0 45 0 05mm 1 2 33...

Page 37: ...Weekly Card Bi Weekly Card 34...

Page 38: ...MEMO 35...

Page 39: ...Printed in Japan Q0100 6120 3 0107 70A01...

Reviews: