background image

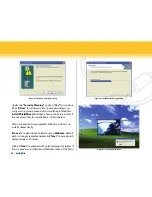
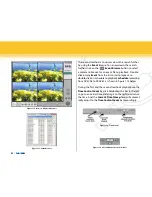
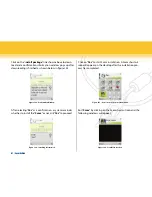
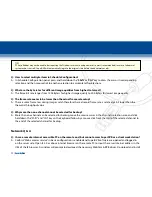
Figure 116 - Connection Screen 

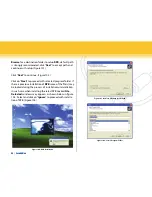
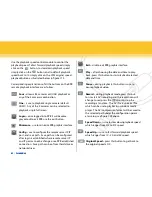
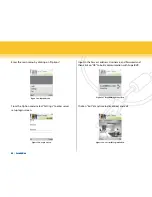
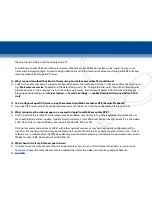
Figure 117 - Download Dialog box

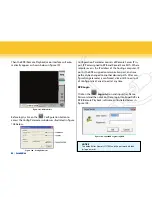
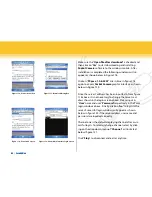
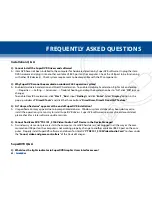
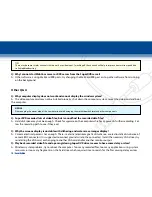
Figure 118 - Connection Screen.

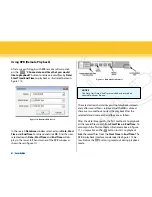
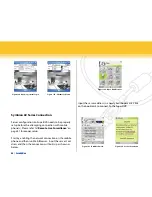
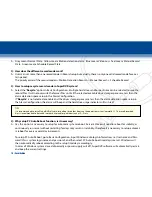
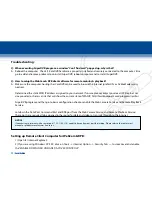
Figure 119 - PCam Main Interface Login Screen

65   |  SecurityMan

Make sure the “

open file after download

” is checked and 

then click on “

yes

” to start downloading and installing 

Pocket Camera

 software to the windows mobile.  After 

installation is completed the following windows will re-
appear as shown below in Figure 118:
 
Click on “

PCam v.1.0.6.5291

” link in blue in figure 118 

again to access 

Pocket Camera

 graphic interface as shown 

below in Figure 119.
 
Since the server’s address has been inputted in from figure 
118 above, it is not necessary to change the server’s ad-
dress shown in the login screen above.  Please input in 

User

” name and user “

Password

” respectively in the Pcam 

login windows above.  Finally, click on “

Go

” to login to the 

server. Successful login windows will appear as shown 
below in figure 120 if the server address, username and 
password are inputted correctly.

Channel one is the default displaying channel after a suc-
cessful login.  To select or change channel select by click-
ing on the drop down menu of “

Channel

” as illustrated 

below I figure 121.

Click “

Stop

” to disconnect and exit at anytime. 

Summary of Contents for iCamDVR

Page 1: ...iCamDVR User s Manaul Easily turn Security camera into a Internet Security WebCam ...

Page 2: ...ration Mistakes Warranty SecurityMan warrants this product will be free from defects in materials and workmanship for period of time specified on the product packaging This limited warranty shall commence from thedate of purchase SecurityMan Products warranty is not transferable and is limited to the original purchaser If the product is found to be defective then as your sole remedy and as the man...

Page 3: ...System setups Basic Configuration Panel 4 6 7 8 8 12 13 14 14 15 15 15 16 16 16 17 19 21 22 22 22 22 22 22 22 23 23 23 23 23 25 26 26 27 27 27 27 28 30 31 31 Record Setup Panel Time Stamp Switch Manual Record Manual Record Frame Rate Schedule Record Schedule Record Frame Rate Motion Detection Motion Record Frame Rate Camera Security Record Quality Audio In Schedule configuration Panel Video ProAmp...

Page 4: ... Surveillance Playback Remote Live Surveillance Remote Client Setup WebCam Installation RPB Remote Playback RPB Set up RPB Remote Playback Client Setup RPB Login Using RPB Remote Playback Mobile Surveillance Symbian 60 Series Connection Frequently Asked Questions Installation Q A SuperDVR Q A Network Q Other Q A Troubleshooting System requirements for iCamDVR Remote Client Computers Installation I...

Page 5: ...s reached Motion Detection Mode Motion detection area and motion sensitivity level is adjustable Each of the 4 channels is independently operated Motion detection sensitivity level can be ad justed for each significant channel The system begins to record when the camera s detects motion or mov ing objects and the system will stop recording after a period of time this period of time is adjustable i...

Page 6: ...Administrator Power Users and Normal Users Different users have different rights to ensure system security and acces sibility Multi Channel Display Support different multi channel display mode full screen display and auto dwell display Watch Dog Function In case SuperDVR driver or windows system froze or lock up the watchdog feature will automatically restart the computer and automatically login t...

Page 7: ...00GT 2 ASUS MZN32 nVidia nForce 590SLI AMD Athlon tm 64_2 3800 512MB nVIDIA GE FORCE 7600 3 GA K8VT890 VIA K8T890 AMD Athlon tm 64 3000 512MB Rad EON X1600 4 WinFast 760G _Sis 760GX_ AMD Sem pron 3000 256MB Sis Mirage 5 ASUS K8N4 nVidia Force4 AMD Sem pron 3000 512MB WinFast PX6600LE Table 2 iCamDVR System Requirements Type PC Module iCamDVR CPU Intel P4 Celeron Processor 1 7GHz Motherboard Intel ...

Page 8: ...8 color quality 16 bits or 32 bits Video Resolution 320x240 or 640x480 NTSC Compression code rate 50kbps 1 2Mbps Compression format MPEG4 4 x RCA Video Input 2 x Audio Input Channel select one Video Output USB 2 0 to PC Recorder Media HDD USB Disk CD RW Record Mode Motion Sensor Schedule Manual Network Protocol TCP IP PTZ Protocol Null Lilin Minking Neon PelcoD PelcoP Star Vido and VISCA Remote so...

Page 9: ...ly install the driver software and the following windows will appear NOTE If the CD is inserted and the auto run does not execute please go into the CD directory into a folder called Install and simply click on SETUP EXE and the installation process will begin Select and click on Install or run program to continue installation iCamDVR Hardware basic USB Connection Video Inputs Audio Input Figure 2...

Page 10: ... and other NTSC countries se lect NTSC and the click Next to continue setup All other than NTSC countries select PAL and then click Next to continue setup Next click on Install SuperDVR and the installation process start with User Account Control windows please select Cancel to quite installation or Allow I trust this program I know where it s from or I ve used it before to continue installation a...

Page 11: ...in to the USB port or simply plug it into another available USB port on the computer Installation process is successful when Windows Secu rity option pops up select Install this drive software vanyway as illustrated below Setup start to install the necessary driver software files as follow If the iCamDVR hardware is not connected to the comput er or has loose connection with the computer in such c...

Page 12: ...gister Application 11 SecurityMan Click Finish and restart the computer to complete driver software installation Choose a Destination Location click on Browse to select path other than the default path or click Next to con tinue using the default path recommended Select Program Folder Setup click Next to continue instal lation ...

Page 13: ...fter the computer restart go to device manager to en sure the hardware installation for iCamDVR exist under Sound Video and Game Controllers as circled below Windows Vista Driver Software Uninstall There are several methods to uninstall the driver software for iCamDVR One way is to auto run the CD and pretends to re install the driver software The following windows will appear to confirm driver so...

Page 14: ... software if SuperDVR cannot execute or show error mes sages Avoid using two or more USB and PCI video capture devices on the hosting computer To uninstall SuperDVR driver software in windows 2000 XP please go to Control Panel Add or Remove Programs and click or select SuperDVR to Change Remove it To execute and run the SuperDVR software for iCamDVR go to All Program SuperDVR or simply double clic...

Page 15: ...sociated with Screen 1 where Screen 1 single channel full screen has to be activated enabled first and then use the Next Page button to manually toggle between each channel Auto Dwell button is use to enable or disable auto channel rotation sequence or auto dwell The sequence dwell time can be configured in the basic configuration setup Screen 4 is used for four channel split quad screen display v...

Page 16: ...Screen 4 display mode right click on any of the four cameras image will switch the display view into a quad full screen display Login Click the Login button and the Login window wil appear Input the User name and Password into the provid ed fields and press OK to login or CANCEL to cancel login The default User name is case sensitive SYSTEM and the default Password is no password blank NOTE It is ...

Page 17: ...tus Panel will light green to show the corresponding channel is in Schedule Record mode If the schedule record mode changes to manual record the green light LED will change to teal color LED Please refer to Schedule Configuration for in depth details Motion Detection Record Mode Motion detection will enable the system to detect the changes in the image then activate motion detection motion alarm r...

Page 18: ... camera chan nel for motion to be active Finally configure the motion detection areas and sensi tivity level for each camera s in the Motion_Detection configuration Recycling Record If Recycling Record function is enabled and all the optional selected hard disk drives or partitions are full the oldest recorded data will be overwritten by the latest current recording data Storage Disk may vary depe...

Page 19: ...anel is the Basic Configuration panel shown above There are a total of 7 different Con figuration panels in all and they are as follow from left to right Basic Configuration Panel Schedule Configuration Panel Video Configuration Panel Motion Detection Configuration Panel Alarm Configuration Panel P T Z Configuration Panel User Configuration Panel The return button is used to return or exit out fro...

Page 20: ...d image files Caption characteristic options consist of None ID Name and ID Name Here is a breakdown of the captions characteristics None means no title id name or record LEDs ID means cameras numbers i e 1 2 3 and 4 Name means cameras name i e Cam1 Cam2 kitchen and etc ID Name means both cameras number and camera name i e 1 Cam1 2 Cam2 3 kitchen and etc Resolution has two options for 640_480 or 3...

Page 21: ... on the Audio Config button and setup the microphone gain The audio gain ranges from 0 to 255 and default setting is 126 Storage Disk displays all the available disk drives or parti tions for the iCamDVR to record all the data files as illus trated below the recording will continue to overwrite the oldest files and starts the recycle recording To disable recycle re cording simply uncheck the Recyc...

Page 22: ...e and they are as follow Manual Record Mode Schedule Record Mode Timer Motion Detection Record Mode All four cameras channels can be independently setup to record using any of the three types of recording methods above Each of the four cameras recorded files is saved in separate folders under different name All record file has parameters in which is categorized as follow camera ID record date time...

Page 23: ...hich can be selected to save hard drive space if space is limited on the hard drive This setting will only affect the manual recording frame rate The lower the frame rate set the more hard drive space will save 5 Schedule Record Select by placing a check mark under each camera to setup schedule recording Deselect to disable schedule recording option Please note that schedule recording de pend sole...

Page 24: ...eras 10 Record Quality Record quality ranges from Lowest Lower Medium Higher Highest level of quality The higher the recording quality used the more the hard drive space is required the better the picture quality If space is limited please use the default Medium setting which is best for balancing picture quality vs space 11 Audio In Audio input can be setup to record audio and are select able bet...

Page 25: ...light selection STEP 2 and then click on Add or Edit to edit modify the days of the week and the time of the days STEP 3 shown Figure32 below The above windows will appear for the selected camera to setup schedule time and days of the week for recording Select or deselect any days of the week between Monday through Sunday and setup a time of the selected day s ranging from 0 to 24 hours Press OK t...

Page 26: ...will over ride Motion Detection settings 2 The Schedule Record Motion Detection schedule configu ration is required to setup first prior to enabling the schedule recording and motion recording under the Basic Configura tion 3 Alarm Output is also required to setup prior for the alarm output to work properly when it is enabled under the Alarm Configuration panel Video ProAmp Panel Click the Video P...

Page 27: ...itivity accord ingly to preference sensitivity ranges from 0 to 100 100 being the most sensitive level and 0 is the least sensitive level Alarm Configuration Panel The Alarm Configuration Panel as its name states is where alarm inputs and alarm outputs are configured There are a total of three tabs under Alarm Configuration Panel and they are labeled as Alarm Output AutoMail and Emap which will be...

Page 28: ...l alarm event s For example if pre alarm record is enable and set to 15 seconds and the motion alarm events happens at 10 30 30am then SuperDVR will start the event recording at 10 30 15am which has a pre alarm recording of 15 seconds before the actual event 10 30 30am Pre Alarm Record ranges from 5 10 15 20 30 45 60 seconds Motion Holding Time Motion sensor may detectt some movement only if the m...

Page 29: ... Function Configuration Press the AutoMail tab under the Alarm configuration panel to access AutoMail setup as shown below in figure 38 AutoMail can be setup to send emails or emails with picture attachments to a desired recipient from a desired sender To setup the From email account in automail it requires Mail Server Setup such as SMTP Server example smtp securitymaninc com mail yahoo com SMTP P...

Page 30: ...der for the correct SMTP Port User Name and Password Check the Attachment selection to enable picture at tachments via email When the alarm triggered the pres ent live image will be sent to the appointed mailbox by ways of attachment s as illustrated in figure41 below Camera Name Display Time Image Format and Resolu tion can be selected and setup as desired to enhanced and help identify the image ...

Page 31: ...h multiple events list and multiple pictures Emap Function Configuration E map is use to show geographic area of homes buildings region and etc which includes locations of cameras layout in the geographic region E map essentially provides geo graphic area with camera layouts monitored by SuperDVR system in a form of a map This feature is simple to use and operates with direct status display and it...

Page 32: ...the geographic picture i e c superdvr to select the ideal picture region or building map Then open the picture file and the picture file will display in this interface in a form of a map as shown below This virtual building region below may apply to other resemblance regional areas other geographic area picture may apply Click hold and drag CAM1 CAM2 CAM3 and CAM4 icons of cameras located at the l...

Page 33: ...on If there is multiple MAP zone enabled the MAP icons will changes from blue to red which means that MAP zone has alarm triggers Select Auto Show will enable Emap to pop up whenever there are motion alarms until the alarm expired Auto Show enabled pro vides quick alarm position as to which camera triggered the alarm Right click on any CAM1 4 to pull up live camera image in Emap view as illustrate...

Page 34: ...al map or drawing of map by own according to the actual needs may be used to scan and save to the computer and be use for Emap map P T Z Configuration Control Panel Click on the icon from Config to enter the PTZ Configuration panel as illustrated below in figure 49 PTZ configuration requires serial port on the computer in order PTZ controls to operation the serial port is called an RS485 port Once...

Page 35: ...protocol cam eras has an address assigned to identify the camera If the camera address is 1 be sure to input in a 1 in the Address field See below for relative explanations Relative definitions Channels List select the camera channel that 1 contain PTZ camera Protocol PTZ device communication protocol 2 Serial Port A serial COM port the computer 3 assigns and uses to communicate with the PTZ proto...

Page 36: ... depending on makers and models the protocol configuration Baud Rate P T Z device Baud Rate ranges from 6 1200 2400 4800 9600 default 19200 38400 57600 and 115200 Please reference PTZ user s guide to specify correct baud rate for your camera Data bits ranges from 4 5 6 7 8 default 7 Please reference PTZ user s guide to specify cor rect data bits for your camera Parity can be of None default Odd Ev...

Page 37: ...ion parameters To Change User s Rights Privileges Highlight one of the user from Login Username under User Configuration refer to Figure5252 above and then click on Edit to enter Edit User windows as illustrated below in figure 53 The Edit User windows can be used to edit password and rights privileges of a user but not the user s name which is grayed out Click on OK to accept the changes or Cance...

Page 38: ...camera image and controls the PTZ refer to Figure2154 below NOTICE Administrators can change Power users and Normal users rights but cannot change other administrators rights or privi leges To Add User Click on the Add button in User Configuration refer to Figure5452 above to access the add user windows as shown below in figure 54 Input a user name a password confirm the password re type and then ...

Page 39: ...right side of the PTZ control panel above is manual immediate Pan Tilt Stop Focus Zoom and Iris controls of the PTZ camera Central control knobs are used to control the Left Right Up and Down movements of the PTZ camera Press the center STOP button whenever the group preset is active to stop the group from auto dwelling On the right side of the PTZ control panel are manual Focus in out Zoom in out...

Page 40: ... Speed Pan Speed control horizontal rotating speed 1 Tilt Speed control vertical rotating speed 2 Focus Speed control focus speed 3 Zoom Speed control zoom in zoom out speed 4 Click on the preset button and a pop up Preset and GROUP list will appear as illustrated below in figure 59 There are a total of 16 preset positions for PTZ camera and 4 GROUP setting Preset camera positions can be con figur...

Page 41: ...r GROUP1 presets first 5 preset to rotate when GROUP1 becomes active and click on SAVE to save the settings Setup GROUP2 4 by following the same procedures as in the example above Any one GROUP can be enabled by selecting GROUP1 4 from figure 59 to start auto dwelling When GROUP is active all the selected preset1 through preset5 will auto dwell in sequence if GROUP1 were to be selected or select a...

Page 42: ...urityMan a desired or specific location see figure 62 below to con ceptualize and then click on the Save button to save the preset image position preset name and preset Notice some camera s protocols may occupied both preset 1 and preset 2 as the same preset location ...

Page 43: ... image zoom in out C display recorded video data from 0 to 24 hours and play back controls and D consists of date search original or backup files search playback time display volume control search by manual schedule and or motion record mode Press the return button at any time to exit out of playback mode and back to the main display interface Record Search There are three methods to search for re...

Page 44: ...lect the Backup Files to search and browse for the backup recorded file from the computer to playback To perform Search by Record Mode simply deselect be tween Manual Schedule and or Motion and the data will automatically be eliminated from the data bars status For example to search for Motion events only simply un checked Manual Schedule and all the manual schedule data bars will automatically di...

Page 45: ... pause button first a must and then the Previous Frame button to advanced reverse frame by frame playback This button will become valid during single channel playback mode and the press of the Pause button Next Frame use to perform frame by frame playback During single channel playback press the pause button first a must and then the Next Frame button to advanced forward frame by frame playback Th...

Page 46: ...re figure 68 display data in hours scale Click on the data bar blue green and yellow again to zoom out or take the minutes scale to the default 24 hours scale as shown in figure 68 above The left side shows the available channels active enable channel s has a check marked in the front and has gray highlights The non active camera has dark gray highlights meaning not active enable Single channel or...

Page 47: ...orresponds to the cam era audio setup to playback click OK to accept changes and starts playback TIPS Click on any channel image to enlarge the image to a single full channel simply click again on the single full channel im age to undo Backup Record Files Click on the Backup button to enter the backup windows as shown below The Backup interface breaks down explanations A Camera s Selection The mor...

Page 48: ...ed Adjust and change the Time Interval to a desired From and To date time Select the Copy To where to backup the files to i e local hard drives local partitions CDROM or Network drives Click on the Browse button to browse for another location path to backup other than the default path Place a check mark on the Attach Ap plication to include the playback software application with the file backup fo...

Page 49: ...ame s to be captured The frame ranges from 1 up to 30 frames in which all can be captured at once Select the Title to display the title of the camera s and checked the Time to display a time date stamps on the capture pictures Click on the Browse button under the Save To to select another path other then the default path Next click on the Snap button to capture the pictures in the number of frames...

Page 50: ...o move the picture upward downward leftward and rightward Select and then click to zoom in and out the image Press to return to the original size and position Move the image to the best desire position and then click on the Print button to print Press on the Exit Print at any time to exit out of Print screen During single channel playback pause mode the color con trol panel in figure 79 will appea...

Page 51: ...d or selectable as follow Select the Zoom In button to enable zoom in feature and then click on the channel display image once to zoom in 1X twice to zoom in 2X and so on Select the Zoom Out button to enable zoom out feature and then click on the channel display im age once to zoom out to 1X click twice to zoom out to 2X and so on Click the Default Size to default image back to the original size F...

Page 52: ...xplorer 5 0 or above browser to download the WebCam RPB Remote Play back software to install on the remote computer s After the WebCam RPB installation the WebCam can be use for Remote Live Surveillance and the RPB can be use for Remote Playback accordingly Remote Internet Access similar to remote intranet ac cess only uses the Wide Area Networking IP address via IE 5 0 or above to access and down...

Page 53: ... Remote Playback and click on OK to download and install the RPB Remote Playback program on the remote client computer s For detail on RPB please proceed to Remote Playback on page 57 setup and page 60 use Live Surveillance is a remote WebCam program used to access SuperDVR live view with PTZ controls over the internet Remote Playback is a remote RPB Remote Playback program used to access SuperDVR...

Page 54: ...lation of WebCam InstallShield Wizard will take a few seconds to extract all the necessary files for installation as shown below After initialization has completed WebCam will start to install automatically Browse for a destination folder to setup WebCam default path is strongly recommended click Next to accept path and continue with setup Click on Next to proceed with selected program folder If t...

Page 55: ...d Figure 91 Finish Installation 54 SecurityMan may be locked during the process of installation uninstal lation in such case when installing the latest WebCam Locked File Detected windows may appears as shown below in figure 90 Select and click on Ignore to proceed with installation of WebCam ...

Page 56: ... to remote login using WebCam Click on Finish to finish After installation has completed an Internet Explorer Security windows will appear to confirm and acceptance of an Unknown Publisher please click on Allow for WebCam to work properly See win dows message below NOTICE The default User Name is SYSTEM and the default password is blank w o password The default Data Port is 1159 Command Port is 11...

Page 57: ...reset Speed and Configuration please refer to page 38 above in detail Click on Exit at anytime to logout and exit out of WebCam RPB Remote Playback RPB Setup RPB is a powerful remote playback software which re motely access SuperDVR to retrieve recorded data files to playback remotely from anywhere at any time To Setup RPB enable Web Camera Service and Remote Playback Service in Basic Configuratio...

Page 58: ...Playback and click OK to download RPB remote software A security warning will appear under the Security Warning click on Yes for windows XP or Allow for windows Vista to accept windows security warning and proceed with installation of RPB Remote Playback software InstallShield Wizard will take a few seconds to extract all the necessary files for installation as shown below in figure 99 After initi...

Page 59: ... continue with setup Figure101 Click Next to continue Figure102 Click on Next to proceed with selected program folder If there is previous installation of RPB some of the file s may be locked during the process of installation uninstallation in such case when installing the latest RPB Locked File Detected windows may appears as shown below in figure 103 Select and click on Ignore to proceed with i...

Page 60: ...e 106 Internet Explorer Security 59 SecurityMan Click on Finish to finish After installation has completed an Internet Explorer Security windows will appear to con firm and acceptance of an Unknown Publisher please click on Allow for RPB Remote Playback to work properly See windows message below ...

Page 61: ...n put IP Port assigned to RPB and Record Save Path Where remote sever is the IP address of the hosting computer IP port is the RPB assigned communication port and save path can be changed to another desired path After con figuration parameter is confirmed click on OK to exit out of Config or click Cancel to exit at anytime RPB Login Click on the Login button and input User Name Password and then c...

Page 62: ... window as shown here in figure 111 The selected search date time will not playback immedi ately after record files is retrieved and the OK is clicked there are two methods to start the playback after the selected date time search and they are as follow After the date time search the first method is to playback all the record files search from Start Time to End Time To accomplish the first method ...

Page 63: ...camera to browse for an event file to playback Double click on any Event from the list to start playback i e double click on Schedule to playback schedule recording from 09 51 08 to 09 58 45 as shown in figure 113 below During the first and the second methods playback use the Time Control Lever by click hold drag the bar to the left to go to an earlier time and drag it to the right to advance the ...

Page 64: ...h Save path can be configured after login is established where remote server IP and IP port cannot be change once RPB established connection Save path can be of local hard drive or network drives Exit click to exit RPB graphic interface Play after choosing the date and time to play back press this button to start playback selected date and time Pause during playback this button is use to pause pla...

Page 65: ...proper setup Activate enable the mobile network on mobile phone first to ensure accessible to the internet and then run Inter net Explorer Input in the server s address in the Address URL to get to the following connection screen as shown below in Figure116 Click on the PCam v1 0 6 5291 link in blue and a Down load confirmation dialog box will pop up as shown below in figure 117 Parameter TYPE SYS...

Page 66: ...c interface as shown below in Figure 119 Since the server s address has been inputted in from figure 118 above it is not necessary to change the server s ad dress shown in the login screen above Please input in User name and user Password respectively in the Pcam login windows above Finally click on Go to login to the server Successful login windows will appear as shown below in figure 120 if the ...

Page 67: ...VR needs to be properly setup before the attempting connection with mobile phone s Please refer to Remote Live Surveillance on page 51 for proper setup Start by enabling the network connection on the mobile phone and then run Web Browser Input the server s ad dress and then the connection will built up as shown as below Input the server address in a newly built bookmark Click on the bookmark to co...

Page 68: ...firmation information window pops up after downloading is finished as shown below in figure 125 After selecting Yes as a confirmation a system reminder whether to install the Scam or not clik Yes to proceed Click on Yes to start Scam installation A Scam shortcut icon will appear on the desktop after the installation pro cess has completed Run Scam by clicking on the Scam shortcut icon and the foll...

Page 69: ...30 Login Screen 68 SecurityMan Enter the main menu by clicking on Options From the Option menu select Settings to enter server setup login screen Input in the Server s address Username and Password and then click on OK to built communication with SuperDVR Click on Exit at anytime to disconnect and exit ...

Page 70: ... option in the pop up window of DirectX Tools and click the three buttons DirectDraw Direct3D and AGP Texture Q An Unspecified error appears at the end of SuperDVR Installation A Unspecified error may appear due to incompatible databases Windows system database has been destroyed re install the operation system or try to install SuperDVR drivers SuperDVR software drivers may be old or outdated ple...

Page 71: ...elected available drive storage spaces are less than the alarm detection space setup in the Alarm Configuration If Recycle is not selected or enable and the drives storage spaces are less than the alarm detection space setup in the Alarm Configuration the alarm will beep and the hard drive usage indicator will turn red Q Why setup PC Auto Reboot function is it necessary A Yes this option is necess...

Page 72: ...ame rate setup A There is some frame loss during image switch therefore the real record frame rate is relatively a bit lower than the theoretic throughput value Q Why more than one channel cannot be selected for backup A More than one channel can be selected for backup move the mouse curser in the channels selection area and click hold down the Shift and Ctrl key on the keyboard follow by a mouse ...

Page 73: ...te Playback A No SuperDVR server cannot be configured remotely and in terms can only be configured on the local server Q Why I cannot see the video images on a successful login from WebCam and or RPB A The VGA card of the remote PC workstation may be outdated may not match system requirement specifications or may need software drivers update Update DirectDraw drivers from Microsoft Make sure the r...

Page 74: ... video files but I cannot find the recorded data files A Hard disk space may not be enough Check for spyware on the computer which may prevents further recording Fol low the recording path to see if they exist Q Why the screens display is unstable with dithering and water wave images display A Camera electrical power is not enough There is external electromagnetic disturbance or electrostatic dist...

Page 75: ... when playback A The selected disk partitions may be selected differently from the current partitions The recorded files are being played back when covering it Database of recorded log was damaged SuperDVR might have been installed in a dif ferent directory Q Why take precautions when changing the date and time on the system hosting iCamDVR A The superDVR system provides the retrieving mechanism o...

Page 76: ...ain For example if current computer date time is 01 01 2008 10 00 00 and the target new time is 01 01 2007 10 00 00 stop SuperDVR recording backup all needed video file first exit SuperDVR to change the date time Q How to use REPAIRDB to repair SuperDVR database A Enter the installation directory of superDVR usually C ProgramFiles SuperDVR SuperDVR to execute REPAIRDB EXE Use the same user s ID SY...

Page 77: ...up with Hardware Wizard click CANCEL 3 Put the installation CD into the CD ROM tray and SuperDVR installation auto run will start select SuperDVR to start the installation process 4 Follow the installation steps on through a message saying this program has not passed windows logo testing click on Continued anyway to precede installation see manual above for detail 5 Reboot computer 6 After compute...

Page 78: ...wse the Internet prefer DSL or Cable Modem con nection Determined the static WAN IP address assigned to your network If unsure please contact your local ISP internet ser vice provider or here is a link that will show the current state of WAN IP http lawrencegoetz com programs ipinfo SuperDVR program and then go to basic configuration check or enable the Web Camera Service and Remote Play Back Serv...

Page 79: ...blished live streaming video from SuperDVR server should display 7 To Playback the video files that has been recorded from SuperDVR open by double clicking on RPB shortcut on the desktop 8 Click on the CONFIG icon button from RPB interface Input in the IP address of the server IP port as 1161 and click OK to save settings 9 Finally click on the Login icon button and click OK to connect Now you sho...

Page 80: ...79 SecurityMan SuperDVR Function Tree ...

Page 81: ...80 SecurityMan Config ...

Page 82: ...81 SecurityMan WebCam Remote Playback ...

Page 83: ...www securitymaninc com ...

Reviews: