scil Element i+ User Manual Download Page 18


Vers.:20220531ENG 


18 


6  Troubleshooting 


6.1.  Error Handling 

When an error occurs, a dialog box appears displaying the error message. The table below 
describes the warnings and error messages that may be displayed, as well as suggested 
actions to take. If you are unable to resolve the problem by following this troubleshooting 
guide, please contact you local Technical Support Services. 
 

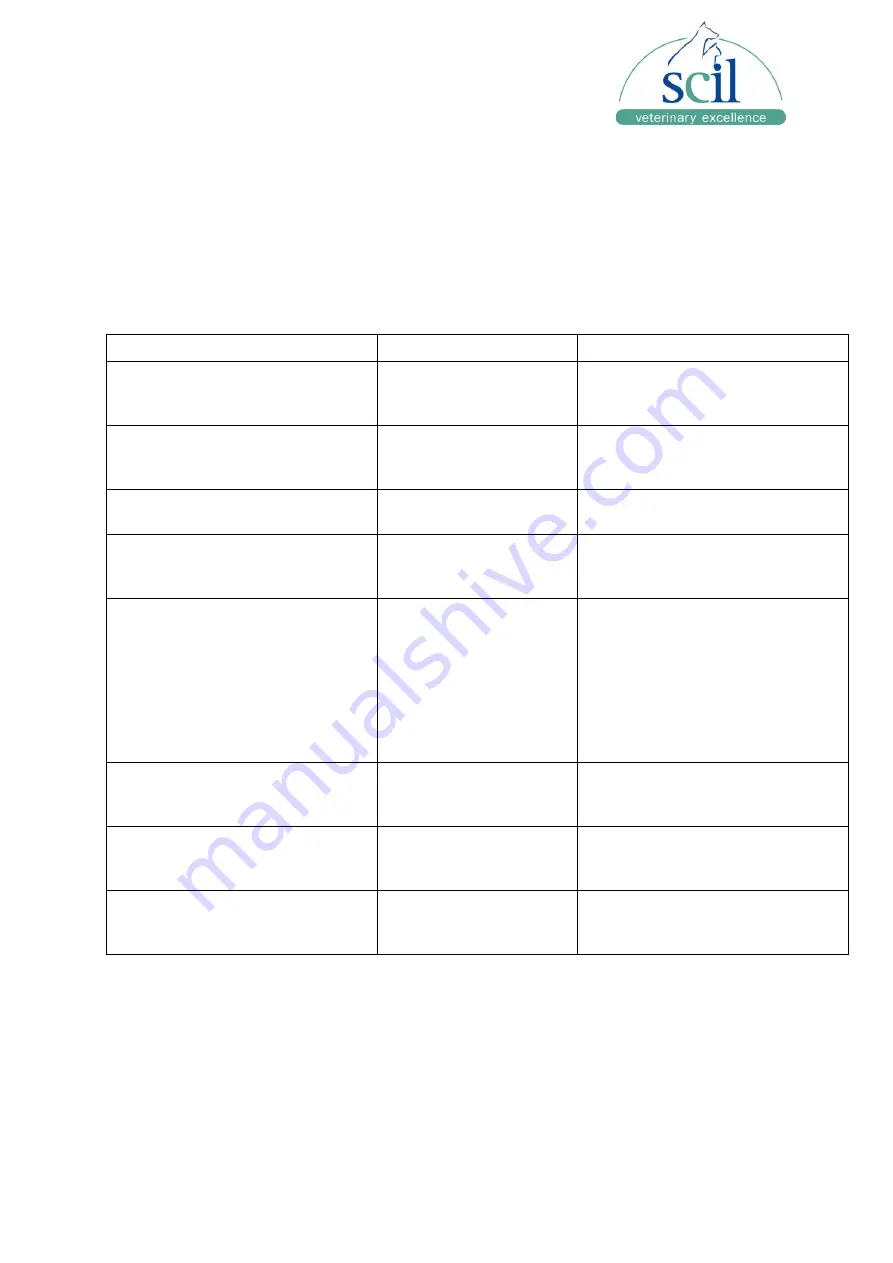
6.2.  Table of Common Error Messages 


Error Message 

Error Type 

Action 

The inserted cartridge has already 
been run. 

Used cartridge. 

A cartridge can only be run one 
time. Get a new untested cartridge 
and re-run the sample. 

The inserted cartridge has expired.  Cartridge shelf life 

exceeded. 

Dispose of expired cartridge and 
run sample on a non-expired 
cartridge. 

The inserted cartridge contains 
an invalid barcode. 

Did not recognize the 
barcode. 

Select a new cartridge. 

Unable to read the barcode from 
the inserted cartridge. 

Barcode not read. 

Verify that barcode is not damaged 
and retry the cartridge. If error 
persists, select a new cartridge. 

The inserted cartridge is of an 
unknown test type. 

Cartridge Definition File 
not loaded in Analyzer 
Software. 

Load the Cartridge 
Type/Calibration Info for that 
specific cartridge lot (see 
instructions in this User Manual). 
The Cartridge Definition File is 
provided on a USB flash drive in 
cartridge box or contact your local 
Technical Support Services. 

Wrong Cartridge Inserted 

– Do 

you wish to proceed? 

Cartridge inserted 
does not match 
requested test. 

Update the sample information to 
indicate test type matching the 
cartridge type. 

Calibration information needed. 

Instrument has no 
record of cartridge 
lot information. 

Install the corresponding 
Cartridge Definition Files for the 
cartridge lot being used. 

There was an unknown error 
processing the cartridge. 

General error. 

Must run a new cartridge. If the 
problem repeats, re-start the 
instrument. 


Summary of Contents for Element i+

Page 1: ...User Manual Immunodiagnostic Analyzer Element i For Veterinary In Vitro Diagnostic Use Only...

Page 2: ...t prior notice Heska MBio shall not be liable for malfunctions and damage resulting from installation relocation remodeling maintenance and repair done by other than dealers specified by Heska Heska M...

Page 3: ...8 2 3 Calibration 8 3 Transport Unpacking and Installation 9 3 1 Packaging 9 3 2 Unpacking 9 3 3 Parts List 9 4 Analyzer Operation 10 4 1 Turning the Analyzer On and Off 10 4 2 Main Screens and Contro...

Page 4: ...use only The intended use is to quantify biological markers in animal serum or plasma samples using Element i Cartridges Do not use the equipment for other purposes Please refer to instructions includ...

Page 5: ...s with Part 15 of FCC regulations and FDA regulations 21 CFR 1040 10 and 1040 11 except for deviations pursuant to Laser Notice No 50 NOTE This equipment has been tested and found to comply with the l...

Page 6: ...or be opened when a cartridge is not present If the enclosure is damaged immediately stop using the analyzer to prevent possible exposure to hazardous laser radiation CAUTION Use of controls or adjust...

Page 7: ...1 Components and Labeling Front Analyzer label found on the bottom of analyzer Back Touch screen Status light Cartridge port door Carrying handle Air filter cover and filter Power button USB A2 0 port...

Page 8: ...n Laser Class 1 per IEC 60825 1 Operating temperature 59 86 F 15 30 C indoors Operating relative humidity 25 65 non condensing Storage temperature 32 113 F 0 45 C Storage humidity 5 95 non condensing...

Page 9: ...ement i Analyzer and place on a level stable surface Inspect for any obvious signs of damage Report any damage immediately Remove protective film from touchscreen if present Before using allow the ana...

Page 10: ...hen initially powered the analyzer will run through a series of self diagnostic checks When boot up is complete the indicator light will glow steady and the login screen will appear The analyzer shoul...

Page 11: ...s you need them If you want to set the reference areas you must first go to the settings Then go to the administrator and there you will find the button reference groups In this menu you can change th...

Page 12: ...until this file is loaded Use the following procedure to load the CDF 1 Insert the provided USB flash drive Figure 1 with cartridge lot calibration information into any of the four USB ports on the b...

Page 13: ...ingerprints smudges and other contamination Fluorescence illumination and imaging are through the clear plastic component on the bottom of the cartridge 4 6 Running a Sample This section assumes that...

Page 14: ...e 6 5 With the cartridge flat on the bench remove the pull tab from the sample inlet port and discard Use the cartridge handle to steady the flat cartridge while removing the pull tab Figure 7 NOTE Ca...

Page 15: ...re Sample screen to open the analyzer door Figure 9 Insert the cartridge until you feel a click and hear a beep Figures 10 11 Figure 9 Figure 10 Figure 11 9 The test will run automatically A status ba...

Page 16: ...n Figure 13 The screen will provide an indication when it is safe to remove the used cartridge Figure 14 4 8 Review Test Results Figure 13 Figure 14 1 Click on the button Review Tests 2 Now you can se...

Page 17: ...the analyzer can be cleaned by wiping with a mild detergent 70 solution of ethanol or isopropyl alcohol in water or 10 bleach solution CAUTION Do not directly spray the Analyzer with cleaner Apply cle...

Page 18: ...new cartridge Unable to read the barcode from the inserted cartridge Barcode not read Verify that barcode is not damaged and retry the cartridge If error persists select a new cartridge The inserted c...

Page 19: ...ed error editing reference range General error Confirm reference ranges are set in the Administrator settings Unexpected error deleting reference range General error Confirm reference ranges are set i...

Reviews: