background image

 www.scheppach.com   

 [email protected]   

 +(49)-08223-4002-99   

 +(49)-08223-4002-58

18 | 

18 | GB

Check the pressure vessel for signs of rust and dam-
age each time before using. Do not use the compres-
sor with a damaged or rusty pressure vessel. If you 
discover any damage, then please contact the cus-
tomer service workshop.

Safety valve (Fig. 1/Pos. 16)

The safety valve (16) has been set for the highest 
permitted pressure of the pressure vessel. It is pro-
hibited to adjust the safety valve or remove its seal. 
Actuate the safety valve from time to time to ensure 

that  it  works  when  required.  Pull  the  ring  with  suffi 

cient force until you can hear the compressed air be-
ing released. 
There lease the ring again.

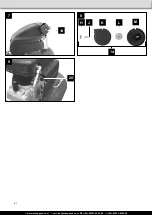
Checking the oil level at regular intervals (Figure 

6)

Place the compressor on a level and straight surface. 
The oil level must be between the MAX and MIN 
marks on the oil level window (18).
Oil change: we recommend SAE 15W 40 or equiva-

lent. The original oil fi lling must be changed after 100 

hours in operation; thereafter the oil must be drained 
and replaced with new oil after every 500 hours in 
operation.

Changing the oil (Figure 6)

Switch off the engine and pull the mains plug out of 
the socket. After releasing any air pressure you can 
unscrew the oil drain plug (19) from the compressor 
pump.
To prevent the oil from running out in an uncontrolled 
manner, hold a small metal chute under the opening 
and collect the oil in a vessel. If the oil does not drain 
out completely, we recommend tilting the compres-

sor slightly. When the oil has drained out, re fit the oil 

drain plug (19).
Dispose of the old oil at a drop-off point for old oil.

To fill in the correct quantity of oil, make sure that the 

compressor stands on an even surface. Fill new oil 

through the oil filler opening until it comes up to the 

maximum level. This is marked with a red dot on the 
oil level window (18) (Fig. 6 pos. 18.1). Do not exceed 

the  maximum  filling  quantity.  Overfilling  the  equip

-

ment may result in damage. Reinsert the oil sealing 

plug (13) into the oil filler opening.

Cleaning the intake filter (Fig. 7, 8)

The intake filter prevents dust and dirt being drawn 
in. It is essential to clean this filter after at least every 
300 hours in service. A clogged intake filter will de

-

crease the compressor’s performance dramatically. 

Then pull off the fi lter cover (K). Now you can remove 
the air filter (L) and the filter housing (M). Carefully tap 
out the air filter, filter cover and filter housing. Then 

blow out these parts with compressed air (approx. 3 
bar) and reinstall in reverse order.

Electrical connection cables must comply with the 
applicable VDE and DIN provisions. Only use con-
nection cables with the marking „H05VV-F“.
The printing of the type designation on the connec-
tion cable is mandatory.

AC motor

• 

The mains voltage must be 230 V~

• 

Extension cables up to 25 m long must have a 
cross-section of 1.5 mm

2

.

Connections and repairs of electrical equipment
may only be carried out by an electrician.

Please provide the following information in the event 
of any enquiries:

• 

Type of current for the motor

• 

Machine data - type plate

Cleaning, maintenance, and storage

Important!

Pull out the power plug before doing any cleaning and 
maintenance work on the equipment. Risk of injury 
from electric shock!

Important!

Wait until the equipment has cooled down complete-
ly! Risk of burns!

Important!

Always depressurize the equipment before carrying 
out any cleaning and maintenance work! Risk of in-
jury!

Cleaning

•  Keep the equipment free of dirt and dust as far as 

possible. Wipe the equipment with a clean cloth or 
blow it down with compressed air at low pressure.

•  We recommend that you clean the equipment im-

mediately after you use it.

•  Clean the equipment regularly with a damp cloth 

and some soft soap. Do not use cleaningagents or 
solvents; these may be aggressive to the plastic 
parts in the equipment. Ensure that no water can 
get into the interior of the equipment.

•  You must disconnect the hose and any spraying 

tools from the compressor before cleaning. Do not 
clean the compressor with water, solvents or the 
like.

Maintenance work on the pressure vessel/con-

densed water (Fig. 1)

m

 Important!

To ensure a long service life of the pressure ves-

sel (7), drain off the condensed water by opening 

the drain valve (15) each time after using.

Release  the  vessel  pressure  first.  Open  the  drain 

screw by turning counter-clockwise (looking at the 
screw from the bottom of the compressor) so that 
all the condensed water can run out of the pres-
sure vessel. Then close the drain screw again (turn 
it clockwise).

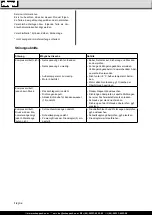
Summary of Contents for 5806103904

Page 1: ...tion des instructions d origine 21 28 IT Compressore Traduzione di manuale d uso originale 29 36 Art Nr 5806103904 AusgabeNr 5806103850 Rev Nr 25 01 2019 www scheppach com service scheppach com 49 082...

Page 2: ...www scheppach com service scheppach com 49 08223 4002 99 49 08223 4002 58 2 1 1 2 3 4 5 6 7 8 9 10 11 12 13 14 15 16 17...

Page 3: ...www scheppach com service scheppach com 49 08223 4002 99 49 08223 4002 58 3 3 17 6 3 5 4 2 13 14 8 A B C D 10 9 E F G 4 9 F G E 10 5 D C B A 8 6 13 18 18 1 19...

Page 4: ...www scheppach com service scheppach com 49 08223 4002 99 49 08223 4002 58 4 7 14 20 9 14 8 H L J K M...

Page 5: ...em Ger t DE Vor Inbetriebnahme Bedienungsanleitung und Sicherheitshinweise lesen und beachten DE Tragen Sie einen Geh rschutz Die Einwirkung von L rm kann Geh r verlust bewirken DE Warnung vor hei en...

Page 6: ...9335 Ichenhausen VEREHRTER KUNDE Wir w nschen Ihnen viel Freude und Erfolg beim Ar beiten mit Ihrem neuen Ger t HINWEIS Der Hersteller dieses Ger tes haftet nach dem gel tenden Produkthaftungsgesetz n...

Page 7: ...dienungsanleitung angegeben ist Besch digte Schalter m ssen bei einer Kun dendienstwerkstatt ersetzt werden Benutzen Sie keine fehlerhaften oder besch digten Anschlussleitungen Benutzen Sie keine Elek...

Page 8: ...ch vorzunehmen und die den Umst nden nach erforderlichen Sicherheits ma nahmen zu treffen Die Aufsichtsbeh rde kann im Einzelfall erforderli che berwachungsma nahmen anordnen Ein Druckbeh lter darf ni...

Page 9: ...alten des Kompressors wird der Ein Ausschalter 17 nach oben gezogen Zum Ab schalten wird der Ein Ausschalter 17 nach unten gedr ckt Druckeinstellung Bild 3 Mit dem Druckregler 3 wird der Druck am Mano...

Page 10: ...herheitsventil 16 ist auf den h chstzul s sigen Druck des Druckbeh lters eingestellt Es ist nicht zul ssig das Sicherheitsventil zu verstellen oder dessen Plombe zu entfernen Druckschaltereinstellung...

Page 11: ...des erforderlichen Ersatztei Damit das Sicherheitsventil im Bedarfsfall richtig funktioniert muss dies von Zeit zu Zeit bet tigt wer den Ziehen Sie so stark am Ring bis die Druckluft h rbar abbl st A...

Page 12: ...ngerungskabel vermeiden Verl ngerungskabel mit ausreichendem Ader querschnitt verwenden Nicht unter 5 C Au entemperatur betrei ben Motor abk hlen lassen ggf Ursache der berhitzung beseitigen Kompresso...

Page 13: ...of the symbols on the equipment GB Read and follow the operating and safety instructions before you start working with this power tool GB Wear ear muffs The impact of noise can cause damage to hearing...

Page 14: ...335 Ichenhausen DEAR CUSTOMER we hope your new tool brings you much enjoyment and success NOTE According to the applicable product liability laws the manufacturer of the device does not assume liabili...

Page 15: ...ave the replacement of damaged power cables strictly to the manufac turer or a qualified electrician There is a risk of electric shock 19 Inflating tires Directly after inflating tires check the press...

Page 16: ...r the maximum permissible operating pres sure of the compressor 21 Place of installation Set up the compressor on an even surface ADDITIONAL SAFETY INSTRUCTIONS Safety instructions for working with co...

Page 17: ...on damage Check the electrical connection cables for damage regularly Make sure that the connection cable does not hang on the power network during the inspection Report any damage immediately to the...

Page 18: ...at least every 300 hours in service A clogged intake filter will de crease the compressor s performance dramatically Then pull off the fi lter cover K Now you can remove the air filter L and the filte...

Page 19: ...cates that this product must not be disposed of together with domestic waste in compliance with the Directive 2012 19 EU pertaining to waste electrical and electronic equipment WEEE This product must...

Page 20: ...overheating The compressor starts but there is no pres sure The non return valve leaks The seals are damaged The drain plug for condensation water 15 leaks Have a service center replace the safety val...

Page 21: ...eil FR Avant la mise en service lisez le mode d emploi et les consignes de s curit et respectez les FR Portez une protection de l ou e L exposition au bruit peut entra ner une perte de l ou e FR Atten...

Page 22: ...nzburger Stra e 69 D 89335 Ichenhausen CHERS CLIENTS Nous esp rons que votre nouvelle machine vous ap portera satisfaction et de bons r sultats REMARQUE Selon la loi en vigueur sur la responsabilit du...

Page 23: ...ectricien sp cialis Cet outil lectrique est conforme aux disposi tions de s curit en vigueur Les r parations ne doivent tre men e bien que par un lec tricien sp cialis qui utilisera des pi ces de rech...

Page 24: ...ations Il ne faut pas exploiter le compresseur avec r ser voir de pression rouill ou endommag Faites un constat de l endommagement et adressez vous au service apr s vente Conservez bien ces consignes...

Page 25: ...glage de pression fig 3 Le r gulateur de pression 3 permet de r gler la pression sur le manom tre 5 La pression r gl e peut tre prise au niveau du raccord rapide fig 3 pos 4 On peut lire la pression...

Page 26: ...rouill ou endommag Si vous constatez des dommages veuillez vous adresser au service apr s vente Commutateur de protection de surcharge fig 9 pos 20 Le compresseur doit protection automatique contre l...

Page 27: ...service d enl vement des d chets Soupape de s curit fig 1 pos 16 La soupape de s curit 16 est r gl e sur la pres sion maximale admise du r cipient sous pression Il est interdit de d r gler la soupape...

Page 28: ...tr ler le c ble la fi che de contact le fusible et la prise de courant Evitez des rallonges de c ble trop longues Utilisez des rallonges de c ble avec suffi sam ment de diam tre de brin Ne pas s en se...

Page 29: ...223 4002 58 IT 29 Legenda delle simboli sullo strumento IT Prima dell inizio istruzioni per l uso e la sicurezza Leggere e seguire IT Indossare protezioni per l udito L esposizione al rumore pu causar...

Page 30: ...i lavori con la nuova macchina Attenzione Secondo le disposizioni attualmente vigenti della Legge sulla responsabilit del produtto re il costruttore del presente apparecchio non risponde di danni all...

Page 31: ...di garantire un esercizio perfetto dell e lettroutensile Dispositivi di protezione e componenti dan neggiati devono essere riparati o sostituiti da un officina specializzata riconosciuta in modo conf...

Page 32: ...arie nel caso specifico Un serbatoio a pressione non deve essere usato se presenta dei difetti che rappresentino un rischio per i dipendenti o per terzi Interruttori danneggiati devono essere sostitui...

Page 33: ...ore ON OFF fig 3 pos 17 Per attivare il compressore necessario tirare verso l alto l interruttore ON OFF 17 Per la disattivazione l interruttore ON OFF 17 viene invece premuto verso il basso Impostazi...

Page 34: ...ssore in direzione del la vite in modo che l acqua di condensa fuoriesca completamente dal serbatoio a pressione La pressione impostata pu essere letta sul giunto rapido fig 3 pos 4 Sul manometro 6 vi...

Page 35: ...modo efficiente le risorse Successivamente chiudere di nuovo la vite di scari co rotazione in senso orario Prima di ogni messa in funzione accertarsi che il serbatoio a pressione non presenti danni o...

Page 36: ...di rete troppo bassa 3 Temperatura esterna troppo bassa 4 Motore surriscaldato 1 Controllare cavo spina di rete fusibile e presa di corrente 2 Evitate cavi di prolunga troppo lunghi Usate cavi di prol...

Page 37: ...www scheppach com service scheppach com 49 08223 4002 99 49 08223 4002 58 37...

Page 38: ...www scheppach com service scheppach com 49 08223 4002 99 49 08223 4002 58 38 www scheppach com service scheppach com 49 08223 4002 99 49 08223 4002 58...

Page 39: ...rmelor UE pentru articolul BG X 2014 29 EU X 2014 35 EU X 2014 30 EU 2004 22 EC X 2014 68 EU X 2011 65 EU 89 686 EC_96 58 EC 90 396 EC Der oben beschriebene Gegenstand der Erkl rung erf llt die Vorsch...

Page 40: ...e in til a causa de fallas de material o de fabricaci n Las piezas que no son fabricadas por nosotros mismos ser n garantizadas hasta el punto que nos corresponda garant a del suministrador anterior L...

Reviews: