background image

 www.scheppach.com   

 [email protected]   

 +(49)-08223-4002-99   

 +(49)-08223-4002-58

 | 17 

 www.scheppach.com   

 [email protected]   

 +(49)-08223-4002-99   

 +(49)-08223-4002-58

GB | 17 

•  At low temperatures below +5°C, sluggishness 

may make starting difficult or impossible.

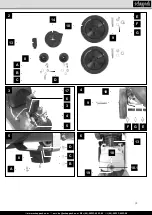
ON/OFF switch (Fig. 3 Pos. 17)

•  Pull the ON/OFF switch (17) upwards to switch 

on the compressor. To switch off the compressor, 
press the ON/OFF switch (17) down.

Setting the pressure (Fig. 3)

•  Use the pressure regulator (3) to set the pressure 

on the pressure gauge (5).

•  The set pressure can be drawn from the quicklock 

coupling (Fig. 3/Pos. 4).

•  The vessel pressure can be read off the pressure 

gauge (6).

Setting the pressure switch

•  The pressure switch (2) is set at the factory. 

Cut-in pressure approx. 8 bar 
Cut-out pressure approx. 10 bar.

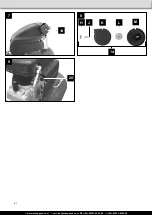
Overload protection switch (fig. 9 pos. 20)

•  The compressor has an automatic protection 

against thermal overload. The overload protector is 
activated at high engine temperature.

•  The device is turned off. Re-commissioning of the 

device can be done only after cooling down and 
manual reset.

•  Follows after activation:


– Let the unit cool down


– Press the overload protection switch (20)

Electrical connection

The electrical motor installed is connected and 

ready for operation. The connection complies 

with the applicable VDE and DIN provisions.

The customer‘s mains connection as well as 

the extension cable used must also comply with 

these regulations.

Damaged electrical connection cable

The insulation on electrical connection cables is of-
ten damaged.
This may have the following causes:

• 

Passage points, where connection cables are 
passed through windows or doors.

• 

Kinks where the connection cable has been im-
properly fastened or routed.

• 

Places where the connection cables have been cut 
due to being driven over.

• 

Insulation damage due to being ripped out of the 
wall outlet.

• 

Cracks due to the insulation ageing.

Such damaged electrical connection cables must not 
be used and are life-threatening due to the insula-
tion damage.
Check the electrical connection cables for damage 
regularly. Make sure that the connection cable does 
not hang on the power network during the inspection.

Report any damage immediately to the transport 
company which was used to deliver the compres-
sor.

• 

Install the compressor near the point of consumption.

• 

Avoid long air lines and supply lines (extension 
cables).

• 

Make sure that the intake air is dry and dustfree.

• 

Do not install the compressor in a damp or wet 
room.

• 

The compressor may only be used in suitable 
rooms (with good ventilation and an ambient tem-
perature from +5 °C to 40 °C). There must be no 

dust, acids, vapors, explosive gases or inflamma

-

ble gases in the room.

• 

The compressor is designed to be used in dry 
rooms. It is prohibited to use the compressor in 
areas where work is conducted with sprayed water.

Attachment and operation

Important!

You must fully assemble the appliance before 

using it for the first time!

Fitting the wheels (10)

•  Fit the supplied wheels (10) as shown in Fig. 4.

Fitting the supporting foot (8)

•  Fit the supplied supporting foot (8) as shown in Fig-

ure 5.

Installation of the air filter (14)

• 

Remove the transport plug and attach the air filter 

(Figure 7/14) on the unit by turning clockwise.

• 

Solve for maintenance the air filter (14) by turning 

counter-clockwise..

Checking the oil level (Figure 6) 

m

 Warning: For the first use, check the oil level of 

the compressor.

1 Operating the machine without oil will cause irrepa-

rable damage and render the warranty invalid.

2 Remove the plastic oil inlet plug on top of the crank 

box of the compressor casing.

3 Check the oil level in the sight glass (18). The oil 

level should be in the centre of the red circle. (see 

fig. 6 pos. 18.1)

4 Attach the closing plug (13), which is included and 

pull it tight.

Mains connection

•  The compressor is equipped with a mains cable 

with shock-proof plug. This can be connected to 
any 230-240 V~ 50 Hz shock-proof socket which is 
protected by a 16 A fuse.

•  Before you use the machine, make sure that the 

mains voltage is the same as the operating voltage 
(see the rating plate).

•  Long supply cables, extensions, cable reels etc. 

cause a drop in voltage and can impede motor 
start-up.

Summary of Contents for 5806103904

Page 1: ...tion des instructions d origine 21 28 IT Compressore Traduzione di manuale d uso originale 29 36 Art Nr 5806103904 AusgabeNr 5806103850 Rev Nr 25 01 2019 www scheppach com service scheppach com 49 082...

Page 2: ...www scheppach com service scheppach com 49 08223 4002 99 49 08223 4002 58 2 1 1 2 3 4 5 6 7 8 9 10 11 12 13 14 15 16 17...

Page 3: ...www scheppach com service scheppach com 49 08223 4002 99 49 08223 4002 58 3 3 17 6 3 5 4 2 13 14 8 A B C D 10 9 E F G 4 9 F G E 10 5 D C B A 8 6 13 18 18 1 19...

Page 4: ...www scheppach com service scheppach com 49 08223 4002 99 49 08223 4002 58 4 7 14 20 9 14 8 H L J K M...

Page 5: ...em Ger t DE Vor Inbetriebnahme Bedienungsanleitung und Sicherheitshinweise lesen und beachten DE Tragen Sie einen Geh rschutz Die Einwirkung von L rm kann Geh r verlust bewirken DE Warnung vor hei en...

Page 6: ...9335 Ichenhausen VEREHRTER KUNDE Wir w nschen Ihnen viel Freude und Erfolg beim Ar beiten mit Ihrem neuen Ger t HINWEIS Der Hersteller dieses Ger tes haftet nach dem gel tenden Produkthaftungsgesetz n...

Page 7: ...dienungsanleitung angegeben ist Besch digte Schalter m ssen bei einer Kun dendienstwerkstatt ersetzt werden Benutzen Sie keine fehlerhaften oder besch digten Anschlussleitungen Benutzen Sie keine Elek...

Page 8: ...ch vorzunehmen und die den Umst nden nach erforderlichen Sicherheits ma nahmen zu treffen Die Aufsichtsbeh rde kann im Einzelfall erforderli che berwachungsma nahmen anordnen Ein Druckbeh lter darf ni...

Page 9: ...alten des Kompressors wird der Ein Ausschalter 17 nach oben gezogen Zum Ab schalten wird der Ein Ausschalter 17 nach unten gedr ckt Druckeinstellung Bild 3 Mit dem Druckregler 3 wird der Druck am Mano...

Page 10: ...herheitsventil 16 ist auf den h chstzul s sigen Druck des Druckbeh lters eingestellt Es ist nicht zul ssig das Sicherheitsventil zu verstellen oder dessen Plombe zu entfernen Druckschaltereinstellung...

Page 11: ...des erforderlichen Ersatztei Damit das Sicherheitsventil im Bedarfsfall richtig funktioniert muss dies von Zeit zu Zeit bet tigt wer den Ziehen Sie so stark am Ring bis die Druckluft h rbar abbl st A...

Page 12: ...ngerungskabel vermeiden Verl ngerungskabel mit ausreichendem Ader querschnitt verwenden Nicht unter 5 C Au entemperatur betrei ben Motor abk hlen lassen ggf Ursache der berhitzung beseitigen Kompresso...

Page 13: ...of the symbols on the equipment GB Read and follow the operating and safety instructions before you start working with this power tool GB Wear ear muffs The impact of noise can cause damage to hearing...

Page 14: ...335 Ichenhausen DEAR CUSTOMER we hope your new tool brings you much enjoyment and success NOTE According to the applicable product liability laws the manufacturer of the device does not assume liabili...

Page 15: ...ave the replacement of damaged power cables strictly to the manufac turer or a qualified electrician There is a risk of electric shock 19 Inflating tires Directly after inflating tires check the press...

Page 16: ...r the maximum permissible operating pres sure of the compressor 21 Place of installation Set up the compressor on an even surface ADDITIONAL SAFETY INSTRUCTIONS Safety instructions for working with co...

Page 17: ...on damage Check the electrical connection cables for damage regularly Make sure that the connection cable does not hang on the power network during the inspection Report any damage immediately to the...

Page 18: ...at least every 300 hours in service A clogged intake filter will de crease the compressor s performance dramatically Then pull off the fi lter cover K Now you can remove the air filter L and the filte...

Page 19: ...cates that this product must not be disposed of together with domestic waste in compliance with the Directive 2012 19 EU pertaining to waste electrical and electronic equipment WEEE This product must...

Page 20: ...overheating The compressor starts but there is no pres sure The non return valve leaks The seals are damaged The drain plug for condensation water 15 leaks Have a service center replace the safety val...

Page 21: ...eil FR Avant la mise en service lisez le mode d emploi et les consignes de s curit et respectez les FR Portez une protection de l ou e L exposition au bruit peut entra ner une perte de l ou e FR Atten...

Page 22: ...nzburger Stra e 69 D 89335 Ichenhausen CHERS CLIENTS Nous esp rons que votre nouvelle machine vous ap portera satisfaction et de bons r sultats REMARQUE Selon la loi en vigueur sur la responsabilit du...

Page 23: ...ectricien sp cialis Cet outil lectrique est conforme aux disposi tions de s curit en vigueur Les r parations ne doivent tre men e bien que par un lec tricien sp cialis qui utilisera des pi ces de rech...

Page 24: ...ations Il ne faut pas exploiter le compresseur avec r ser voir de pression rouill ou endommag Faites un constat de l endommagement et adressez vous au service apr s vente Conservez bien ces consignes...

Page 25: ...glage de pression fig 3 Le r gulateur de pression 3 permet de r gler la pression sur le manom tre 5 La pression r gl e peut tre prise au niveau du raccord rapide fig 3 pos 4 On peut lire la pression...

Page 26: ...rouill ou endommag Si vous constatez des dommages veuillez vous adresser au service apr s vente Commutateur de protection de surcharge fig 9 pos 20 Le compresseur doit protection automatique contre l...

Page 27: ...service d enl vement des d chets Soupape de s curit fig 1 pos 16 La soupape de s curit 16 est r gl e sur la pres sion maximale admise du r cipient sous pression Il est interdit de d r gler la soupape...

Page 28: ...tr ler le c ble la fi che de contact le fusible et la prise de courant Evitez des rallonges de c ble trop longues Utilisez des rallonges de c ble avec suffi sam ment de diam tre de brin Ne pas s en se...

Page 29: ...223 4002 58 IT 29 Legenda delle simboli sullo strumento IT Prima dell inizio istruzioni per l uso e la sicurezza Leggere e seguire IT Indossare protezioni per l udito L esposizione al rumore pu causar...

Page 30: ...i lavori con la nuova macchina Attenzione Secondo le disposizioni attualmente vigenti della Legge sulla responsabilit del produtto re il costruttore del presente apparecchio non risponde di danni all...

Page 31: ...di garantire un esercizio perfetto dell e lettroutensile Dispositivi di protezione e componenti dan neggiati devono essere riparati o sostituiti da un officina specializzata riconosciuta in modo conf...

Page 32: ...arie nel caso specifico Un serbatoio a pressione non deve essere usato se presenta dei difetti che rappresentino un rischio per i dipendenti o per terzi Interruttori danneggiati devono essere sostitui...

Page 33: ...ore ON OFF fig 3 pos 17 Per attivare il compressore necessario tirare verso l alto l interruttore ON OFF 17 Per la disattivazione l interruttore ON OFF 17 viene invece premuto verso il basso Impostazi...

Page 34: ...ssore in direzione del la vite in modo che l acqua di condensa fuoriesca completamente dal serbatoio a pressione La pressione impostata pu essere letta sul giunto rapido fig 3 pos 4 Sul manometro 6 vi...

Page 35: ...modo efficiente le risorse Successivamente chiudere di nuovo la vite di scari co rotazione in senso orario Prima di ogni messa in funzione accertarsi che il serbatoio a pressione non presenti danni o...

Page 36: ...di rete troppo bassa 3 Temperatura esterna troppo bassa 4 Motore surriscaldato 1 Controllare cavo spina di rete fusibile e presa di corrente 2 Evitate cavi di prolunga troppo lunghi Usate cavi di prol...

Page 37: ...www scheppach com service scheppach com 49 08223 4002 99 49 08223 4002 58 37...

Page 38: ...www scheppach com service scheppach com 49 08223 4002 99 49 08223 4002 58 38 www scheppach com service scheppach com 49 08223 4002 99 49 08223 4002 58...

Page 39: ...rmelor UE pentru articolul BG X 2014 29 EU X 2014 35 EU X 2014 30 EU 2004 22 EC X 2014 68 EU X 2011 65 EU 89 686 EC_96 58 EC 90 396 EC Der oben beschriebene Gegenstand der Erkl rung erf llt die Vorsch...

Page 40: ...e in til a causa de fallas de material o de fabricaci n Las piezas que no son fabricadas por nosotros mismos ser n garantizadas hasta el punto que nos corresponda garant a del suministrador anterior L...

Reviews: