background image

40

 - 

www.SCEPTRE.com 

SCEPTRE UMR Series UHD Display User Manual 

MHL Explained  


MHL

® 

stands for mobile high definition link.  It is a protocol and cable that enables mobile devices 

(tablets, cell phones…etc) to be displayed and charging at the same time on a display.  This Sceptre 
display supports MHL on HDMI1.  If you see your mobile device supporting MHL then you can 
purchase a MHL cable and connect one end (usually micro USB) to your mobile device and the 
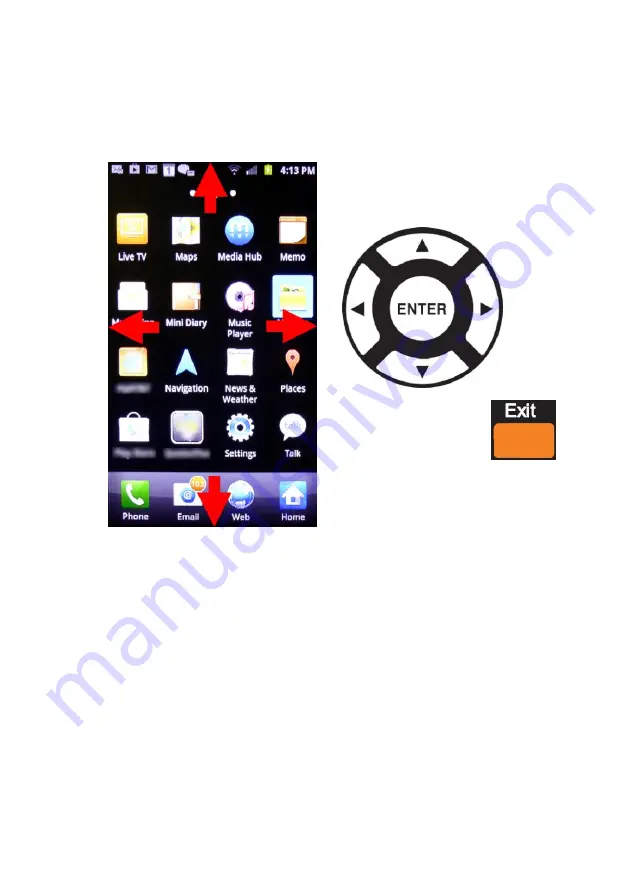
other end to HDMI 1.  Turn on both the mobile device and the Sceptre display and press the MHL 
button and things displayed on the mobile device will be displayed on the display. 


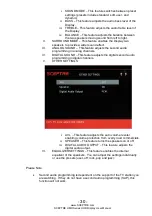
Once you see the cell phone screen on the display you can either use the cell phone itself to control 
the screen or use the display 

remote’s buttons shown above to control the cell phone screen. 

 
Please Note: 


Not every cell phone supports MHL.  Please contact your cell phone 
company for support information or search MHL on the web for more 
information. 


Not every MHL cable supports your cell phone. There are different versions 
of MHL cables for different cell phones. The wrong type of cable will not 
produce an image on the display. Please contact your cell phone company to 
ensure you have the correct MHL cable. 


The directional button and ENTER buttons on the display

’s remote have 

limited control over the cell phone’s OS and the programs within.  Some 
programs will respond to the control, some will not.  For maximum control 
please use the cell phone’s touch screen instead of the display’s remote. 

Summary of Contents for U750CV-UMR

Page 1: ...ces We hope you enjoy your new SCEPTRE UHD Display For technical assistance please call 1800 788 2878 and select option 3 or email our tech support group at SceptreTS sceptre com For all other inquiries please call 1800 788 2878 and select option 4 or email our customer service group at SceptreCS sceptre com Web Chat is available during business hours M F 8 30AM 5 30PM We recommend you register yo...

Page 2: ... 2 www SCEPTRE com SCEPTRE UMR Series UHD Display User Manual IMPORTANT INFORMATION ...

Page 3: ...ce heat 9 Do not defeat the safety purpose of the polarized or grounding type plug A polarized plug has two blades with one wider than the other A grounding type plug has two blades and a third grounding prong The wide blade and the third prong are provided for your safety If the provided plug does not fit into your outlet consult an electrician for replacement of the obsolete outlet 10 Protect th...

Page 4: ...amplifier etc Do not install the product too close to anything that produces smoke or moisture Operating the product close to smoke or moisture may cause fire or electric shock Slots and openings in the back and bottom of the cabinet are provided for ventilation To ensure reliable operation of the display and to protect it from overheating be sure these openings are not blocked or covered Do not p...

Page 5: ...ately Do not try to repair the product yourself Avoid using dropped or damaged appliances If the product is dropped and the housing is damaged the internal components may function abnormally Unplug the power cord immediately and contact your dealer for repair Continued use of the product may cause fire or electric shock Do not install the product in an area with heavy dust or high humidity Operati...

Page 6: ...rmation with regard to proper grounding of the mast and supporting structure grounding of the lead in wire to an antenna discharge unit size of the grounding conductors location of antenna discharge unit connection to grounding electrodes and requirements of the grounding electrode Lightning Protection For added protection of the display during a lightning storm or when it is left unattended or un...

Page 7: ...ontrol AAA Batteries included x 1 User Guide x 1 Complete manual available online at sceptre com Installation Please read the user manual carefully before performing the installation Please use the power cord designated for the product When an extension cord is required use one with the correct power rating The cord must be grounded and the grounding feature must not be defeated The product should...

Page 8: ...the graphics below Please note that the longer side of the feet faces the front 2 To finalize your installation of the Display please read the following a If you are placing the Display on a stand we recommend you to use a display safety strap not included in order to minimize the possibility of the display toppling over Safety straps are available for purchase online at websites such as amazon co...

Page 9: ...th Composite 19 Connecting Cable or Satellite boxes with HDMI 20 Connecting to a PC with HDMI 21 Connecting a Digital Audio Receiver with Optical SPDIF 22 Switching Sources 23 Let s Watch Some TV 24 Starting up the UHD Display 24 If You ve Connected Antenna to the TV 24 OSD On Screen Display Controls 25 Via Remote Control 25 Via Display Side Panel Buttons 25 OSD Options 26 PICTURE 26 SOUND 29 CHAN...

Page 10: ...display is not turned on The light turns blue when the display is turned on The display might take 10 12 seconds to power on This is considered to be normal REMOTE SENSOR The remote sensor receives all the commands from the remote control Rear View Mounting Pattern Mounting Specification 400mm x 200mm using 4 screws sized at M6 not included The mounting holes are 16mm deep ...

Page 11: ...ivates the On Screen Display OSD If a sub menu is active pressing this button will exit the OSD 4 CH This button changes the display channel up If the OSD is active this button functions as up for the menu 5 CH This button changes the display channel down If the OSD is active this button functions as down for the menu 6 VOL This button increases the display s volume If a sub menu is active pressin...

Page 12: ... ver 1 4 HDMI 4 houses a HDMI version 1 4 connection Under ultra HD 4K x 2K resolution this connection supports 30 Hz refresh rate This HDMI also supports ARC audio return channel CEC consumer electronics control functions no audio return channel HDMI connects to devices that use HDMI cable such as Blu ray or HD DVD player or HD cable satellite set top box This connection port receives pure digita...

Page 13: ...DMI 1 also doubles as the MHL connection for cell phones MHL is a protocol where the display will display what your cell phone displays If your cell phone supports MHL you can purchase a MHL cable from any electronic store and connect it to HDMI 1 and also your cell phone Make sure the display s source is changed to HDMI 1 and turn on your cell phone You should see an image of your cell phone scre...

Page 14: ...PTRE com SCEPTRE UMR Series UHD Display User Manual Sceptre Remote Control This remote control follows SONY s universal remote code To find the actual code you need to consult your cable or satellite tech support ...

Page 15: ...sed captioning modes 14 MUTE Turns the sound off from the display To un mute either press VOL or press the MUTE button again 15 FAV Gives you your list of favorite channels 16 F ADD DEL Adds or Deletes current channel from favorite list 17 SLEEP Turns the TV off in a specific set of time dependent on your selection 18 USB This button switches the source to USB 19 YPbPr This button switches the sou...

Page 16: ...use AAA batteries Do not mix new and old batteries This may result in cracking or leakage that may pose a fire risk or lead to personal injury Inserting the batteries incorrectly may also result in cracking or leakage that may pose a fire risk or lead to personal injury Dispose the batteries in accordance with local laws and regulations Keep the batteries away from children and pets If the remote ...

Page 17: ...back of your UHD display 3 Turn on the UHD display 4 Follow the first time on screen instructions Please Note Not all broadcasts are in High Definition HD Please refer to your local broadcasting stations for more information TV tuner is an optional item in this display The UHD TV s tuner is designed for UHD display therefore requires a stronger signal than normal displays If you cannot achieve tha...

Page 18: ...r UHD display 5 Obtain a RCA Audio Cable Connect the white color connector to both your DVD player and YPbPr s white connector port on the back of your UHD display 6 Connect the red color connector to both your DVD player and YPbPr s red connector port on the back of your UHD display 7 Turn on the UHD display and your DVD player 8 Use the remote control s source button or the source button on the ...

Page 19: ...of your UHD display 3 Obtain a RCA Audio Cable Connect the white color connector to both your Wii and AV s white connector port on the back side of your UHD display 4 Connect the red color connector to both your Wii and AV s red connector port on the back side of your UHD display 5 Turn on the UHD display and your Wii 6 Use the remote control s source button or the source button on the display to ...

Page 20: ...ther end to the HDMI port on the back of your UHD display 3 Turn on the UHD display and your set top box 4 Use the remote control s source button or the source button on the display to switch to HDMI Please Note Please reference the set top box manual to make sure the set top box is configured to output correctly to the display Sceptre s UHD display supports SONY s universal remote code Please loo...

Page 21: ...rn on the power of the UHD display and your PC 4 Use the remote control s source button or the source button on the display to switch to HDMI1 5 Change your PC resolution to 3840 x 2160 at 60 Hz refresh rate Please Note For the best results please set your PC resolution to 3840 x 2160 at 60 Hz Please refer to the PC or graphic card s manual for further instructions on how to set your resolution an...

Page 22: ...lay and your receiver Please Note If you want pure digital stream for your receiver to decode you must also configure the display s OSD Sound Digital Audio Out function Make sure the option is on 5 1CH If your receiver is making static noises when receiving 5 1CH you must use the PCM option instead Please reference the receiver s manual as well to make sure the receiver is configured to receive si...

Page 23: ...e middle of the buttons 3 If you have connected coax cable the cable with a needle in the middle and a ring to tighten the connection from the box to the display you ll need to change to the correct channel Make sure your source is TV and press 3 and ENTER on the display remote If that does not work you ll need to connect your Satellite or Cable Company for support TV Source is optional It may not...

Page 24: ... You ve Connected Antenna to the TV If an antenna or cable without a cable box is connected to your display s TV tuner you will need to go through an INITIAL SETUP process in order to watch the display 1 Press MENU to open the menu 2 Use the or button to select the CHANNEL icon and press ENTER 3 Use the or buttons to highlight the signal type and press or to select your connection either AIR or CA...

Page 25: ...n functions as left direction in the OSD This button functions as right direction in the OSD ENTER This button changes the channel in conjunction with the number pad and also functions as ENTER for selecting options in the OSD Via Display Side Panel Buttons In order to provide more than one type of OSD control buttons the side panel s buttons have also been made functional for adjusting the OSD 1 ...

Page 26: ...settings for all ports such as SPDIF Type treble bass and AVL etc CHANNEL This main option has functions for the tuner port such as scanning channels editing channels audio language and tuner mode etc SETUP This main option has functions for all ports OSD language caption styles time setup and channel setup sleep reset display functions PICTURE This option allows users to adjust the Display s pict...

Page 27: ...e changes the picture quality II SCREEN SIZE This feature changes the various aspects of the Display s video Normal Wide Cinema Zoom FULL 100 III PC SETTINGS i AUTO ADJUST This feature automatically adjusts the picture syncing in with the signal of the PC ii HORIZONTAL POSITION This feature adjusts the to the left or right position of the PC picture iii VERTICAL POSITION This feature adjusts the u...

Page 28: ...wing ii FILM MODE This feature is 24p that syncs with DVD movies and should be enabled when viewing DVD video to allow smoother frame rate iii VIDEO NOISE REDUCTION This feature reduces general pixilation by blurring them iv DT NOISE REDUCTION This feature reduces DVD video pixilation by blurring them v MEMC Setting MEMC Stands for Motion Estimation Motion Compensation This feature controls the pi...

Page 29: ...y User Manual SOUND This option allows users to adjust the Display s sound functions 1 Press MENU to open the OSD 2 Press or to select SOUND and press ENTER 3 Use or to select the one you want to adjust and or or ENTER to adjust them I SOUND SETTINGS ...

Page 30: ... the second audio programming in analog channels IV DIGITAL SOUND This feature adjusts the digital second audio programming in digital channels V OTHER SETTINGS i AVL This feature adjusts the auto volume leveler enabling volume protection from overly loud commercials ii SPEAKER This feature turns the speakers on or off iii DIGITAL AUDIO OUTPUT This feature adjusts the digital audio output VI EQUAL...

Page 31: ...nels added III CHANNEL SETTING i CHANNEL NUMBER This feature shows the channel number ii SKIP This feature tells you if you have chosen for channel to be skipped iii FAVORITE This feature tells you if you have the current channel in your favorite list Press ENTER to add or remove the current channel into the favorite list iv LABEL This feature changes the name of the channel IV SIGNAL TYPE This fe...

Page 32: ... them I CLOSED CAPTION This provides your display tuner AV ports with subtitles i CAPTION DISPLAY This turns on or off the closed captioning ii ANALOG CAPTION TYPE This chooses the subchannel that supplies the closed captioning For United States usually the setting is CC1 TEXT1 4 displays advertisements of the channel iii DIGITAL CAPTION TYPE This chooses the subchannel for digital channel closed ...

Page 33: ...French and Spanish III MENU TRANSPARENCY This function adjusts the opacity of the OSD menu IV CLOCK i TIME ZONE This adjusts the time zone for the display s clock ii AUTO CLOCK This feature sets the display clock to the TV channel s clock You must have antenna to use this feature iii SETUP TIME This feature manually lets you adjust the time and date iv DAY OF THE WEEK This feature tells you the da...

Page 34: ...tible device s remote to power on iv AUDIO RECEIVER This enables the display to use audio return channel function via source HDMI 1 v DEVICE LISTS This shows the current CEC compatible devices connected vi CONNECT This turns on CEC devices through this menu vii ROOT MENU This shows CEC compatible device s own menu VIII TV MODE Allows the user to select between RETAIL MODE or HOME MODE Retail mode ...

Page 35: ... can be downloaded from the channel e CLEAR DOWNLOADABLE DATA This feature clears the downloaded ratings data ii CHANGE PASSWORD This feature changes the password of the parental control function iii KEYPAD LOCK This feature locks the buttons on the display from functioning except for the POWER button iv SOURCE LOCK This feature locks different sources from working XI BLUE BACKGROUND This feature ...

Page 36: ... Depending on the TV station s support either you will hear the description through the main channel or the secondary audio channel Please Note Please refer to RATINGS EXPLAINED for more information on ratings definitions Downloadable rating and clear downloadable data might be grayed out depending on the TV stations support Closed captioning is only available under AV and antenna ports Closed cap...

Page 37: ...onnect a USB flash drive to the USB port of the display and press the USB button to start browsing for music and pictures Once you press the USB button the USB menu will come up Select either the music or picture you want to browse using the arrow buttons Press the ENTER button to select the file you want Browsing Music and Photo In the USB function select Music or Photo Use the or button to selec...

Page 38: ...laying music 6 MUSIC AUTO PLAY This function toggles the auto play feature which will play any music found in the USB flash drive once you insert the flash drive Technical Limitation 1 The USB port does not support USB hubs 2 The USB flash drive supports FAT32 and FAT16 file system only 3 The biggest file size is 2 gigabyte FAT32 4 The picture function only supports JPEG file baseline only progres...

Page 39: ...ce available on digital TV programs also at the election of the service provider It is a more flexible system than the original Closed Caption system because it allows a variety of caption sizes and font styles Not all programs and VHS video tapes offer closed caption Please look for the CC symbol to ensure that captions will be shown In the Closed Caption system there can be more than one caption...

Page 40: ...n on the display you can either use the cell phone itself to control the screen or use the display remote s buttons shown above to control the cell phone screen Please Note Not every cell phone supports MHL Please contact your cell phone company for support information or search MHL on the web for more information Not every MHL cable supports your cell phone There are different versions of MHL cab...

Page 41: ...3D buttons are only functional if you have the product Without the Sceptre Sound Bar or a Sceptre 3D display those buttons will be non functional Sceptre Sound Bar The Sceptre Sound Bar is an add on speakers designed to connect to any flat panel display or UHD display including Sceptre s own These direct function buttons above help eliminate the use of the Sound Bar remote Power This button turns ...

Page 42: ... an AV receiver or surround sound DVD Blu ray player This feature eliminates the necessity of having a separate S PDIF audio connection for sending display audio to the receiver For ARC to work properly the following needs to be met Make sure the display the audio receiver both have the ARC function Make sure the HDMI cable is ARC capable HDMI ver 1 4 or higher Make sure you are using ARC on the c...

Page 43: ...or all ages Although this rating does not signify a program designed specifically for children most parents may let younger children watch this program unattended It contains little or no violence no strong language and little or no sexual dialogue or situations TV PG USTV Parental Guidance Suggested This program contains material that parents may find unsuitable for younger children Many parents ...

Page 44: ...ome material may be inappropriate for children under 13 R MPAA Restricted Under 17 requires accompanying parent or adult guardian age varies in some jurisdictions NC 17 MPAA No one 17 and under admitted X MPAA X is an older rating that is unified with NC 17 but may be encoded in the data of older movies ...

Page 45: ...s aspect keeps that aspect ratio and shows you the black bars on the side 2 WIDE This mode will stretch the picture to a widescreen ratio If you have a perfect 16 9 ratio picture you will not see any black bars If you are watching a widescreen movie in 1 85 1 or 2 35 1 ratio you will still get black bars on the top and bottom of the screen If you use this mode on 4 3 pictures they will be stretche...

Page 46: ...n the remote control You will see a FAV on the INFO banner denoting that this channel is in the favorites list TO DELETE FROM THE FAVORITE LIST 1 Go to any channel you would like to remove from your favorites list 2 Press the ADD DEL button on the remote control You will then see the FAV disappear on the INFO banner denoting that this channel is no longer in the favorites list BROWSING CHANNELS WI...

Page 47: ...o the panel it will cause malfunction and possible permanent damage to the panel which will not be covered under the warranty with clean water and wipe again Wipe the display with a dry micro fiber cloth or 100 cotton cloth afterwards Please Note Make sure you wring the water out of the cloth before cleaning the bezel or remote in order to prevent water from penetrating into the electronics Cleani...

Page 48: ...te control The display s tuner signal must not be lower than 65 REMOTE CONTROL DOES NOT WORK Turn off the display unplug it from the socket Remove the batteries out of the remote for 30 seconds Press the remote buttons and the power button randomly for a good 2 seconds and then reinstall the batteries Try the remote to see if it works For battery removal instructions refer to page 16 The display s...

Page 49: ...ctrical appliances cars motorcycles or fluorescent lights If the display is close to the wall try moving the display to another room in your house to see if the problem still occurs PICTURE DOES NOT COVER THE ENTIRE SCREEN If you re using HDMI or a TV digital channel make sure you use the ASPECT button to switch to 16 9 format If you are using VGA use the AUTO ADJUST function to adjust to the scre...

Page 50: ...ons of DVD movies are most commonly formatted for standard 4 3 TVs The display has the capability of expanding this content so the entire screen is filled at the expense of the image proportion To use this function press the aspect button on the remote control and cycle among the available options I CANNOT FIND THE VOLUME AND CHANNEL CHANGING BUTTONS The buttons are represented by the buttons loca...

Page 51: ...fterwards turn on the display and cable box and make sure your display s source is HDMI MY VIDEO IS BLACK AND WHITE UNDER YPBPR Make sure you are not using yellow video cable connecting to the YPbPr s green port If you are you ll need to use AV as your source instead of YPbPr I DON T SEE AN OPTION FOR THE RESOLUTION 3840 x 2160 WHILE CONNECTED TO HDMI Check and make sure your video card supports t...

Page 52: ...n warranty services or repairs after the warranty period please contact our support department at the number below For technical help contact our Sceptre Technical Support Group via email or phone Please have your Sceptre Product Number P N Serial Number S N and date of purchase available before you call Tech Support E mail SceptreTS sceptre com Customer Service Email SceptreCS sceptre com TEL 180...

Page 53: ... hrs TV DISPLAY Dimension 66 10 x 40 47 x 14 29 with stand 66 10 x 37 91 x 2 66 without stand Weight 74 36 lbs with stand 71 56 lbs without stand Power input 100 240VAC 60 50 Hz 3 A Max Typical 118 watts Maximum 300 watts Function 1 Video De interlace 3D Frame recover 3 2 Noise reducing core technology 3D Aspect ratio Full Normal WIDE CINEMA Zoom Gamma Fixed Gamma Lamp adjust Yes Picture mode Vivi...

Page 54: ... chip Closed caption CC1 CC4 Text 1 Text 4 ATSC Favorite Channel V chip Video input format 1080i 720p 480p 480i Analog closed caption CC1 CC4 Text 1 Text 4 Digital closed caption Service 1 Service 6 5 I O 1 input x TV Tuner NTSC ATSC 1 input x YPbPr AV shared 4 inputs x HDMI HDCP HDMI1 2 3 ver 2 0 supports 4k resolution at 60 Hz HDMI4 ver 1 4 supports 4K at 30hz 1 input x USB 1 output x SPDIF digi...

Page 55: ... PRIOR AUTHORIZATION Parts New or remanufactured parts will be used for repairs by SCEPTRE at its designated Service Center for one 1 year or ninety 90 days for commercial use from the effective warranty date Such replacement parts are warranted for the remaining portion of the original warranty period Service During the one 1 year or ninety 90 days for commercial use warranty period SCEPTRE will ...

Page 56: ...tate to state This is the only warranty applicable no one is authorized to extend or modify it or to grant any other warranty SCEPTRE retains the right to assess all warranty claims and to determine if damages are covered by the warranty In case of a claim that is not covered by the warranty you will be contacted to determine whether SCEPTRE should repair the damage for a fee or whether the produc...

Page 57: ...uide labels will not always reflect your current electricity prices They may also vary due to local energy prices and user s usage habits SCEPTRE is a trademark or registered trademark of Sceptre Group Sceptre Inc shall not be liable for technical or editorial errors or omissions contained herein nor for incidental or consequential damages resulting from furnishing this material or the performance...

Page 58: ...e equipment off and on the user is encouraged to try to correct the interference by one or more of the following measures Reorient or relocate the receiving antenna Increase the separation between the equipment and the receiver Connect the equipment into an outlet on a circuit different from that to which the receiver is connected Caution To comply with the limits for an FCC Class B computing devi...

Reviews: