Using Aroma Oils
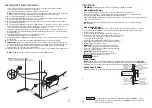
Solder Fittings
When using solder fittings use only tin base solder with a melting point below 315
ºC
.
Do not overheat. Ends of water supply tubing must be thoroughly cleansed for a minimum
distance of 25mm from ends. Do not remove valve cover.
To Check Operation
1. Turn on SAWO and allow tank to fill with water.
2. Turn off SAWO control. Water should stay in tank.
3. Turn off power at the panel box. Water should discharge from tank.
4. Turn on power at panel box.
5. Repeat.
PROVIDE DRAIN PLUMBING ACCORDING TO LOCAL REQUIREMENTS.
PLUMB AS REQUIRED FOR GRAVITY DRAIN SYSTEM.
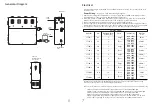
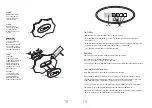
Aroma oil
10ml bottle with
integrated
dropper
Recess for
essential oil
Steam head
(install per instructions
on page 5)
Steam emission slot
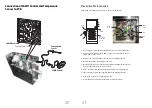
Optional Automatic Drain System
12
!
CAUTION
!
CAUTION
!
CAUTION
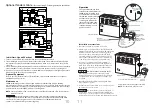
Enjoy aroma oils by placing a drop or
two into your steamhead as shown in
the attached illutration. Only use SAWO
aroma oils in a SAWO steamhead, or any
other equivalent oil deemed suitable for
use in the SAWO steamhead.
Use aroma oils with caution.
aroma oils are for external use only. Keep
out of reach of children. aroma oils are highly
concentrated and are potent substances and
should not be applied directly to the skin as they
can be irritants. Use aroma oils with caution.
Place the drops into the SAWO steamhead recess prior to turning on the
steambath. Do not place drops in a hot steamhead as SERIOUS INJURY CAN RESULT IF YOU
DO NOT FOLLOW THIS WARNING.
Start with one drop to gauge strength and suitability. Limit to a maximum of a few
drops during a steambathing session. Some people may find that the aroma makes dizzy and
the user should exit the steam bath IMMEDIATELY. If skin irritation occurs stop using the oils
immediately. Remove any excess oil by washing in mild soap and water. If ingested, rinse
mouth with water. Administer water or milk to dilute. contact a physician immediately.
13
Model No
.
kW
St
eam Room
V
olume (m³)
Light walls
(t
emper
ed glass
,
acr
ylic
, et
c.
)
Hea
vy walls
(tiles
, c
oncr
et
e,
et
c.
)
V
oltage (
V
)
W
ir
e Siz
e
mm²
Length
Width
Height
Siz
e
of St
eam G
ener
at
or (mm)
cbm
wt.
kg
C
ar
ton Bo
x
Phase
C
u
rr
ent (A)
STR45-1
4.5
6.0mm²
1
4mm²
3
4mm²
3
2.5mm²
3
8.0mm²
1
2.5mm²
3
6.0mm²
1
2.5mm²
3
2.5mm²
3
4mm²
368
502
502
368
368
368
368
368
368
368
171
200
200
171
171
171
171
171
171
171
375
466
466
375
375
375
375
375
375
375
0.07
0.12
0.12
0.07
0.07
0.07
0.07
0.07
0.07
0.07
14
21
21
14
14
14
14
14
14
14
1
20A @ 380V 21A @ 415V
16A @ 380V 17A @ 415V
12A @ 380V 13A @ 415V
10A @ 380V 11A @ 415V
8A @ 380V 9A @ 415V
35A @ 220V 38A @ 240V
29A @ 220V 32A @ 240V
23A @ 220V 25A @ 240V
6A @ 380V 7A @ 415V
18A @ 220V 19A @ 240V
380 - 415
380 - 415
380 - 415
380 - 415
220 - 240
380 - 415
220 - 240
380 - 415
220 - 240
220 - 240
STR45-3
4.5
STR60-1
6.0
STR60-3
6.0
STR75-1
7.5
STR75-3
7.5
STR90-1
9.0
STR90-3
9.0
STR120-3
12.0
STR150-3
15.0
2 - 6
2 - 6
4 -13
4 - 13
5 -18
5 - 18
12 - 24
12 - 24
20 - 30
23 - 35
2 - 4
2 - 4
3 - 8
3 - 8
4 - 12
4 - 12
6 - 16
6 - 16
12 - 20
14 - 25
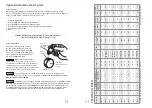
TECHNICAL DA
T
A
*F
or steam rooms with v
entilation,
please use higher k
ilo
w
att steam gener
ators
.
*F
or steam rooms with v
entilation,
please use higher k
ilo
w
att steam gener
ators
.
Subjec
t to change without prior notic
e.
16A @ 380V 17A @ 415V


