background image

SATEL 

INT-TSH2 

1.  Introduction 

This manual contains basic information on how to use the INT-TSH2 keypad with factory 
default settings in the INTEGRA alarm system. The functions available in the user menu of 
the keypad allow you to control your alarm system, regardless of its configuration. In addition, 
the user screens can be prepared by the installer for customization of the keypad 
functionality. The installer can create new user screens and add widgets that you will use for 
day to day operations of the alarm system. The installer may also personalize the look of the 
screen to better suit your preferences in terms of widget, font and background colors. 
Pictures selected by you may be used as the background image. 

Ask the installer for instructions on how to use your individually configured keypad. 
The instructions must include all the changes from the default settings. The installer should 
also instruct you on how to operate the alarm system by using the INT-TSH2 keypad. 

Some functions that can be started in other keypads by entering the code and 
pressing   (e.g. guard round confirmation, unblocking cash machine access, etc.) are 
not available in this keypad. 

2.  Using the touch screen 

The touch screen displays information about the system status, while allowing you to operate 
and program the alarm system, as well as control the home automation equipment. 

In order to control the alarm system, you can use: 

  user screens and additional screens created for you by the installer, 

  user menu created by SATEL. 

After 10 minutes of inactivity, the keypad screen can turn off (this setting is available in the 
service menu). 

Use the gestures described below. 

Tap 

Tap on an item on the screen. 


Summary of Contents for INTEGRA INT-TSH2

Page 1: ...INT TSH2 Keypad User manual INTEGRA EN Firmware version 2 00 int tsh2_oi_en 12 21 SATEL sp z o o ul Budowlanych 66 80 298 Gdańsk POLAND tel 48 58 320 94 00 www satel eu ...

Page 2: ...er the warranty Warning This is a Class A product In a domestic environment this product may cause radio frequency interference The declaration of conformity may be consulted at www satel eu ce Factory default codes Service code 12345 Object 1 master user administrator code 1111 The following symbols may be used in this manual note caution ...

Page 3: ...2 10 User menu 12 10 1 User menu home screen 13 10 2 QWERTY keyboard 14 10 3 Terminal 15 10 3 1 Data editing by using the terminal 15 10 4 Partitions screen 16 10 4 1 Arming 18 10 4 2 Two code arming 18 10 4 3 Disarming 18 10 4 4 Two code disarming 19 10 4 5 Cancelling the first code 19 10 4 6 Auto arming deferment 19 10 4 7 Filtering the partition list 20 10 4 8 Searching for partitions 20 10 5 Z...

Page 4: ... 2 Removing a user 25 10 9 3 Editing a user 25 10 9 4 Searching for users 25 10 10 Tests screen 25 10 10 1 Messaging test 27 10 10 2 Burglary fire technical zone test 27 10 10 3 Selected zone test 27 10 10 4 Review of test results 28 10 11 Settings screen 28 10 11 1 Keypad screen 30 10 12 Others screen 32 10 12 1 Downloading screen 33 11 Service menu 34 12 Manual update history 34 ...

Page 5: ...or instructions on how to use your individually configured keypad The instructions must include all the changes from the default settings The installer should also instruct you on how to operate the alarm system by using the INT TSH2 keypad Some functions that can be started in other keypads by entering the code and pressing e g guard round confirmation unblocking cash machine access etc are not a...

Page 6: ...etween the screensaver user screen user menu home screen scroll through a list Swipe right left Tap the screen and slide your finger right or left to swipe the screen right left go to the previous next screen When the screensaver is active swipe right left to start end the slideshow The slideshow is available when a memory card containing image files is installed in the keypad ...

Page 7: ...e service mode by using this gesture 3 Screensaver The screensaver is displayed when you swipe down on the user screen when you swipe right on the slideshow 60 seconds after the last operation is performed on the screen except when in the service menu You will be logged out when the screensaver is displayed Fig 1 Screensaver keypad with factory default settings The screensaver on a keypad with fac...

Page 8: ...ling The silent panic alarm is useful when the control panel reports events to the monitoring station but unauthorized persons should not be aware of the alarm being triggered 4 User screens When the screensaver or slideshow is displayed tap the screen to go to the user home screen Only one user screen is available in the keypad with factory default settings The installer can add more user screens...

Page 9: ...ed by the alarm system or silent without signaling tap and hold for 3 seconds to trigger the fire alarm tap and hold for 3 seconds to trigger the medical auxiliary alarm tap to view the message Consult the installer about which additional widgets may help you to operate the alarm system or control the home automation devices connected to the control panel Only the installer can create new user scr...

Page 10: ...ap the icon to log in keypad will open see p 12 After you have logged in entered the code the user name will be displayed below the icon If you are logged in tap the icon to log out or go to the user menu 7 Status icons Icon Color System status yellow trouble or trouble memory green at least one partition is armed green service mode started red alarm or alarm memory Information about the armed sta...

Page 11: ...2 Partition state The widget indicates the partition state by means of the following icons Icon Partition status disarmed there are no violated zones disarmed there are violated zones exit delay is running remaining time longer than 10 seconds exit delay is running less than 10 seconds remained armed mode full armed mode full bypasses armed mode without interior armed mode without interior and wit...

Page 12: ...ed The icons selected by SATEL are described in the table below Icon Zone status normal violated trouble long violation trouble no violation inhibited isolated tamper alarm alarm tamper alarm memory alarm memory tamper masking masking memory 8 4 Output state The widget displays the output state represented by either icons selected by SATEL indicator text messages text icons selected by the install...

Page 13: ...e an output 8 8 Rectangle The widget displays a rectangle that can be translucent and have different colors As an additional graphic element it may be used e g to highlight a part of the screen 8 9 Macro The icon for the widget is selected by the installer Tap the widget to run a macro command The macro command is a sequence of actions to be performed by the control panel Macro commands are create...

Page 14: ...if you entered an invalid code If you tap before you enter the code the on screen keypad will close and you will return to the previous screen By default the following codes are programmed in the control panel service code 12345 object 1 master administrator code 1 1111 If there is an alarm in the system it will be cleared after you enter the code 10 User menu Swipe up on the user screen additiona...

Page 15: ... go to the Troubles screen p 23 The function is available when a trouble is signaled by the alarm system tap to go to the Events screen p 23 tap to go to the Users screen p 24 tap to go to the Tests screen p 25 tap to go to the Settings screen p 28 tap to go to the Others screen p 32 If the icon is greyed out the function is unavailable The icon displayed in the top right corner of the screen allo...

Page 16: ... above the keys In addition to the typing keys the following special keys are available tap to switch the keyboard to the uppercase mode tap to switch the keyboard to the lowercase mode tap to exit the QWERTY keyboard tap to switch the keyboard to the number keys mode tap to switch the keyboard to the letter keys mode tap to delete the character before the cursor tap to enable disable the diacriti...

Page 17: ...way as from the LCD keypad with text menu acts as acts as It is displayed if you run certain user functions or service functions Fig 8 Terminal 10 3 1 Data editing by using the terminal The editing method depends on the type of data Having completed the editing tap to save the changes If you want to exit the function without saving the changes tap ...

Page 18: ...aracters from A to F use the and keys keep tapping the key until the required character appears Entering names Keep tapping the key until the required character appears Long tap the key to display the digit assigned to it Shown on the left side in the upper line of the display is information about the letter case Abc ABC or abc it is shown for a few seconds when you tap any key Tap to change the l...

Page 19: ...the object tap to show the list of partitions that belong to the object Information about how many partitions are selected is shown in brackets next to the partition name number of selected partitions number of partitions The numbers displayed next to the following icons indicate number of disarmed partitions number of armed partitions number of partitions where alarm condition occurs number of pa...

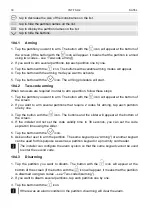
Page 20: ...tom of the screen 2 If you want to arm several partitions that require 2 codes for arming tap each partition one by one 3 Tap the button with the icon The buttons and the slider will appear at the bottom of the screen 4 If the installer did not set the code validity time to 30 seconds you can set the code expiration time using the slider 5 Tap the button with the icon 6 Ask another user to arm the...

Page 21: ...If you entered the first code while two code arming disarming you can cancel it by following these steps 1 Tap the partition where you want to cancel the first code The button with the icon will appear at the bottom of the screen 2 If you want to cancel the first code in several partitions tap each partition one by one 3 Tap the button with the icon The buttons will appear at the bottom of the scr...

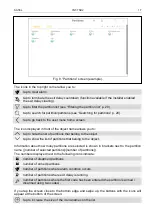
Page 22: ... will be displayed 10 5 Zones screen On this screen you can see the list of zones belonging to the partitions that you can operate by means of the keypad The zones are represented by icons that indicate the zone state The icons are the same as the ones used by the Zone state widget in the indicator mode p 10 The zone name may be displayed beside the icon Fig 10 Zones screen example The icons in th...

Page 23: ...ist tap to hide the buttons 10 5 1 Zone inhibiting The inhibited zone will remain bypassed until disarming the partition it belongs to or until unbypassing the zone by the user 1 Tap the zone you want to inhibit The button with the icon will appear at the bottom of the screen 2 If you want to inhibit several zones tap each zone one by one 3 Tap the button with the icon 10 5 2 Zone isolating The is...

Page 24: ...yed 10 6 Outputs screen On this screen you can see the list of outputs in the system The outputs are represented by icons that indicate the output state The icons are the same as the ones used by the Output state widget in the indicator mode p 10 The output name may be displayed beside the icon Fig 11 Outputs screen example The icon is displayed in the top right corner of the screen Tap it to go b...

Page 25: ... ended trouble memory Each trouble poses a danger to proper functioning of the alarm system and should be repaired as soon as possible If necessary consult the installer The icons in the top right corner allow you to tap to clear the trouble memory tap to go back to the user menu home screen 10 8 Events screen On this screen you can see the list of events Events are displayed in order from the mos...

Page 26: ...All actions that you can perform for the users are also available for the administrators Icon Status user requires no attention Scheduled type user has no access to the system tap the user name to obtain additional information user should change the code telephone code prefix tap the user name to obtain additional information The numbers displayed next to the following icons indicate number of use...

Page 27: ...s the entered string of characters will be displayed 10 10 Tests screen The following functions can be displayed on the screen Supply voltages tap to check the supply voltage of the control panel mainboard and the modules The function available to the installer Radio devices tap to check the radio signal level of wireless devices Temperatures tap to check the temperature temperature information is...

Page 28: ...tap to display information on the control panel firmware version STM prg version tap to display information on the program version of the processor used to operate the zones ABAX system GSM IMEI v sig tap to display the information on the level of GSM signal IMEI number and version of the telephone The function available in the INTEGRA 128 WRL control panel IP MAC IMEI ID tap to display the inform...

Page 29: ...e displayed next to the partition name Y 3 Tap 4 Specify the test duration maximum 50 minutes and tap 5 Define whether violation of a zone is to trigger CHIME in the keypad if yes tap any number key the following character will be displayed Y 6 Tap The zone test will start Starting the zone test will enable the test mode in all ABAX 2 ABAX system wireless devices the wireless detectors will indica...

Page 30: ...detectors follow the manufacturer s directions for the detector testing 8 Tap the View results function to see the test results see Review of test results p 28 9 Tap the Clear results function to delete the test results 10 10 4 Review of test results Tap the View results function The list of tested zones will be displayed The icon that indicates the test results is displayed below the zone name zo...

Page 31: ...o temporarily disable the expansion module tamper supervision tap to specify whether the installer is to have access to the alarm system The function available to the administrator tap to specify whether the installer can add edit remove users The function available to the administrator and applies to his her object tap to specify whether the installer can arm disarm the system clear alarms and by...

Page 32: ... icon is displayed in the top right corner of the screen Tap it to go back to the user menu home screen 10 11 1 Keypad screen Fig 14 Keypad screen The functions available on the Keypad screen are described below tap to set the screen brightness see Setting the screen brightness p 31 tap to set the keypad volume see Setting the keypad volume p 31 tap to lock the touch screen for 30 seconds It will ...

Page 33: ...the keypad is not used beginning of the nighttime Tap the button with the icon to confirm changes Tap the button with the icon to cancel changes Setting the keypad volume Tap the Loudness function The sliders and the buttons will appear at the bottom of the screen The sliders are marked with the icons described in the table below volume of the sounds generated when using the keypad tapping the scr...

Page 34: ...formation on troubles is displayed tap to temporarily deactivate the 43 Resetable power supply type outputs reset the detectors supplied from those outputs tap to deactivate the 9 DAY Alarm 12 Silent alarm and 116 Internal siren type outputs as well as outputs for which the Latch option is enabled tap to restore the control of the doors unlocked due to fire the doors controlled by the access contr...

Page 35: ...ontrol panel GSM communicator The function available in the INTEGRA 128 WRL control panel Start DWNL GPRS tap when you want to start the GPRS communication with the DLOADX program via the control panel GSM communicator The function available in the INTEGRA 128 WRL control panel ETHM 1 DLOADX tap when you want to start the communication with the DLOADX program via the ETHM 1 ETHM 1 Plus module The ...

Page 36: ...me Y or disabled the following character will be displayed next to the option name The icons in the top right corner allow you to tap to display hide the terminal the terminal allows you to use the service menu in the same way as from the LCD keypad with text menu tap to return to the previous list in the service menu For details on how to configure the control panel see the control panel programm...

Reviews: