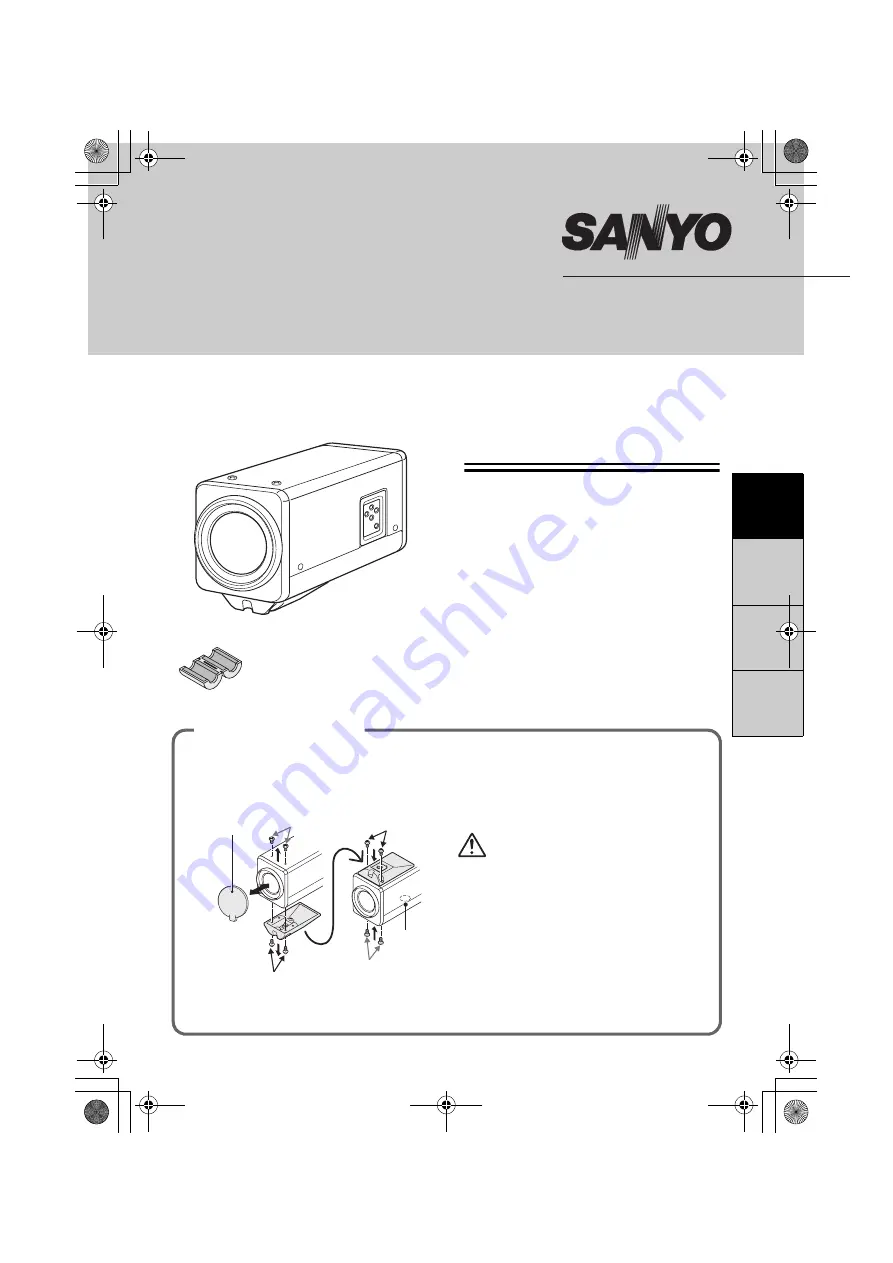
background image

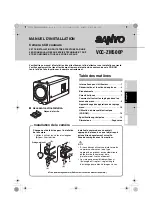
INSTALLATION MANUAL

Color CCD Camera

THIS INSTALLATION SHOULD BE MADE BY A QUALIFIED 
SERVICE PERSON AND SHOULD CONFORM TO ALL LOCAL 
CODES.

Please read this installation manual carefully in order to ensure correct installation. In addition, 
be sure to read carefully the electronic manual contained in the supplied CD-ROM to ensure 
correct operation of the camera.

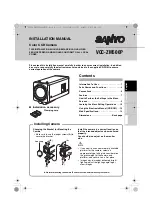
Installation accessory

Contents

Information To User. . . . . . . . . . . . . . . . . . . .  1

Parts Names and Functions . . . . . . . . . . . . .  3

Connections. . . . . . . . . . . . . . . . . . . . . . . . . .  5

Features . . . . . . . . . . . . . . . . . . . . . . . . . . . . .  7

How to Perform the Settings in the Menu 
Screens 
 . . . . . . . . . . . . . . . . . . . . . . . . . . . . .  9

Learning the Menu Setting Operations . . .  10

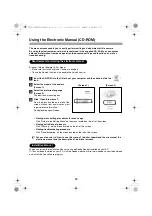
Using the Electronic Manual (CD-ROM)  . .  12

Main Specifications . . . . . . . . . . . . . . . . . . .  13

Dimensions  . . . . . . . . . . . . . . . . . .  Back page

Clamping core

VCC-ZM500P

E

ngl

is

h

F

ran

çai

s

Deutsc

h

中文

简体

Changing the Bracket for Mounting the 
Camera

• Make sure to use the longer screws 

(A)

 to 

secure the bracket.

Install the camera in a correct location so 
that the intended object can be monitored 
properly.

You should also adjust on the monitor 
side.

• If you want to use a commercially available 

platform for the camera, select an 
appropriate type, taking into consideration 
the gross weight of the camera and 
platform, and secure it on a firm place.

• Images may blur under extremely bright 

lighting; adjust the lighting angle to get 
clear images.

(B)

(A)

(A)

(B)

Lens cap

Installing Camera

 Hole for mounting the camera (Remove the screw before mounting the camera.)

L5CN2_XE(INSTALLATION).book  0 ページ  2008年5月7日 水曜日 午後1時13分

Summary of Contents for VCC-ZM500P

Page 1: ...2 Main Specifications 13 Dimensions Back page Clamping core VCC ZM500P English Français Deutsch 中文简体 Changing the Bracket for Mounting the Camera Make sure to use the longer screws A to secure the bracket Install the camera in a correct location so that the intended object can be monitored properly You should also adjust on the monitor side If you want to use a commercially available platform for ...

Page 2: ...this unit close to magnetic fields The magnetic fields may result in unstable operation Protect from humidity and dust To prevent damage do not install the unit where there is greasy smoke or steam where the humidity may get too high or where there is a lot of dust Protect from high temperatures Do not install close to stoves or other heat sources such as spotlights etc or where it could be subjec...

Page 3: ... your local community waste collection recycling centre In the European Union there are separate collection systems for used electrical and electronic products Please help us to conserve the environment we live in This symbol mark and recycle system are applied only to EU countries and not applied to the countries in the other area of the world SANYO FISHER Sales Europe GmbH Stahlgruberring 4 D 81...

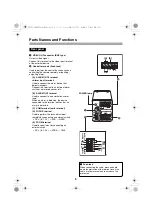
Page 4: ...n alarm is detected the device connected to the terminal notifies that an alarm is detected C COM terminal earth terminal D FOCUS terminal Used to perform the focus adjustment remotely by connecting an external switch DC 6 12 V FAR NEAR E ZOOM terminal Used to zoom in out by connecting an external switch DC 6 12 V WIDE TELE Rear panel RS485 A B POWER VIDEO OUT ALARM IN 2 ALARM IN 1 ALARM OUT COM F...

Page 5: ... about 10 seconds b For zoom focus While viewing the live image you can perform focusing or zooming operation 1 c Wide d Tele j Near l Far 2 Pressing the button once starts auto focus function b For menu operations 1 j Moves the cursor upward l Moves the cursor downward c Changes the setting value or moves the cursor to the right d Changes the setting value or moves the cursor to the left 2 Pressi...

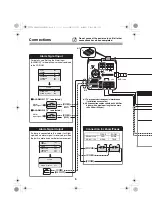
Page 6: ...other connections have been completed For details see Setting the Alarm Input ALARM IN in the electronic manual contained in the CD ROM b ALARM IN 1 1 is selected b ALARM IN 2 2 is selected Alarm input signal Alarm input signal Alarm Signal Input If a lamp is connected to this cable it will light up when an alarm signal is received or when the built in motion sensor detects movement Alarm Signal O...

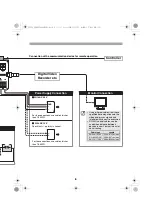
Page 7: ...cation device for remote operation Digital Video Recorder etc Using different cables from those specified here may attenuate the video and or sync signals and interfere with correct transmission RG 59U coaxial cables can be used when distance between devices is short but not in duct or aerial routing Cable type Length RG 59U 3C 2V 250 m 273 yds max RG 6U 5C 2V 500 m 547 yds max RG 11U 7C 2V 600 m ...

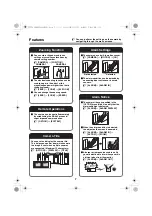
Page 8: ...b The camera can be controlled remotely by establishing the RS 485 or coaxial super imposed communication OPTION SYSTEM Camera Title You can set and display the camera title This helps you confirm from which camera the image is sent when multiple cameras are connected Maximum 16 characters OPTION DISPLAY TITLE ROOM1 ROOM2 ROOM1 ROOM2 Alarm Notice b The camera title you specified in the OPTION menu...

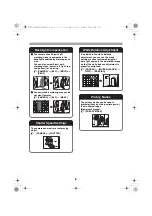
Page 9: ...areas to compensate the backlight condition by metering each area You can also select 5 part split metering areas center left right top and bottom for metering CAMERA BLC MULT or CENT b You can mask a metering area you do not want to meter CAMERA BLC MASK Privacy Masks The privacy masks can be used to protect privacy by hiding certain part of the monitored image Maximum 4 masks PRIVACY MASK Shutte...

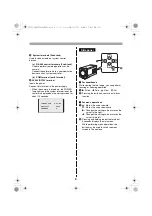
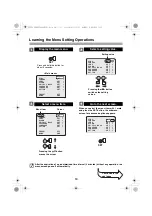
Page 10: ...splays the main menu Press and hold down the SET button for 3 seconds or longer to display the main menu 2 Moves the cursor during menu setting operations 3 Switches the menu screen 4 Performs focusing or zooming in out operations While the auto focus function is activated you can perform focusing operations using the buttons j NEAR l FAR d WIDE c TELE A Using the buttons on the camera B Using the...

Page 11: ...ET SET SET SET SET SET OFF END Main menu Press and hold the button for about 3 seconds SYNC CAMERA LENS ALARM PRIVACY MASK PASSWORD LANGUAGE OPTION PRESET MENU y y y y y y y INT 1 SET SET SET SET SET SET OFF END Pressing the jl button moves the cursor Cursor Menu item 3 Select a setting value 4 Go to the next screen SYNC CAMERA LENS ALARM PRIVACY MASK PASSWORD LANGUAGE OPTION y y y y y y y INT 1 S...

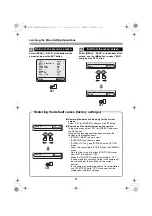
Page 12: ...toring all the default values on the camera In the main menu select ON for PRESET and press the SET button Note that the resetting operation does not reset the settings for the following items PRIVACY MASK on main menu PASSWORD on the main menu DISPLAY TITLE and SYSTEM on the OPTION menu Zoom or focus setting in POSITION on the CAMERA menu Note that the value of the item POSITION is reset from ON ...

Page 13: ...creen click an item on which you want to get relevant information An applicable page will open Viewing menu setting procedures for each usage Click Guide to the Setting Menu on the menu located on the left of the screen Viewing definitions of glossary Click Glossary on the menu located on the left of the screen Viewing troubleshooting procedure Click Troubleshooting on the menu located on the left...

Page 14: ...terminal x 2 NO Normal Open NC Normal Close switching Alarm output Control terminal x 1 NO NC switching open collector Focus Zoom control Control voltage 6 12 V DC Communication method System connection terminals RS 485 Coaxial support of camera control unit VAC 70 Operating ambient temperature humidity 10 50 C 14 122 F 90 RH max no condensation Power source 24 V AC 10 50 Hz 12 15 V DC Power consu...

Page 15: ...n du manuel électronique CD ROM 12 Spécifications principales 13 Dimensions Page verso Noyau de ferrite VCC ZM500P Installation de la caméra English Français Deutsch 中文简体 Changement de la bride pour l installation de la caméra Veillez à utilisez les vis les plus longues A pour fixer la bride Installez la caméra dans un endroit approprié de façon à ce que l objet requis puisse être adéquatement sur...

Page 16: ...gnétiques Les champs magnétiques peuvent causer un mauvais fonctionnement Gardez le à l abri de l humidité et de la poussière Pour éviter d endommager l appareil ne l installez pas là où il y a de la vapeur ou de la fumée grasse où le degré d humidité risque de devenir trop élevé ou là où il y a beaucoup de poussière Gardez le à l abri des températures élevées N installez pas l appareil près de fo...

Page 17: ...es de manière inappropriée peuvent s avérer potentiellement dangereuses pour la santé humaine et pour l environnement Cependant ces matières sont nécessaires au bon fonctionnement de votre appareil ou de votre machine Pour cette raison il vous est demandé de ne pas vous débarrasser de votre appareil ou machine usagé avec vos ordures ménagères Ce symbole et le système de recyclage ne sont appliqués...

Page 18: ...ositif connecté à la borne signale qu une alarme a été détectée C Borne COM borne de terre D Borne FOCUS Utilisée pour le réglage à distance de la mise au point via la connexion d un interrupteur externe CC 6 12 V Éloignée Proche E Borne ZOOM Utilisée pour le zoom avant arrière via la connexion d un interrupteur externe CC 6 12 V Grand angulaire Téléobjectif Panneau arrière RS485 A B POWER VIDEO O...

Page 19: ...iliser le zoom ou la mise au point pendant le visionnement de l image en direct 1 c Grand angulaire d Téléobjectif j Proche l Éloignée 2 Une seule pression du bouton fait démarrer la fonction de mise au point automatique b Pour les fonctions de menu 1 j Déplace le curseur vers le haut l Déplace le curseur vers le bas c Modifie la valeur de réglage ou déplace le curseur vers la droite d Modifie la ...

Page 20: ...ctues Pour tout détail consultez Réglage de l entrée d alarme ENT ALARME dans le manuel électronique contenu dans le CD ROM b ALARM IN 1 1 est sélectionné b ALARM IN 2 2 est sélectionné Alarme signal d entrée Alarme signal d entrée Entrée du signal d alarme Si un témoin est relié à ce câble il s allume lorsqu un signal d alarme est reçu ou lorsque le capteur intégré détecte un mouvement Sortie du ...

Page 21: ...pareil de communication pour la commande à distance Enregistreur vidéo numérique etc L utilisation de câbles autres que ceux spécifiés peut atténuer les signaux vidéo et ou sync et réduire la qualité de la transmission Des câbles coaxiaux RG 59U peuvent être utilisés lorsque la distance entre les appareils est courte mais pas dans un câblage dans une gaine ou une antenne Type de câble Longueur RG ...

Page 22: ...ment à distance b La caméra peut être commandée à distance via une communication superposée coaxiale ou RS 485 OPTION SYSTEME Titre de la caméra Vous pouvez définir et visualiser le titre de caméra Lorsque plusieurs caméras sont connectées cela vous permet d identifier la caméra dont proviennent les images 16 caractères maximum OPTION AFFICHER TITRE ROOM1 ROOM2 ROOM1 ROOM2 Notation alarme b Le tit...

Page 23: ... chaque zone Vous pouvez également sélectionner des zones de mesure divisées en 5 centre gauche droite haut et bas pour effectuer la mesure CAMERA BLC MULT ou CENT b Vous pouvez masquer une zone de mesure que vous ne souhaitez pas mesurer CAMERA BLC MASQ Masques de confidentialité Il est possible d utiliser des masques de confidentialité pour cacher certaines parties de l image de surveillance afi...

Page 24: ...ncé le bouton SET pendant 3 secondes ou plus pour afficher le menu principal 2 Déplace le curseur pendant les opérations de réglage menu 3 Commute l écran de menu 4 Effectue des opérations de mise au point ou zoom avant arrière Vous pouvez utiliser ces boutons pour effectuer la mise au point lorsque la fonction de mise au point automatique est activée j Proche l Éloignée d Grand angulaire c Téléob...

Page 25: ...R FIN Menu principal Appuyez et maintenez enfoncé le bouton pendant environ 3 secondes SYNC CAMERA LENTILLE ALARME MASQUE M PASSE LANGUE OPTION PREREGLAGE MENU y y y y y y y INT 1 REG REG REG REG REG REG ARR FIN Pressez le bouton jl pour déplacer le curseur Curseur Article de menu 3 Sélectionnez une valeur de réglage 4 Allez au menu suivant SYNC CAMERA LENTILLE ALARME MASQUE M PASSE LANGUE OPTION ...

Page 26: ...s les valeurs par défaut de la caméra Dans le menu principal sélectionnez MAR pour PREREGLAGE puis pressez le bouton SET Remarque elle ne réinitialise pas les réglages pour les articles suivants MASQUE dans le menu principal M PASSE dans le menu principal AFFICHER TITRE et RESEAU dans le menu OPTION Réglage du zoom ou de la mise au point dans POSITION dans le menu CAMERA Notez que la valeur de l a...

Page 27: ... informations appropriées Une page pertinente s affiche Visualisation des procédures de définition menu pour chaque utilisation Cliquez sur Guide au menu de réglage sur le menu situé à gauche de l écran Visualisation des définitions de glossaire Cliquez sur Glossaire sur le menu situé à gauche de l écran Visualisation de la procédure de résolution des problèmes Cliquez sur En cas de problème sur l...

Page 28: ...ande x 2 commutation NO Normalement Ouvert NF Normalement fermé Sortie d alarme Borne de commande x 1 commutation NO NF collecteur ouvert Contrôle zoom mise au point Tension de contrôle de 6 à 12 V DC Mode de communication Bornes de connexion système RS 485 Coaxial support télécommande caméra VAC 70 Humidité température ambiantes de service 10 50 C 90 RH maxi pas de condensation Source d alimentat...

Page 29: ...sions Abmessungen Rückseite Ferritkern VCC ZM500P English Français Deutsch 中文简体 Ändern der Halterung zur Kamerainstallation Für die Befestigung der Halterung müssen Sie die längeren Schrauben A verwenden Installieren Sie die Kamera an einem passenden Ort damit das betreffende Objekt einwandfrei überwacht werden kann Dabei sollte auch die Monitorseite eingestellt werden Falls Sie eine handelsüblich...

Page 30: ... Vibrationen ausgesetzt werden Das Gerät darf nicht in der Nähe eines Magnetfelds aufgestellt werden Ein Magnetfeld kann einen instabilen Betrieb verursachen Das Gerät vor Feuchtigkeit und Staub schützen Um Beschädigungen zu verhüten darf das Gerät keinem Ölrauch oder Dampf ausgesetzt werden und nicht an Orten mit hoher Luftfeuchtigkeit oder hoher Staubkonzentration betrieben werden Das Gerät darf...

Page 31: ...me für Elektrik und Elektronikgeräte Helfen Sie uns bitte die Umwelt zu erhalten in der wir leben Dieses Symbol und das entsprechende Recycling System gelten nur für EU Länder und finden in den anderen Ländern der Welt keine Anwendung SANYO FISHER Sales Europe GmbH Stahlgruberring 4 D 81829 München Germany SANYO Electric Co Ltd 1 1 Sanyo cho Daito City Osaka 574 8534 Japan Die Installationsanleitu...

Page 32: ...larmausgang ALARM OUT Klemme Wenn ein Alarm erfasst wird weist das an die Klemme angeschlossene Gerät auf die Erfassung des Alarms hin C Erdungsklemme COM D Fokus Klemme FOCUS Für die fernbediente Scharfeinstellung über ein externes Schalter DC 6 12 V Fern Nahe E Zoom Klemme ZOOM Für das Ein Auszoomen über ein externes Schalter DC 6 12 V Weitwinkel Tele Rückseite RS485 A B POWER VIDEO OUT ALARM IN...

Page 33: ... Für Zoom Scharfeinstellung Während der Anzeige des Live Bildes können Sie die Scharfeinstellung vornehmen oder das Bild zoomen 1 c Weitwinkel d Tele j Nahe l Fern 2 Durch einmaliges Drücken der Taste starten Sie die Autofokus Funktion b Für die Menübedienung 1 j Bewegt den Cursor nach oben l Bewegt den Cursor nach unten c Ändert den Einstellwert oder bewegt den Cursor nach rechts d Ändert den Ein...

Page 34: ...rt wurden 1 Vermeiden von elektromagnetischen Störungen Installationszubehör 2 Alle Anschlusskabel müssen mindestens 24 AWG entsprechen und die Länge darf nicht mehr als 600 m betragen Weitere Einzelheiten finden Sie unter Einstellen des Alarmeingangs ALARM EIN in der elektronischen Anleitung auf der CD ROM b ALARM IN 1 1 ist aktiviert b ALARM IN 2 2 ist aktiviert Alarm eingangssignal Alarm eingan...

Page 35: ...ionsgerät zur Fernbedienung Digital Videorecorder etc Die Verwendung von nicht mit den Spezifikationen konformen Kabeln kann die Video und oder Synchronisationssignalen schwächen und die korrekte Übertragung beeinträchtigen RG 59U Koaxialkabel können verwendet werden wenn der Abstand zwischen den Geräten kurz ist aber nicht bei Kabelkanälen oder an Außenwänden verlegten Leitungen Kabeltyp Länge RG...

Page 36: ...ttstelle oder die überlagerte Koaxialkommunikation ist die Fernbedienung der Kamera möglich OPTION SYSTEM Kamerabezeichnung Sie können die Kamerabezeichnung einstellen und anzeigen Wenn mehrere Kameras angeschlossen sind ist dies bei der Bestätigung der Kamera hilfreich von der das Bild gesendet wird Maximal 16 Zeichen OPTION ANZEIGE ANZEIGE ROOM1 ROOM2 ROOM1 ROOM2 Alarmmeldung b Die im Menü OPTIO...

Page 37: ... auszugleichen Für die Messung können Sie auch 5 fach unterteilte Messbereiche Mitte links rechts oben und unten auswählen KAMERA GEGENL KOMP MULT oder MITTE b Messbereiche die nicht gemessen werden sollen können Sie durch eine Maske abdecken KAMERA GEGENL KOMP MASKE Masken Die Masken dienen der Verdeckung eines bestimmten Bereichs des Überwachungsbilds und damit dem Schutz der Privatsphäre Maxima...

Page 38: ...s Hauptmenü an Drücken Sie die SET Taste und halten Sie sie mindestens 3 Sekunden lang gedrückt um das Hauptmenü anzuzeigen 2 Bewegt den Cursor während der Einstellung des Menüs 3 Schaltet auf den nächsten Menübildschirm um 4 Dient der Scharfeinstellung oder dem Ein Auszoomen Bei aktivierter Autofokus Funktion können Sie mit den Tasten die Scharfeinstellung vornehmen j Nahe l Fern d Weitwinke c Te...

Page 39: ...Taste und halten Sie sie circa 3 Sekunden lang gedrückt SYNC KAMERA OBJEKTIV ALARM PRIV MASK KENNWORT SPRACHE OPTION VOREINST MENUE y y y y y y y INT 1 EINST EINST EINST EINST EINST EINST AUS ENDE Durch Drücken der Tasten jl bewegen Sie den Cursor Cursor Menüpunkt 3 Wählen Sie einen Einstellwert aus 4 Rufen Sie den nächsten Bildschirm auf SYNC KAMERA OBJEKTIV ALARM PRIV MASK KENNWORT SPRACHE OPTIO...

Page 40: ...en Sie im Hauptmenü die Option EIN für VOREINST und drücken Sie die SET Taste Beachten Sie dass bei diesem Vorgang die Einstellungen der folgenden Menüpunkte nicht zurückgesetzt werden PRIV MASK im Hauptmenü KENNWORT im Hauptmenü ANZEIGE BEZEICHNUNG und NETZWERK im Menü OPTION Zoom or focus setting in POSITION on the CAMERA menu Zoom oder Scharfeinstellungswerte in POSITION im KAMERA Menü Beachten...

Page 41: ...onen erhalten möchten Die zutreffende Seite wird geöffnet Anzeige von Verfahren für die Menüeinstellungen für jeden Gebrauch Klicken Sie auf Übersicht über das Einstellmenü im Menü auf der linken Bildschirmseite Anzeigen der Glossarsdefinitionen Klicken Sie auf Schlüsselbegriffe im Menü auf der linken Bildschirmseite Anzeigen der Vorgehensweise zur Fehlersuche Klicken Sie auf Fehlersuche im Menü a...

Page 42: ...s x 2 NO Normal geöffnet NC Normal geschlossen Umschaltung Alarmausgang Steuerungsanschluss x 1 NO NC Umschaltung Open Collector Steuerung von Scharfeinstellung Zoom Steuerspannung 6 bis 12 V DC Kommunikation Systemanschlussklemmen RS 485 Koaxial Unterstützung der Kamerasteuergerät VAC 70 Betriebstemperatur Luftfeuchtigkeit 10 50 C 90 max RF keine Kondenswasserbildung Stromversorgung 24 V AC 10 50...

Page 43: ...设置 9 了解菜单设置操作 10 使用电子手册 CD ROM 光盘 12 主要规格 13 Dimensions 尺寸 封底 卡榫屏蔽环 VCC ZM500P English Français Deutsch 中文简体 改变托架以便安装摄像头 请确保使用较长的螺钉 A 固定托架 将摄像头安装在正确位置 以便能够正确监视 目标 也应该在监视器侧进行调整 如果想在摄像头上使用市面出售的托板 请选择适当的形式 需考虑托板和摄像头 的总重量 并需要将其固定在牢固的位 置 如果光线极强 图像可能变得模糊 调整 采光角度可获得清晰图像 B A A B 镜头盖 安装摄像头 摄像头的安装孔 安装摄像头之前请取下螺钉 L5CN2_XE INSTALLATION book 0 ページ 2008年5月7日 水曜日 午後1時13分 ...
Page 44: ...伤 切勿使本机掉落或遭受强烈的冲 击或震动 不要将本机安装在磁场的附近 磁场可能会引起动作不稳定 避免湿气和灰尘 为了避免本机损伤 切勿把它设置在有油烟或水 蒸汽 湿度过高或有很多灰尘的场所 避免高温 切勿设置在取暖炉或其他热源 如聚光灯等的附 近 也不要设置在易受到直射阳光照射的地方 否则可能会引起变形 褪色或其他损伤 当设置在天花板 厨房或锅炉房附近时 温度可 能会升得很高 请予注意 清洁 用软布擦拭能去掉壳体上的脏物 要除去污 垢 可用软布沾上洗涤剂溶液并拧干后擦拭 然后再用干的软布擦干 切勿使用汽油 涂料稀释剂或其他化学品清洁 壳体 否则可能会引起变形和涂漆剥落 在使 用化学性抹布时 务必阅读全部随带的使用说 明 切勿将塑料或橡胶材料长时间与机壳接 触 不然会引起损伤或涂漆剥落 本安装手册和电子手册的版权归SANYO Electric Co Ltd 所有 未经版权所有者的事先许可 ...

Page 45: ...2 L5CN2_XE INSTALLATION book 2 ページ 2008年5月7日 水曜日 午後1時13分 ...
Page 46: ...此端子的设备会发出 已检测到报警的通知 C COM端子 接地端子 D FOCUS端子 通过连接外部开关遥控调节焦距 DC 6 12 V 远 近 E ZOOM端子 通过连接外部开关进行放大 缩小操作 DC 6 12 V 广角 望远 后面板 RS485 A B POWER VIDEO OUT ALARM IN 2 ALARM IN 1 ALARM OUT COM FOCUS ZOOM N C COM AC24V DC12V GND ALARM IN 2 ALARM IN 1 ALARM OUT COM FOCUS ZOOM 1 4 B D C E A RS485 A B N C COM 3 2 b a POWER指示灯 b 压锁式 在连接电缆时 请按住端子的突出端 将电 缆插入端子 然后松开突出端 L5CN2_XE INSTALLATION book 3 ページ 2008年5月7日 水曜日 午...

Page 47: ...头时 POWER指示灯将会变亮 摄像头的系统信息将会在启动屏幕上显示约10 秒钟 b 用于变焦 聚焦 在观看动像时 可以进行聚焦或变焦操作 1 c 广角 d 望远 j 近 l 远 2 按一下此按钮即可启动自动聚焦功能 b 用于菜单操作 1 j 向上移动光标 l 向下移动光标 c 更改设置值或向右移动光标 d 更改设置值或向左移动光标 2 按住此按钮大约3秒钟即可显示主菜单 在进行菜单操作时 可使用此按钮将菜单屏 幕切换到下一屏幕 CAMERA VER PROTOCOL ADDRESS X XX XX XXXX X SET 1 2 侧面板 L5CN2_XE INSTALLATION book 4 ページ 2008年5月7日 水曜日 午後1時13分 ...
Page 48: ...ISPLAY SYNC CAMERA LENS ALARM PRIVACY MASK PASSWORD LANGUAGE OPTION y y y y y y y INT 1 SET SET SET SET SET SET 1 COM ZOOM FOCUS IN2 COM IN1 COM COM AL OUT 连接 在其它连接尚未完成之前 请勿连接电源线 欲了解详细信息 请参见CD ROM光盘中包含的 电子手册的 设置报警输入 ALARM IN 一 节 b ALARM IN 1 选定 1 b ALARM IN 2 选定 2 报警 输入信号 报警 输入信号 报警信号输入 如果此电缆已连接到指示灯 当接收到报警信 号或是内置运动传感器检测到运动时 该灯就 会亮起 报警信号输出 FOCUS ZOOM DC 6V 12V 远 广角 DC 6V 12V 近 望远 变焦 聚焦连接设备 BNC类型 1 ...

Page 49: ... AWG粗的电缆进行连接 请使用比18 AWG粗的电缆进行连接 监视器连接 连接通信设备以进行遥控操作 数字视频录像机等 如果使用与这些指定类型不同的电 缆 视频和 或同步信号将会被削 弱和受到干扰而无法正常传输 当装置之间的距离很短时 可以使 用RG 59U同轴电缆 但不能在管 线或是天线布线中使用 电缆类型 长度 RG 59U 3C 2V 最长250m RG 6U 5C 2V 最长500m RG 11U 7C 2V 最长600m L5CN2_XE INSTALLATION book 6 ページ 2008年5月7日 水曜日 午後1時13分 ...
Page 50: ...ON ON b 通过连接门开关或红外线传感器 可以检 测到报警条件 ALARM ALARM IN 未检测到 已检测到 遥控操作 b 通过建立RS 485或同轴电缆叠加信号通 信 可对摄像头进行遥控 OPTION SYSTEM 摄像头名称 b 可以设置和显示摄像头名称 在连接了多 个摄像头时 这有助于确认发送图像的摄 像头 最多16个字符 OPTION DISPLAY TITLE ROOM1 ROOM2 ROOM1 ROOM2 报警通知 b 在 OPTION 菜单中指定的摄像头名称将 会通过闪烁来表明已检测到报警条件 ALARM ALARM DISPLAY b 当检测到报警条件时 将会放大屏幕上的 物体 ALARM ALARM IN ACTION ZOOM b 当您位于离监视器较远的位置时 蜂鸣器 或指示灯可用来通知您已检测到报警 ALARM ALARM OUT DOOR1 DOOR1 DO...

Page 51: ... MASKING 背光补偿 b 摄像头使用了48 分拆分测光区域 可通 过对每个区域进行测光来补偿背光条件 也可以选择5 分拆分测光区域 中 左 右 上 下 进行测光 CAMERA BLC MULT or CENT b 可以掩蔽不想对其进行测光的测光区域 CAMERA BLC MASK 隐私掩蔽 隐私掩蔽可隐藏被监控图像的某个部分 因 此可用来保护隐私 最多 4 个掩蔽位置 PRIVACY MASK 快门速度设置 摄像头可以监控快速移动的物体 CAMERA SHUTTER L5CN2_XE INSTALLATION book 8 ページ 2008年5月7日 水曜日 午後1時13分 ...
Page 52: ...AC 70 与摄像 头进行相同的操作 欲了解详细信息 请参阅摄像头控制器的说明 手册 1 显示主菜单 按住SET按钮3秒钟以上即可显示 主菜单 2 在菜单设置操作中移动光标 3 切换菜单屏幕 4 进行聚焦或放大 缩小操作 在自动聚焦功能激活时 可以使用 这些按钮进行聚焦操作 j 近 l 远 d 广角 c 望远 A 使用摄像头上的按钮 B 使用VAC 70摄像头控制器 可选购 进行遥控设置 SET 1 3 2 4 1 2 4 3 L5CN2_XE INSTALLATION book 9 ページ 2008年5月7日 水曜日 午後1時13分 ...

Page 53: ...AMERA LENS ALARM PRIVACY MASK PASSWORD LANGUAGE OPTION PRESET MENU y y y y y y y INT 1 SET SET SET SET SET SET OFF END 按jl 按钮即可移动光标 光标 菜单项 3 选择设置值 4 转到下一屏幕 SYNC CAMERA LENS ALARM PRIVACY MASK PASSWORD LANGUAGE OPTION y y y y y y y INT 1 SET SET SET SET SET SET 设置值 按dc按钮即可切换设置值 SYNC CAMERA LENS ALARM PRIVACY MASK PASSWORD LANGUAGE OPTION INT 1 SET SET SET SET SET SET SET y y y y y y y 下一页将继续说明 菜单设置...

Page 54: ...SET MENU OFF END SET PRESET MENU OFF BACK PRESET MENU ON END SET 仅对当前屏幕恢复默认值 对 PRESET 选择 ON 然后按下SET按钮 恢复摄像头上的所有默认值 在主菜单中对 PRESET 选择 ON 然后按下SET按 钮 请注意 复位操作不会对以下项目的设置进行复位 主菜单上的 PRIVACY MASK 主菜单上的 PASSWORD OPTION菜单上的 DISPLAY TITLE 和 NETWORK CAMERA菜单上的 POSITION 中的变焦或聚焦设置 请注意 POSITION 项的值已从 ON 复位为默认的 OFF 当 POSITION 设置切换为 OFF 时 摄像头内存储的 变焦和聚焦设置将被当前位置的设置所覆盖 同样 在 POSITION 设置为 OFF 的情况下进行变焦 或聚焦操作也将覆盖存储的变焦和聚焦...

Page 55: ... 屏幕1 3选择所需的语言 屏幕2 电子手册开启 4单击 Open this manual 打开本手册 在屏幕左侧的菜单中单击需要获得相关 信息的项目 此时将会打开一个应用页面 查看每个用法的菜单设置步骤 在屏幕左侧的菜单上单击 设置菜单指导 查看术语表的定义 在屏幕左侧的菜单上单击 术语表 查看故障排除步骤 在屏幕左侧的菜单上单击 故障排除 也可以参考 How to use this manual 如何使用本手册 一节 以更好地了解电子手册的结构 和各屏幕的说明 为了打开和查看本安装手册 需要在计算机上安装 Adobe Reader 如果您的计算机上尚未安装 Adobe Reader 请登录 Adobe 网站 http www adobe com 以下载并安装这种免费的软件程序 查看电子手册的要求 屏幕2 屏幕1 安装手册 L5CN2_XE INSTALLATION book 12 ペー...

Page 56: ... NO NC切换 集电极开路 聚焦 变焦控制 控制电压 6至12 V DC 通信方法 系统连接端子 RS 485 同轴 支持摄像头控制器 VAC 70 工作环境温度 湿度 10 50 最高90 RH 无冷凝 电源 24 V AC 10 50Hz 12 15 V DC 功耗 4 5W 尺寸 W x H x D 56 x 64 x 150 mm 重量 约为540g Microsoft ActiveX和Internet Explorer是Microsoft Corporation在美国和其他国家 地区 的注册商标或商标 Adobe Reader是Adobe Systems Incorporated的商标 本手册中的所有其他品牌和产品名称均是各自所有者的注册商标或商标 1 4 20UNC 147 5 8 10 0 4 3 0 1 11 56 2 2 64 2 5 Unit mm inch Dime...

Reviews: