background image

IMPORTANT INFORMATION

If  a  television  is  not  positioned  in  a  sufficiently  stable  location,  it  can  be 
potentially hazardous due to falling. Many injuries, particularly to children, can 
be avoided by taking simple precautions such as:

!

 Using cabinets or stands recommended by the manufacturer of the television.

!

 Only using furniture that can safely support the television.

!

  Ensuring  the  television  is  not  overhanging  the  edge  of  the  supporting 

furniture.

!

  Not  placing  the  television  on  tall  furniture  (for  example,  cupboards  or 

bookcases)  without  anchoring  both  the  furniture  and  the  television  to  a 
suitable support.

!

 Not standing the televisions on cloth or other materials placed between the 

television and


supporting


furniture

.

!


Educating


children


about


the


dangers


of


climbing


on


furniture


to


reach


the


television


or


its


controls

.

Warning

:

To  prevent  the  spread  of  fire,  keep  candles  or  other 
open flames away from this product at all times. 

1

Summary of Contents for LCD-40XAZ10F

Page 1: ...INSTRUCTION MANUAL LCD 40XAZ10F LCD TV Before connecting operating or adjusting this product please read the manual completely Please keep this manual for future reference ...

Page 2: ...ls 5 Setting Up 7 Connections 8 Basic Operations 12 Memorizing the Channels Setting Channels 14 Adjusting the Picture Adjusting the Sound Adjusting Basic Settings Teletext Operation Adjusting the Computer Image Troubleshooting 24 Specifications 25 Appendix Installing the Stand 26 18 19 20 21 22 Using USB 22 ...

Page 3: ...n Ensuring the television is not overhanging the edge of the supporting furniture Not placing the television on tall furniture for example cupboards or bookcases without anchoring both the furniture and the television to a suitable support Not standing the televisions on cloth or other materials placed between the television and supporting furniture Educating children about the dangers of climbing...

Page 4: ...r electric shock 9 Entering of objects and liquids Never insert an object into the product through vents or openings High voltages are present in the product and inserting an object can cause electric shock and or short internal parts For the same reason do not spill water or liquid on the product 10 Servicing Refer all servicing to qualified service personnel Servicing is required when the appara...

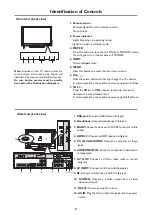
Page 5: ...ry cloth Unplug this product from the wall outlet before cleaning Do not use liquid cleaners or aerosol cleaners Use a damp cloth for cleaning 20 Ventilation Do not block any ventilation openings Install in accordance with the manufacturer instructions The vents and other openings in the cabinet are designed for ventilation Do not cover or block these vents and openings since insufficient ventilat...

Page 6: ... minimum viewing level B Do not display the fixed image for extended periods of time C Turn the power off when not in actual use Important Information Regarding Use of Video Games Computers Captions or Other Fixed Image Displays To clean this unit wipe with a soft dry cloth If the surfaces are extremely dirty use a soft cloth dipped in a soap and water solution or a weak detergent solution Use eye...

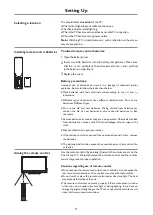
Page 7: ...minate it Second touch will fulfill its function Be sure button presses must be quickly done before the illumination disappears 5 1 2 INPUT MENU CH VOL 3 4 5 6 7 INPUT MENU CH VOL 1 USB port Connect a USB device to this port 2 Headphone Connect headphones to this jack 3 SCART Connect a device with SCART connector to this socket 4 HDMI1 2 Connect an HDMI device to this jack 5 PC IN VGA AUDIO Connec...

Page 8: ...ext Teletext 17 HDMI Press repeatedly to cycle between HDMI 1 HDMI2 inputs 18 AUTO STEREO Selects Stereo or Mono In VGA mode press to automatically adjust PC image settings 19 TV Press to switch to TV mode 20 VIDEO Press repeatedly to cycle between AV SCART SVideo inputs 21 FREEZE To freeze the current picture 22 MUTE Mutes the sound 23 EXIT Exits the menu screen 24 PICTURE Selects picture mode 25...

Page 9: ... the and symbols in the battery compartment 2 Replace the cover 3 Selecting a location You should select a location for the TV Where direct light does not reflect on the screen That has indirect and soft lighting Where the TV has access to an antenna or cable TV connection Where the TV has access to a power outlet Note Watching TV in total darkness or with a reflection on the screen may cause eyes...

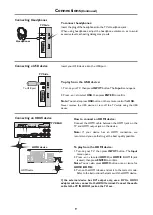
Page 10: ...t using for a long period of time This illustration is for reference only The AC plug may be different on different models Connections When connecting an external device to the TV make sure that the TV and the device are turned off Check the plugs on the ends of cables to make sure that they are the correct type before you try plugging them into jacks on the TV Make sure that all plugs are securel...

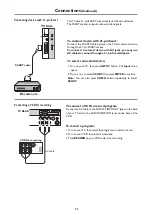
Page 11: ... You can also press HDMI button once or twice for HDMI1 HDMI2 3 Turn on the HDMI device and set it to the correct mode Refer to the instructions that came with the HDMI device If the external device has DVI output only use a DVI to HDMI adapter cable to connect to the HDMI terminal Connect the audio cable to the PC IN AUDIO jack on the TV rear Connecting a USB device TV Side Insert your USB device...

Page 12: ...GA 3 Turn on your computer and adjust the display properties as required To play video from the computer Connect a VGA cable between the VGA jack on the computer and the VGA input jack on the unit Connect an Audio cable between the AUDIO output on the computer and AUDIO input jack on the unit 10 TV REAR Component cables often have red green and blue color coded video connectors and red and white a...

Page 13: ...rt Connect the SCART Cable between the TV and external device through the 21 pin SCART socket To connect to external device with AV jacks you may use AV cables to connect through a 21 pin Scart Adapter To connect device with 21 pin Scart 1 Turn on your TV then press INPUT button The Input menu opens 2 Press 5 or6 to select SCART then press ENTER to confirm Note You can also press VIDEO button repe...

Page 14: ...ode COMP Press to switch to COMPONENT mode VIDEO Press repeatedly to cycle between the AV SCART SVideo inputs VGA Press to switch to VGA mode TV Press to switch to TV mode USB Press to switch to USB mode Selecting a channel You can use the following ways to change channels Press CH or CH to go to the next or previous channel The skipped channels can not be selected Press the number buttons to dire...

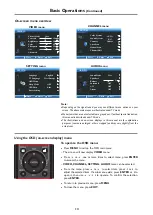
Page 15: ...DIO menu can be selected From the menu press 5 or 6 to select item press 3 or4 to adjust the selected item If a sub menu exists press ENTER or 4 to open it then use 5 6 3 4 to operate To confirm the selection press ENTER To return to previous menu press MENU To close the menu press EXIT Using the OSD on screen display menu Note Depending on the signal tuned you may see different menu options on yo...

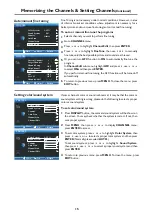
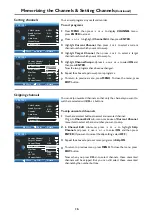
Page 16: ...n to search programs manually To manual scan for channels 2 3 Press 6 or 5 to highlight Manual Scan then press ENTER 4 Press3 to scan towards lower frequency press4 to scan towards higher frequency If the program found is not the one you desire press 3 4 until you get the desired program then this program is stored in the current channel position 5 65 75MHz Exit Adjust Manual Scan Current Channel ...

Page 17: ...l Edit Manual Scan Color System AUTO I CHANNEL Move DK BG L I Return OK Return Country Country 2 3 Press 6 or 5 to highlight Channel Edit then press ENTER 4 Press 6 or 5 to highlight FineTune then use 3 or4 to manually fine tune until the best possible picture and sound are achieved Or you can turn AFC function to ON to automatically fine tune the program In Channel Edit sub menu highlight AFC and...

Page 18: ...ystem Auto Scan Channel Edit Manual Scan Color System AUTO CHANNEL Move Enter To sort programs 1 Press MENU then press 6 or 5 to display CHANNEL menu press ENTER to access Press 6 or 5 to highlight Channel Edit then press ENTER 2 Highlight Current Channel then press 3 or4 to select a current channel number which you want to swap 3 Highlight Target Channel then press 3 or4 to select a target channe...

Page 19: ...O CHANNEL Move Enter BG Return Country Others CHANNEL Current Channel Target Channel Channel Swap Skip Channel FineTune AFC Fav CH Channel Label 1 9 OFF OFF OFF Move OK Return OFF OFF ON 0 Setting Channel Label Label channels to make it easier to identify To Label channels 1 Use channel select buttons to select a channel you want Or go to Channel Edit sub menu make use of Current Channel menu item...

Page 20: ...e aspect ratio of the picture You can select Auto Selects the correct aspect ratio automatically 4 3 Shows picture in 4 3 display mode 16 9 Shows a full screen picture in 16 9 mode Zoom1 Enlarges the picture vertically The top and bottom may be cropped Zoom2 Enlarges the picture both horizontally and vertically The edges may be cropped Panorama Stretches the picture at the edges but maintains a go...

Page 21: ...TER to operate You can select 3 To close the menu press EXIT button Normal Music Movie News 0db 6db 6db 0 0 0 0 0 0 1K 2K 3K 8K 300 15K hz AUDIO Move Adjust Return Return User Equalizer Setting Sub Menu Adjusting the Sound Nicam OFF You can quickly select sound multiplex mode by using the AUTO STEREO button on the remote control This enables the selection of the reception mode when receiving a NIC...

Page 22: ...nu up or down Sleep Mode Selects the amount of time you want your TV to wait before it automatically turns off To cancel sleep mode select OFF Note You can also press SLEEP to set the sleep timer OSD Skin Selects skin for OSD menu display Reset Setting Resets all settings to defaults Operate according to on screen instructions Press 6 or 5 to highlight an option press ENTER to access the option Th...

Page 23: ...isplayed at the bottom of the screen The 4 coloured buttons are used to access the items or corresponding pages Hold button Certain pages contain sub pages which are automatically displayed successively This button is used to stop or resume sub page acquisition Reveal button Press the button to reveal the concealed information such as games solutions Press the button again to hide the information ...

Page 24: ...or play compatible MP3 audio Switching to USB mode To switch to USB mode 1 Make sure that you have connected the USB device to the USB port on the side of your TV 2 Press INPUT button 3 Press 6 or 5 to select USB then press ENTER Or you can press USB button on the remote control to switch to USB mode directly Exit Adjust Return Notes Never remove the USB device or turn off the TV while using the U...

Page 25: ...n Unknown Unknown Unknown Unknown Unknown Unknown Unknown Unknown Unknown Unknown Unknown Other Other Unknown Move Enter Exit Switch During music playing a music playback interface appears you can press 5 or 6 to select the previous or next music to play pause the playback EXIT to exit from current interface Settings for slide show music playing To customize slide show music playing settings 1 2 F...

Page 26: ...ould be station trouble Adjustthe antenna Movethe TVawayfromnoise sources suchascars neonsigns orhairdryers Using a highly directional outdoor antenna or a cable may solve the problem Good picture no sound The sound may be muted Press MUTE again to cancel Audio noise Communication problems may occur if infrared communication equipment e g infrared cordless headphones is used near the TV Move the i...

Page 27: ...ght 16 kg Terminals Specifications 1 Design and specifications are subject to change without notice 2 Weight and dimensions shown are approximate 3 Specifications and external appearance may be changed for the sake of improvement Note Antenna in 1 AV in 1 S Video in 1 COMPONENT in 1 VGA in 1 HDMI in 2 SCART 1 Headphone 1 USB port 1 AV out 1 RS 232 1 25 Audio out 8W 2 ...

Page 28: ... other vertical surface you must remove the stand column If the stand is provided please read these instructions thoroughly before attempting this installation NOTE The appearance of this product in these illustrations may differ from your actual product and is for comparative purposes only Installing the stand 26 To remove the stand from the TV perform these steps in reverse order 1 Remove the st...

Page 29: ...5944038000 Ver 1 0 ...

Reviews: